Popular Post Coenut Posted November 27, 2016 Popular Post Share Posted November 27, 2016 After months of hard work the chassis is finally painted. The chassis was stretched 3 feet in the rear, crossmember behind cab moved back a few inches for exhaust to clear, dual exhaust bracket and fuel tank brackets fabbed, and new a cross member added. Now it's time to reassemble, then onto the cab. 11 Quote Link to comment https://www.bigmacktrucks.com/topic/47801-finally-got-the-chassis-painted/ Share on other sites More sharing options...
Timmyb Posted November 28, 2016 Share Posted November 28, 2016 Well done. That will give you a bit to work on over your winter. Quote Link to comment https://www.bigmacktrucks.com/topic/47801-finally-got-the-chassis-painted/#findComment-353224 Share on other sites More sharing options...
hurstscrambler Posted November 28, 2016 Share Posted November 28, 2016 Well done sir! Andy Quote Link to comment https://www.bigmacktrucks.com/topic/47801-finally-got-the-chassis-painted/#findComment-353232 Share on other sites More sharing options...
mattb73lt Posted November 28, 2016 Share Posted November 28, 2016 Very nice, great work!! Quote Link to comment https://www.bigmacktrucks.com/topic/47801-finally-got-the-chassis-painted/#findComment-353290 Share on other sites More sharing options...
mowerman Posted November 28, 2016 Share Posted November 28, 2016 wow looks real good thanks for sharing...bob Quote Link to comment https://www.bigmacktrucks.com/topic/47801-finally-got-the-chassis-painted/#findComment-353291 Share on other sites More sharing options...
Vladislav Posted November 28, 2016 Share Posted November 28, 2016 Congratulations on the step made! Where did you do the stretch split? Did you weld two pieces of the rail together? Or put any reinforcement on the inner side? Quote Никогда не бывает слишком много грузовиков! leversole 11.2012 Link to comment https://www.bigmacktrucks.com/topic/47801-finally-got-the-chassis-painted/#findComment-353323 Share on other sites More sharing options...
Coenut Posted November 29, 2016 Author Share Posted November 29, 2016 I moved the front walking beam frame mount into the rear mount and the new rail was welded to the end of the stock chassis. I bolted the main crossmember the used that as a guide for me to drill remaining holes. Sunbelt rentals has mag drills and I bought rotabroaches from Blair equipment. All edges where beveled and slowly welded. The seam is dead center under the rear chassis beam mount. I notched the frame spacers underneath the hat and welded in a big gusset. Also welded a small gusset in the notch under the chassis flange. Easier to say than type. In hindsight it may have been wiser to split the rail more toward the center of that massive crossmember. I'm thinking that between the 9 bolts on each side, all the weld and the gussets it should be good. The truck does not pull a trailer it's just for show. 1 Quote Link to comment https://www.bigmacktrucks.com/topic/47801-finally-got-the-chassis-painted/#findComment-353353 Share on other sites More sharing options...
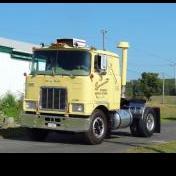
hurstscrambler Posted November 29, 2016 Share Posted November 29, 2016 What year and model truck is this? Is there some pics of what you started with? Andy Quote Link to comment https://www.bigmacktrucks.com/topic/47801-finally-got-the-chassis-painted/#findComment-353361 Share on other sites More sharing options...
Popular Post Coenut Posted November 29, 2016 Author Popular Post Share Posted November 29, 2016 1980 r747 290 cummins 10spd Rockwell rears. 3 Quote Link to comment https://www.bigmacktrucks.com/topic/47801-finally-got-the-chassis-painted/#findComment-353413 Share on other sites More sharing options...
eddeere Posted November 29, 2016 Share Posted November 29, 2016 looks great. Quote Link to comment https://www.bigmacktrucks.com/topic/47801-finally-got-the-chassis-painted/#findComment-353428 Share on other sites More sharing options...
mattb73lt Posted November 29, 2016 Share Posted November 29, 2016 I wondered where that went. Aiudi was in my town, over by the Berlin RR Station. It's a parking lot now. They had several B's and a Autocar dump that sat around for years and never moved. wonder where the B's went? Quote Link to comment https://www.bigmacktrucks.com/topic/47801-finally-got-the-chassis-painted/#findComment-353453 Share on other sites More sharing options...
Coenut Posted November 30, 2016 Author Share Posted November 30, 2016 The fello that I purchased this from, if memory is correct said that he took it on a trade from a guy in ct. I found lots of paperwork in the cab from Ryder truck rental for this vehicle. Do you know if anyone from aiudi and sons is still alive? I could not find any info on the co. Quote Link to comment https://www.bigmacktrucks.com/topic/47801-finally-got-the-chassis-painted/#findComment-353480 Share on other sites More sharing options...
Mack58B42 Posted November 30, 2016 Share Posted November 30, 2016 Looks like the 3rd generation is carrying on. Here's their current web address. No pics, though..... http://www.aiudiconstruction.com/ Quote Link to comment https://www.bigmacktrucks.com/topic/47801-finally-got-the-chassis-painted/#findComment-353481 Share on other sites More sharing options...
mattb73lt Posted November 30, 2016 Share Posted November 30, 2016 1 hour ago, Coenut said: The fello that I purchased this from, if memory is correct said that he took it on a trade from a guy in ct. I found lots of paperwork in the cab from Ryder truck rental for this vehicle. Do you know if anyone from aiudi and sons is still alive? I could not find any info on the co. I'll look around. They have a yard in town on RT 71 with a few pieces of equipment still in it, there's a Ford compressor truck for sale here also. A steel nose R dump that's also still in use. The Company garage was razed recently to expand the rail station. Are you looking to contact them? I'll see what I can find out. Quote Link to comment https://www.bigmacktrucks.com/topic/47801-finally-got-the-chassis-painted/#findComment-353495 Share on other sites More sharing options...
Maddog13407 Posted November 30, 2016 Share Posted November 30, 2016 definitely has a Ryder fuel tank on it. we had an ex Ryder R600 at work with the same ugly fuel tanks Quote Link to comment https://www.bigmacktrucks.com/topic/47801-finally-got-the-chassis-painted/#findComment-353506 Share on other sites More sharing options...
Vladislav Posted November 30, 2016 Share Posted November 30, 2016 On 29.11.2016 at 5:26 AM, Coenut said: I moved the front walking beam frame mount into the rear mount and the new rail was welded to the end of the stock chassis. I bolted the main crossmember the used that as a guide for me to drill remaining holes. Sunbelt rentals has mag drills and I bought rotabroaches from Blair equipment. All edges where beveled and slowly welded. The seam is dead center under the rear chassis beam mount. I notched the frame spacers underneath the hat and welded in a big gusset. Also welded a small gusset in the notch under the chassis flange. Easier to say than type. In hindsight it may have been wiser to split the rail more toward the center of that massive crossmember. I'm thinking that between the 9 bolts on each side, all the weld and the gussets it should be good. The truck does not pull a trailer it's just for show. Thank you for explaining the things. I suppose you will have no troubles with the stretch the way you have it done. Especially in case no trailer will be attached. I'm just tinkering with ideas on how to fix the frame of my R-model. The one I'd like to use has massive damage to the both reails because of the excident in the past. Poor shape with lots of weld and either cracks repaired. One of the options is to fabricate two pieces of new rail locally and weld them to the original front. Nobody can make totally new rails front to end but pieces of a straight channel are possible. This way I will need to put the halves together under the sleeper. Not sure it's a good idea, especially if I grind all excessive metal off the seams as I want to to get the look untouched. Quote Никогда не бывает слишком много грузовиков! leversole 11.2012 Link to comment https://www.bigmacktrucks.com/topic/47801-finally-got-the-chassis-painted/#findComment-353563 Share on other sites More sharing options...
Freightrain Posted November 30, 2016 Share Posted November 30, 2016 Vlad, How about a sleeve on the inside of frame rail to help support the two halves? Bolt it in between two crossmembers, that way the inner rail butts up against the crossmembers and is less noticeable with the bunk over top of it. 1 Quote Larry 1959 B61 Liv'n Large...................... Charter member of the "MACK PACK" Link to comment https://www.bigmacktrucks.com/topic/47801-finally-got-the-chassis-painted/#findComment-353564 Share on other sites More sharing options...
Vladislav Posted December 1, 2016 Share Posted December 1, 2016 On 30.11.2016 at 11:02 PM, Freightrain said: Vlad, How about a sleeve on the inside of frame rail to help support the two halves? Bolt it in between two crossmembers, that way the inner rail butts up against the crossmembers and is less noticeable with the bunk over top of it. Larry, It could be done. And should be if I would. But no space to make it long enough. Something like 30 cm or one foot long. Could be positioned between two crossmembers only since their flanges attached straight to the rails. I would prefere use longer ones and put them between the crossmember ends and the rails if any spacers in those spots originally used. But no spacers. And if I use them short inner rails only four bolts will attach them to every rail. Two bolts on each end. There's a tank mounting bracket on the outer side. Uses 4 bolts. On each side of the truck. A good thing to cover the seam from observation either. Actually this plan is just one of the possible options. The frame I plan to use have VIN stamped and I have this truck registered. The second truck has relatively solid frame and with no VIN marking. Although it could be used it also need some fixing of cracks in the airride brackets attaching areas. And another thing I really dislike is a need to completely part out the secong truck which runs now. The most reliable option is to order two brand new rails. Just have no idea of how it might be costy to purchase or fabricate. Shipping sure would be a story either. But I'd like to at least estimate that case. I have time to choose so far. Quote Никогда не бывает слишком много грузовиков! leversole 11.2012 Link to comment https://www.bigmacktrucks.com/topic/47801-finally-got-the-chassis-painted/#findComment-353653 Share on other sites More sharing options...
Freightrain Posted December 1, 2016 Share Posted December 1, 2016 Ya, one foot sleeve isn't much. Didn't realize you were that constrained with space between crossmembers. If you didn't want to uses spacers, then you could narrow the crossmember? I've seen where guys have cut out of the middle and welded them back together(stamped steel crossmember). I could see them put on a mill and run a 1/2"-5/8" end mill(whatever it took for twice the frame rail thickness) to divide them. Bevel the ends and clamp to a table and weld back together. Grind it and Presto a custom crossmember that would allow a sleeve to fit! Depends on how sneaky you want to get to save the big cost of complete new rails. 1 Quote Larry 1959 B61 Liv'n Large...................... Charter member of the "MACK PACK" Link to comment https://www.bigmacktrucks.com/topic/47801-finally-got-the-chassis-painted/#findComment-353655 Share on other sites More sharing options...
Willie dog Posted December 1, 2016 Share Posted December 1, 2016 Very nice. I'm sure you're glad that part is over. On to assembly! Quote Link to comment https://www.bigmacktrucks.com/topic/47801-finally-got-the-chassis-painted/#findComment-353657 Share on other sites More sharing options...
Popular Post Coenut Posted February 22, 2017 Author Popular Post Share Posted February 22, 2017 Made some more progress. Did a full brake job, new seals, slacks, u joints, and chambers. Serviced the diffs, sanded and buffed the steers. 5 Quote Link to comment https://www.bigmacktrucks.com/topic/47801-finally-got-the-chassis-painted/#findComment-362311 Share on other sites More sharing options...
mattb73lt Posted February 22, 2017 Share Posted February 22, 2017 That really looks nice. Great work!! Quote Link to comment https://www.bigmacktrucks.com/topic/47801-finally-got-the-chassis-painted/#findComment-362374 Share on other sites More sharing options...
h67st Posted February 22, 2017 Share Posted February 22, 2017 That's a fine looking chassis! What type of paint and gun did you use on it? By the way, you need lots of junk piled around your shop so it looks like mine! Quote Link to comment https://www.bigmacktrucks.com/topic/47801-finally-got-the-chassis-painted/#findComment-362391 Share on other sites More sharing options...
beatngu Posted February 23, 2017 Share Posted February 23, 2017 Wow that is looking good, can't wait to see the finished product! Quote Link to comment https://www.bigmacktrucks.com/topic/47801-finally-got-the-chassis-painted/#findComment-362427 Share on other sites More sharing options...


Recommended Posts
Join the conversation
You can post now and register later. If you have an account, sign in now to post with your account.