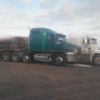
Popular Post Ezrider Posted January 24, 2019 Popular Post Share Posted January 24, 2019 yesterday today that was just after imron base coat before clear, i forgot to take a picture after i shot the clear it was getting pretty late when i finished up. ill post up a picture tomorrow of it all un wrapped with the clear coat on it. i recorded some video on the whole process so that will be in the works as well. but my old peeling fading pant on the mack has been replaced with nice shiny new paint. its had some clear coat issues as long as iv owned it but it has really started showing its age up close over the last couple years, the whole drivers side was starting to peel bad and the passenger side was starting to peel and there was absolutely no clear coat left on the roof, not to mention the hood had been re painted previously by someone else and the color didn't exactly match they painted over stickers and it was separating in spots. as the original paint was failing underneath the repaint on the hood. 12 Quote Link to comment https://www.bigmacktrucks.com/topic/55393-what-a-difference-a-day-makes/ Share on other sites More sharing options...
hatcity Posted January 24, 2019 Share Posted January 24, 2019 Damn!! that's like two cases of rattle cans worth looks good 1 Quote Success is only a stones throw away.................................................................for a Palestinian Link to comment https://www.bigmacktrucks.com/topic/55393-what-a-difference-a-day-makes/#findComment-413986 Share on other sites More sharing options...
Popular Post Ezrider Posted January 25, 2019 Author Popular Post Share Posted January 25, 2019 it was sprayed with a hvlp gun. dupont imron base clear. 5 Quote Link to comment https://www.bigmacktrucks.com/topic/55393-what-a-difference-a-day-makes/#findComment-414057 Share on other sites More sharing options...
1958 F.W.D. Posted January 25, 2019 Share Posted January 25, 2019 How much do you charge to paint firetrucks? 1 Quote TWO STROKES ARE FOR GARDEN TOOLS Link to comment https://www.bigmacktrucks.com/topic/55393-what-a-difference-a-day-makes/#findComment-414101 Share on other sites More sharing options...
Freightrain Posted January 25, 2019 Share Posted January 25, 2019 1 hour ago, 1958 F.W.D. said: How much do you charge to paint firetrucks? Apline green!!!! 2 Quote Larry 1959 B61 Liv'n Large...................... Charter member of the "MACK PACK" Link to comment https://www.bigmacktrucks.com/topic/55393-what-a-difference-a-day-makes/#findComment-414105 Share on other sites More sharing options...
h67st Posted January 25, 2019 Share Posted January 25, 2019 Dang, Easy...is there anything you can't do? Looks great! 1 Quote Link to comment https://www.bigmacktrucks.com/topic/55393-what-a-difference-a-day-makes/#findComment-414125 Share on other sites More sharing options...
1958 F.W.D. Posted January 25, 2019 Share Posted January 25, 2019 5 hours ago, Freightrain said: Apline green!!!! Even though you spelled it wrong, I knew what you meant and I used to like you............ 1 Quote TWO STROKES ARE FOR GARDEN TOOLS Link to comment https://www.bigmacktrucks.com/topic/55393-what-a-difference-a-day-makes/#findComment-414128 Share on other sites More sharing options...
Ezrider Posted January 26, 2019 Author Share Posted January 26, 2019 12 hours ago, 1958 F.W.D. said: How much do you charge to paint firetrucks? lol too much iv done a number of cars in the past but this was the first truck i repainted ill probably still be aching for a couple more weeks...lol a truck doesn't look that big till you have to prep one to paint...lol esp considering my main issue was clear coat peeling off in order to not have problems down the road all the clear coat needed to be sanded off the entire truck took 10 days working on it to get it ready to paint and about 8 hours from the time i sprayed the first drop of basecoat till i was done spraying clear. i could only immagine doing a fire truck it would take me a month...lol 11 hours ago, Freightrain said: Apline green!!!! truck was jade green metallic the supplier i buy my paint from couldn't cross my mack paint code, there was a jade green listed but it was a bit darker than my truck, a volvo color called go go green was pretty much a perfect match so i had them mix that color rather than going off a scan just to keep it a coded color in case i have to do a repair down the road and buy more paint for it. 6 hours ago, h67st said: Dang, Easy...is there anything you can't do? Looks great! jack of all trades master of none....lol its not 100% perfect but its pretty good. i would cut and buff it if it was a car but its a truck....lol i had a bit of trouble with the base coat. i had never shot with imron before and its really thick and sticky hard to get it to wet out nice and then when i started i mixed up a big batch of paint and it was starting to kick before i got it all sprayed witch made it spray even worse so i jumped to the back of the cab it still came out nice but on the back of the cab where it wasn't coming out of the gun the best the metal flake laid in a little funny. when you look at it in the right light the flake looks a bit funkey on the back of the cab. after that i mixed smaller batches and cleaned the gun between each re-fill and it went better after that. i also still need to re shoot my visor because the lid wasn't fully seated on my paint gun and dribbled on the visor. overall im pretty happy with it, it has slightly more orange peel than i would really like but really its not that bad iv seen some cars from the factory that have worse orange peel if it was a car id probably cut and buff it but its a working truck so i think im fine with it, iv shot flatter paint jobs i might hit a couple small spots or i might not. i still got a bit of re-assembly to do i didn't visually get a ton done today got new cab lights installed all the bolts broke off in the bulldog when i removed it so i drilled those out and re-threaded the holes and got the bull dog installed and seems how i had to remove the interior head liner and door panels i had ordered some dynamat and put that inside the doors and on the roof today re installed the air horns and sanded off my paint dribbles on the visor. it will probably be 100% back together in the next couple of days. then ill need a vacation from my vacation...lol Quote Link to comment https://www.bigmacktrucks.com/topic/55393-what-a-difference-a-day-makes/#findComment-414154 Share on other sites More sharing options...
Freightrain Posted January 26, 2019 Share Posted January 26, 2019 (edited) 12 hours ago, 1958 F.W.D. said: Even though you spelled it wrong, I knew what you meant and I used to like you............ Oh, maybe it's Hahn green?? LOL!! Ya, I see now the ol speelchuck didn't catch it. I'll have to update my dictionary. When I needed to get the bunk repainted after fixing it, I ALMOST went and bought all the supplies. Then I realized what an undertaking it would be and what would I do with all the supplies left over? I loaded it up and delivered it to my buddy with a paint shop. Presto-change a week later it was all white again. Anymore I've learned to just hit the EASY button!!! Edited January 26, 2019 by Freightrain 1 Quote Larry 1959 B61 Liv'n Large...................... Charter member of the "MACK PACK" Link to comment https://www.bigmacktrucks.com/topic/55393-what-a-difference-a-day-makes/#findComment-414157 Share on other sites More sharing options...
Timmyb Posted January 26, 2019 Share Posted January 26, 2019 You done a good job. I’m putting my truck in for a paint job on Tuesday. Ive seen so many clear coats lift off down here it’s not funny. 1 Quote Link to comment https://www.bigmacktrucks.com/topic/55393-what-a-difference-a-day-makes/#findComment-414166 Share on other sites More sharing options...
eddeere Posted January 26, 2019 Share Posted January 26, 2019 Great looking paint job . I have not used Imron in years . I thought it was easier to spray than acrylic or single stage . Went on like the old straight enamel . I do not think any thing holds up better than Imron . From some of the old Dupon literature I have seen pictures of fire trucks that have been to close to the fire and the plastic melted in the turn signals but the Imron paint was sill good . I think cost was the main reason I stopped using it. Quote Link to comment https://www.bigmacktrucks.com/topic/55393-what-a-difference-a-day-makes/#findComment-414169 Share on other sites More sharing options...
Popular Post other dog Posted January 26, 2019 Popular Post Share Posted January 26, 2019 I'll pain't that fire truck for you if you want me to. Just let me know, so I can get the Krylon and bring it to Macungie. I don't use that cheap dollar store crap, only Krylon, so it won't be cheap. The paint alone will probably be 25 or 30 dollars, then you got your tape, old newspapers, etc. You're probably looking at close to 40 bucks. 2 4 Quote Producer of poorly photo-chopped pictures since 1999. Link to comment https://www.bigmacktrucks.com/topic/55393-what-a-difference-a-day-makes/#findComment-414184 Share on other sites More sharing options...
Popular Post Ezrider Posted January 28, 2019 Author Popular Post Share Posted January 28, 2019 (edited) On 1/26/2019 at 9:55 AM, eddeere said: Great looking paint job . I have not used Imron in years . I thought it was easier to spray than acrylic or single stage . Went on like the old straight enamel . I do not think any thing holds up better than Imron . From some of the old Dupon literature I have seen pictures of fire trucks that have been to close to the fire and the plastic melted in the turn signals but the Imron paint was sill good . I think cost was the main reason I stopped using it. the imron was defiantly not cheap was over $1500 in paint . normally i would use nasson or croma base on cars. i have not sprayed many single stages not on a allover paint job anyway, iv done like some trailer fenders or things like that in single stage paints. i drive a lot of gravel roads so that was part of my reason for going with the imron should be more chip and scratch resistant. its not been very long sense i sprayed it but i wet sanded and buffed out a small spot and it was almost like buffing stainless steel..lol its defiantly some tough stuff. mostly all back together now got the exhaust stack back on and the grab handle on the back of the cab after i took those pictures mostly just have to put the interior door panels back on and interior trim around sleeper windows and a couple broken bolts i still need to deal with on the drivers side front 1/4 fender and put my lettering back on the truck. id like to re-polish all my alluminum before i put it back on the road as well. but its almost done. oh and here is the visor after i fixed my screw up and re-sprayed it and a close up picture of the color Edited January 28, 2019 by Ezrider 9 Quote Link to comment https://www.bigmacktrucks.com/topic/55393-what-a-difference-a-day-makes/#findComment-414297 Share on other sites More sharing options...
Mack Technician Posted January 28, 2019 Share Posted January 28, 2019 1 Quote Link to comment https://www.bigmacktrucks.com/topic/55393-what-a-difference-a-day-makes/#findComment-414301 Share on other sites More sharing options...
j hancock Posted January 29, 2019 Share Posted January 29, 2019 Looks Excellent EZ! 1 Quote JimIt doesn't cost anything to pay attention. Link to comment https://www.bigmacktrucks.com/topic/55393-what-a-difference-a-day-makes/#findComment-414356 Share on other sites More sharing options...
terry Posted January 29, 2019 Share Posted January 29, 2019 👍👍👍 1 Quote Link to comment https://www.bigmacktrucks.com/topic/55393-what-a-difference-a-day-makes/#findComment-414369 Share on other sites More sharing options...
1958 F.W.D. Posted January 29, 2019 Share Posted January 29, 2019 Hey not bad! It actually looks like you know what you're doing! 1 Quote TWO STROKES ARE FOR GARDEN TOOLS Link to comment https://www.bigmacktrucks.com/topic/55393-what-a-difference-a-day-makes/#findComment-414380 Share on other sites More sharing options...
Ezrider Posted January 31, 2019 Author Share Posted January 31, 2019 On 1/29/2019 at 12:22 PM, 1958 F.W.D. said: Hey not bad! It actually looks like you know what you're doing! iv got the youtube video on the repaint uploading so all the internet hero's can tell me everything i did wrong....lol 1 Quote Link to comment https://www.bigmacktrucks.com/topic/55393-what-a-difference-a-day-makes/#findComment-414550 Share on other sites More sharing options...
Ezrider Posted January 31, 2019 Author Share Posted January 31, 2019 some of the issues i had with getting the base to spray well could have been self inflicted and it really wasn't that bad it just didn't flow/atomize the best. but my heat had gone out in the shop the night before i sprayed. the technical data sheet specified that the paint be warmed to between 75-80* i had had the paint in my bathroom with the baseboard heater on but when the main shop heater went out the air temps in the shop dropped to the 50's before i came in that day. so after fixing the heat in the shop i had sat the basecoat directly ontop of the baseboard heater in the bathroom as paint temp was down to about 68 while i was finishing up getting ready and by the time i checked on it again it was up to 100* i cooled the paint back off to 85 before i actually started spraying it but i wonder if accidentally overheating it paint a bit might have had something to do with it not flowing well. i didn't have the same issue with the clear sprayed pretty nice, it was still a bit more viscous than say a nasson or cromabase clear but it sprayed well. the base coat defiantly didn't want to push the pot life window at all. the worst it sprayed the paint was at the end of the first large batch that i mixed. once i started mixing about a quart at a time it went a bit smoother. here is a link to the video for anyone who wants to check it out. its a bit on the lengthy side (20mins) but i didn't want to do a whole bunch of video's on just that project and there was a lot to show. wasn't as detailed as i would have liked but i thought it was better than having it be an hour long or breaking it up into several video's Quote Link to comment https://www.bigmacktrucks.com/topic/55393-what-a-difference-a-day-makes/#findComment-414576 Share on other sites More sharing options...
Ezrider Posted January 31, 2019 Author Share Posted January 31, 2019 (edited) yeah i think my surface temps on the truck were up to about 70 by the time i actually started spraying probably closer to 75 by the time i got to clear, the only area that looks off is the rear of the sleeper and even there the paint is smooth, but that was where i was nearing the end of the pot life on the first big batch of paint i mixed before i started mixing smaller batches and it paint came out smooth but if you look at it at a strong angle in the light the flake laid a bit funny, basically you kinda have spots where the flake stood up more than others. luckily the rear of the cab isn't that visible now with the stack and everything else on the truck its even harder to notice. if it was the hood or something like that i probably would have re shot that area but for the back of the cab i can live with it im probably the only person that will ever notice it...lol its one of those things you learn from your mistakes and every time you do it you learn a bit more, iv probably painted about a dozen cars in my life and a few more spot repairs so still learning for sure. this was my first semi truck i ever painted and using a different product that i had never used threw a few more variables in the mix. Edited January 31, 2019 by Ezrider 1 Quote Link to comment https://www.bigmacktrucks.com/topic/55393-what-a-difference-a-day-makes/#findComment-414580 Share on other sites More sharing options...
eddeere Posted January 31, 2019 Share Posted January 31, 2019 Enjoyed the video . Thanks for taking the time to film it . 1 Quote Link to comment https://www.bigmacktrucks.com/topic/55393-what-a-difference-a-day-makes/#findComment-414582 Share on other sites More sharing options...
Rob Posted January 31, 2019 Share Posted January 31, 2019 I'll watch the video but won't critique negatively. Nothing to be learned from that. Thanks in advance for taking the time/trouble to film your progress. I've taught literally dozens of students/prospects through the years from the local auto body tech school(s) and programs so a bit familiar if I can remember anything..... Not hard and everyone develops a rhythm to their personal "style", but there's no substitute for time in the saddle. Youtube will give anyone the basics to build upon but there's a lot more than that involved and mistakes are plenty expensive to correct any more. Still best to have a "tutor" with a bit of experience when in unfamiliar territory. Material and consumables expenses have increased exponentially since the early 2000's along with operating expenses. Retail rates have not increased linearly as the insurance agencies closely regulate this to keep their costs down. Vicious cycle is what I seen it as till no longer worth the effort, (to me). 1 Quote Plodding along with no job nor practical application for my existence, but still trying to fix what's broke. Link to comment https://www.bigmacktrucks.com/topic/55393-what-a-difference-a-day-makes/#findComment-414587 Share on other sites More sharing options...
HeavyGunner Posted January 31, 2019 Share Posted January 31, 2019 Looks great EZ, the video was great. I need all of the info like this that I can get my hands on. I’m going to paint a couple of my pickups in the near future. They’re not worth what a body shop charges to paint them so I figure I’m going give it a run. Thank again. 1 Quote The problems we face today exist because the people who work for a living are outnumbered by the people who vote for a living.The government can only "give" someone what they first take from another. Link to comment https://www.bigmacktrucks.com/topic/55393-what-a-difference-a-day-makes/#findComment-414589 Share on other sites More sharing options...
Ezrider Posted January 31, 2019 Author Share Posted January 31, 2019 (edited) 1 hour ago, Rob said: I'll watch the video but won't critique negatively. Nothing to be learned from that. Thanks in advance for taking the time/trouble to film your progress. I've taught literally dozens of students/prospects through the years from the local auto body tech school(s) and programs so a bit familiar if I can remember anything..... Not hard and everyone develops a rhythm to their personal "style", but there's no substitute for time in the saddle. Youtube will give anyone the basics to build upon but there's a lot more than that involved and mistakes are plenty expensive to correct any more. Still best to have a "tutor" with a bit of experience when in unfamiliar territory. Material and consumables expenses have increased exponentially since the early 2000's along with operating expenses. Retail rates have not increased linearly as the insurance agencies closely regulate this to keep their costs down. Vicious cycle is what I seen it as till no longer worth the effort, (to me). i don't mind helpfull cretques from people more knowledgeable than myself. sometimes the people who are just rude for the sake of being rude without adding anything or very little of value that can sometimes annoy me. or comments like "wow this guy looks like a crashing meth addic" ect i normally don't get a whole lot of that i was kinda bombarded by some of that on a video i recently did comparing the espar heaters to there Chinese knock off. sometimes i just have to remind myself that it goes with the territory to a certain extent and most the people that make those comments have probably never done anything usefull in there life....lol the auto body business is not one i would want to be in professionally. its worth it to me to paint my own stuff but to do it for hire is a whole lot of not worth it to me...lol Edited January 31, 2019 by Ezrider 2 Quote Link to comment https://www.bigmacktrucks.com/topic/55393-what-a-difference-a-day-makes/#findComment-414592 Share on other sites More sharing options...
Rob Posted January 31, 2019 Share Posted January 31, 2019 Here is a link to what I consider spray guns worth the money: https://www.tat-co.com/Products/Refinish/Spray-Guns/1-3-Needle-Nozzle-Kit Get yourself a 1.4mm, and a 1.7mm to cover the spectrum of undercoats and topcoats. The 1.4mm breaks up basecoat very evenly and for me the 1.7mm tip allows for a very fast traverse speed applying the clearcoat. Small jobs the 1.4mm tip will work great but for an overall or large job it's too small, (for me) as the speed is far too slow. However, and that being said, the slow traverse speed leaves a very fine spray pattern that many times does not have to be buffed on flat panels, (such as a hood) if it stays clean during the dry/cure. I have several high end spray guns, (Sata, OMC, DeVilbis, Binks, Accu-Spray, etc.) and these are about 1/3rd the cost and hold up very well. They are HVLP and perform very close to conventional spray guns. Use between 4-5.5 psi on basecoat and about 8-10 psi on clear and all works well. I also have a 2.1mm tip I use for polyester primer which is very thick and it takes that big hole in the end to push the product through. Being a polyester based primer it's great for filling grinder scratches in truck parts after repair or grafting on sections. 1 Quote Plodding along with no job nor practical application for my existence, but still trying to fix what's broke. Link to comment https://www.bigmacktrucks.com/topic/55393-what-a-difference-a-day-makes/#findComment-414593 Share on other sites More sharing options...


Recommended Posts
Join the conversation
You can post now and register later. If you have an account, sign in now to post with your account.