

Vladislav
-
Posts
8,135 -
Joined
-
Last visited
-
Days Won
79
Content Type
Profiles
Forums
Gallery
Events
Blogs
BMT Wiki
Collections
Store
Everything posted by Vladislav
-
 Excellent stuff! Drool.
 -
Yes, sometimes we may be dealing with not pleasurant circumstances. Or may be involved into.
-
Yes, that's me. Sorry, can't understand the meaning of "not easy hit'n send". The thread was posted by Randy 1958FWD who was in contact with Hat. I just pulled it from where it was in "Odds and Ends"
-
Unfortunately guys you are late to the party.
-
B-73 Restoration
Vladislav replied to mattb73lt's topic in Antique and Classic Mack Trucks General Discussion
Definitely better! -
B-73 Restoration
Vladislav replied to mattb73lt's topic in Antique and Classic Mack Trucks General Discussion
Time will tell -
You already helped alot. And it's quite a common case when even very clever person may be achived in stupid situation just not knowing some key point. From the post you shared about engine repairs etc it clearly seemed to me that your knoweledges were deep and skills very impressive. But the fact you are eager to share the info and help others is very appreciated. Nice to discuss with you. It's already late time at me. I'm off to a sack
-
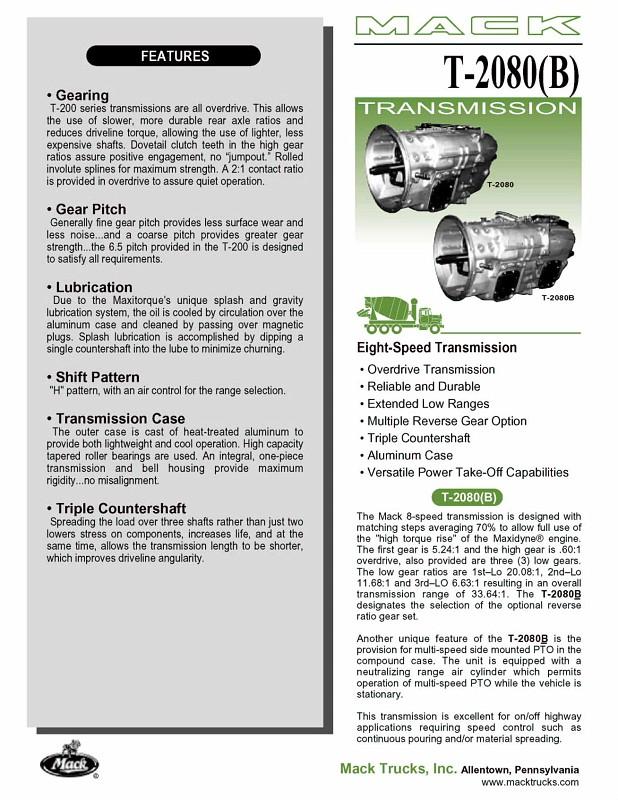
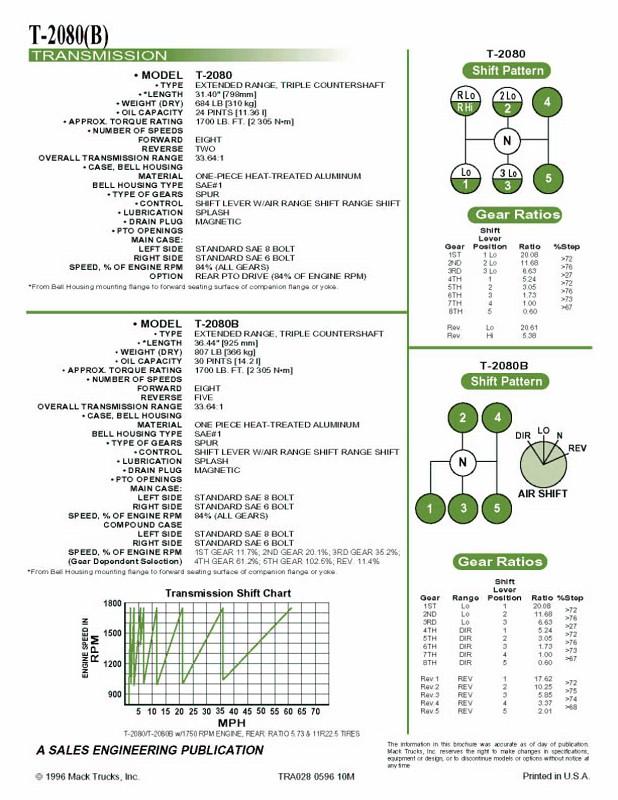
That's what I would suggest using logic, the same as you did. But looking the pages of the manual you posted the T2080 short compound box also shows the synchro installed.
-
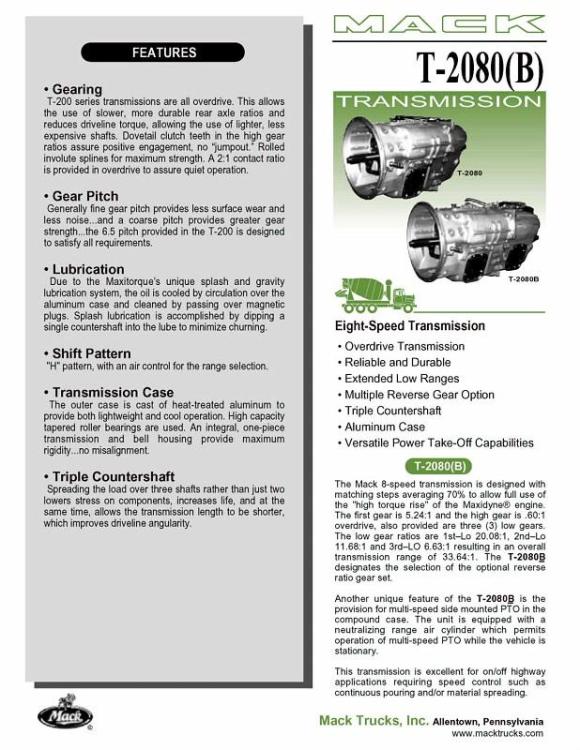
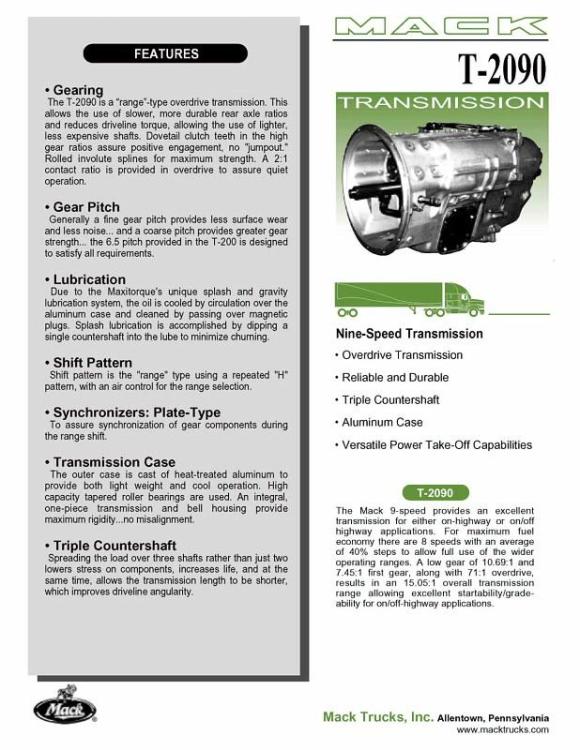
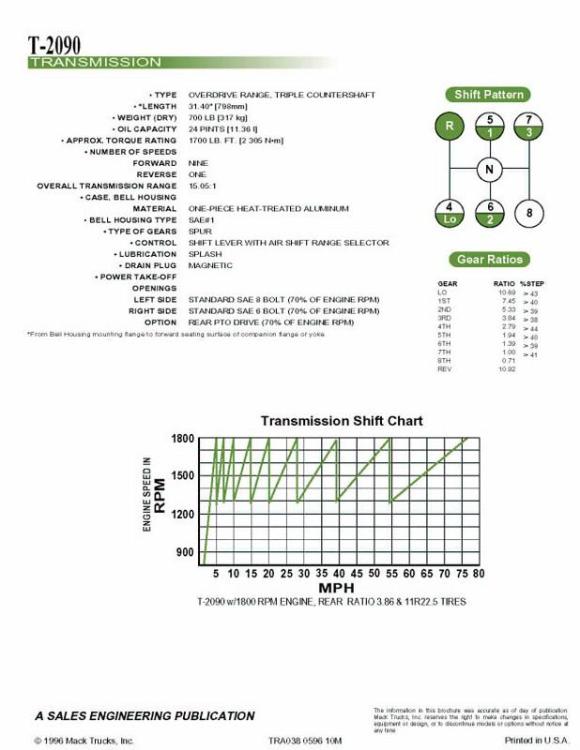
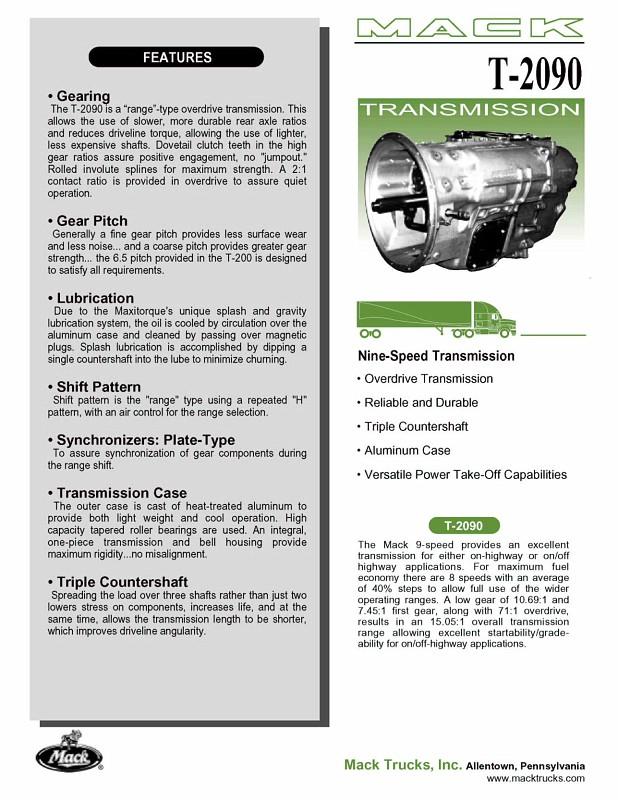
Actually there were 3 sets of gears for the main boxes utilized in T200 series. One for long steps of nearly 70% for work with Maxidyne engines. Those had 5.24 1st gear and 0.60 overdrive. This was achieved by "fast" constant mesh gear set. The use was T2050, T2060, T2070(B) and T2080(B). Another combo was for 40% steps and took place in T2090. 1st gear of 2.79 with 0.71 overdrive. Intersting point the overdrive gear set was the same parts as in the 1st lot used (T2050 etc) But slower constant mesh made the overall overdrive ratio slower (0.71 vs 0.60). Adding a second compound to T2090 Mack turned it into T2130 and T2180. One more main box gear combo was used to get nearly 30% steps in T2110 10 speed unit. The constant mesh was again lowered a bit and the overdrive ratio became 0.77 (still having the same gears on the main shaft/counter shaft). Basing on this design an interesting modification T2110B was made. It had its special feature of one more "low" set of gears installed in place of the reverse gear in the main box. So you have 6 front speeds on the stick and this tranny was offered in a "B' mod only since reverse needed to take place somewhere and was moved to the compound box. Speaking the compound box there were 3 variations of its low range ratio. The fastest was used in T2060 so the only gear of the main box (1st) became lower when the Lo range shifted (and the tranny obtains 6th speed). The medium took place in T2070 setting 2 gears off into the lower range (5+2=7 speed). And the lowest of 3.84 was used in T2080 making 3 gears lower than the Hi range so 3+5=8. All the highway trannies starting from T2090 used that same compound gear set of 3.84. 10-speed and 11 speed units achived a bit slower constant mesh ratio again so 5 speeds formed the Lo range. I put all that info together to show that Mack made a whole family of different transmissions using only 3 sets of gears in the main box (even with only one gear set for overdrive) and 3 sets of gears for the compound box. Don't know who may be interested in these facts but was going to share them systematically for general use.
-
What also put me off the tracks is diagrams someone shared on here a long while back. If you look at the first pages of these two the T2090 sheet mentions a synchro in the list of options. And T2080 sheet doesn't. I have similar files for the whole T200 series and everything higher than 8 speeds mentioned synchro with lesser speed units don't.

-
Wow! Many thanks for the quick answer and immediately scanned images! From the diagrams you posted both T2080 and T2080B have synchros. The unit of my desire is a long compound housing with outside shift cylinder. So it's definitely a "B". There was a tag in the cab of that truck which also said that. And there was a stick off the transmission with spinning trigger. Funny thing I already purchased that cab and the stick was laying inside of it. So the only thing I need to add is the tranny The truck was a 1998 DM concrete mixer which worked mostly in the city. So my hope is the drivers seldom shifted the ranges and the milage was not exremely high either. I may take the top cover off for the inspection but you can't see condition of the synchro teeth without taking it off and apart. On the other hand the cost of the tranny turns out as a half of a new PAI synchro set if count together with the mating gears. Or nearly twice more than its scrap value. So seems worth making a try. Good collection of the manuals you have! I also stocked up a little. Have T2090/T2100 book, T2110 and T2070. But missed a chance grabbing one for 2080. Kept in mind it should be similar to T2070 and T2060 with only different compound box gears (which are of the same ratio as T2090 BTW). But now seems a worthy bit of info slicked off from my attention.
-
I always suggested that T200 series trannies utilized synchronizers for the range shift starting from T2090 9-speed and further to multy-speed units such as T2100, T2110. T2130 and T2180. T2060 and T2070 (and T2080) have much deeper 1st speed in the high range so my guess was they didn't use synchro because you don't shift Lo-Hi on a highway and only ocassionally when on a job site. So less times of the parts to couple, less wear and not much need in the expensive synchronizer. But recently I met a listing (on evil bay) representing synchro repair kit which was described to be used in T2080(B). I made more googling and other sources (mostly related to PAI parts sellls) mentioned Mack synchronizer and mating gears suitable for T2090 and so on but T2080 and T2080(B) either. Were those 8-speed trannies equipped with similar synchro as 9 or 10 speeds had? Or starting from a certain time maybe? Unfortunately I don't have a book particulary for T2080. The reason I ask is there's an 8-speed unit for sale locally. I could grab it for parts but saw no reason since I already catched 2 T2070 and have 2 T2090 to rebuild. But if there's synchro in that T2080B I would be much more exited to add it to the inventory. Thanks in advance for any input. Vlad
-
B-73 Restoration
Vladislav replied to mattb73lt's topic in Antique and Classic Mack Trucks General Discussion
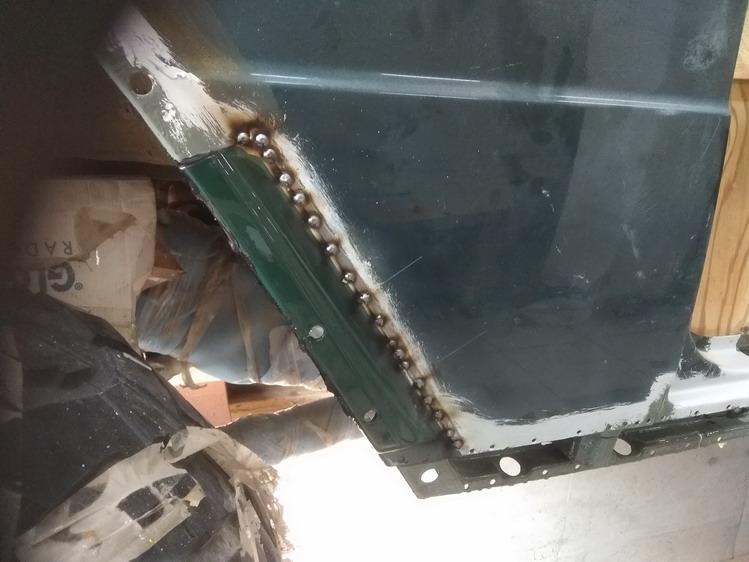
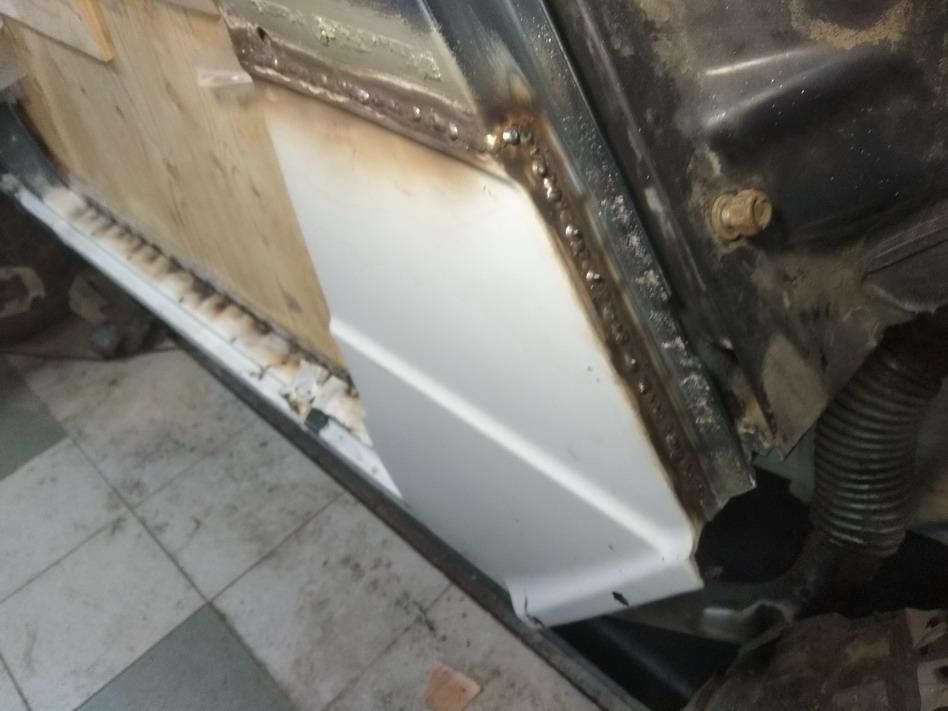
Thanks for the tip. I count me as a puppy welder so far. Only play 3 or 4 years with a wire welder. And from time to time, way far from a everyday job. Trucks have thicker skins than cars so easier to put body seams with no overlap. And you can also be 'braver' with a hammer. Green Mercedes in the photos is 1mm steel. Macks go smoother. And sorry to load up the thread with off-topic stuff. Subject related though.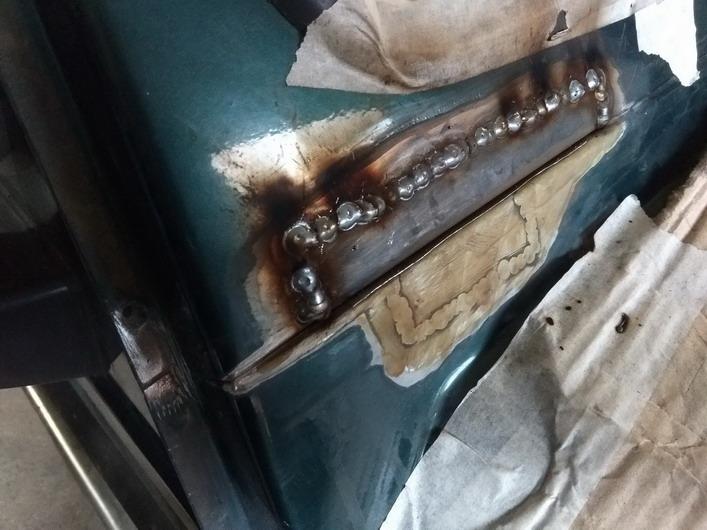
-
B-73 Restoration
Vladislav replied to mattb73lt's topic in Antique and Classic Mack Trucks General Discussion
Love those little patches with no overlap. When you have the spots ground off the part gets back it its very original condition. Bad thing is when plenty of weld is required and the sheet is thin. Hammering back to the shape could be a trouble or require professionalizm. And I'm not a professional with that -
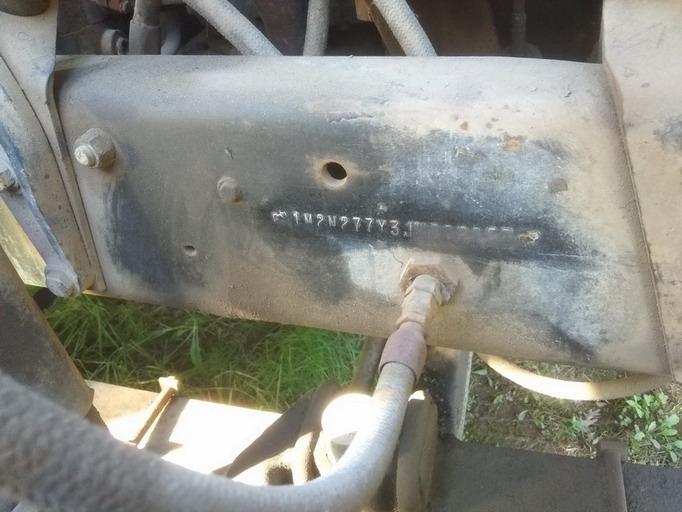
All is Keith said. 17 digit international standard VIN became about 1980 (I think different countries put it in service at different times and some haven't done that at all). All US made Macks have VIN starting from 1M... since 1 means US and M means... yes, it means Mack nothing else. Canada stamped 2M... Pre-1980 chassis numbers represened model and serial number starting from 1001 for each model. The most trucks of the era had a chassis number stamped into the frame rail. Different models used different locations. R and RD had marking at the right rail behind the wheel. I saw two locations, further to the front as on the picture and further back to the rear spring hanger. Some trucks don't have the stamping though. I kept my attention to the matter and figured it could take place when a complete rail swap was done. On the other hand I saw relatively many Macks with no stamping so seemed like the factory was "forgetting" to mark chassis from time to time. Doubtful suggestion but I don't have anything better. in fact I have no idea on how many trucks on avarage were treated for a set of new OEM rails to be swapped during the lifetime. Vlad
-
General way of mind overhere is the same as on your coast. Or even worse. Some folks of newer generation got access to really big money. You know when a person has no experience dealing with lots of cash it doesn't turn out nice. So general tendency is to consume over than others could consume. Actually there's no culture of consume or it's just too young. There are some exceptions though but the most you meet is plenty of money and no mind or (pretty common in the two recent decades) no money but no intend to do job since you may cover your needs by what you already have. Or adding a few coins by stealing something. Overall actual cost of life is not really high here. The most people who used to work hard or just got to a "warm place" already have accomodations, a car, many travel to a sea coast once a year etc. Oil sells high and people here only boast they get nothing from what the government gets for oil. Actually those export $$$ go into internal consumption, straight way or making circles. Main issue I see the income comes into consumption and not into development. Straight ways are always simplier.
-
Sad stories guys. I noted many times that in your society(es) a statement works that if some thing is your property you may do what ever you want to with it. In my neighbourhoods the things go a bit different. In fact the most cases turn out almost the same. But people's mind set slightly different. I once put a note on this matter in some (ocassional) thread but it didn't take any attention. On my mind when a person gets an ownership of anything he automatically obtains responsibility of certain kind or grade. Nobody would argue that when someone drives a car he's responsible for any damage he may give to the surround. No matter he owns it at the time. It's just a sample. When we own an old rig it's a part of our history. And as long as we enjoy historical things we should care about the thing we have. And if someone else would do the same we may keep alot. I sure don't declare everyone MUST do things which are not prescribed by law. But if we just keep that idea somewhere in a back corner of our mind the grade of losses may be lower.
-
Sorry to see the trucks became in such poor shape due to age and outside storage. At the same time I very appreciate your approach to offer them for sale on here. It's definitely better to give someone a chance to get a truck or a part off it before they go a scrap route. Vlad
-
EY was one of 4 Thermodyne engines Mack newly represented in 1938. There were 4 gassers of 510, 672 and 707 ci and one Diesel with Lanova combustion chamber and 519 ci. displacement. I have a truck made in 1944 with original to it EY engine. It's even EY-11... Just don't remember the last two digits at the moment. The place you found the stamping is correct.
-
If the stamping is EY it means the engine is 707 Mack gasser.
-
By the look of the cast iron banjo's they're 44000 the most probably.
-
Chances to sell these axles too depend on the diff ratio.
-
They seem being not avalible for a while. I hunted one in 2013 and could purchase a good used take off from Global Truck Traders in NH. Than one more from another cool place in upstate NY
-
I went through such a story in the past. Obtained good result but the amount of the efforts involved doesn't seem very pleasurant now. The bores in the block were of a standard size and the pistons went poor as in your case. I was lucky purchasing a set of NOS pistons but they were STD either. The block had dry liners and I could remove them in a press. Was going to use pre-cast tubings for fabrication of new liners but got no luck due to the size of my liners. I could only get shorter or wider tubings. Ended up purchasing custom cast tubes with further machining, pressing into the place and reboring-honing. All was described here: As you can see it wasn't the easiest way to resolve the problem. Now having that experience I would try another option. There are shops which machine new pistons of forged aluminium, mostly for race cars. Their performances are much higher than old truck engines had and tolerances too. So seems I better ordered 6 new pistons milled of solid alu and made them already oversized. Than bored the original liners in the block and found compression rings to fit the size.
-
1983 Mack Superliner auction
Vladislav replied to BOBWhite's topic in Antique and Classic Mack Trucks General Discussion
That's Reyco suspension judging from what can bee seen in the photos.


BMT Forum Logo
