

Vladislav
-
Posts
8,135 -
Joined
-
Last visited
-
Days Won
79
Content Type
Profiles
Forums
Gallery
Events
Blogs
BMT Wiki
Collections
Store
Everything posted by Vladislav
-

I need a 12 volt starter for my '48 KB-7
Vladislav replied to Joey Mack's topic in Electrical, Electronics and Lighting
Sometimes a guy (I was going to type "a woman" with cross out letters but seems they are not avalible anymiore) may programm his brain cells so hard with some idea he would push forward as a diesel loc no matter who whould happen to be on his way. -
I need a 12 volt starter for my '48 KB-7
Vladislav replied to Joey Mack's topic in Electrical, Electronics and Lighting
For a not really large engine it's quite possible. Especially if it's a gasser. I started some rigs with hand crank in deep past and as I remember it was easy. It works good for old low compression gassers when you don't need fast revs. I even think old ZIL-130 trucks with 6 liter OHV V8 could be started that way and it was regulary done by drivers in the past. One thing I'm sure it would be much easier than inventing hydraulic starting system driven from the brakes -
I need a 12 volt starter for my '48 KB-7
Vladislav replied to Joey Mack's topic in Electrical, Electronics and Lighting
Do you mean the one with the plane? -
Very interesting. Is it seen true also for spring hangers and other chassis brackets?
-
B-Model Square Fuel Tanks Are Available!!
Vladislav replied to Barry's topic in Product Announcements & Group Buys
Great! I understand they're not made of gold. But hope they will work as like made of silver! -
I need a 12 volt starter for my '48 KB-7
Vladislav replied to Joey Mack's topic in Electrical, Electronics and Lighting
So are we going to loose you?? As for the starter - just a thought. An air start? -
Need help identifying a tranny by VIN. Vision Mack
Vladislav replied to Vladislav's question in Mack Truck Q & A
Thanks for the tips once again. I looked pics I made when the top cover was removed and saw its overdrive transmission. You can always identify it seeing one gear wheel on the main shaft of lesser OD than the constant mesh one. Which means that gear set is faster than direct. The rest of wheels is larger. So if the B is direct top it turns I've got the C. I haven't made decition on what to do with that transmission so far. Now I know the ratios and general specific so may spin thoughts on my mind. Maybe to keep it for future projects or maybe just sell it. Actually I have a whole collection of Mack transmissions to choose from for what to play with. And they don't cost anything in my neck of the woods. At the same time Eaton has market and honestly I don't lean toward using off-breed unit in a hobby truck. -
Need help identifying a tranny by VIN. Vision Mack
Vladislav replied to Vladislav's question in Mack Truck Q & A
Many thanks, guys! I got myself to where the tranny was stored (laying down on a floor) today. The top cover had METRIC script casted on it and I could see something like a big rectangular cover with bolts at the bottom left of the housing. Aside of that it had two angle fittings with threads for attaching hoses which my guess is for external cooler. The tranny drips oil out of them onto the floor for a while and that's transmission oil definitely not antefreeze or water or whatever else. So puzzle gets into shape like a FRO-16210. But no clue so far it's C or B or anything else if such exists. Can I try identifying by teeth count as Joey mentioned or another way? Also a question is are there typical weak points I should investigate to determine its condition? I had the top cover removed and saw all gear wheels solid covered with clean oil. Sliding clutches didn't show any crytical wear. A synchro hub could be either seen showing its Hi range side (probably it was shifted in Lo before removing from the truck). And it looked as perfect as new. I couldn't find crytical play of shafts or gears on them. Only excessive rust all over the housing at the outer side and very light oily sweat around the yoke seal. -
I acquired a transmission from a truck which was parted out locally. By the look folks told me it's RTO-16210 or so but the tag is missing and I would like to learn more about it. Mostly the ratios. Hope interweb search will help but I need its model first. I hope it can be tracked by the truck's VIN. Too probably it's original to the truck. Thanks. VIN: 1M1AE07Y14N020543
-
Coca Cola LJ Mack colors
Vladislav replied to 1961H67's topic in Antique and Classic Mack Trucks General Discussion
I belive some L-models had steel floor panels from the factory. As for oil the source could be the U-joint right behind the transmission. It spreads excess of grease due to spin. Shift lever also supposed to leak some tranny oil on a hot run. -
Sounds as a great day! Best wishes and many more to come!
-
B-73 Restoration
Vladislav replied to mattb73lt's topic in Antique and Classic Mack Trucks General Discussion
Good luck on seamless reassembly! -
carrier bearing question
Vladislav replied to nam vet's topic in Antique and Classic Mack Trucks General Discussion
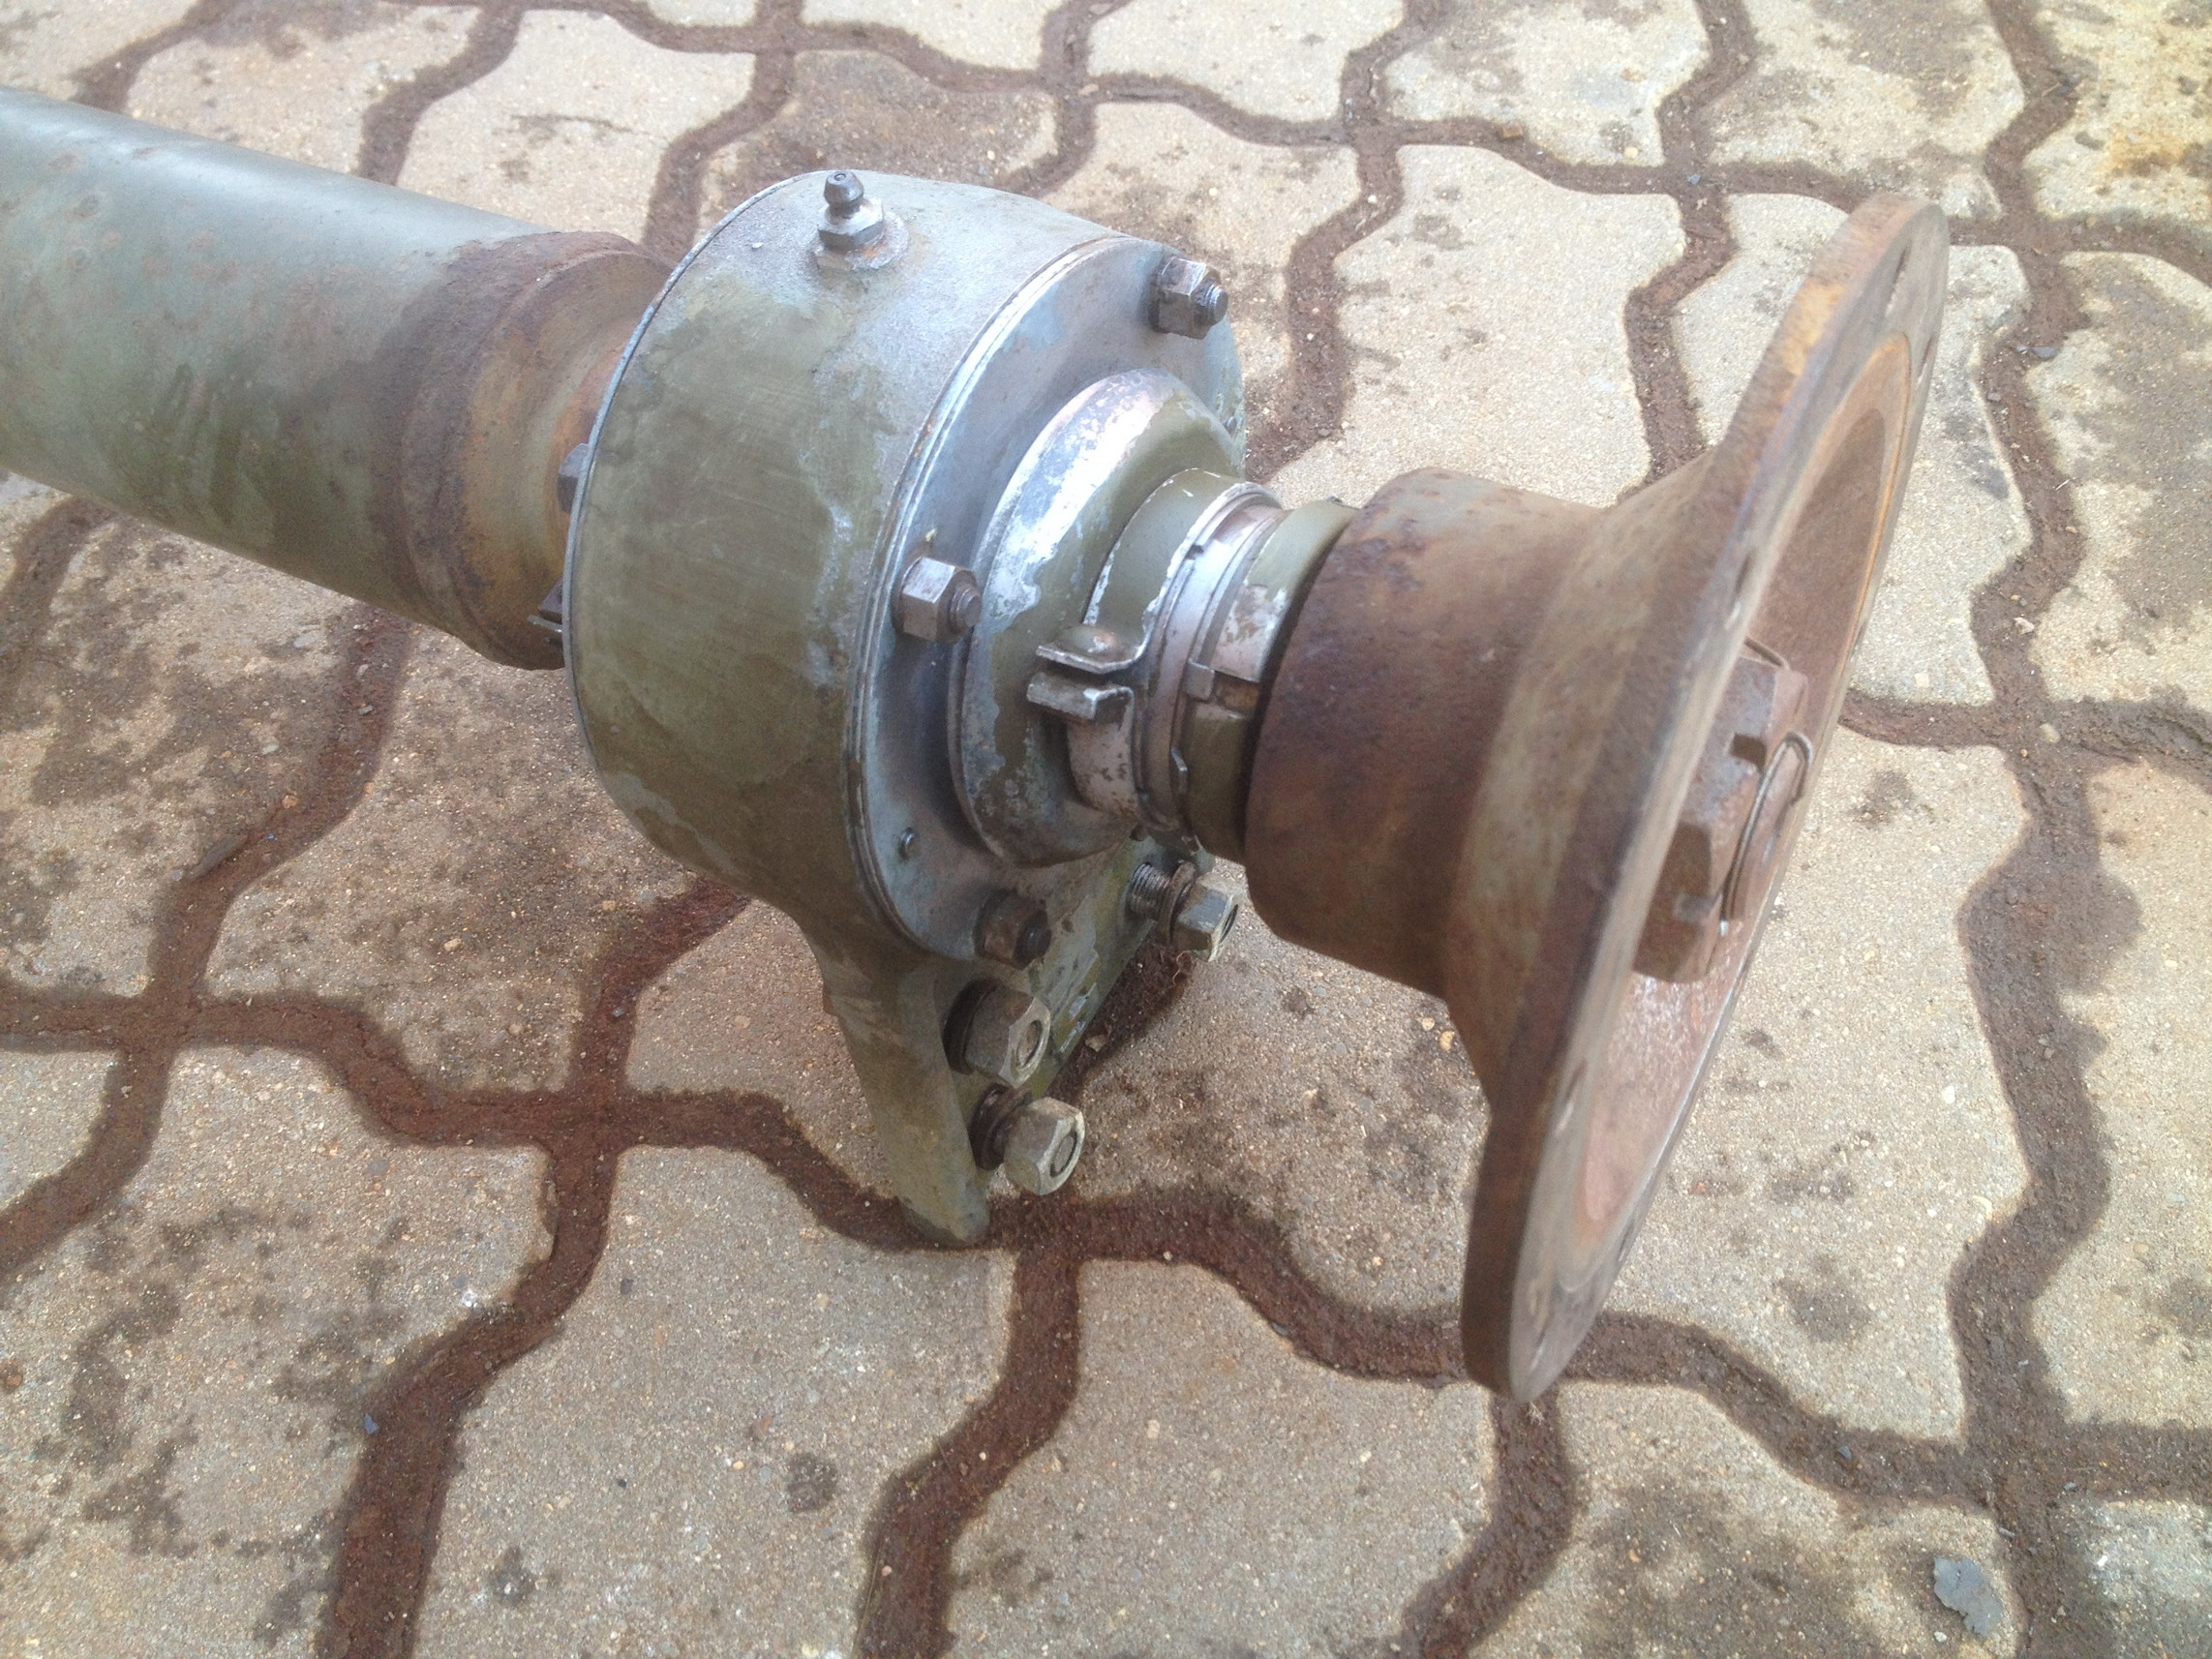
Judging by the drawing posted above the bearing is of a simple style ball bearing of the same OD as the seals. It may be measured without disturbing the seals and the same to its ID and width. Mine (on the pic I posted) had double raw ball bearing which could rotate in its outer race when the shaft bounces relating to the horizont. -
carrier bearing question
Vladislav replied to nam vet's topic in Antique and Classic Mack Trucks General Discussion
Do you have anything like this overthere? Honestly I thought the talk was about a bearing in a carrier (in a diff). IDK why differential housings are called carriers but there seems to be a reason though. The particular thread be better called a prop shaft hanger bearing on my mind.
-
Paul, personally I like them both. Bright colors and color combos offset the trucks. I was grown in a country where half of the trucks were painted khaky leaving assembly lines. Which is no kidding in the recent times and send me shivers when I meet 'em down the road.
-
When the truck is in a shop, and the pan is off you don't spend really much time opening every cap and investigating each journal instead of doing only the one that failed or only rods. But you sure spend that extra bit. And if the work was done being limited by only direct need and after its complete and truck on the road getting brake down because of the another issue which could be inspected for a few bucks but wasn't it would cost a full repair once more. So such extra care about side related things may be overlooked as a kind of insurance. You pay say 3% of the potential expences and exclude the risk. Actually a customer doesn't like increase of work cost. So such actions seem difficult to charge straight and I don't estimate them separately. But clients see your care to the repair and value your job. So you may hide those 3% in the overall figure and make the things the way you like. And when all is done smooth both sides are usually satisfied. Personally I'm also about that. I do gear set swaps in Mercedes axles from time to time. The job worth some coins since you have to tinker with setting the mesh. But when the insides are out I always take the differential apart and revise. I don't need to do that setting the gears but it worth me only 20 minutes of extra time. And when the axle is on a vehicle it's nearly a half day job to get there with another half to put everuthing back.
-
Yup, I agree with the said above. Personally I value the most when serviceman and a customer have fully clear understanding and communication. This way once you found a guy or a place which have something done for you and both satisfied with the result and communication it worth to continue cooperating even for a bit higher cost than the market. Or actually you like a customer ready to pay extra 10% but being a 2nd (3rd, 4th) time buyer may be getting 10% discount. So you're paying the market price but being treated by a trusty people. Many years ago I bought a Mercedes car with ruined engine. And bought another driving one as a donor. I was offered to swap the engine for $100 by a guy. His shop had a ground floor verbatim. So I figured there was no way and ended up renting (another) shop for 3 days and do the swap myself. It cost me $150 for the rent but the car drove many years after that with no issue. So counting pennie is not the most important point concerning services on my mind.
-
I'd like to see a couple of pics of the parted one if possible. Thanks.
-
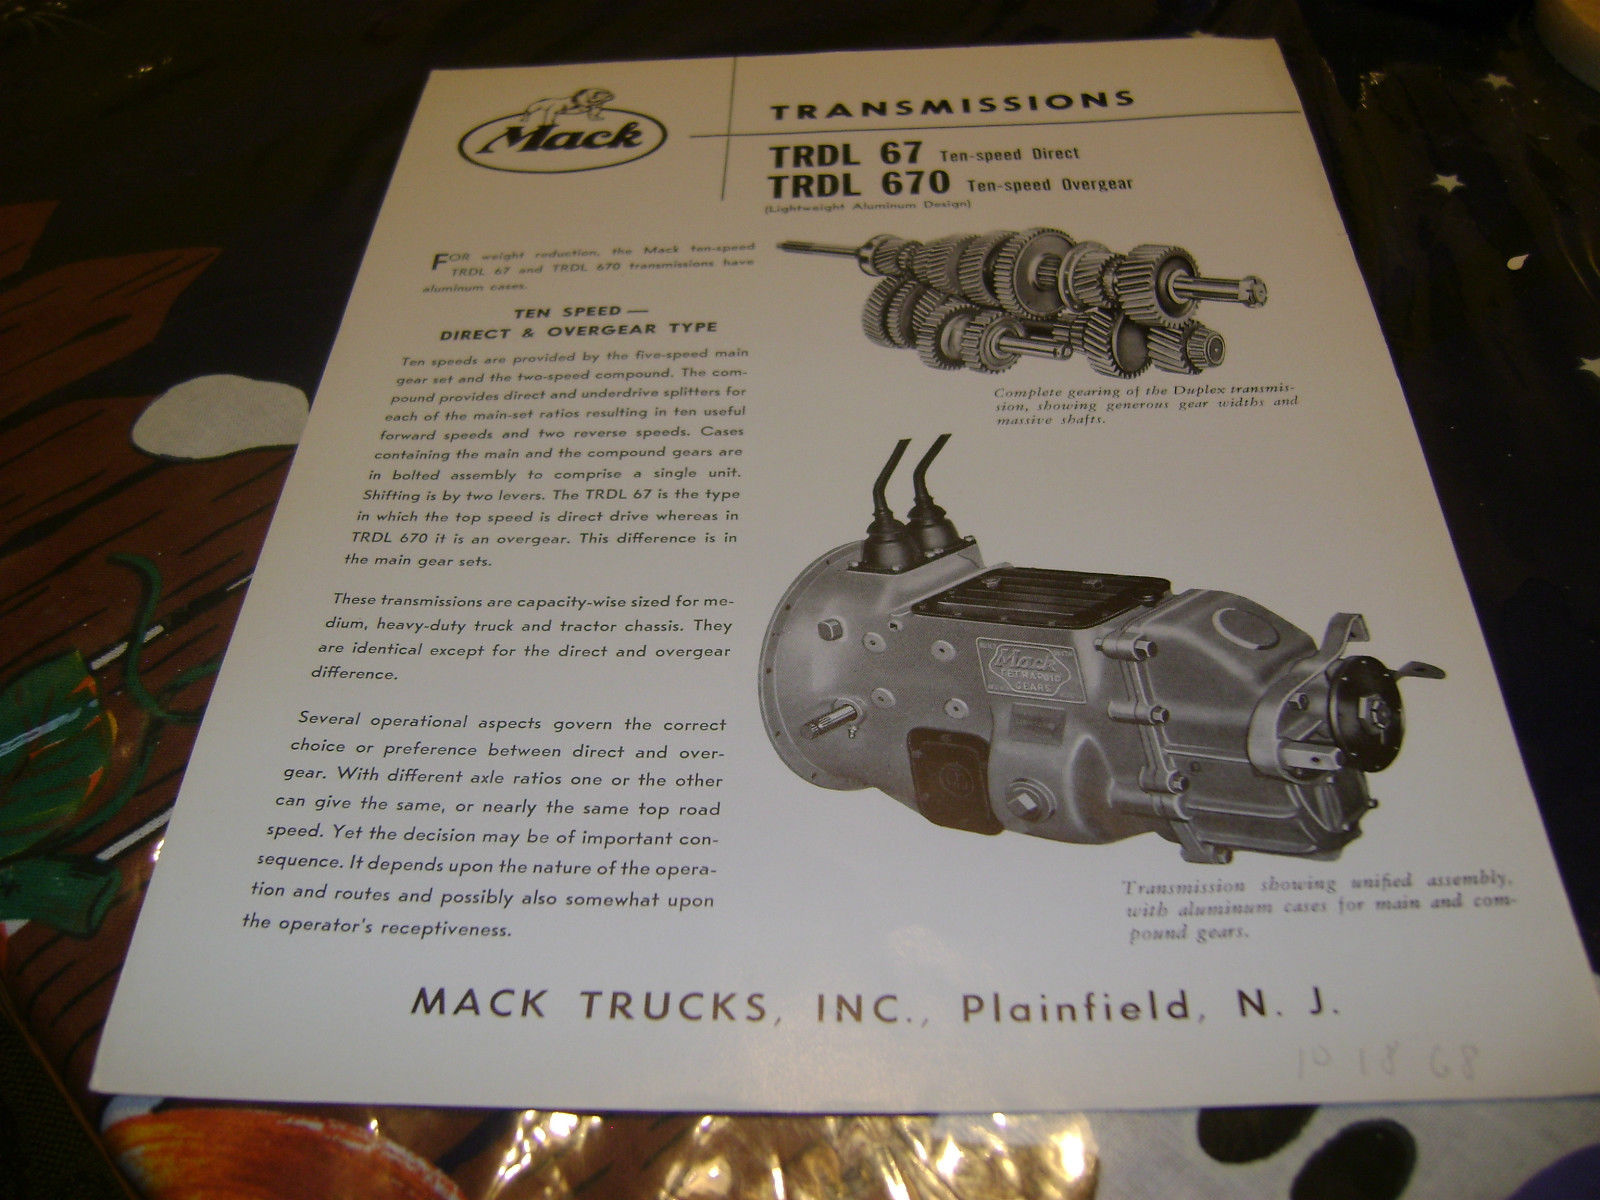
Here you probably talk about 67 and 72 series transmissions. Both were used on B-models. The 1st was lighter series box with lesser torque rating. The 2nd is what you described as a clutch housing with a vent cover on the top (it has a similar one at the bottom either). I don't know were they used with different clutch sizes but it seems making sence. And I see no reason a man can not install one style in place of the other on a engine using different flywheel, clutch, mounts, prop shaft etc. Or just swap an engine together with a tranny making adaptations to the chassis. Vlad
yIVBSDBoh1wVw60_57.thumb.JPG.15ea9008d1cee301534f9a833092f938.JPG)

-
On The Side Of The Road
Vladislav replied to SandyLee's topic in Antique and Classic Mack Trucks General Discussion
Bob, a thought popped up in my mind while reading your post. Just imagine what people think seeing you DM or my Macks in the yard? Just wonder what would you say being asked on selling the Mack? We sure try keeping our trasures to not be ruined by rain or snow but some one may be thinking he'd do that much better. And my guess the most everybody would think he would -
On The Side Of The Road
Vladislav replied to SandyLee's topic in Antique and Classic Mack Trucks General Discussion
They indeed look like a kind of someone's collection a guy enjoys having them the way they are. We sure may have multiple suggestions on what would be better or worse with them but that was already said on here many times. Thanks for posting, was interesting to see. -
How about the top?
-
Coca Cola LJ Mack colors
Vladislav replied to 1961H67's topic in Antique and Classic Mack Trucks General Discussion
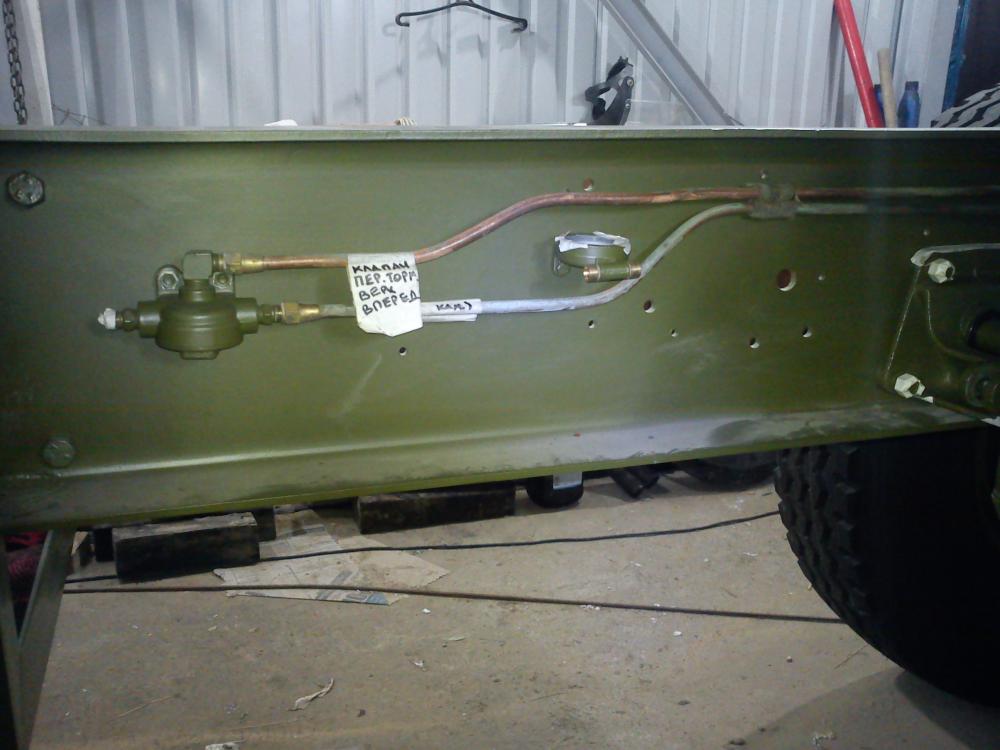
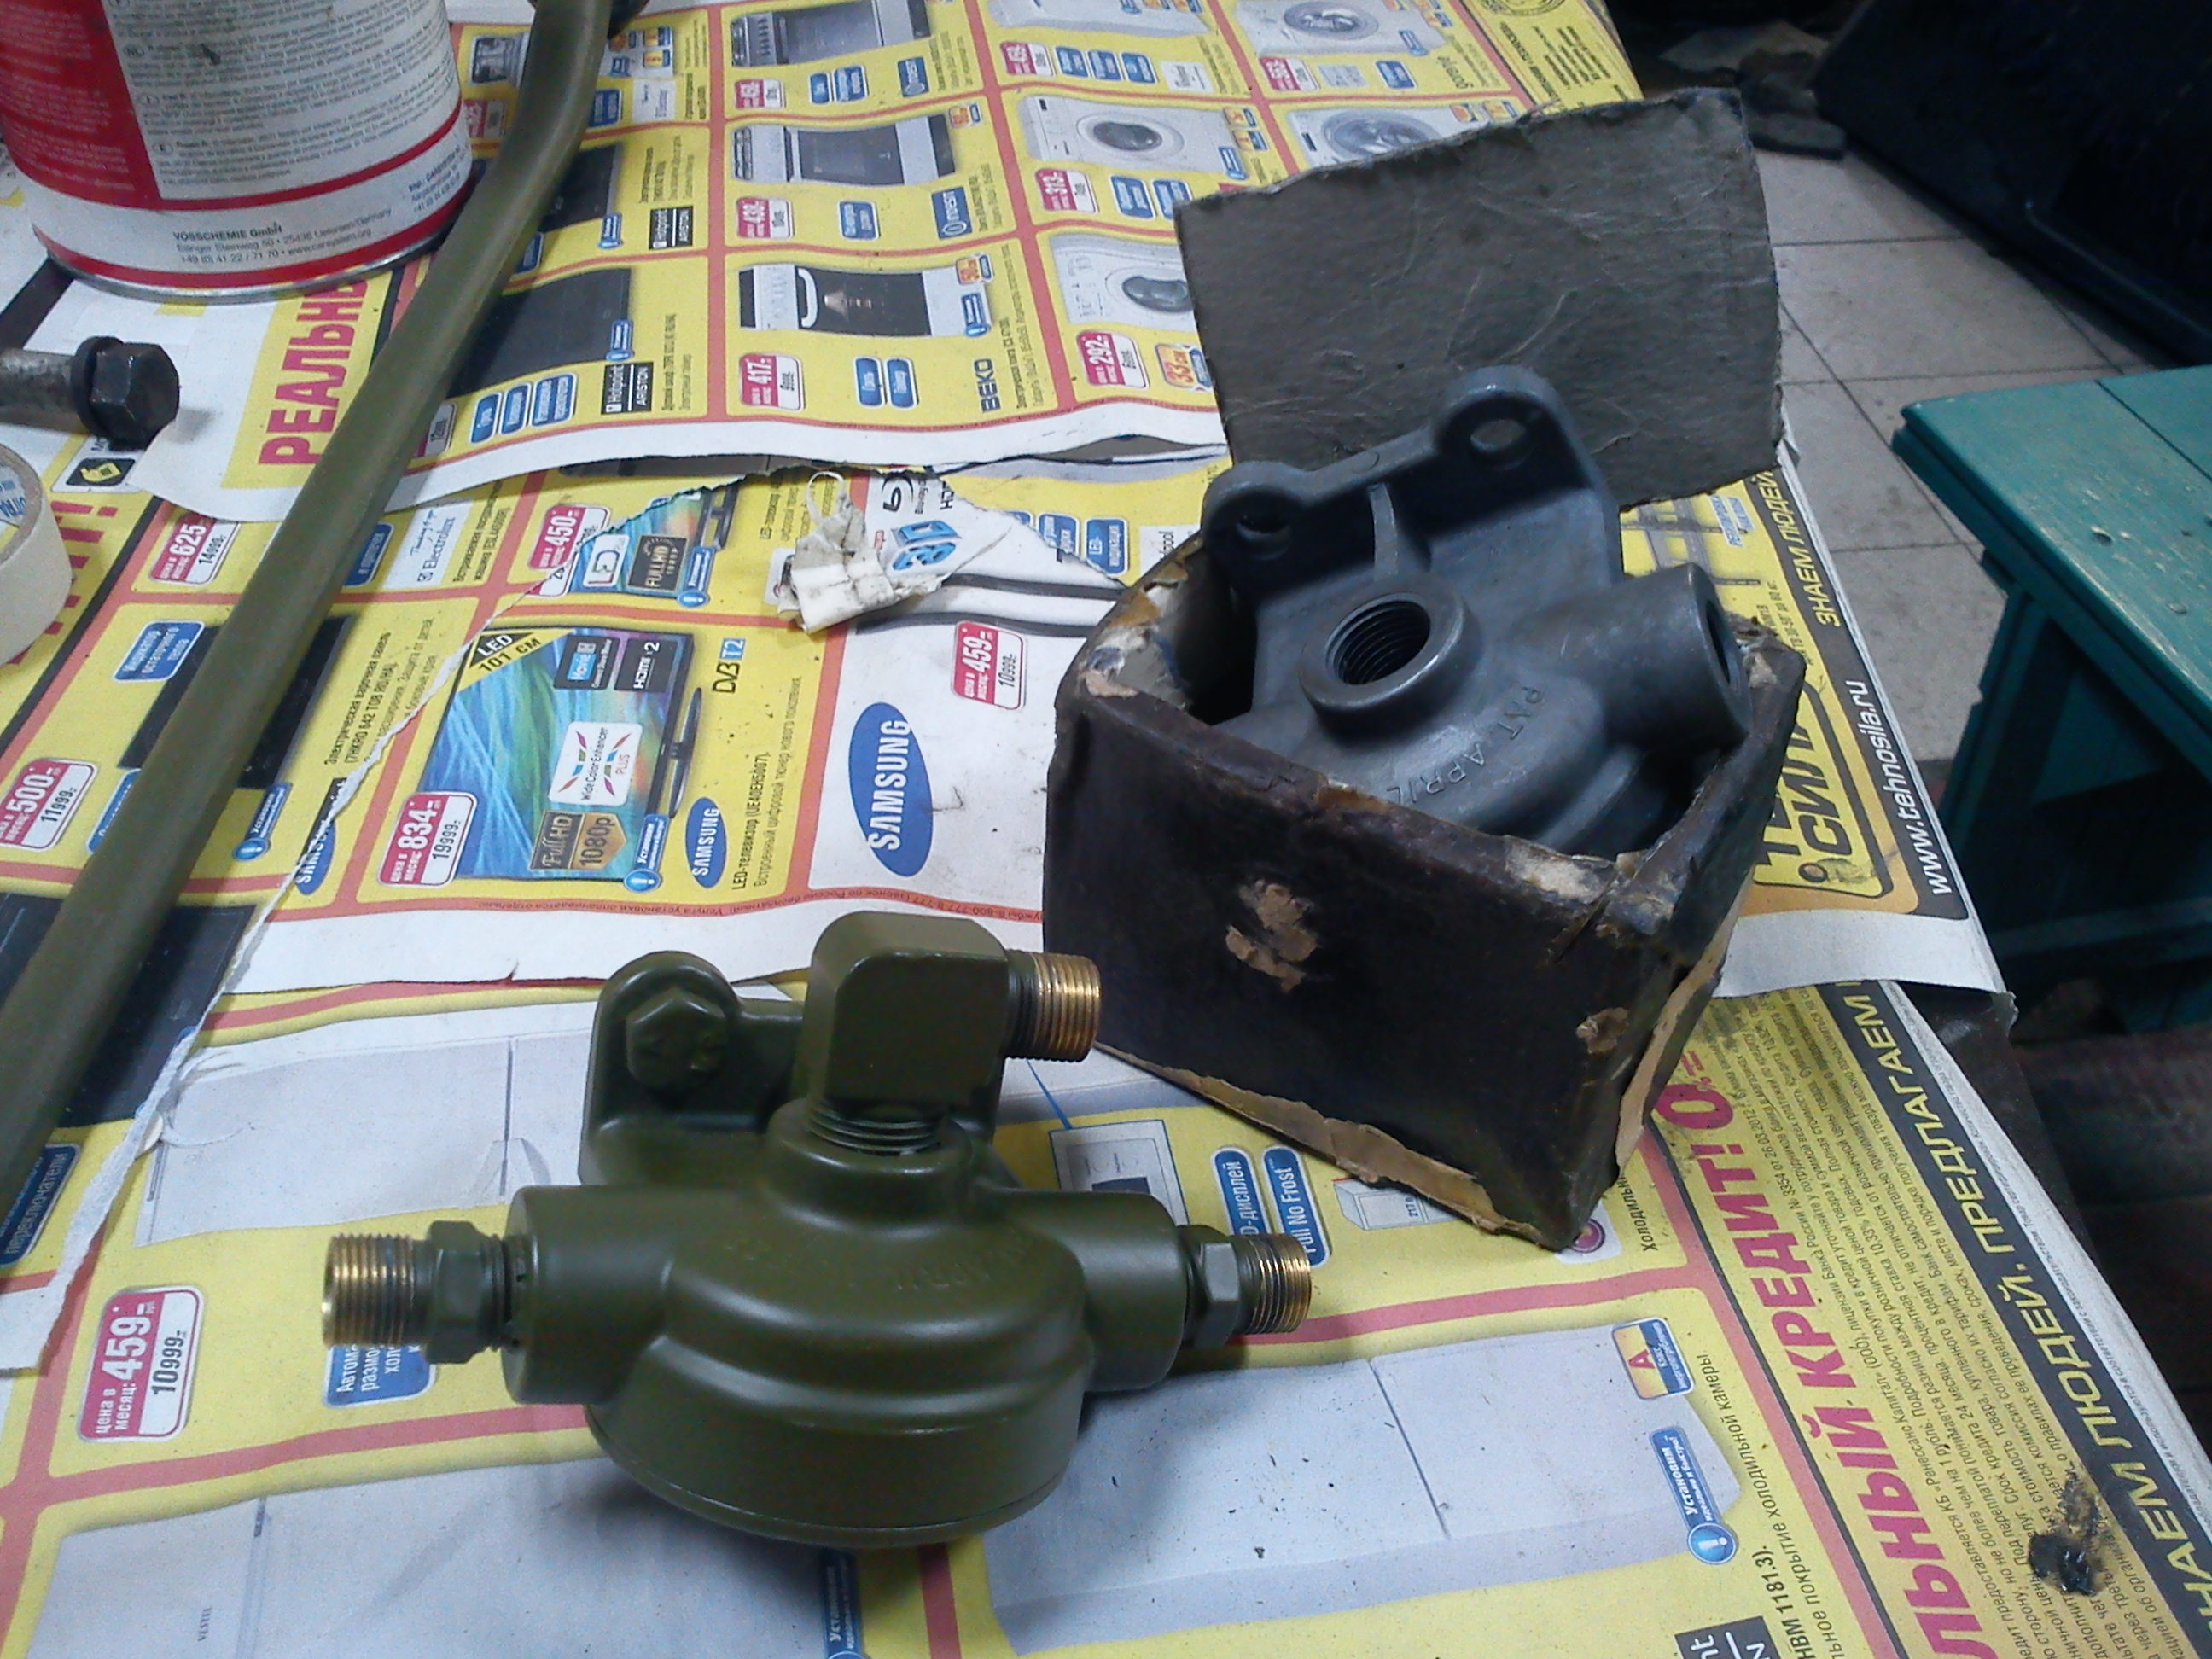
Congratulation on the milestone! Moving a rig under its own power for the first time is very exciting moment. Also thanks for posting many progress pics, they definitely give motivation. For any reason the pictures are how front brake quick release valve may look on a L-model. Mine has its schematic pretty simple. The top line comes from the theadle valve and two at the sides (they're actually at the bottom in the housing below a diaphragm) go straight to the front cans. My truck doesn't have a trolley valve and limiting one though.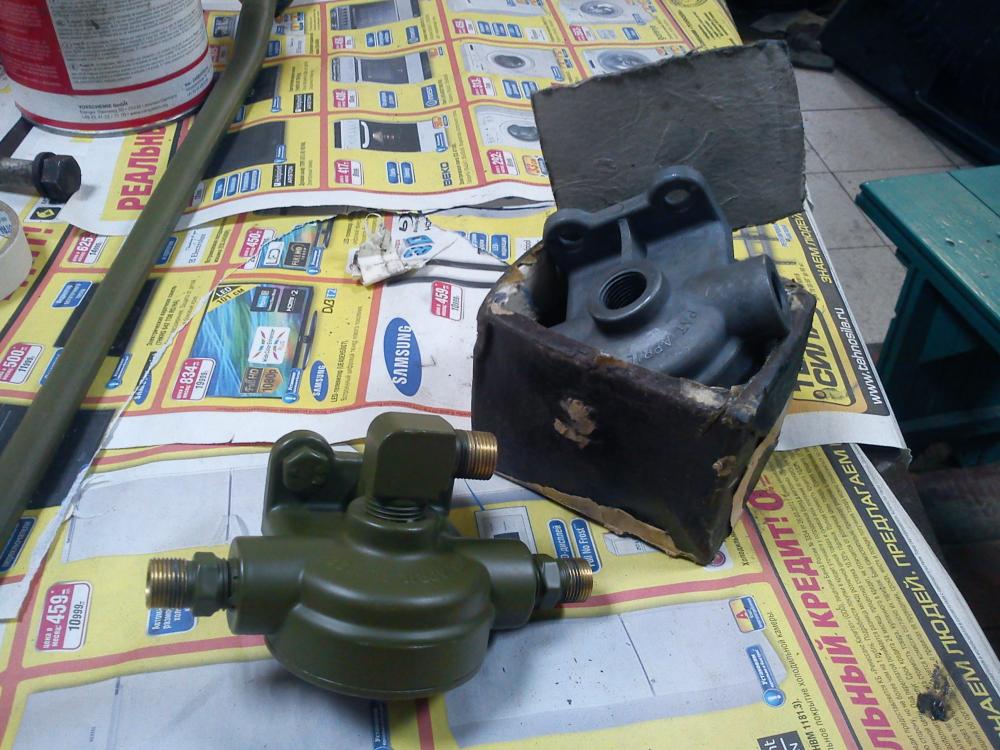
-
B-73 Restoration
Vladislav replied to mattb73lt's topic in Antique and Classic Mack Trucks General Discussion
Uggh... I was off from extensive thread reading for a while and finally got myself to all the recent (to me) portion of the story today. The most of my expressions duplicated the comments the other folks put in. Actually the engine story turned out as a restoration in a restoration. It may be pointed out that the engine could be revised before the initial installation etc but I won't be that crytical on that point (and sure the most others won't too). First of all a huge portion of job was done to the cab and chassis. Which both turned out absolutely amazing. Second the initial engine condition didn't give matters to mind rebuild. And third it's much easier (psychologically) to redo the engine knowing the rest of the truck is already done and waiting for only the last part. So I'm pretty sure the things will be fine soon. And with the approach Matt puts to his work it can not even be any other way. It was very interesting also to read about jobs and services over the years and see the lathe. Personally I have never seen equipment of such style before. Sooo... Best of luck to Matt on the further progress and sooner complete of the truck! -
I was going to say about that figure also. Something close to one metric ton, maybe a bit less.


yIVBSDBoh1wVw60_57.JPG.40ea1c8faa358f5bac773bb17db86cb7.JPG)

BMT Forum Logo
