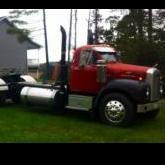
Popular Post Hobert62 Posted April 20, 2016 Popular Post Share Posted April 20, 2016 I decided to include a little extra procrastination time to allow for some people that don't seem to give the mandatory time required. I'm trying to keep the man gods happy for us all. I finally turned the corner and its now time to start putting back together. I'm still dreading the wiring and plumbing, but I'm atleast going in the right direction. No body work yet everythings pretty solid,but I will be driving it this summer, thanks to the vast knowledge that's shared around here. 4 Quote Link to comment https://www.bigmacktrucks.com/topic/44907-finally-time-to-start-assembly/ Share on other sites More sharing options...
mowerman Posted April 20, 2016 Share Posted April 20, 2016 holy cow......nice work...bob 1 Quote Link to comment https://www.bigmacktrucks.com/topic/44907-finally-time-to-start-assembly/#findComment-330950 Share on other sites More sharing options...
41chevy Posted April 20, 2016 Share Posted April 20, 2016 Coming along nice. My trick with wiring and plumbing is , if it get to be a bit frustrating, I go do something else and come back later. Seems for me at least to clear my fruistration away. Paul 1 Quote "OPERTUNITY IS MISSED BY MOST PEOPLE BECAUSE IT IS DRESSED IN OVERALLS AND LOOKS LIKE WORK" Thomas Edison “Life’s journey is not to arrive at the grave safely, in a well preserved body, but rather to skid in sideways, totally worn out, shouting ‘Holy shit, what a ride!’” P.T.CHESHIRE Link to comment https://www.bigmacktrucks.com/topic/44907-finally-time-to-start-assembly/#findComment-330953 Share on other sites More sharing options...
Gmerrill0516 Posted April 20, 2016 Share Posted April 20, 2016 Start!? Looks like you have started a long time ago! Nice project there. Take it down to manageable sections. Divide an conquer. I was watching an episode of Stacey David's "Gearz" this week and he had a universal wiring kit. I'm thinking of going that route depending on the cost. The good thing is that every wire said right on it what it is for. It looked like it made things easier. He wired up his Sargent Rock project from the ground up including gauges and it appeared reasonable. They break the entire harness up into sections or groups of wires to go to specific parts of the vehicle for you...you can reroute as necessary. Good luck anyway. Post some more pictures and let us know how it is going. 1 Quote Link to comment https://www.bigmacktrucks.com/topic/44907-finally-time-to-start-assembly/#findComment-330954 Share on other sites More sharing options...
Coenut Posted April 21, 2016 Share Posted April 21, 2016 I have used the universal painless wiring harnesses before. They are very well made and for what you get a great price. I would measure the distance from where you plan to mount the fuse panel to the rear of the truck and to the front. Just to be sure the harness will be long enough to reach your rear tailights and turn signals. 1 Quote Link to comment https://www.bigmacktrucks.com/topic/44907-finally-time-to-start-assembly/#findComment-331010 Share on other sites More sharing options...
Hobert62 Posted April 21, 2016 Author Share Posted April 21, 2016 I've looked at the universal harnesses online and thought that would be a good starting point. Quote Link to comment https://www.bigmacktrucks.com/topic/44907-finally-time-to-start-assembly/#findComment-331012 Share on other sites More sharing options...
The Fireman Posted April 21, 2016 Share Posted April 21, 2016 Looking good, when I rewired my B I used a fork truck fuse panel that I salvaged out of a hyster 120xm that we were scraping at work. Gave me plenty of circuits and I have relays controlling all of the high draw stuff so my old factory switches aren't going to be overloaded. Was a bit of work to plan it all out and install but well worth it in the long run, I also set it up so that everything except the signal lights shut off with the key. 1 Quote Link to comment https://www.bigmacktrucks.com/topic/44907-finally-time-to-start-assembly/#findComment-331032 Share on other sites More sharing options...
fxfymn Posted April 22, 2016 Share Posted April 22, 2016 Quote I also set it up so that everything except the signal lights shut off with the key. And I would install a battery cut-off switch as well. It stops parasitic losses and may well prevent an unattended electrical fire. 1 Quote Money, sex, and fire; everybody thinks everyone else is getting more than they are! Link to comment https://www.bigmacktrucks.com/topic/44907-finally-time-to-start-assembly/#findComment-331121 Share on other sites More sharing options...
Popular Post Hobert62 Posted April 27, 2016 Author Popular Post Share Posted April 27, 2016 Like Johnny Cash said one peice at a time. 4 Quote Link to comment https://www.bigmacktrucks.com/topic/44907-finally-time-to-start-assembly/#findComment-331723 Share on other sites More sharing options...
HeavyGunner Posted April 27, 2016 Share Posted April 27, 2016 Like it was said earlier Painless Performance wiring harnesses are awesome. Everything wire labeled multiple times so there is no confusing any wires. Redid my cj5 with one and it was a breeze. 1 Quote The problems we face today exist because the people who work for a living are outnumbered by the people who vote for a living.The government can only "give" someone what they first take from another. Link to comment https://www.bigmacktrucks.com/topic/44907-finally-time-to-start-assembly/#findComment-331737 Share on other sites More sharing options...
Hobert62 Posted April 27, 2016 Author Share Posted April 27, 2016 3 minutes ago, HeavyGunner said: Like it was said earlier Painless Performance wiring harnesses are awesome. Everything wire labeled multiple times so there is no confusing any wires. Redid my cj5 with one and it was a breeze. That's the way I'm leaning towards. Quote Link to comment https://www.bigmacktrucks.com/topic/44907-finally-time-to-start-assembly/#findComment-331738 Share on other sites More sharing options...
Freightrain Posted April 28, 2016 Share Posted April 28, 2016 I just built a complete harness for this Willy's. Used an EZ wiring harness. I too put relays on things light headlights so the switch won't see the high draw from the halogen bulbs. The harnesses are typically marked well but the instructions can be vague. Work slow and have a plan and they do work. 1 Quote Larry 1959 B61 Liv'n Large...................... Charter member of the "MACK PACK" Link to comment https://www.bigmacktrucks.com/topic/44907-finally-time-to-start-assembly/#findComment-331780 Share on other sites More sharing options...
Hobert62 Posted May 11, 2016 Author Share Posted May 11, 2016 Front fenders had lots if previous body work over there life. Some with fiberglass some with bondo and some with pop rivits and patches. I took the da sander and smoothed everything out with 80 grit paper. Then went to harborfreight to grab a gallon of their truck bed coating. I finished it about 3am this morning and I'm very happy with the results. It gave a nice finish kinda like a vinyl top on a car, helped hide the body work imperfections, and gave a nice uniform finish. As a bedliner it would be a joke but as a heavyduty paint I'm happy with the results. Quote Link to comment https://www.bigmacktrucks.com/topic/44907-finally-time-to-start-assembly/#findComment-332945 Share on other sites More sharing options...
eddeere Posted May 11, 2016 Share Posted May 11, 2016 Neat idea on the fenders. 1 Quote Link to comment https://www.bigmacktrucks.com/topic/44907-finally-time-to-start-assembly/#findComment-332951 Share on other sites More sharing options...
Hobert62 Posted June 21, 2016 Author Share Posted June 21, 2016 Got the stacks and tank mounted. They will be 3' taller when outside. Need a piece of flex pipe then toolbox step can get put on. Battery box with disconnect switch mounted on the inside. "Kinda a security thing." Alternator mounted. Used a belt adjuster off a 3208 cat. Basically perfect fit. Just had to cut 1" off end and drill a new hole. 1 Quote Link to comment https://www.bigmacktrucks.com/topic/44907-finally-time-to-start-assembly/#findComment-337328 Share on other sites More sharing options...
Hobert62 Posted July 4, 2016 Author Share Posted July 4, 2016 Been working on fuel and water lines. I'm easing into the air lines. Got the stacks hooked up, air cleaner installed, and passenger side toolbox mounted. I'm still trying to figure out which way to go on the wiring and how many circuit kit Im going to need. 1 Quote Link to comment https://www.bigmacktrucks.com/topic/44907-finally-time-to-start-assembly/#findComment-338385 Share on other sites More sharing options...
Freightrain Posted July 4, 2016 Share Posted July 4, 2016 (edited) I would stay small. I put a 20 circuit in that Willys. WAYYY overkill, but it was already in the car when I started on it. Most kits handle the typical operating systems and I doubt you need more then 10-12 circuits. Heck you have air wipers, so that leaves one out already. Either way, put the headlights on relays(doubt most kits are set up this way--it wasn't in Willys). I took the lo/hi wires and ran them to two relays under the dash and used them to turn them on/off. Then used good heavy wire to the headlights. On my B, I put the relays on the front core support right next to the wire terminals. Even with my std halogen bulbs it would overheat the original headlight switch and make them blink if I turned on the brights. Using the relays I can run my brights without issue. Edited July 4, 2016 by Freightrain 1 Quote Larry 1959 B61 Liv'n Large...................... Charter member of the "MACK PACK" Link to comment https://www.bigmacktrucks.com/topic/44907-finally-time-to-start-assembly/#findComment-338410 Share on other sites More sharing options...
41chevy Posted July 5, 2016 Share Posted July 5, 2016 7 hours ago, Hobert62 said: Been working on fuel and water lines. I'm easing into the air lines. Got the stacks hooked up, air cleaner installed, and passenger side toolbox mounted. I'm still trying to figure out which way to go on the wiring and how many circuit kit Im going to need. With my stuff I look at everything that needs fuses/circuit breakers and add 4 more fuse locations for add on items. Works out 99% of the time. Paul 1 Quote "OPERTUNITY IS MISSED BY MOST PEOPLE BECAUSE IT IS DRESSED IN OVERALLS AND LOOKS LIKE WORK" Thomas Edison “Life’s journey is not to arrive at the grave safely, in a well preserved body, but rather to skid in sideways, totally worn out, shouting ‘Holy shit, what a ride!’” P.T.CHESHIRE Link to comment https://www.bigmacktrucks.com/topic/44907-finally-time-to-start-assembly/#findComment-338453 Share on other sites More sharing options...
fxfymn Posted July 5, 2016 Share Posted July 5, 2016 If you go with LED's you can greatly cut back on the wire gauges. i.e. most tail light circuits are 14 or 16 ga., but an LED could reduce that to as low as 22. On the trucks that I have totally re-wired I used a similar theory to how you wire a house. Decide on the fixture and location, figure out which can be run on the same circuit, wire the fixtures together that share a circuit,and then do a "home run" from there back to the circuit box and/or switch. After all the home runs are done you can figure out how many circuits you will need in the box. I label each home run with masking tape. If you want to make a loom do the home runs and leave them on the floor until you bundle them in what ever covering you choose. If I'm not concerned about maintaining the originality of the rig I use a waterproof junction box like these: https://www.amazon.com/Trailer-Wiring-Junction-Box-Troubleshooting/dp/B01HR7VGJW/ref=sr_1_8?ie=UTF8&qid=1467724266&sr=8-8&keywords=automotive+waterproof+electrical+junction+box I use a separate color for each circuit and be sure to make a chart of which color goes to each circuit for future reference. With the advent of heat shrink connectors it is much easier to do than it ever was. Good luck. 1 Quote Money, sex, and fire; everybody thinks everyone else is getting more than they are! Link to comment https://www.bigmacktrucks.com/topic/44907-finally-time-to-start-assembly/#findComment-338497 Share on other sites More sharing options...
Hobert62 Posted July 5, 2016 Author Share Posted July 5, 2016 Thanks for all the ideas and advice. This is the part that i can and have done before, but its just overwhelming to look at it. I've rewired several trailers and I have used waterproof junction boxes. I like that style box it's more sleek compared to what I've used before. When I rewired my gooseneck I used a heavy extension cord. I ran it from the front junction box to the taillight box in the rear. The cord made for a neat and easy installation. Quote Link to comment https://www.bigmacktrucks.com/topic/44907-finally-time-to-start-assembly/#findComment-338518 Share on other sites More sharing options...
fxfymn Posted July 5, 2016 Share Posted July 5, 2016 Quote This is the part that i can and have done before, but its just overwhelming to look at it. The journey of a 1000 miles begins with one step; start at the ass end and work your way forward to the gauges, etc. Every re-build, restoration, or freshening up I ever do scares the shit out of me at one time or another because it seems so overwhelming. When that happens I focus on one small thing I know I can get done and try like hell to not even think about the total project. 1 Quote Money, sex, and fire; everybody thinks everyone else is getting more than they are! Link to comment https://www.bigmacktrucks.com/topic/44907-finally-time-to-start-assembly/#findComment-338528 Share on other sites More sharing options...
Popular Post Hobert62 Posted July 15, 2016 Author Popular Post Share Posted July 15, 2016 wish I would of had the Mack ready for this trip. A farmall H, johndeere B, & A Plus 2000# of extra weights 2 spare tires and a 20 ton bottle jack. And an extra gas can. 5 Quote Link to comment https://www.bigmacktrucks.com/topic/44907-finally-time-to-start-assembly/#findComment-339386 Share on other sites More sharing options...
j hancock Posted July 15, 2016 Share Posted July 15, 2016 Ahhh.... the joys of loading trikes. Good Job! 1 Quote JimIt doesn't cost anything to pay attention. Link to comment https://www.bigmacktrucks.com/topic/44907-finally-time-to-start-assembly/#findComment-339412 Share on other sites More sharing options...
mowerman Posted July 17, 2016 Share Posted July 17, 2016 coming along real well...a friend of mine put that duel stack setup on..... perfect sound not too loud...sounds good...keep up the good work,,,and shanks for sharing....bob Quote Link to comment https://www.bigmacktrucks.com/topic/44907-finally-time-to-start-assembly/#findComment-339534 Share on other sites More sharing options...
Hobert62 Posted July 17, 2016 Author Share Posted July 17, 2016 On July 15, 2016 at 8:22 AM, j hancock said: Ahhh.... the joys of loading trikes. Good Job! It was alot harder to load to bring them back home. I had to rember how they fit and everyone was watching in amazement that I was doing it with a single wheel truck. Alot of people with dually's and only 1 tractor. I ran across a scale it was 28,560. This was the first time since I had this pickup that the 8.1 gas job was a little short on power. Otherwise handled it great. Now back to Mack school. Quote Link to comment https://www.bigmacktrucks.com/topic/44907-finally-time-to-start-assembly/#findComment-339544 Share on other sites More sharing options...


Recommended Posts
Join the conversation
You can post now and register later. If you have an account, sign in now to post with your account.