

Licensed to kill
-
Posts
582 -
Joined
-
Last visited
-
Days Won
9
Content Type
Profiles
Forums
Gallery
Events
Blogs
BMT Wiki
Collections
Store
Everything posted by Licensed to kill
-
B model headliner
Licensed to kill replied to 1wonton's topic in Antique and Classic Mack Trucks General Discussion
I have one from one of my trucks that is sagging a bit from a mouse nest that I plan to use as a pattern to make a new one. We will see how that goes. If it works well, perhaps there is a market for a cheap pattern for those that are not making a "correct" restoration. -
Is it just me or does it look like the corners of the fenders have been cropped?. If so, was this done to accommodate the wide steers and, if so, is this a factory "option" or just something someone did?.
-
He said that he doesn't have much of anything anymore. He did not elaborate on whether that was due solely to the fire or if he had moved some prior to the fire, just said that he lost some to the fire and no longer has much stuff left.
-
I got ahold of Norman and he said he would look and see if he has one. He will look for a couple other parts that I need but said that he doesn't have much left anymore. Lost much of it to a fire. Thanks for the heads up Bob. Really enjoyed talking to Norman. Really nice guy.
-
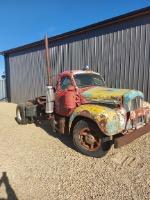
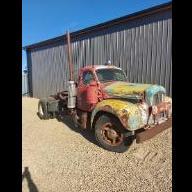
Wanted a bulldog for a B model. I don't want to pay a lot but I don't want a good one either. Prefer one that is not a good candidate for restoration (pitted) as it is for a "yard art" truck and a good one might get stollen.
-
B61 at auction
Licensed to kill replied to upsman's topic in Antique and Classic Mack Trucks General Discussion
OK, so I looked it up.
-
B61 at auction
Licensed to kill replied to upsman's topic in Antique and Classic Mack Trucks General Discussion
Winter driving perhaps??. -
B61 at auction
Licensed to kill replied to upsman's topic in Antique and Classic Mack Trucks General Discussion
What is a "Joe dog" set up? -
B61 at auction
Licensed to kill replied to upsman's topic in Antique and Classic Mack Trucks General Discussion
One of my parts trucks is a 61T with a tag. -
B61 at auction
Licensed to kill replied to upsman's topic in Antique and Classic Mack Trucks General Discussion
I see lots of things that are "different" but don't see anything that is "wrong". A few things that I would not do perhaps but that does not make them "wrong" -
There is no 5th wheel plate, just hinge points bolted to the frame. Unusual. Looks to ME like it is pretty good shape but, yes pretty pricey. I am not one to gravitate to "rare", I like what I like and if it is rare, that sucks because it makes parts hard to get. I prefer common. I suspect they ARE rare but probably because they were to ugly for anyone to buy them new.
-
I read somewhere that JFK was wearing a back brace due to this injury and that is why he could not bend over and take cover after the first shot leaving him upright and exposed to the next two shots.
-
Had my 1994 E7 V-Mack runaway on me yesterday.
Licensed to kill replied to jzack's topic in Engine and Transmission
Easier said than done. Unless you catch it, understand what is going on and react in the first couple hundred RPM, aint no way you are going to stab that thing in gear. "jam it in gear and side step the clutch" is like telling a cop to shoot the guy that surprises him with a weapon in the leg. Sounds good from the couch but just don't work that way. Now, having said that, my Dad did exactly that "jammed it in gear and side stepped the clutch" when he was driving my brothers truck haul g bales. However, he was sitting idling while my brother was loading the bales, the truck was a 1982 LW 3406CAT (so 100% mechanical) and dad had experience with runaways before. Sitting at idle and the RPM suddenly started to climb FAST. Dad recognized what was happening g instantly and slammed it in gear in a nanosecond so it CAN be done but is VERY rare. Shaft on the turbo broke and the engine stared to feed on oil. -
Had my 1994 E7 V-Mack runaway on me yesterday.
Licensed to kill replied to jzack's topic in Engine and Transmission
A couple thoughts from the peanut gallery. First, I would check the ECM and see what exactly was the RPM that it peeked at. That should tell you the likelihood of damage. Second, while runaways are often cause by a failed oil seal in the turbo, in this case, since cracking a fuel line shut it down, that would suggest to me that the runaway was running on fuel, not oil so that would eliminate the turbo as a cause. Being a "over fuel" condition, there is a good chance that the RPM did not get TOO high, not like a runaway due to oil feeding since the fuel lines can only provide so much fuel. -
237 in b model
Licensed to kill replied to 1988 R model's topic in Antique and Classic Mack Trucks General Discussion
My truck is still under construction but I swapped out the original rear for rear from. 2016 Freightshaker with air liner suspension. Mine has a 2.53 gear and I will be running a Mack 6spd (no OD) so at 65MPH I will be turning 1250RPM with the 11R 22.5's. The engine (2 valve E6 350) produces max torque @ 1250RPM so, to my way of thinking should get it's best fuel economy there as it will just be lumbering along making more torque than required so not working hard at all. Mine is a single axle only intended to pull my holiday trailer. -
I am not familiar with the difference between the B61 and the B67 (other than "6") but round fuel tank and the front hub (doesn't take the "Mack" hub cap" is unusual to me.
-
Not a new phenomenon, Frank wrote about it in the 1970's.
-
I bought a cold cut saw a couple years ago when my chop saw quit working. I wanted an Evolution but could not find one anywhere> my next choice was a Milwaukee but ntyehy quit making them so I bought a Dewalt. The saw cuts great (they all will) but the vice sucks big time. I don;t know what the vice is like on an Evolution but it can not be worse than on my Dewalt. I should have kept looking for the Evolution.
-
That makes sense. However, tri-drive on a lighter series truck????, I'm missing the logic there.
-
Apparently, no "real Mack guys" saw any value in it while it sat by the road for sale. It's easy to assume that someone wanting a rat rod is doing it "to take the easy route" but maybe the owner just LIKES rat rods better than restored to original state. Just saying. I am not a rat rod fan but support anybody doing what makes them happy with their project. I will admit though that I get bummed out when someone takes a real nice original example, be it a survivor or an older restoration then proceeds to chop it up and ratrod/hotrod it. Happens ALL THE TIME with Model A fords. I am sure there are those that are disgusted by what I did with the truck in my avatar, cut it up for parts for my resto-mod but the reality is that if I had not bought it it WAS going for scrap and I saved most of it. Good on Ben for saving this example and I hope he has years of pleasure with whatever he makes of it.
-
Diesel fuel prices ?
Licensed to kill replied to MACKS's topic in Modern Mack Truck General Discussion
I had never thought of it that way but that makes complete sense to me. -
Diesel fuel prices ?
Licensed to kill replied to MACKS's topic in Modern Mack Truck General Discussion
I don't believe in fuel surcharges. First, you add a fuel surcharge and the customer will, expect you to lower it as soon as the price changes, second, high fuel prices raise the price of EVERYTHING including your cost of living. If you only raise your rate by the increase in fuel you are using you are going backwards. I set my rate at what I need which include the present price of fuel and all of the added cost of living and doing business associated. Just use the same formula you used to set your rate before just using your current costs and cost of living. -
OK, I will definitely have one available. If you don't hear from me by end of September shoot me a reminder.
-
Just more work....
Licensed to kill replied to Licensed to kill's topic in Antique and Classic Mack Trucks General Discussion
I do not know what is meant by "crank hub". -
How much of a hurry are you??. I checked and I do have 2 and I need 1. I do not know the condition of the cores or the fan motors but the boxes are pretty good (need a little hammer/dolly work but not much). Of course I will want to keep the best one for my truck but to be honest, I don't think there os a WHOLE lot of difference in them. I suspect that they both will need new cores and maybe fan motors. I might not have time to play with them before fall now to see what is there. I am talking about the heaters that mount on the passenger side under the dash. I think I also have 2 that mount on the drivers side and attach to the steering column support. Where you wanting one of those as well?.


BMT Forum Logo
