

Vladislav
-
Posts
7,977 -
Joined
-
Last visited
-
Days Won
78
Content Type
Profiles
Forums
Gallery
Events
Blogs
BMT Wiki
Collections
Store
Everything posted by Vladislav
-

stripping
Vladislav replied to Willie dog's topic in Antique and Classic Mack Trucks General Discussion
It seems not easy to weld a steel guard to alu grinder body. I hate working unprotected but if I try grab a grinder I always find all of them with protectors ruined. Looks like my guys play Russian rullette... -
From seeing the wide bumper I'd say it's EH or EQ. Wet trace on the fuel tank just sreams "Diesel". The tank itself looks aftermarket. And at least some of or maybe all of factury diesel E's had "Mack Diesel" badge on sides of the hood. If you pay attention to the form of the front axle beam you can see the difference to the one on the picture Paul posted. Israel truck has it heavier. But as far as I've found out from studying the pictures in E-model Mack book (green serie) the axle beams roamed to heavier styles during the production years in every E-serie Mack. Nice truck
-
Exactlly as said above. Your R-model is by some reason just a R-model and lots of parts could be found off commercial trucks.
-
The most thing you need to start from is the current ratio. You can find it stamped at the front right of the diff housing on the beveled surface. Something like 4.17 or 3.86. Must be the same on FR and RR diffs. Than just Google "CRD-93" with the ratio and you'll be full of offers. If you want to go a self rebuild route gear sets are avalible from PAI.
-
It was for sale for a while. Are there better chances to sell in Massachusetts?
-
That is sad and terrible story. Thank you for getting and explaining the details. Hope it might help to anyone to be safer and have his time later. Wonder how things will come along with the driver who was backing to the trailer.
-
G whiz another one
Vladislav replied to mackdaddy's topic in Antique and Classic Mack Trucks General Discussion
Looks pretty solid. Good find!! -
Dashboard Parking Brake Warning Light Stays On
Vladislav replied to MTMACK50's topic in Air Systems and Brakes
What's a problem with metric fittings? They're all over!! Sorry, couldn't resist myself I'd look for metric Parker fittings (wich should be DOT approved) of the size required and combine them with plastic air hose. And... I'm not sure Mack CS has original metric pipes marked DOT. If a part is metric it means it's origin is Renault. Renault might have different marks wich would be a mistery to DOT officer. -
Thanks, found. I just thought that option would change the text background in posts. I'd like a bit lighter on Carbon.
-
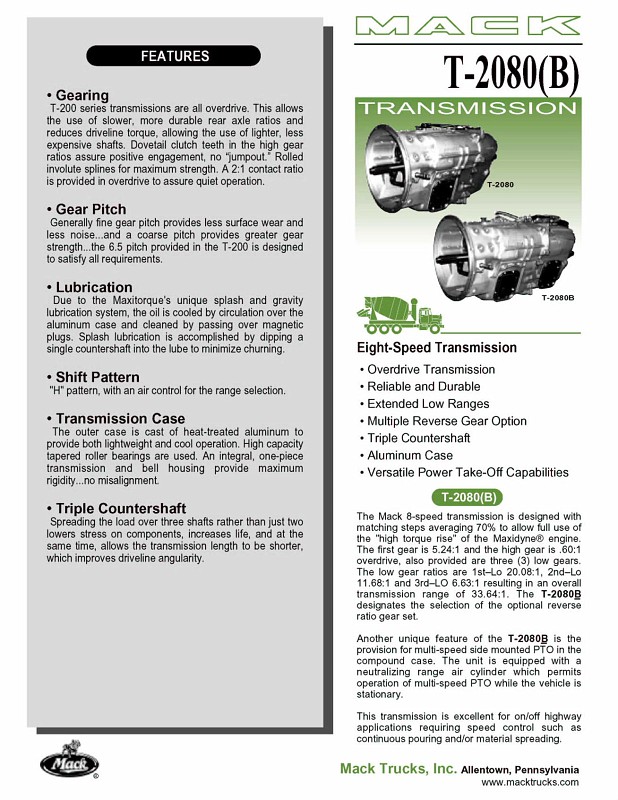
Mack 2070 transmission speed ratio
Vladislav replied to DCCLAPPER's topic in Engine and Transmission
-
What the paintbrush icon ??
-
As for the cabs a military open one wasn't quite comfortable and warm for everyday driving so home made roofs were added in many cases. Many cabs were just swapped with different full-metal ones from other trucks. Sometimes you could see a "top level" rebuild done with imported from the US factory L-model cab. It fits "right in" because the early versions of NR's were equipped with them originally. Talking about the cabs on the later series trucks, not the ones wich were Lend-Lease supplies, there was a quite common practice to import just a chassis with a cowl to save costs and use local-built cabs. That was pretty common in Europe, generally in Holland and France. That's the reason many of old European Macks look so strange. The first two pics - NR's in Russia, the third - factory closed cab NR, the next ones - different cab swaps.


-
Those old black and white photos are pretty interesting and amazing! Actually here in Russia info on trucks wich were supplied under Lend-Lease during WW2 is far from to be called "clear". I try for a long while and still have no answer on how military Macks came to the country. There were many ways for Lend-Lease supplies including Polar conwoys, Iranian corridor and Far East way through the port of Vladivostok. As far as I know many trucks (including Macks) came as a PKD form. But if any were driven from Iran they should be complete running units. And maybe some were used in different areas before. No official data in open sources on the number of NR's supplied to Russia during the war either. Looking the old pictures you posted I can tell for sure some of the trucks were original military NR's and some were not. Original military style open cab was not a thing people had a need to build a copy of. So I suppose all the trucks with flat rectangular two-piece windscreen were original military ones. Including the first shot, the truck at the right from the L-model and the one with the broken axle. The last one has also original left side fuel tank. But there was nothing of hood emblems or shutters on the military Macks and it means they were added later. And I'm sure those parts came from no other place but America. It seems to me there was some deal on Macks imported from the US to Iran wich had no relation with supplies to Russia. And L-models together with later production examples came to Iran along that entertainment. You know the factory "Iran-Kaveh" produced R-models for some time (with local-built cabs again!). Too probably the trucks we are talking about were early products of that facility. It's my idea (again) and I (again!!) would be too likely to learn more facts about. Interesting point - Mack with the wrecker body (or crane) has front wheel drive hubs. And those hubs look pretty much the same as the ones wich were used together with Timken-Detroit front drive axle on military Macks model NM.
-
As usual, Mike. The truck is pretty anyway. Have I missed any thread of Mickey's red RW purchase?
-
H Model shift boot
Vladislav replied to steve s.'s topic in Antique and Classic Mack Trucks General Discussion
That's what I stole from Hank's site a long while back. Hope nobody will annihilate me for that. Matt Pfahl might know more and have more pictures since he restored that truck.
-
Great purchase! Congrats!
-
For sale section BMT
Vladislav replied to james j neiweem's topic in Antique and Classic Mack Trucks General Discussion
As said in the previous post. -
Cool pictures of tracktors, thank you for posting. My favorite one is with your red Mack. And it seems your phone enjoy picturing concrete blocks
-
Nice to see pics Mike, thank you for sharing. Wonder whom you allowed to drive the white dream machine heavier than yourself that the left top tank step got biased.
-
Keep hanging up Hat. The cake and the lil boy pics are inreplacable
-
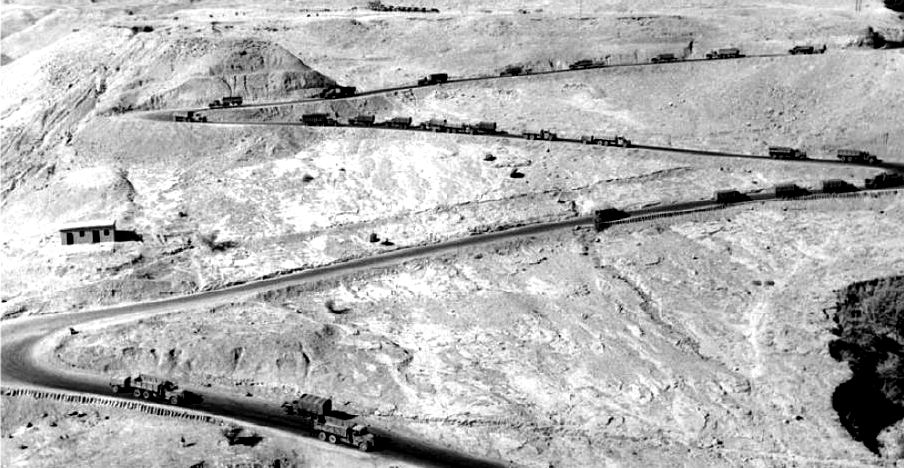
Hi and welcome to the site! Thank you for posting so many good quality pictures of these trucks. I keep my eye on them for a while but still have no serious info about. Was hoping I could get it from some native Iranian person who are difficult to meet in my neighbourhood. And now I'm too surprized you aren't lucky on learning that either. As far as I've figured out those Macks are unicue, have their own special design. I can tell for sure they were basicaly built as WW2 military NR model. NR's were assembled in Iran and than drove to Russia together with other American trucks loaded with military supply materials to fight Germans. But the style and the number of the produced NR's are good known facts. And as far as I know the plant wich provided their assembly (from PKD - partly knocked down form) was taken apart and also shipped to Russia in early 1945. So those Iranian trucks were produced after the war and seem to me as another story than WW2 NR's. Too probably there was some contract of some Iranian company or the goernment and Mack trucks to build a factory. Too probably some components could be supplied from the States and some produced locally. The most interesting to me fact about those Macks is that they utilized many parts of the style exactly the same as military NR-model had, not of the commercial Macks wich were produced those days. The front fenders, front axle beam, 24 inch hubs and tall tyres all look the same as on a NR. The cab is too interesting thing. It sure was produced locally and had it's own original design. But it doesn't look similar top any of Mack commercial cabs. Instead of that it too looks like was made as a conversion of WW2 military style open cab wich was utilized on NR model Macks. Although the relations to NR-model can not be seen along all the truck. Front grill, hood sides style look and some other parts copied (or were used off) a L-model Mack with a special "hard nose" desing as folks on here call it. Interesting that NR-model used the "soft nose". You said the hood script is B85. It seems to me those trucks were built the same years as B-model and some of them could be built using B85 components (power plant) but had their own old style sheet metal. Too interesting point some driver told about LM2DM. The fact it that a NR-model frame is about similar to the frames used in L-models. Worth to tell a NR actually was a militarized version of the commercial L-series Mack. And the most correct way to determine the chassis is to track down its serial number. All factory NR's had it starting from NR4D. If the driver meant LM2D(M) was his truck's model it too might mean his truck had that marking on the frame rail. And both on the tag in the cab if there was any. L means L-model, LM - heavy series of a L, 2D - two drive axles. I currently have no idea what the additional "M" meant but it could easily be some speciality to that frame or the truck. That's all of my thoughts on the matter. Would be too like to learn more from Iranian truck lover. The chassis number markings and some repair manuals or parts lists are a potential way to go. Vlad P.S. Some pics of NR-model and the last one is trucks on the Iranian corridor transporting goodies to Russia.
-
Can't get the link working. Sold? Or so far away that my interweb machine can't get to it?
-
Sad about that man. Thank you for the pictures.
-
Dashboard Parking Brake Warning Light Stays On
Vladislav replied to MTMACK50's topic in Air Systems and Brakes
If you haven't done any primary inspection I would point you out to the brake light switch wich might got stuck in "on" position. Don't know where it could be located on Midliner and the most forum members seem like about that either. So not much of help to your post. I had the same issue with my R-model some while back. Found the switch being attached to the firewall. Actually you should look for a unit wich is attached to a air line and has a wire terminal (or two) on its body. Connecting/disconnecting the wires or wire to the ground (chassis) you can check it's what you're looking for or not. Sure might be a short circuit in the stop light wiring and so on. In my case (to my big surprize) the trolley valve lever on the steering column was moved a bit from its off position and that initiated brake lights for all the time. It was with no trailer either. But that how it was with a R-model, again, no practice with a CS. P.S. If you google Renault Midliner electric scheme that could be the way to go. Vlad -
Need an R cab visor
Vladislav replied to xdudebrahx's topic in Antique and Classic Mack Trucks General Discussion
So no one want to make aftermarket reproductions? Seems like the demand exists. I get that on mind myself and see not much of a trouble to fabricate them locally. But it would have reason to be done as at least 10-20 pieces serie. No market for them in Russia and I'm not full of an idea of how to ship them overseas.


BMT Forum Logo
