Pawel Posted January 19, 2012 Share Posted January 19, 2012 Hello everybody!I wanted to paint some stripes on a truck (truck model, but still!). So would like to ask you how to avoid two main problems I've seen before:1. Paint seepeing under the masking tape, ruining the edge2. A distinctive "step" where the colours meetSome help would really be appreciated! Thanks in advance, have a nice dayPaweł Quote Link to comment https://www.bigmacktrucks.com/topic/22757-painting-stripes-on-a-truck/ Share on other sites More sharing options...
Rob Posted January 19, 2012 Share Posted January 19, 2012 On something that small you are probably going to have a problem with the "step" from the striping color as you are actually adding film build to the base color. I cannot tell you the best way on a small area but the way I do it with automobiles and trucks is to lay the base color, then mask off for striping colors with a vinyl tape called "fine line stiping tape". This is a plastic tape and bends/contours easily to curves. You then mask off the base color where you do not want the stripe color and spray. After this stripe color sets up, pull the tape free against itself to avoid a jagged edge. You now have more paint film thickness in your stripe area than the base color area so the "step" exists. Clearcoat the complete panel or assembly with three coats in the stripe area, and two full coats, (usually) over the complete panel. This is to allow adequate clear coat film build to be color sanded off, and level the surface. I then buff to shine. Again, I don't know about a small area such as you are working but the theory should be the same. Rob Quote Plodding along with no job nor practical application for my existence, but still trying to fix what's broke. Link to comment https://www.bigmacktrucks.com/topic/22757-painting-stripes-on-a-truck/#findComment-98778 Share on other sites More sharing options...
Pawel Posted January 19, 2012 Author Share Posted January 19, 2012 Rob - thanks a lot for your answer! So you kinda "fill" the recessed area (with less paint) with clear, to equalize it, do I understand it right? Could you also say more on "pulling the tape free against itself"? I don't quite understand this one. Thanks again for your help, I'll let you know how it worked for me. Have a nice dayPaweł Quote Link to comment https://www.bigmacktrucks.com/topic/22757-painting-stripes-on-a-truck/#findComment-98785 Share on other sites More sharing options...
Rob Posted January 19, 2012 Share Posted January 19, 2012 Rob - thanks a lot for your answer! So you kinda "fill" the recessed area (with less paint) with clear, to equalize it, do I understand it right? Could you also say more on "pulling the tape free against itself"? I don't quite understand this one. Thanks again for your help, I'll let you know how it worked for me. Have a nice dayPawełYou are correct in your assumption with the "fill". What I mean by pulling the tape against itself is: Do not pull the tape away from the paint at a 90 degree angle. Imagine how you applied the tape, pull it off in reverse of the way you applied it. You need a very sharp break point when fracturing the paint film surface. I typically pull the tape back by grasping the tape between my index finger and thumb, and while "dragging" any other finger on the tape that is adhered to the surface, slowly, and steadily pull it back off. This offers a sharp break line between the paint that is on the tape, and the surface rendering a very sharp cut off.Rob Quote Plodding along with no job nor practical application for my existence, but still trying to fix what's broke. Link to comment https://www.bigmacktrucks.com/topic/22757-painting-stripes-on-a-truck/#findComment-98789 Share on other sites More sharing options...
vision386 Posted January 20, 2012 Share Posted January 20, 2012 Pawel,when doing stripes on a model (or full-size vehicle) my methods are basically the same as what Rob has stated,with one small exception (with regards to models) i always use 3-M brand masking tape (the blue type) i un-roll a few lengths and stick them down to a piece of clean glass (this helps remove some of the "tack" in the tape) and then using a straightedge,cut the tape into equal length/width strips (this helps remove some of the "ragged" edges on the tape) lay out your design,apply your top-coat color,i find removing the tape (in the same manner as Rob described) easiest when the paint is still slightly "tacky" later,when completely dry, the stripes can be lightly wet-sanded,and touched-up if needed, then progressive clear coats can be added,to help "blend" the stripes. And when separating finer lines in stripe designs,i have found using cut-down full size pinstriping tape to have good results. Hope this is of some help to you!.................................................Mark Quote Mack Truck literate. Computer illiterate. Link to comment https://www.bigmacktrucks.com/topic/22757-painting-stripes-on-a-truck/#findComment-98832 Share on other sites More sharing options...
Pawel Posted January 20, 2012 Author Share Posted January 20, 2012 Rob, Mark - thanks a lot, very helpful advice here. I just started working yesterday, let's see what comes out. I'll let you know. Have a nice dayPaweł Quote Link to comment https://www.bigmacktrucks.com/topic/22757-painting-stripes-on-a-truck/#findComment-98863 Share on other sites More sharing options...
Rob Posted January 20, 2012 Share Posted January 20, 2012 Rob, Mark - thanks a lot, very helpful advice here. I just started working yesterday, let's see what comes out. I'll let you know. Have a nice dayPawełJust remember; light even coats, especially in small areas where blemishes are more difficult to hide.Rob Quote Plodding along with no job nor practical application for my existence, but still trying to fix what's broke. Link to comment https://www.bigmacktrucks.com/topic/22757-painting-stripes-on-a-truck/#findComment-98866 Share on other sites More sharing options...
Pawel Posted January 20, 2012 Author Share Posted January 20, 2012 Thanks Rob! I already heard that, and I even already know what happens if I don't - but I still need to remind myself that - so I'll try to do it as you said. Thanks again for your advice, have a nice dayPaweł Quote Link to comment https://www.bigmacktrucks.com/topic/22757-painting-stripes-on-a-truck/#findComment-98906 Share on other sites More sharing options...
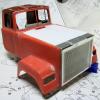
Pawel Posted January 24, 2012 Author Share Posted January 24, 2012 Hello again!Here's what I managed to do. First, I painted the sleeperbox white, then I laid out the stripes with thin tape:After that, I sprayed some white again - it was an idea I picked up watching some german house improvement show. The idea is: should paint sip under the tape, let it be the same colour. After it dried, I masked the area where the stripe would be and started applying the base colour - unfortunately it needed some three coats to really cover - bad for the "step" where the colours meet:After the base colour dried, I had to "reverse" the mask - uncover the stripes and mask the base colour:Then I applied black primer:And after it was dry, I went to town - green to brown to gold prismatic paint:Then the thrilling moment came, to remove the masking. Here's what was underneath:As can be seen, some red paint still managed to seep under the tape, but I think I can work on it. There is also a distinctive "step" where the colours meet, but I hope I can improve it some with clear coat. How do you like my colour choice? Thanks a lot for your help, and thanks for reading, have a nice dayPaweł Quote Link to comment https://www.bigmacktrucks.com/topic/22757-painting-stripes-on-a-truck/#findComment-99411 Share on other sites More sharing options...
Rob Posted January 24, 2012 Share Posted January 24, 2012 Hello again!Here's what I managed to do. First, I painted the sleeperbox white, then I laid out the stripes with thin tape:After that, I sprayed some white again - it was an idea I picked up watching some german house improvement show. The idea is: should paint sip under the tape, let it be the same colour. After it dried, I masked the area where the stripe would be and started applying the base colour - unfortunately it needed some three coats to really cover - bad for the "step" where the colours meet:After the base colour dried, I had to "reverse" the mask - uncover the stripes and mask the base colour:Then I applied black primer:And after it was dry, I went to town - green to brown to gold prismatic paint:Then the thrilling moment came, to remove the masking. Here's what was underneath:As can be seen, some red paint still managed to seep under the tape, but I think I can work on it. There is also a distinctive "step" where the colours meet, but I hope I can improve it some with clear coat. How do you like my colour choice? Thanks a lot for your help, and thanks for reading, have a nice dayPawełI like the color choice a lot. I cannot say much as to model building as I really never was into that. I always was too "hyper" and did not have the patience needed/required. I can however tell you put a lot of effort forth to try to have a nice finished product which I think you do.What type of masking, and striping tape did you use? Was it vinyl, or crepe paper based? Paint leakage is ususally a problem when crepe type paper tapes are used against the solvents borne in the paints.Rob Quote Plodding along with no job nor practical application for my existence, but still trying to fix what's broke. Link to comment https://www.bigmacktrucks.com/topic/22757-painting-stripes-on-a-truck/#findComment-99414 Share on other sites More sharing options...
slpwlker Posted January 24, 2012 Share Posted January 24, 2012 Coming along nice Quote Link to comment https://www.bigmacktrucks.com/topic/22757-painting-stripes-on-a-truck/#findComment-99415 Share on other sites More sharing options...
vision386 Posted January 24, 2012 Share Posted January 24, 2012 Looks good! are you using spray cans for painting? personally i prefer an airbrush you can get much lighter coats,without the buildup between coats. On separation lines as small as these,i have found using "Pactra" brand pintriping tape very usefull,comes in many colors,widths,etc. and it adheres well to small details,such as rivets,curves etc...............Mark Quote Mack Truck literate. Computer illiterate. Link to comment https://www.bigmacktrucks.com/topic/22757-painting-stripes-on-a-truck/#findComment-99430 Share on other sites More sharing options...
Pawel Posted January 24, 2012 Author Share Posted January 24, 2012 Rob - thanks a lot for your comment, glad you like my colours. Yeah, the tape is crepe paper, I took it because it came cut to 1mm width, that seemed to save a lot of time cutting. I have yet to find a good vinyl masking tape, it would be good to compare them.slpwlkr - thanks!Mark - Thanks a lot. That's yes and no, the red paint came in a can, the black base and the prismatic paint were applied by airbrush. You're right, airbrush gives much lighter coats, just for bigger surfaces I'd need a larger nozzle for it, otherwise I wouldn't get a nice shiny surface on bigger objects. I haven't seen "Pactra" tape yet, I don't know if you can buy it in Europe. I'll take a lookAnd now on to the cab and the hood! Let's see if I can improve my process. Thanks again for your help and your comments, have a nice dayPaweł Quote Link to comment https://www.bigmacktrucks.com/topic/22757-painting-stripes-on-a-truck/#findComment-99439 Share on other sites More sharing options...
vision386 Posted January 24, 2012 Share Posted January 24, 2012 Pawel,its always on ebay,i also have had good results with Tamiya masking tape,also available on ebay.................................Mark Quote Mack Truck literate. Computer illiterate. Link to comment https://www.bigmacktrucks.com/topic/22757-painting-stripes-on-a-truck/#findComment-99442 Share on other sites More sharing options...
Pawel Posted January 31, 2012 Author Share Posted January 31, 2012 Mark - thanks a lot. I have yet to get this Pactra tape to try it out. I know Tamiya tape though - a little hard to get in the shops around here, but a very good material.I write, to show you, what I managed to do about the cab and the hood to match the sleeper. I don't have the photo of the stage, when the cab and hood were white and masked, but since I applied the base colour, my work wnet like this:Masking "reversed":Two layers of gloss black and one layer of prismatic paint later:And after the masking was completely removed - a few problems are there, but working on the sleeper I found out most of them can be taken care of using the tip of a surgical blade:Thanks for reading, have a nice dayPaweł Quote Link to comment https://www.bigmacktrucks.com/topic/22757-painting-stripes-on-a-truck/#findComment-100502 Share on other sites More sharing options...
Olivetroad Posted February 1, 2012 Share Posted February 1, 2012 I really admire your patience! Keep posting! Quote Link to comment https://www.bigmacktrucks.com/topic/22757-painting-stripes-on-a-truck/#findComment-100630 Share on other sites More sharing options...
umodelnut Posted February 2, 2012 Share Posted February 2, 2012 Awesome! You have some skill when it comes to making models and painting. Quote Link to comment https://www.bigmacktrucks.com/topic/22757-painting-stripes-on-a-truck/#findComment-100678 Share on other sites More sharing options...
DodgeMan Posted February 2, 2012 Share Posted February 2, 2012 Looks great!!!! good Job!! Quote Link to comment https://www.bigmacktrucks.com/topic/22757-painting-stripes-on-a-truck/#findComment-100679 Share on other sites More sharing options...
Pawel Posted February 2, 2012 Author Share Posted February 2, 2012 Olivetroad, umodelnut, DodgeMan - thanks a lot for your kind words. Not much left for me to post in this one, the stripes now need some clear coat and very careful sanding between the coats. Once that's done, I'll post some more photos. The rest of my build can be seen in another thread here, and I intend to continue to update that one. Glad you like it - thanks again for your comments and have a nice dayPawel Quote Link to comment https://www.bigmacktrucks.com/topic/22757-painting-stripes-on-a-truck/#findComment-100747 Share on other sites More sharing options...
Vladislav Posted February 4, 2012 Share Posted February 4, 2012 I see you have good skill in striping models.All the written is correct of course.I can note only that metallics are better-cowers and it means you can apply less thickness of a film. That helps to reduse the step. I prefer (prefered - I was not in a modelling during 10 years and slowly coming back again) - prefer not to use ready paints but mix them from clear lack and metallic base. I used to add Humbrol/Rewell chrom coat into a clear coat of kind I like. Last times - water based Tamiya with spirit as solwent. Little pieced metallic looks realistic in scale and cowers back color efficiently. You can also apply metallic into the non-metallic color, for example in white. It doesn't change color hard but improwes cowerity. I'm shure you know Dutch F-model Mack painted as American flag - stars with stripes. I saw this truck real in Holland this authumn and it always painted in metallic - blue, red and white.How do you do during the winter?I have -20 outside.Vlad Quote Никогда не бывает слишком много грузовиков! leversole 11.2012 Link to comment https://www.bigmacktrucks.com/topic/22757-painting-stripes-on-a-truck/#findComment-100952 Share on other sites More sharing options...
Olivetroad Posted February 4, 2012 Share Posted February 4, 2012 I have -20 outside.VladI hope your mother taught you to stay inside out of the cold! Quote Link to comment https://www.bigmacktrucks.com/topic/22757-painting-stripes-on-a-truck/#findComment-100958 Share on other sites More sharing options...
Pawel Posted February 5, 2012 Author Share Posted February 5, 2012 Hey Vlad! Thanks a lot for your comment! While metalics seem to cover allright, I noticed they are a little tricky - the colour gets a little deeper with each coat, so then it's easy to get in trouble with mismatched shades on parts that were painted separatey but then join together - like the cab, the hood and in my case - the roof that was painted separately. For my model, I chose the colours because I liked them. I heard about the trick with white - I have yet to try it out - sounds interesting. As for the winter - it's harsh but not unusual in western Poland - the temperature drops below -15 degrees at night and about -10 at daytime. I was forced to buy a new battery for my car though, and started using diesel fuel additive to keep it running smooth. In eastern Poland they said at times it dropped below -30 degrees - now that starts to get bad. Lots of people already froze to death this winter.Olivetroad - you know we're talking degrees Celsius here, right? -30 deg C are -22 Fahrenheit, -20 deg C are -4 Fahrenheit and -10 deg C are 14 Fahrenheit. Still very cold, can't wait for the spring.Thanks for reading, have a nice dayPaweł Quote Link to comment https://www.bigmacktrucks.com/topic/22757-painting-stripes-on-a-truck/#findComment-101028 Share on other sites More sharing options...
Olivetroad Posted February 5, 2012 Share Posted February 5, 2012 Olivetroad - you know we're talking degrees Celsius here, right?Nope - it happens all the time - I was not born stupid, I just have had lots of practiceMy dad always said he was solar powered - if it is below freezing and no sun - he stayed close to the fire 1 Quote Link to comment https://www.bigmacktrucks.com/topic/22757-painting-stripes-on-a-truck/#findComment-101056 Share on other sites More sharing options...
hatcity Posted February 5, 2012 Share Posted February 5, 2012 Nope - it happens all the time - I was not born stupid, I just have had lots of practiceMy dad always said he was solar powered - if it is below freezing and no sun - he stayed close to the fireThanks for that. Gonna have to use it as my tag line Quote Success is only a stones throw away.................................................................for a Palestinian Link to comment https://www.bigmacktrucks.com/topic/22757-painting-stripes-on-a-truck/#findComment-101069 Share on other sites More sharing options...
Olivetroad Posted February 5, 2012 Share Posted February 5, 2012 Thanks for that. Gonna have to use it as my tag linetoo late - I copyrighted it - but you can use if for a free 30 day trial period, be-ins youse is good folks 1 Quote Link to comment https://www.bigmacktrucks.com/topic/22757-painting-stripes-on-a-truck/#findComment-101072 Share on other sites More sharing options...


Recommended Posts
Join the conversation
You can post now and register later. If you have an account, sign in now to post with your account.