

phantom309
-
Posts
131 -
Joined
-
Last visited
-
Days Won
1
Content Type
Profiles
Forums
Gallery
Events
Blogs
BMT Wiki
Collections
Store
Everything posted by phantom309
-
Welcome to the site! I used to live in Thunder Bay, nice place! Good luck with your project.
-
 As we all know the steering wheels on old cars and trucks will eventually develop cracks. I just thought I'd do a post for the benefit of someone that might be thinking about restoring their steering wheel. It's a bit of a job but if you can handle basic body work you can restore a steering wheel. I'm sure there's lots of great info on the web that will suggest various styles of epoxies etc. but you can get great, long lasting results using regular auto body supplies. The most important thing you have to do is to use a Dremel grinder or a die grinder and grind out all the cracks. This will of course make the wheel look worse than ever but it's really important because the filler won't stick worth a darn if you just try to force it into the crack. For best results you shouldn't ignore the small cracks, they too should get ground out. Here's the wheel after the cracks are ground out. Now you're ready to fill the cracks. I should mention that it's important to wipe all traces of grease and oil off the wheel. It has to be absolutely clean in order for the paint and filler to stick. I used to use a two part epoxy to fill the cracks but regular short or medium strand re-enforced body filler seems to work just fine. I use that to fill the bulk of the crack then just use regular filler to smooth off the last bit. It'll take a few coats to get everything smooth but it's just like doing body work. Then you just lightly sand the entire wheel and apply a coat of primer and then paint. I've always used fairly good quality urethane paints (two part, paint with hardener) and the cracks have never come back even after several years. These good quality automotive paints are also pretty tough, they won't wear off anytime soon. I'm sure regular spray paint would work but it won't last nearly as long. I have a pole stand that I put the wheel on for painting. It's a little tricky to paint them without getting runs so it's best to use light coats. If you want you can probably get any body shop to do the actual painting. I should point out that I'm certainly no expert but that's good because if I can do it you can. Here's a picture of the finished wheel.
 -
B Model Car Hauler
phantom309 replied to phantom309's topic in Antique and Classic Mack Trucks General Discussion
The doors are on! We'll probably get the side windows in tomorrow. We installed some speakers in the doors and attached a powered bass speaker to the console. It's nice to see doors on this thing, I can't wait to install the hood and fenders. -
My New One,( Not A Mack)
phantom309 replied to MACK MAN's topic in Antique and Classic Mack Trucks General Discussion
Way to go!!! I used to have a 69 Autocar back in the seventies. I thought it had heavy rear axles, ( 55,000 lbs ) but it was just a lightweight compared to yours. -
B Model Car Hauler
phantom309 replied to phantom309's topic in Antique and Classic Mack Trucks General Discussion
We're making more progress. It doesn't look like much but we've been working on stuff like wiring, getting the wipers working and plumbing etc. We've finished painting everything except the box so we can start assembling things now. We added a layer of padding and installed the carpet on the floor. We got a new headliner from Watt's Mack and painted it beige. I think they actually refer to this paint as die, it goes on very thin and kind of soaks right in. The visors are out of an early 90's GMC pickup. We sat the seats and console in place just to figure out where to drill the mounting holes. We've still got plenty to do but it's starting to come together. Jim -
My Restore Oject
phantom309 replied to wyodog's topic in Antique and Classic Mack Trucks General Discussion
Looks like a great project. Here's a direct link to the site. http://oldmacktruck.com/index.php?page=index You'll have to do a post from time to time to let us know how things are going. -
B Model Car Hauler
phantom309 replied to phantom309's topic in Antique and Classic Mack Trucks General Discussion
I don't have any good pictures of the hitch but I'll get some soon. The receiver hitch fits under the bumper. It's a little hard to see in this picture. Instead of mounting a 5th wheel in the box we're going to install a king pin that pops down level with the floor when it's not in use. The 5th wheel gets mounted to the trailer instead. The re-chromed grill shell looks good. It's nice to have the Bulldog back up where he belongs. Jim -
B Model Car Hauler
phantom309 replied to phantom309's topic in Antique and Classic Mack Trucks General Discussion
We put the cab on the frame and the rad's in place. We coated the back and underside of the cab with a boxliner type of coating. Then we added more sound deadener. It should be fairly quiet when it's done. It's nice to see this thing finally going together. -
B Model Car Hauler
phantom309 replied to phantom309's topic in Antique and Classic Mack Trucks General Discussion
We use a product called Hushmat. It seems to be about the same as the more common Dynamat except that this stuff is cheaper. It was also on sale when we got it but it's still pretty pricey. We really want the truck to be quiet so we've also got some padding that will go under the carpet and we're also going to use boxliner as a sort of undercoating under the cab. Larry, That's a Canadian Pontiac. These cars only came with Chevrolet engines. This particular car came with an inline six cylinder but the 348 was an option. Canadian Pontiacs were built at the Chevy plant and used a Chevrolet frame and drivetrain. These cars are lighter than a regular US built Pontiac, they're basically a Chevy with Pontiac styled sheet metal. The Gasser Magazine Gasser Reunion has been moved to Norwalk but Thompson is going to go ahead with their own Gasser Reunion on the regular first weekend in June date. It sounds like most of the Gasser crowd will be at Thompson and I'm sure many will also go to Norwalk. Here's the event poster... -
B Model Car Hauler
phantom309 replied to phantom309's topic in Antique and Classic Mack Trucks General Discussion
You're close, the engine is going into a 61 Pontiac. It's a 348 Chevy engine which is a smaller version of the 409, although this particular 348 happens to be stroked to 437ci. Here's the car it's going into. It HAS TO be ready to race in time for the big Gasser race in Thompson Ohio on the first weekend in June. The car looks OK but it needs a fair bit of work to make it race ready. We can't even start on it until the Mack gets done. Oh and Larry, (Freightrain) I know what you're wondering,,, and no this car won't have a 4 speed, it's got a 350 automatic. -
B Model Car Hauler
phantom309 replied to phantom309's topic in Antique and Classic Mack Trucks General Discussion
Time for an update. Unfortunately we haven't had much time to work on the Mack but we have managed to make a little headway. We covered the floor and firewall with some sound deadener. Rather than try to carpet the complex shape of the doghouse we decided to make a fiberglass cover for it. We made the cover by molding a sheet of lead around the doghouse to get the shape. We then covered the lead with fiberglass. After a few layer of fiberglass and a little body filler it's almost ready for paint. The plan is to install the carpet then put the cover on. As I mentioned earlier, the doghouse is actually a kitchen sink but I think it'll look fine when it's done. We've also been plugging away at the paint and body work so I think we'll be able to start re-assembling things soon. Jim -
B Model Sun Visor?
phantom309 replied to Mackb53's topic in Antique and Classic Mack Trucks General Discussion
No, I'm way too busy and besides they really should be made out of stainless. We used aluminum because it was easier to work with. The visor itself is pretty simple, building the brackets is the time consuming part. It seems like there's dozens of companies making hundreds if different visors for Peterbilts. You'd think ONE of them could stamp out some B model visors. -
B Model Sun Visor?
phantom309 replied to Mackb53's topic in Antique and Classic Mack Trucks General Discussion
It seems that nobody is making metal visors for the B model. Here's a link to a discussion on the topic. http://www.bigmacktrucks.com/index.php?showtopic=11271&view=&hl=visor&fromsearch=1 Here's some pictures of one that we built.
-
Pai B-61T
phantom309 replied to MalibuJim's topic in Antique and Classic Mack Trucks General Discussion
Great Job I was just going back through your gallery pictures. The truck looks terrific! -
B Model Car Hauler
phantom309 replied to phantom309's topic in Antique and Classic Mack Trucks General Discussion
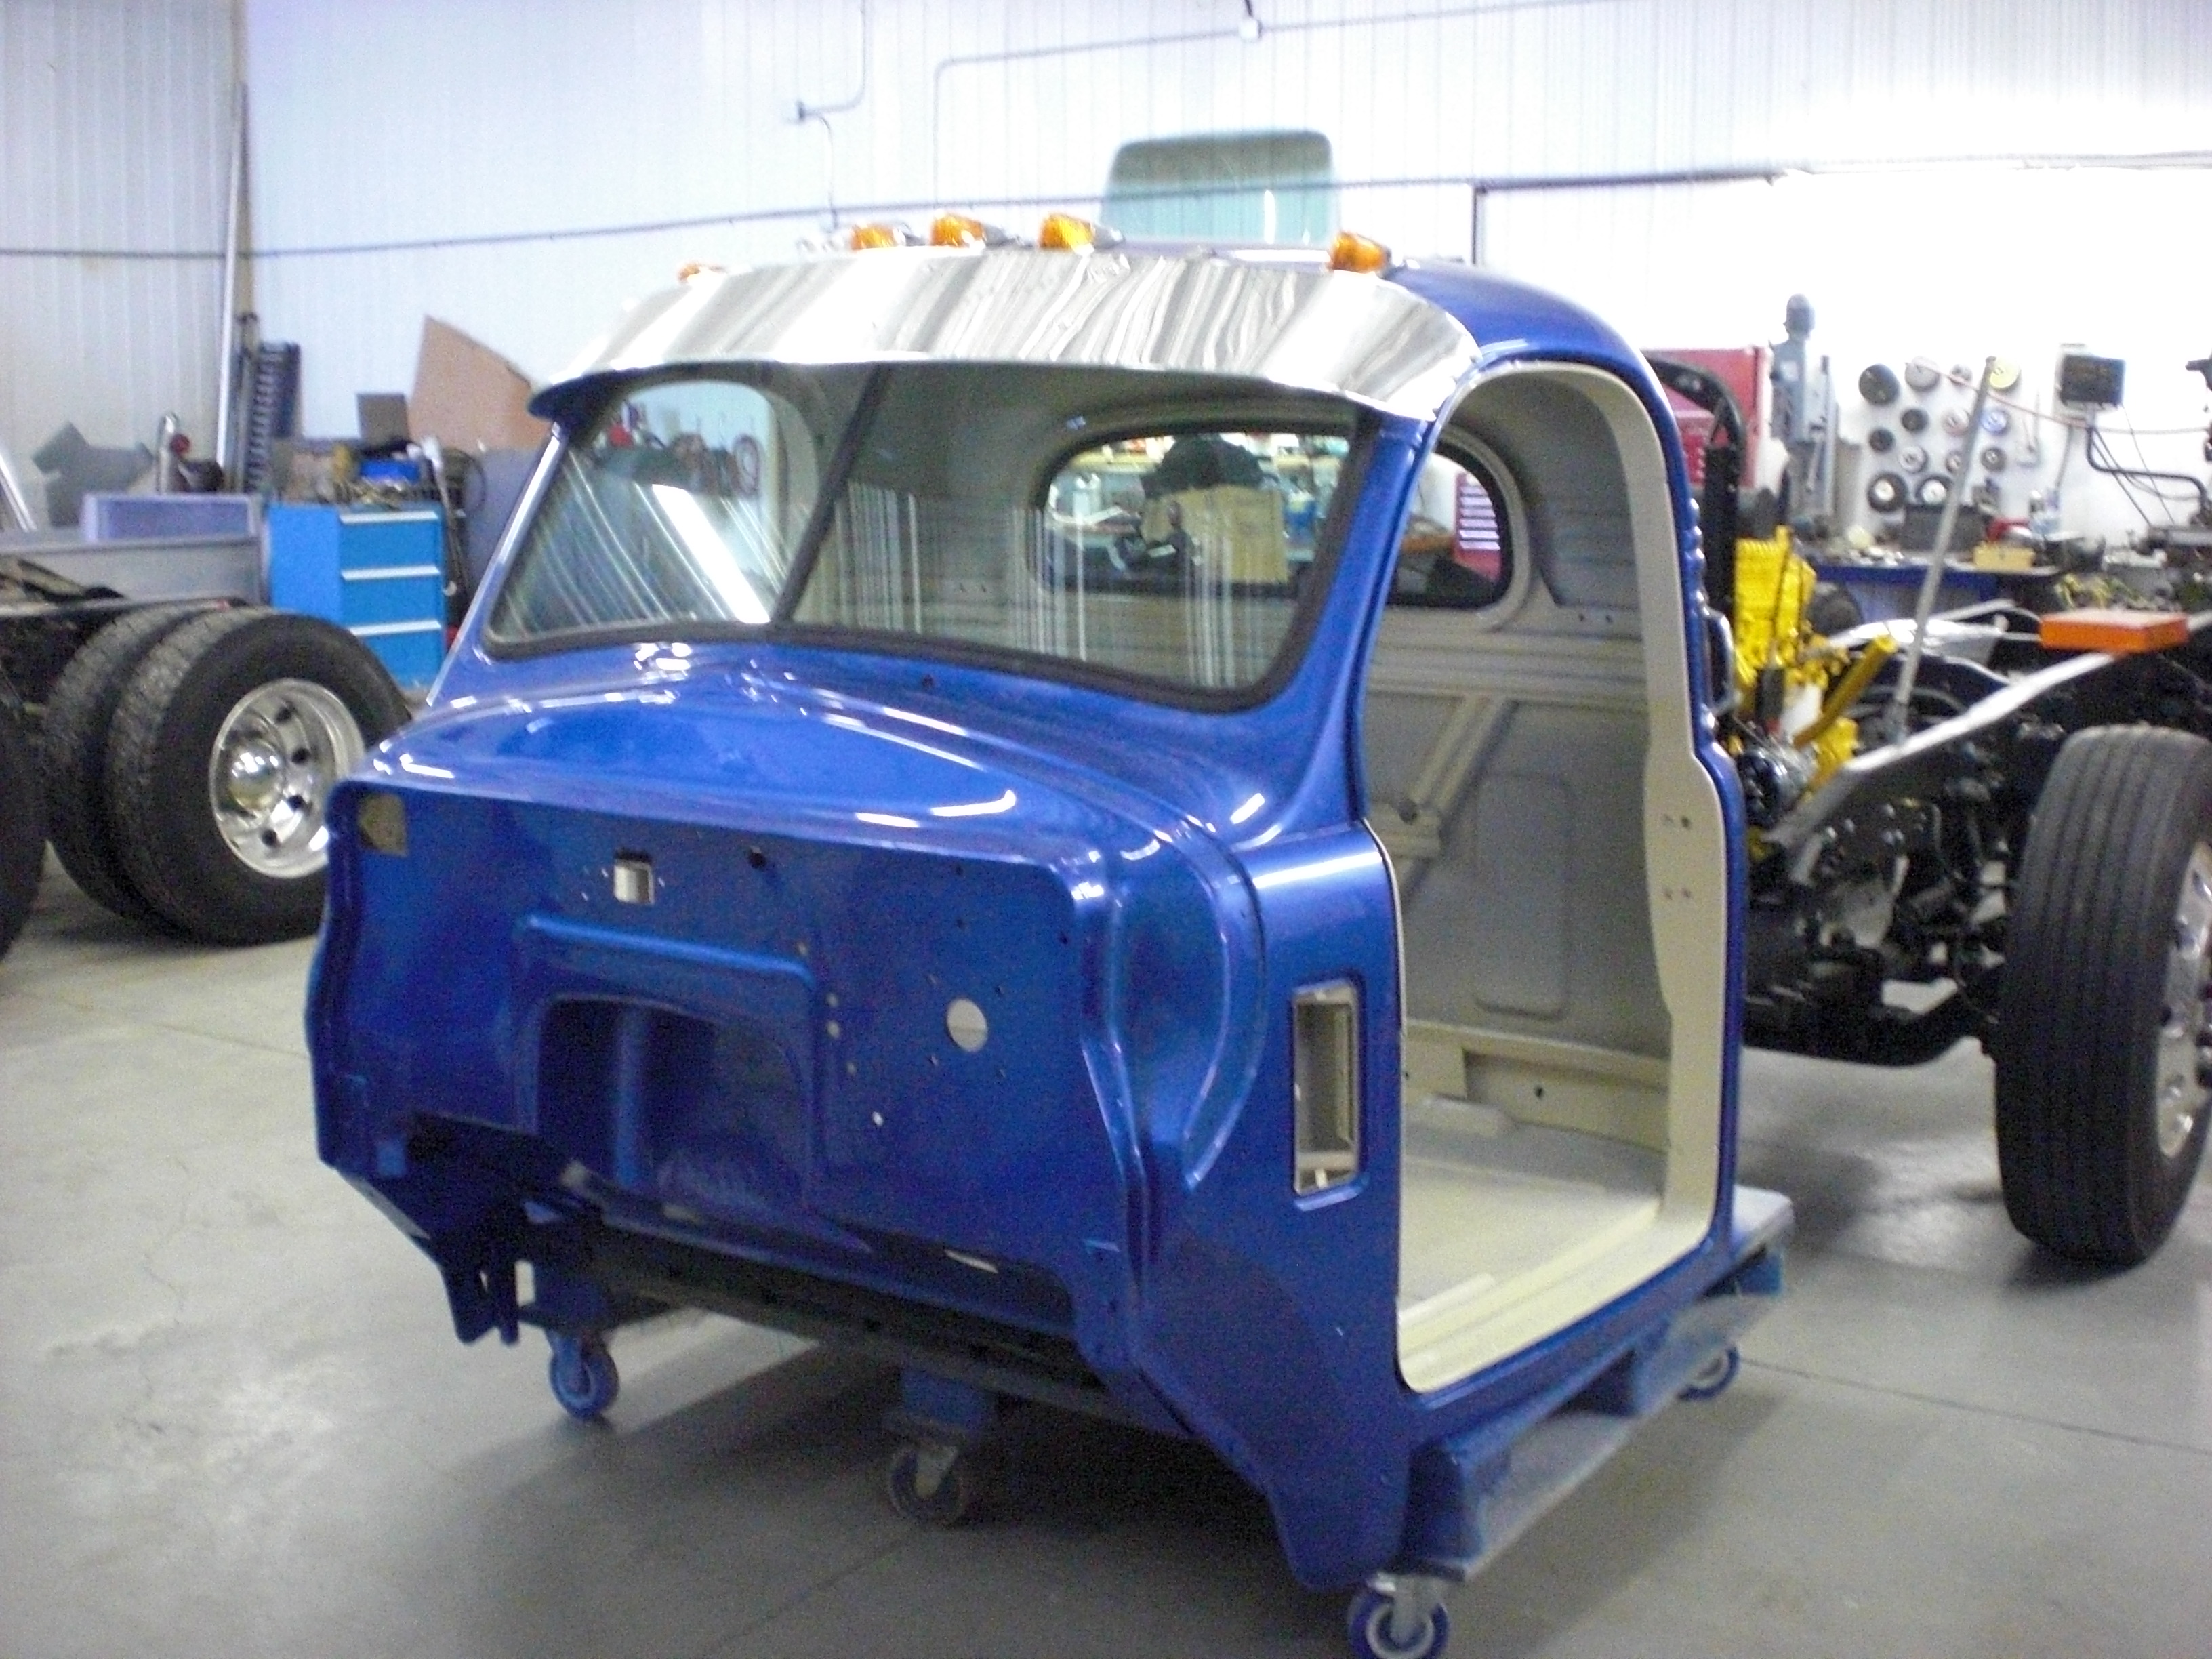
Boy, this project has been moving slow. We just haven't had much time available for working on it. I'm happy to say we finally painted the cab. That's all we've done so far but I'm hoping to start painting the rest soon. We stuck with the plan and painted it to match the race car. Here's a picture of the race car beside the truck... We painted the interior a creamy beige color that should go well with the seats we've got. I really like the Mack green but I think it would have clashed with the blue. Here's the cab beside the chassis... We had to modify the firewall and doghouse to make room for the heater and air conditioner. We actually used a stainless steel kitchen sink for the doghouse. I'll post more as we go along. Jim -
1957 B Model Mack Project Truck
phantom309 replied to Ironman's topic in Antique and Classic Mack Trucks General Discussion
All that new chrome looks great, kind of like jewelry. -
I'm sure there's better info out there on the internet but here's the basic idea behind a power divider. The front differential has a set of spider gears directly behind the front yoke. This is what is called the inter axle differential or power divider. What it does is divide up the power to the front and rear axles. If both axles are on flat ground and there's no slippage both axles will get the same amount of power but if one axle is going over a hump or is slipping the inter axle differential will allow the axles to turn at different speeds. This setup allows everything to move smoothly without binding. The only problem is, the inter axle differential always likes to feed power to the axle that's easiest to spin. So if for example you were to put a jack under the rear axle and raise the tires off the ground the inter axle differential would put almost no power to the front axle and the back tires would spin in mid air but the truck wouldn't move. In fact all you really have to do is raise ONE rear tire because there is also a differential that divides the power between the left and right axle. The "power divider" or inter axle differential divides the power between the front and rear axle equally but as the example shows when you have one axle with zero traction it will apply zero power to the other axle too. When you flip the switch and lock the power divider a gear slides up and locks the driveline up so you send full power to both axles. Now, if you were to jack up the rear axle the front axle would get power and the truck would just drive right off the jack. There's really no harm in locking up the power divider at any speed as long as all the wheels are turning the same speed but if you're spinning up an icy hill and either the front or rear axle is spinning faster the gear will grind and damage may result. The best bet in that situation is to let off on the throttle a bit so the wheels aren't spinning while you lock up the power divider. Some trucks also have locking differentials that lock the left and right axles together. The same rules apply there except that locked axles will cause more binding when going around corners. This binding on turns will make the truck tend to want to go straight ahead. This can be a problem in icy conditions if for example you are trying to make a tight turn. The truck will start to turn well enough but as the binding increases the steering axle can sometimes break free and start to plow a bit. So you have to be careful and give yourself a little more room. Using the regular power divider and most especially the locking axles will always cause a certain amount of binding on anything but straight roads so you try to only use them when necessary. Jim
-
I'm not sure whether to believe that one or not. It sounds a little far fetched but then again, there are plenty of stupid people out there.
-
I don't usually get involved with political discussions but I notice that the Canadian medical system is usually called a SOCIALIZED system. I think that's an accurate description but strangely enough I don't think most Canadians actually think of it that way. I guess it would also be accurate to say we have a SOCIALIZED highway system, a SOCIALIZED military and even a SOCIALIZED sewer and water system, but most of us just seem to think of it as the health care system. I was curious so I tried doing a search of worldwide rankings of health care systems and Canada was well down the list at #30 I think most Canadians, including me, give very little thought to the health care system. We used to have a private medical system in Canada but that was a long time ago. I think most people here are fairly comfortable with the system we have. http://www.photius.com/rankings/healthranks.html I also checked life expectancy and Canada was pretty good there, #8 http://en.wikipedia.org/wiki/List_of_countries_by_life_expectancy I also did a search to compare Canada to the USA and this is the first thing I got... http://vorg.ca/2283-Healthcare-battle-Canada-vs-USA The problem with these kinds of studies is that you can't always be sure how accurate they are but it looks to me like the Canadian and US systems both work fairly well and each probably have their strong and weak points.
-
Hello Jim, well the B you see in the picture is mine now and is in the Netherlands. It came from Canada and i was told that a guy made only 3 of these sunvisors. He would have made more but he became very busy because he 's making sunvisors for Western star now. Was your b a former firetruck? if so than i saw the truck in Teeswater! and that's the town where my Mack came from! greetings Jan Jan, It sure is a small world. Yes we did get the truck in Teeswater and yes it was a fire engine. I remember the guy we got it from saying there was another Mack guy in town. Your Mack looks great!!! In fact, we seriously considered painting the one we've got a similar color but decided to go with blue because it matched the race car.
-
I came across a picture of a really nice B model with a visor similar to the one we built... Here's the one we built... The visor itself is pretty simple but was a pretty time consuming job to get the brackets right. I think someone should build a bunch of these things,,, but not me,,, someone else. Jim
-
1960 B61
phantom309 replied to mack4ever's topic in Antique and Classic Mack Trucks General Discussion
Congratulations on the new (old) Mack! It looks like it'll be a great project. Thanks for posting the pictures. Jim -
This is just an amature opinion but I don't think you'd hear the bearings unless your engine was really ready to die and then you'd hear them even at an idle. One thing you can try is to get the truck cruising up the road at a steady rpm then try going from coasting to full throttle while watching your oil pressure. The extra pressure on the crank at full throttle should cause the crank to squeeze down on the oil and settle a little deeper into the lower bearing. The oil is fed from the top so that will expose an easier path for the oil to escape and therefore you should see a drop in pressure if the main bearings are worn. I think it's fairly normal to see a drop of a couple of pounds but if you get much more than that it might be something to follow up on. This isn't really any kind of accurate test but if you try it and don't see much of a drop in pressure it might help put your mind at ease. Hopefully someone will be able to answer what the normal oil pressure should be on that engine. I know the Cummins engines run very low pressures similar to what you've described.
-
Welcome to the site Corey! I'm just up the road in Barrie Ont. Good luck with your project and don't forget to post some pictures from time to time. Jim
-
B Model Car Hauler
phantom309 replied to phantom309's topic in Antique and Classic Mack Trucks General Discussion
We built a battery box today. The batteries were originally kept under the passengers seat but there was nothing behind the dress panel under the cab so we made a box to fit behind it and put a door on the panel. We haven't installed the latch hardware yet. We're going to make another box like it for the other side. We'll use that one for tool storage etc.
BMT Forum Logo
