

phantom309
-
Posts
131 -
Joined
-
Last visited
-
Days Won
1
Content Type
Profiles
Forums
Gallery
Events
Blogs
BMT Wiki
Collections
Store
Everything posted by phantom309
-
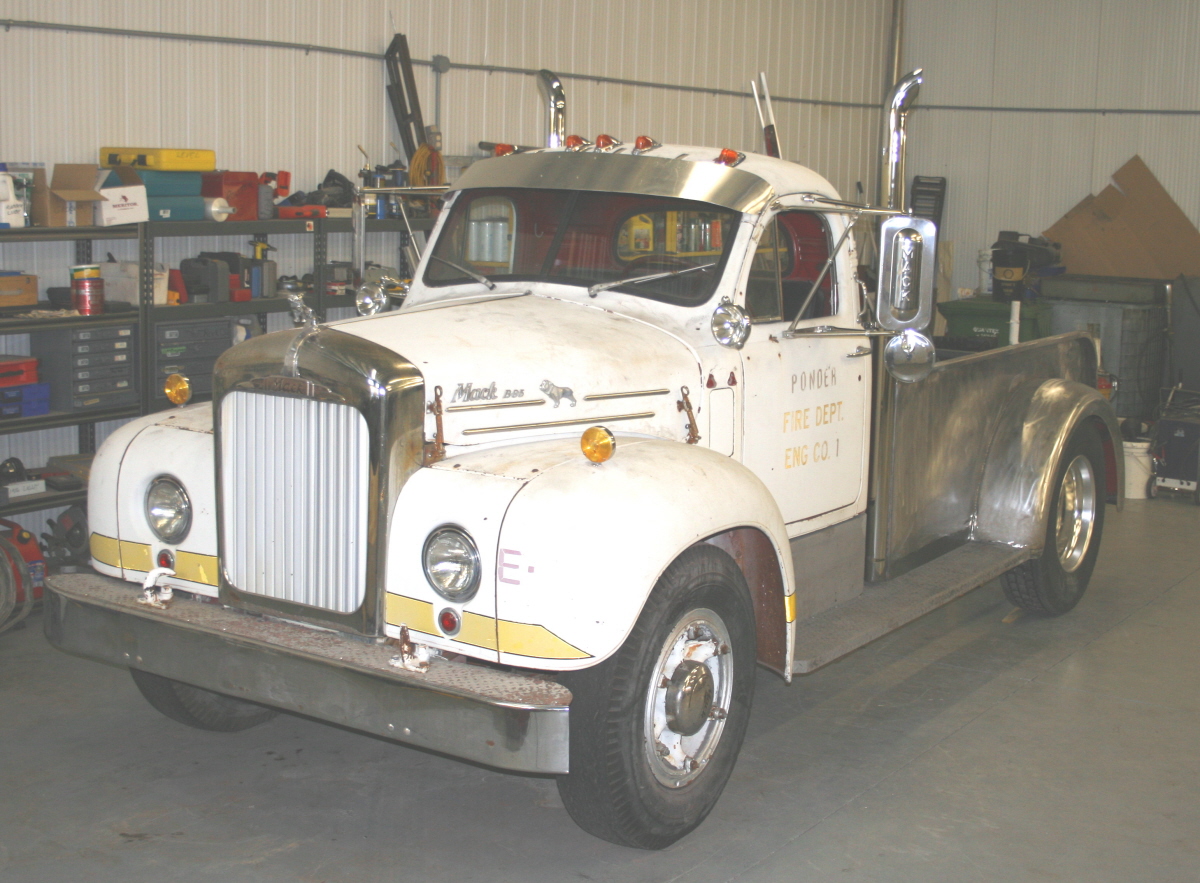
B Model Car Hauler
phantom309 replied to phantom309's topic in Antique and Classic Mack Trucks General Discussion
Larry, Seeing your Mack at Thompson really made me want to hurry up and get this thing done. By the way, I see there's a video from Thompson that shows you making a few runs... Jim -
B Model Car Hauler
phantom309 replied to phantom309's topic in Antique and Classic Mack Trucks General Discussion
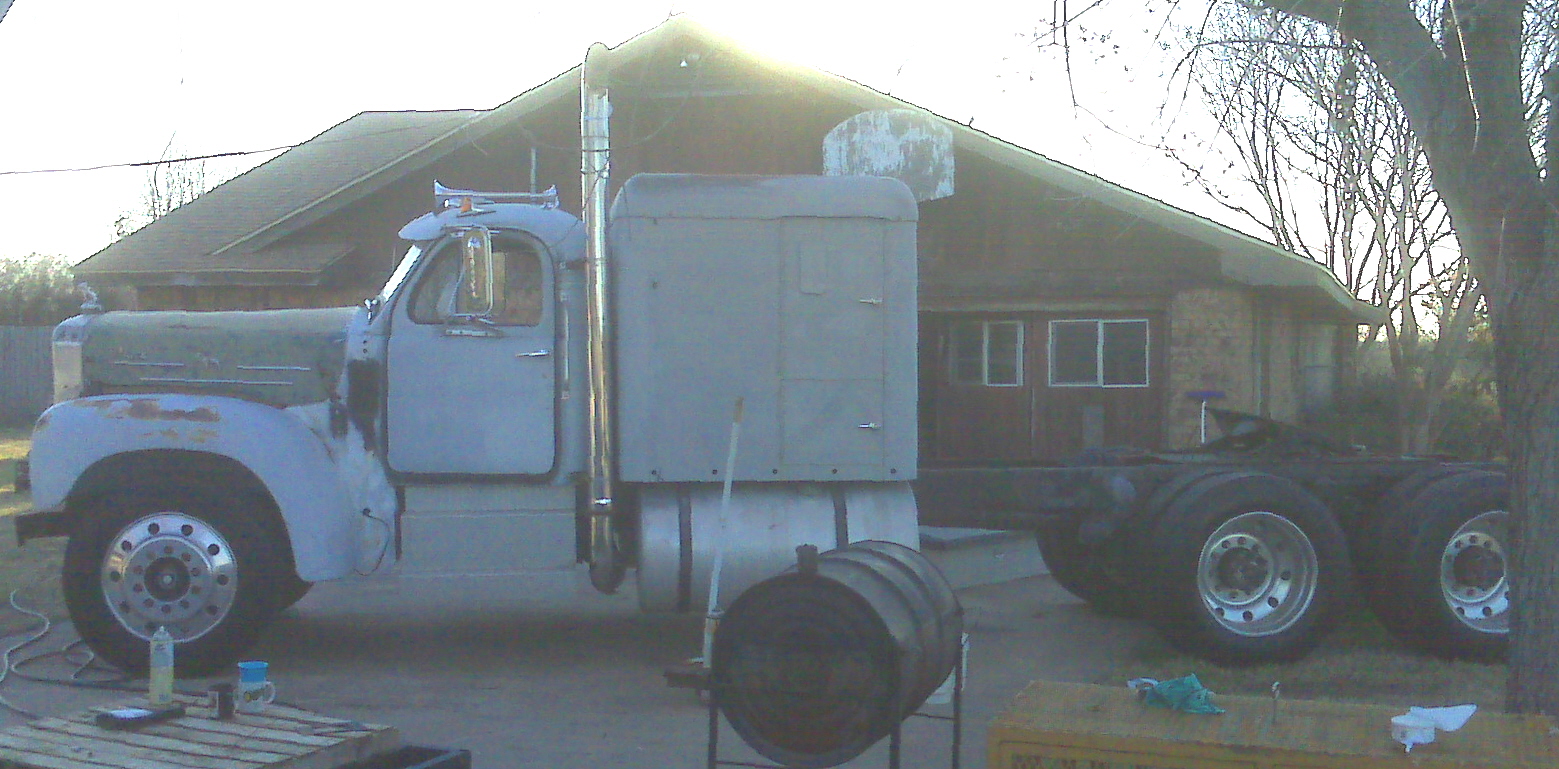
We had to leave the Mack sitting for about six weeks while we got a few other things done but we're back working on it. We're making some progress. The box is all welded up and the inner fenders are done. The floor will be wood. We're renting the shop next door to use for sandblasting and painting. All the cab and box parts are done. There was no rust on anything so that's going to make the body work easier. We had to modify the firewall in order to get the new heater and air conditioner setup to fit. We also had to modify the top of the firewall to make room for the electric wipers from the bus. By the way, we used a stainless steel sink for a dog house. It looks a little goofy right now but it'll look fine when it's done. We ran the chassis over today. We'll be blasting that tomorrow. It'll be good to get the blasting finished, it's a lot of work. -
Congratulations on the win! From what I've heard there's a lot of good cars in the UMTR so you must have been doing something right this weekend. If you make it to Thompson I'll drop by and say hello. Jim
-
Was For Sale!
phantom309 replied to Greg Rider's topic in Antique and Classic Mack Trucks General Discussion
Nice truck!!! -
Hoover's New Mack Ed Pickup
phantom309 replied to Barry's topic in Antique and Classic Mack Trucks General Discussion
Looks great! Nice job! Jim -
The wheels look great! In fact, the whole truck looks great! Jim
-
Jet trucks are pretty spectacular to watch. I took this picture at Norwalk Ohio a few years ago. Jim
-
Muffler Location?
phantom309 replied to MalibuJim's topic in Antique and Classic Mack Trucks General Discussion
The muffler looks good to me too. -
B Model Car Hauler
phantom309 replied to phantom309's topic in Antique and Classic Mack Trucks General Discussion
Paul, That might be a good idea! The fan clears the stock Mack rad just fine but we've also got to fit in a air to air cooler and an air conditioning condenser. I had considered remote mounting the AC condenser and transmission cooler and using electric fans for them but hadn't considered electric fans for the rad, that might free up some room. The IHC fan is also just a regular thermatic as opposed to an air operated clutch fan so it'll probably draw a fair bit of power and also be pretty noisy. Jim -
B Model Car Hauler
phantom309 replied to phantom309's topic in Antique and Classic Mack Trucks General Discussion
I forgot to post a picture of the master cylinder. We had to cut out a piece of the firewall and weld in a flat piece of heavier steel. -
B Model Car Hauler
phantom309 replied to phantom309's topic in Antique and Classic Mack Trucks General Discussion
It's been about three weeks since I posted an update. We've been working on the truck but it's been the kind of slow progress that doesn't look like much. We took the truck apart getting ready to install the new axles... Then we dropped the engine in and put the cab in place to check for clearance. The IHC engine is smaller than the 707ci Mack engine but the fan sticks out a long ways so it takes up almost as much room. We were able to use the Mack's rear motor mounts we just had to make new brackets to come off of the IHC engine. We'll finish welding those when we pull the engine back out. The IHC axles have hydraulic brakes, so did the Mack axles but the Mack setup used a master cylinder mounted under the floor and a hydro-vac unit on the frame. The IHC setup uses pressure from the power steering pump and also has an electric motor as a backup in case the engine stalls. The simplest setup was to mount the IHC brake peddle and master cylinder to the firewall. It was also easier to install the IHC throttle peddle rather than try to adapt the throttle cable and transmission modulator cable to the Mack peddle. We just installed the wide "super single" tires today, they look good! We're also working on the exhaust. The bus we're using for a donor truck had a new exhaust system so we were able to re-use the muffler and quite a bit of the piping. Pretty soon we'll be able to pull the cab and box off to sandblast and paint the chassis. Jim -
Welcome to the site Merlin. You never know,,, some day you might come across a deal on a Mack that you won't be able to refuse. Jim
-
Whoaaaaaaaa Greeeeeeeeeen !
phantom309 replied to mack4ever's topic in Antique and Classic Mack Trucks General Discussion
WOW! That frame looks great! I'm looking forward to seeing the cab. Jim -
I'm In Trouble Now!
phantom309 replied to MalibuJim's topic in Antique and Classic Mack Trucks General Discussion
It really looks like you're doing a top notch job on that truck. Keep us updated on the progress. Jim -
B Model Car Hauler
phantom309 replied to phantom309's topic in Antique and Classic Mack Trucks General Discussion
Freightrain, yes the cab part of the bracket is made from two pieces welded together. You have to run a series of short beads to keep the heat down otherwise the brackets will distort. I'm not the best welder so I had to grind the welds down and polish the brackets in order to make them look okay. We actually considered painting the engine gold but went with the Cat Yellow at the last minute. I hope Mackdog's prediction doesn't apply to Cornbinder engines. -
B Model Car Hauler
phantom309 replied to phantom309's topic in Antique and Classic Mack Trucks General Discussion
Larry, I didn't see your last post. Yes the visor is screwed directly to the roof at the ends. The screws are just temporary, I've ordered some steel threaded inserts that sort of rivet into the roof. That will allow us to use 1/4" bolts. We've got some of those inserts made out of aluminum but they're not very strong. We made the part of the bracket that mounts to the roof out of stainless steel. I find stainless kind of hard to work with but I find it even harder to weld aluminum, so it's kind of the lessor of the two evils. We'll polish up the aluminum and stainless before we do the final installation. We haven't had much to post in the last couple of weeks but we're continuing to make progress. We pulled the engine and transmission out of the bus that we're using as a donor truck. The engine, an International DT466, was painted a shade of blue that would have clashed with the color that we're painting the truck so we painted it Caterpillar yellow. The transmission is an Allison automatic. -
Welcome to the site! Hopefully you'll find the Superliner you're looking for. Jim
-
B Model Car Hauler
phantom309 replied to phantom309's topic in Antique and Classic Mack Trucks General Discussion
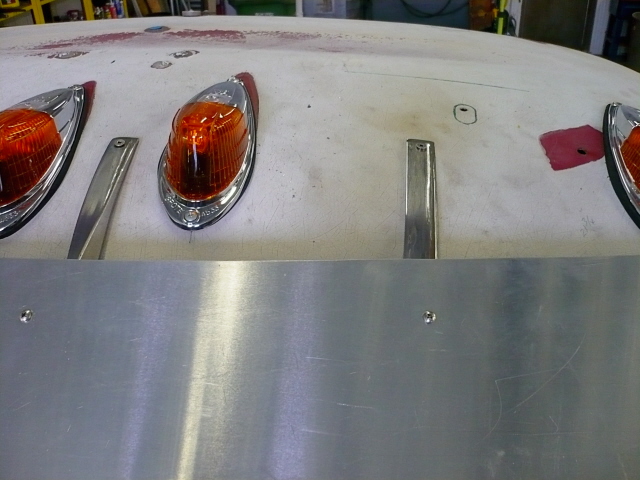
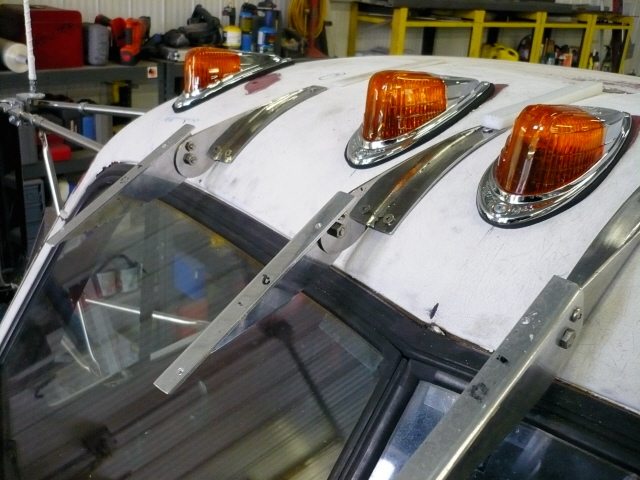
Gasser Magazine sponsors the Gasser Reunion at Thompson OH. The pictures are probably from last years race. This year there's also going to be a whole bunch of 409 powered cars racing so I pretty well HAVE TO make it there. I'd have loved to have the Mack going by then but there's no way we'll have it done in time. In fact we just lifted the cab off today and it's really starting to sink in that this will be a pretty big job. I took some close up pictures of the sunvisor and brackets. We just used small screws to attach everything to the roof for now but we will use different fasteners when we actually install it.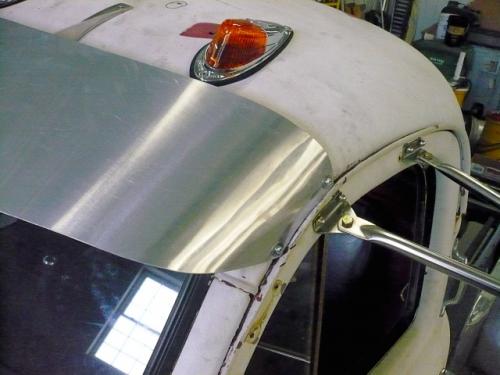


-
B Model Car Hauler
phantom309 replied to phantom309's topic in Antique and Classic Mack Trucks General Discussion
The pipes will be a little higher than the trailer when we're done so I'm hoping it will stay reasonably clean. We pretty much did what you described, cardboard and sissors. It's a lot easier if you've got a second person to help. I made the brackets that hold it onto the roof a little too low so I used some strips of teflon as spacers. You don't really notice it unless you look carefully. Now that we've got all the holes drilled for the visor and air horns etc. we've started dismantling everything. I took some close up photos of the visor and brackets but I forgot to bring the camera home. I'll try to post them tomorrow. Jim -
Neat video! The Killer Bee looks great! Jim
-
B Model Car Hauler
phantom309 replied to phantom309's topic in Antique and Classic Mack Trucks General Discussion
Paul, I don't think we'll be making any more sunvisors. I'd like to say it's really simple to build one but it's actually pretty time consuming. The design is simple enough but here's a lot of trial and error involved trying to get it to fit and look right. My first plan was to make a more peaked, Peterbilt style, visor but when we mocked one up we just couldn't get it to look right so we ended up just going with a curved visor. We would have preferred to make it out of stainless steel but settled for aluminum because it was a lot cheaper and easier to work with. I think anyone could make one, it's just time consuming. I'm happy with the way it looks but I also think one of the Lund style visors would have looked good. I'll try to attach a larger picture, as you can see it's really a pretty simple design. Jim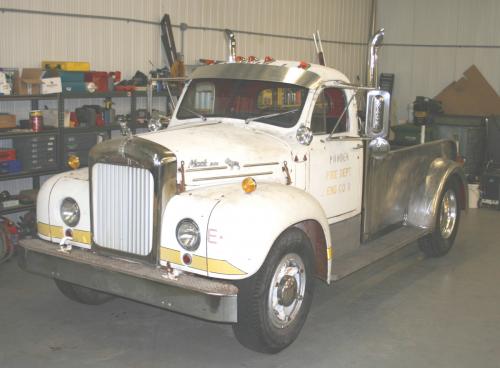
-
B Model Car Hauler
phantom309 replied to phantom309's topic in Antique and Classic Mack Trucks General Discussion
Mike, We thought seriously about doing that. We've got a set of side pipes for the race car and since we're going to paint the Mack to match the car the side pipes would have looked good. But the truck already had running boards and I think the International diesel might smoke a little once we get through adjusting the fuel pump. I think the vertical stacks will look good when the truck is hooked to the trailer. We actually welded the hose holder trays that came with the truck into the front corners of the box so there would be room for the exhaust. -
B Model Car Hauler
phantom309 replied to phantom309's topic in Antique and Classic Mack Trucks General Discussion
We built a sunvisor. I'm pretty happy with the way it looks but it was more work than I expected. There was a lot of trial and error involved with getting it to fit properly. We've got the new exhaust pipes standing in place but we're waiting for the shields to come in before we actually mount them. We're almost finished with all the mock up, pretty soon we'll be pulling the cab off. Jim -
Cool truck!!! The picture looked a little dark on my screen so I tried brightening it up a little. Jim

-
Upgrading to a Big Block Chevy like Rob suggested would be great. Sometimes you can find a 454 from an old motor home at a reasonable price too. I suspect that much of the overheating problem you're experiencing is caused by a carb or ignition tuning problem. If the rad, thermostat, water pump etc. is okay two very common reasons for overheating are,, improper timing and or,, carb set too rich. If the timing is not advanced enough, the fuel mixture will burn too late. That means that the piston will be a fair way down the hole while most of the fuel-air mixture is burning. That will expose the cylinder walls to more heat and that heat will have to be absorbed by the cooling system. Too rich a fuel-air mixture will cause a similar problem. A rich mixture will take longer to burn so it will not only heat the exposed cylinder walls but will also continue to burn or be extra hot as it goes out the exhaust valves. That will of course expose the exhaust ports in the heads to extra heat which again, will have to be absorbed by the cooling system. The exhaust manifolds will also run hotter than normal, which will increase the under hood temperatures. One other problem you'll run into is that the combustion chamber and especially the exhaust valves will get hot and cause both detonation and dieseling. Jim


BMT Forum Logo
