


JoeH
-
Posts
2,732 -
Joined
-
Last visited
-
Days Won
18
Content Type
Profiles
Forums
Gallery
Events
Blogs
BMT Wiki
Collections
Store
Everything posted by JoeH
-
Mack 44,000 differential carrier side cover o-ring
JoeH replied to mackone's topic in Driveline and Suspension
Reading through this has been helpful, our MR688 has this same leak, wondering if it's a cracked housing or loose bolts. Driving the intermediate axle up on blocks should make access a lot easier? Should lift the frame up away from the rear drive axle. Won't be able to look into this til I drive the truck back from Iowa in 6 weeks though. -
MR 688 electrical trouble shooting. No crank
JoeH replied to Ryanp's topic in Electrical, Electronics and Lighting
Nothing like a little hands on experience! You should be proud of yourself! -
Pyro gauges stick sometimes. With the engine up to temp driving around, tap the face of the gauge. One of my trucks does that.
-
They detoured down to Kentucky and Missouri so they could skip Illinois completely. I'll be driving the truck back in 6 weeks when the mixer is done and mounted on. I'll have to try and find out what condition 74 is in. I would take US 34 from Iowa to Galesburg Illinois, then pick up 74 to Indianapolis. Or I'll detour south to Missouri and Kentucky.
-
Single drive with a lift axle saves tire wear. Setup is just fine for highway/parking lot work where a truck doesn't have to go mudding. Pulling the tag axle up saves a lot of twisting on the tires, tandem, etc. If I had a truck like that it wouldn't be leaving the blacktop.
-
MR 688 electrical trouble shooting. No crank
JoeH replied to Ryanp's topic in Electrical, Electronics and Lighting
Part of identifying good/bad EUPs involves swapping eup locations around. Take a known "good" eup (one that causes motor to stumple/die when you interrupt it) put it where a bad one is and see if the eup makes the "bad" cylinder fire. Process of elimination you can find whether EUPs are bad or injectors are bad. Good plan to tear down all the EUPs first, if they're stuck and need to be freed up you may get slot more of them firing. -
My apologies to the parts guy, but I'm glad your compatibility options opened up!
-
MR 688 electrical trouble shooting. No crank
JoeH replied to Ryanp's topic in Electrical, Electronics and Lighting
Though I'm not sure if it's possible to over rev an automatic? Unless the engine came from a different truck... -
DOT # is at the bottom of the door; changed our # to "interstate" this morning. Since the truck has a PA only plate we have to buy permits for every state we want to drive through. Some states won't let you buy the permits if your DOT # isn't marked interstate. Some states don't care. Ohio cares, Illinois cares and since we have heard horrible things about Illinois roads the truck is going from Ohio to Kentucky to Missouri to Iowa.
-
What one man might define as "jerky" another might describe as a lull in the idle. Low speed governor springs could be worn out. But I've never messed with a fuel pump other than adjusting timing or idle speed. If your heel isn't planted on the floor while you're driving around it'll be a jerky ride...
-
If you have work for a 99k gcvwr then buy a rig rated for a 99k gcvwr.
-
My parents are driving our MR688 from PA to Indianola Iowa. Everything they have heard is that Illinois roads are awful. Can anyone give us feedback? A couple route options: Rte 80 Rte 74 splitting to either 72 to Missouri or staying with 74 to Iowa. Anyone know what shape these roads are in? Remember truck is a cabover bobtailing on 20k steer axle. It rides like shit, and my dad is nearing 70!
-
MR 688 electrical trouble shooting. No crank
JoeH replied to Ryanp's topic in Electrical, Electronics and Lighting
That you have it chugging along somewhat means the EECU must be working to some degree. Pull the valve covers, time to check mechanical bits. Check slop on rocker arms. Bent pushrods? This engine could have been over revved. Oil pan gets you a view on bottom of the engine: camshaft, debris in bottom of pan, etc. Valve covers tell you what's going on above. -
Measure how tall the frame is. I think 9" is a tractor trailer frame, 10" or 11" is required for dump truck work.
-
The screwdriver trick I learned for motorcycles. Minor size/noise difference.
-
2004 Trident 470 CCRS , Solenoid Boost Voltage
JoeH replied to steve p's topic in Electrical, Electronics and Lighting
@Joey Mack -
MR 688 electrical trouble shooting. No crank
JoeH replied to Ryanp's topic in Electrical, Electronics and Lighting
Go to your dealer and order book # 8-211! -
MR 688 electrical trouble shooting. No crank
JoeH replied to Ryanp's topic in Electrical, Electronics and Lighting
3-4 is engine position sensor, located on the timing cover. Camshaft. -
MR 688 electrical trouble shooting. No crank
JoeH replied to Ryanp's topic in Electrical, Electronics and Lighting
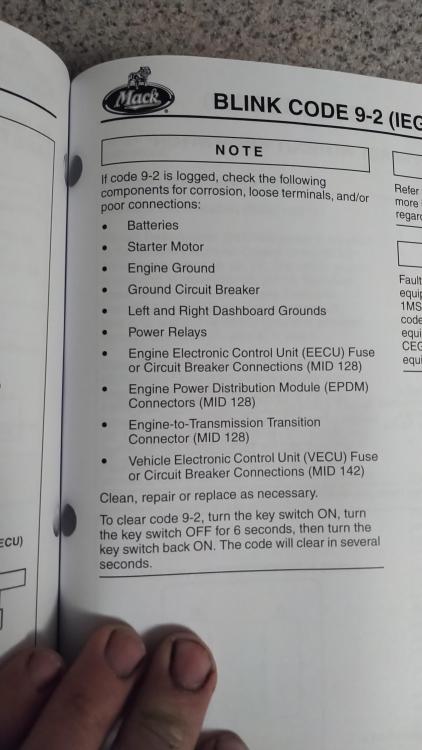
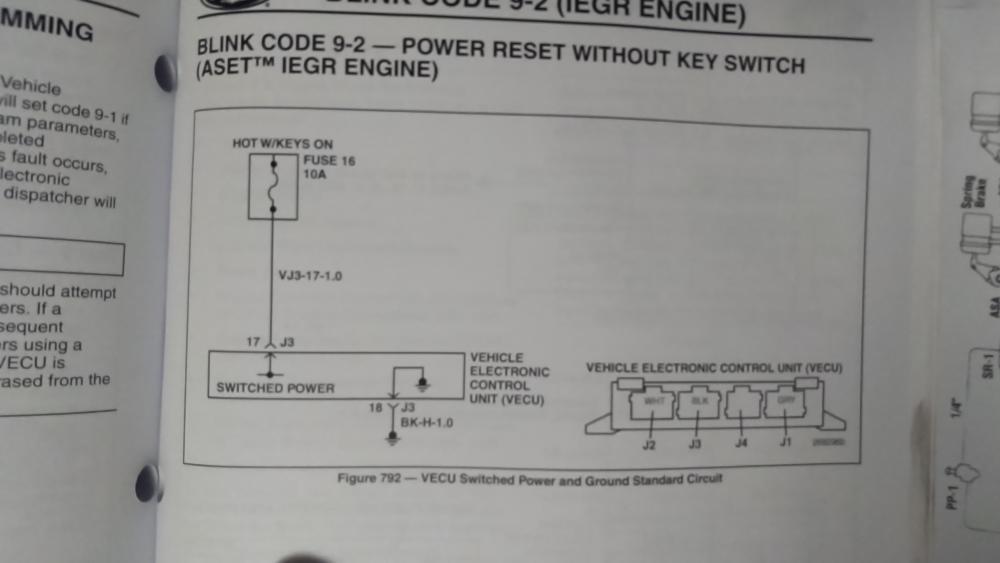
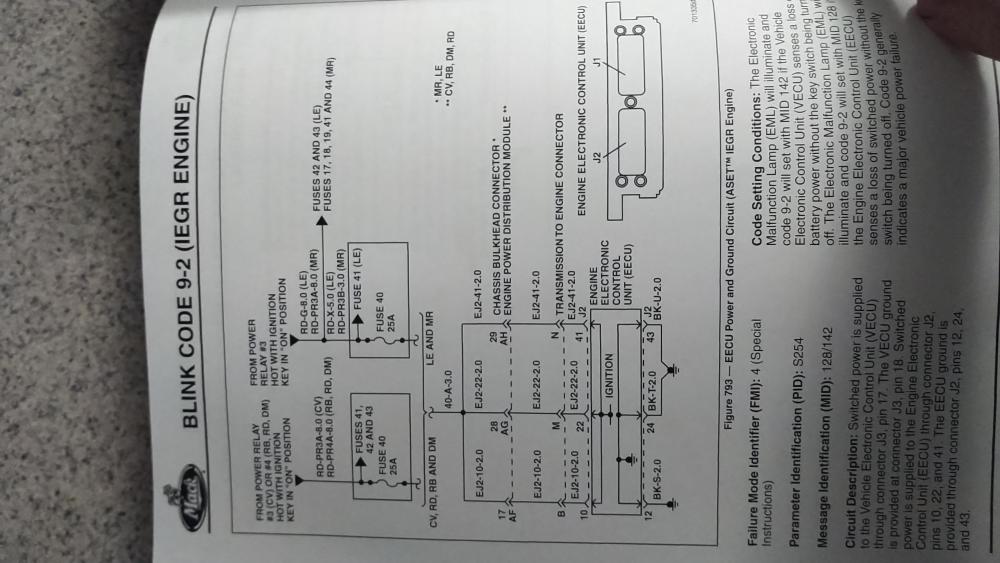
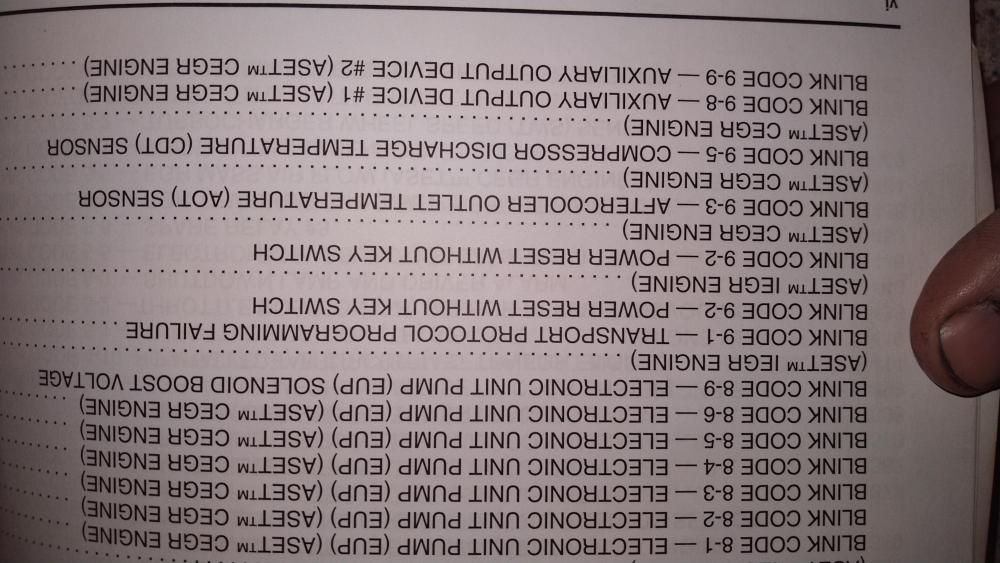
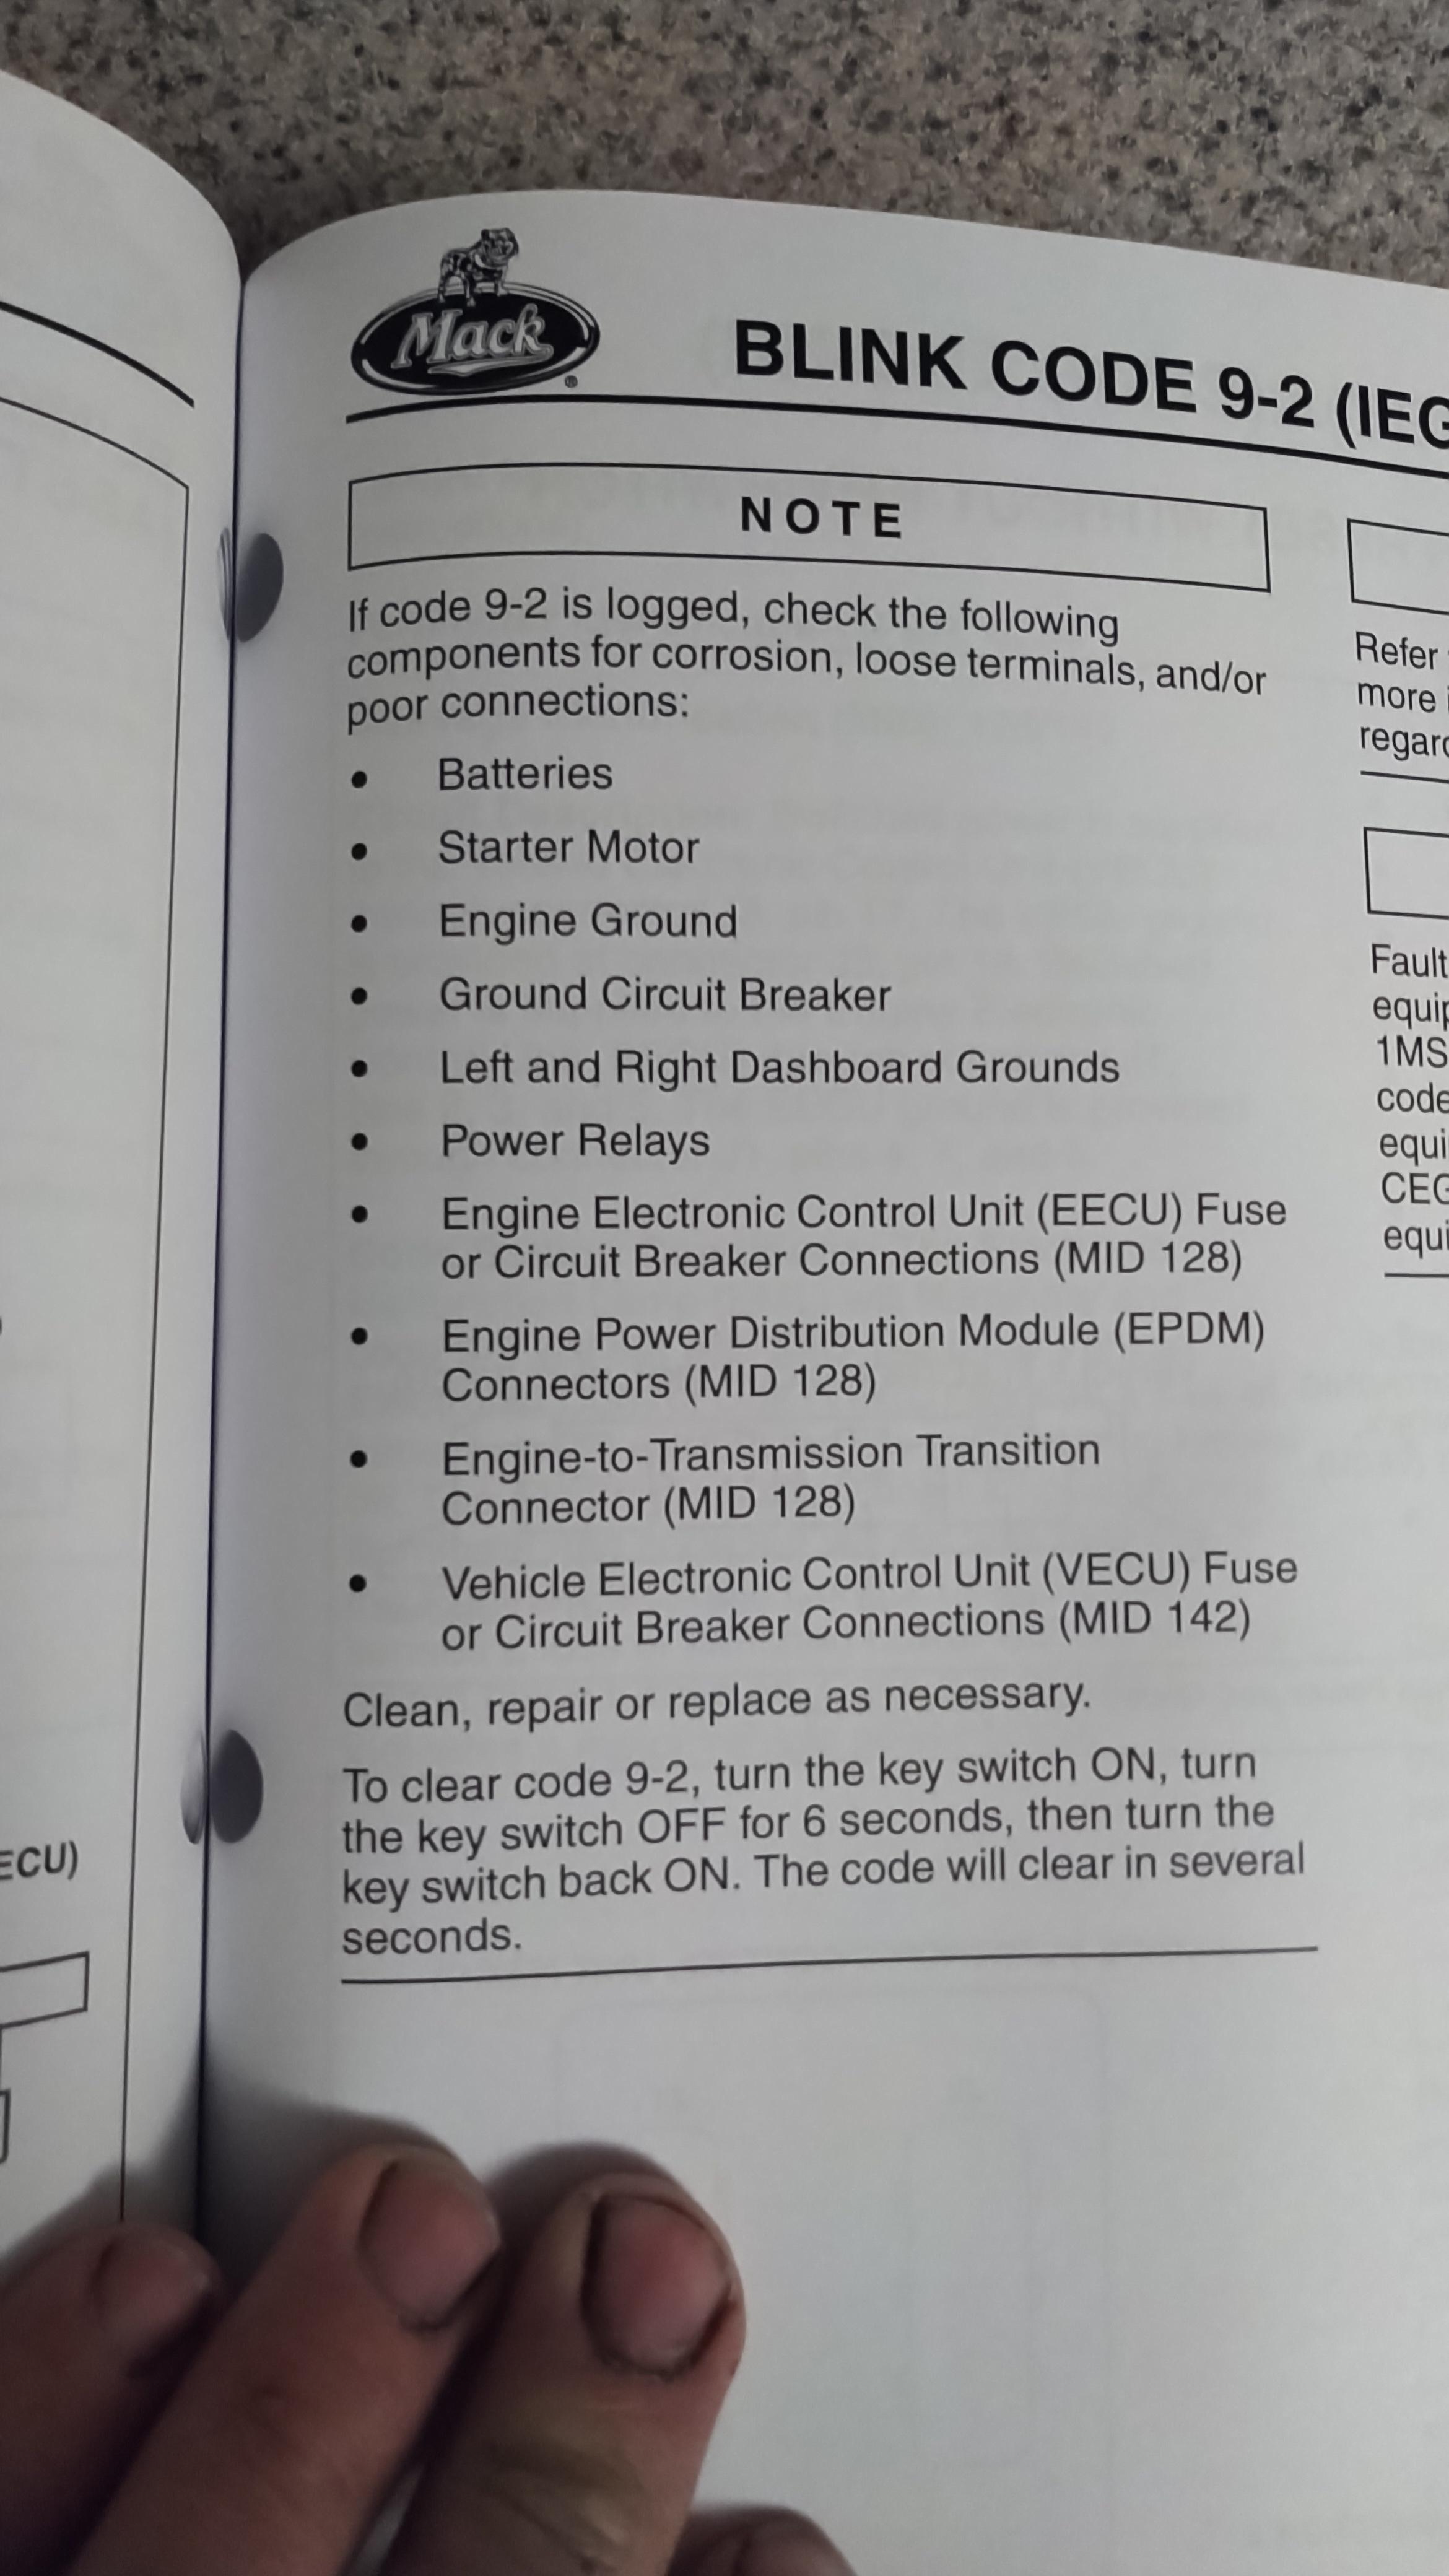
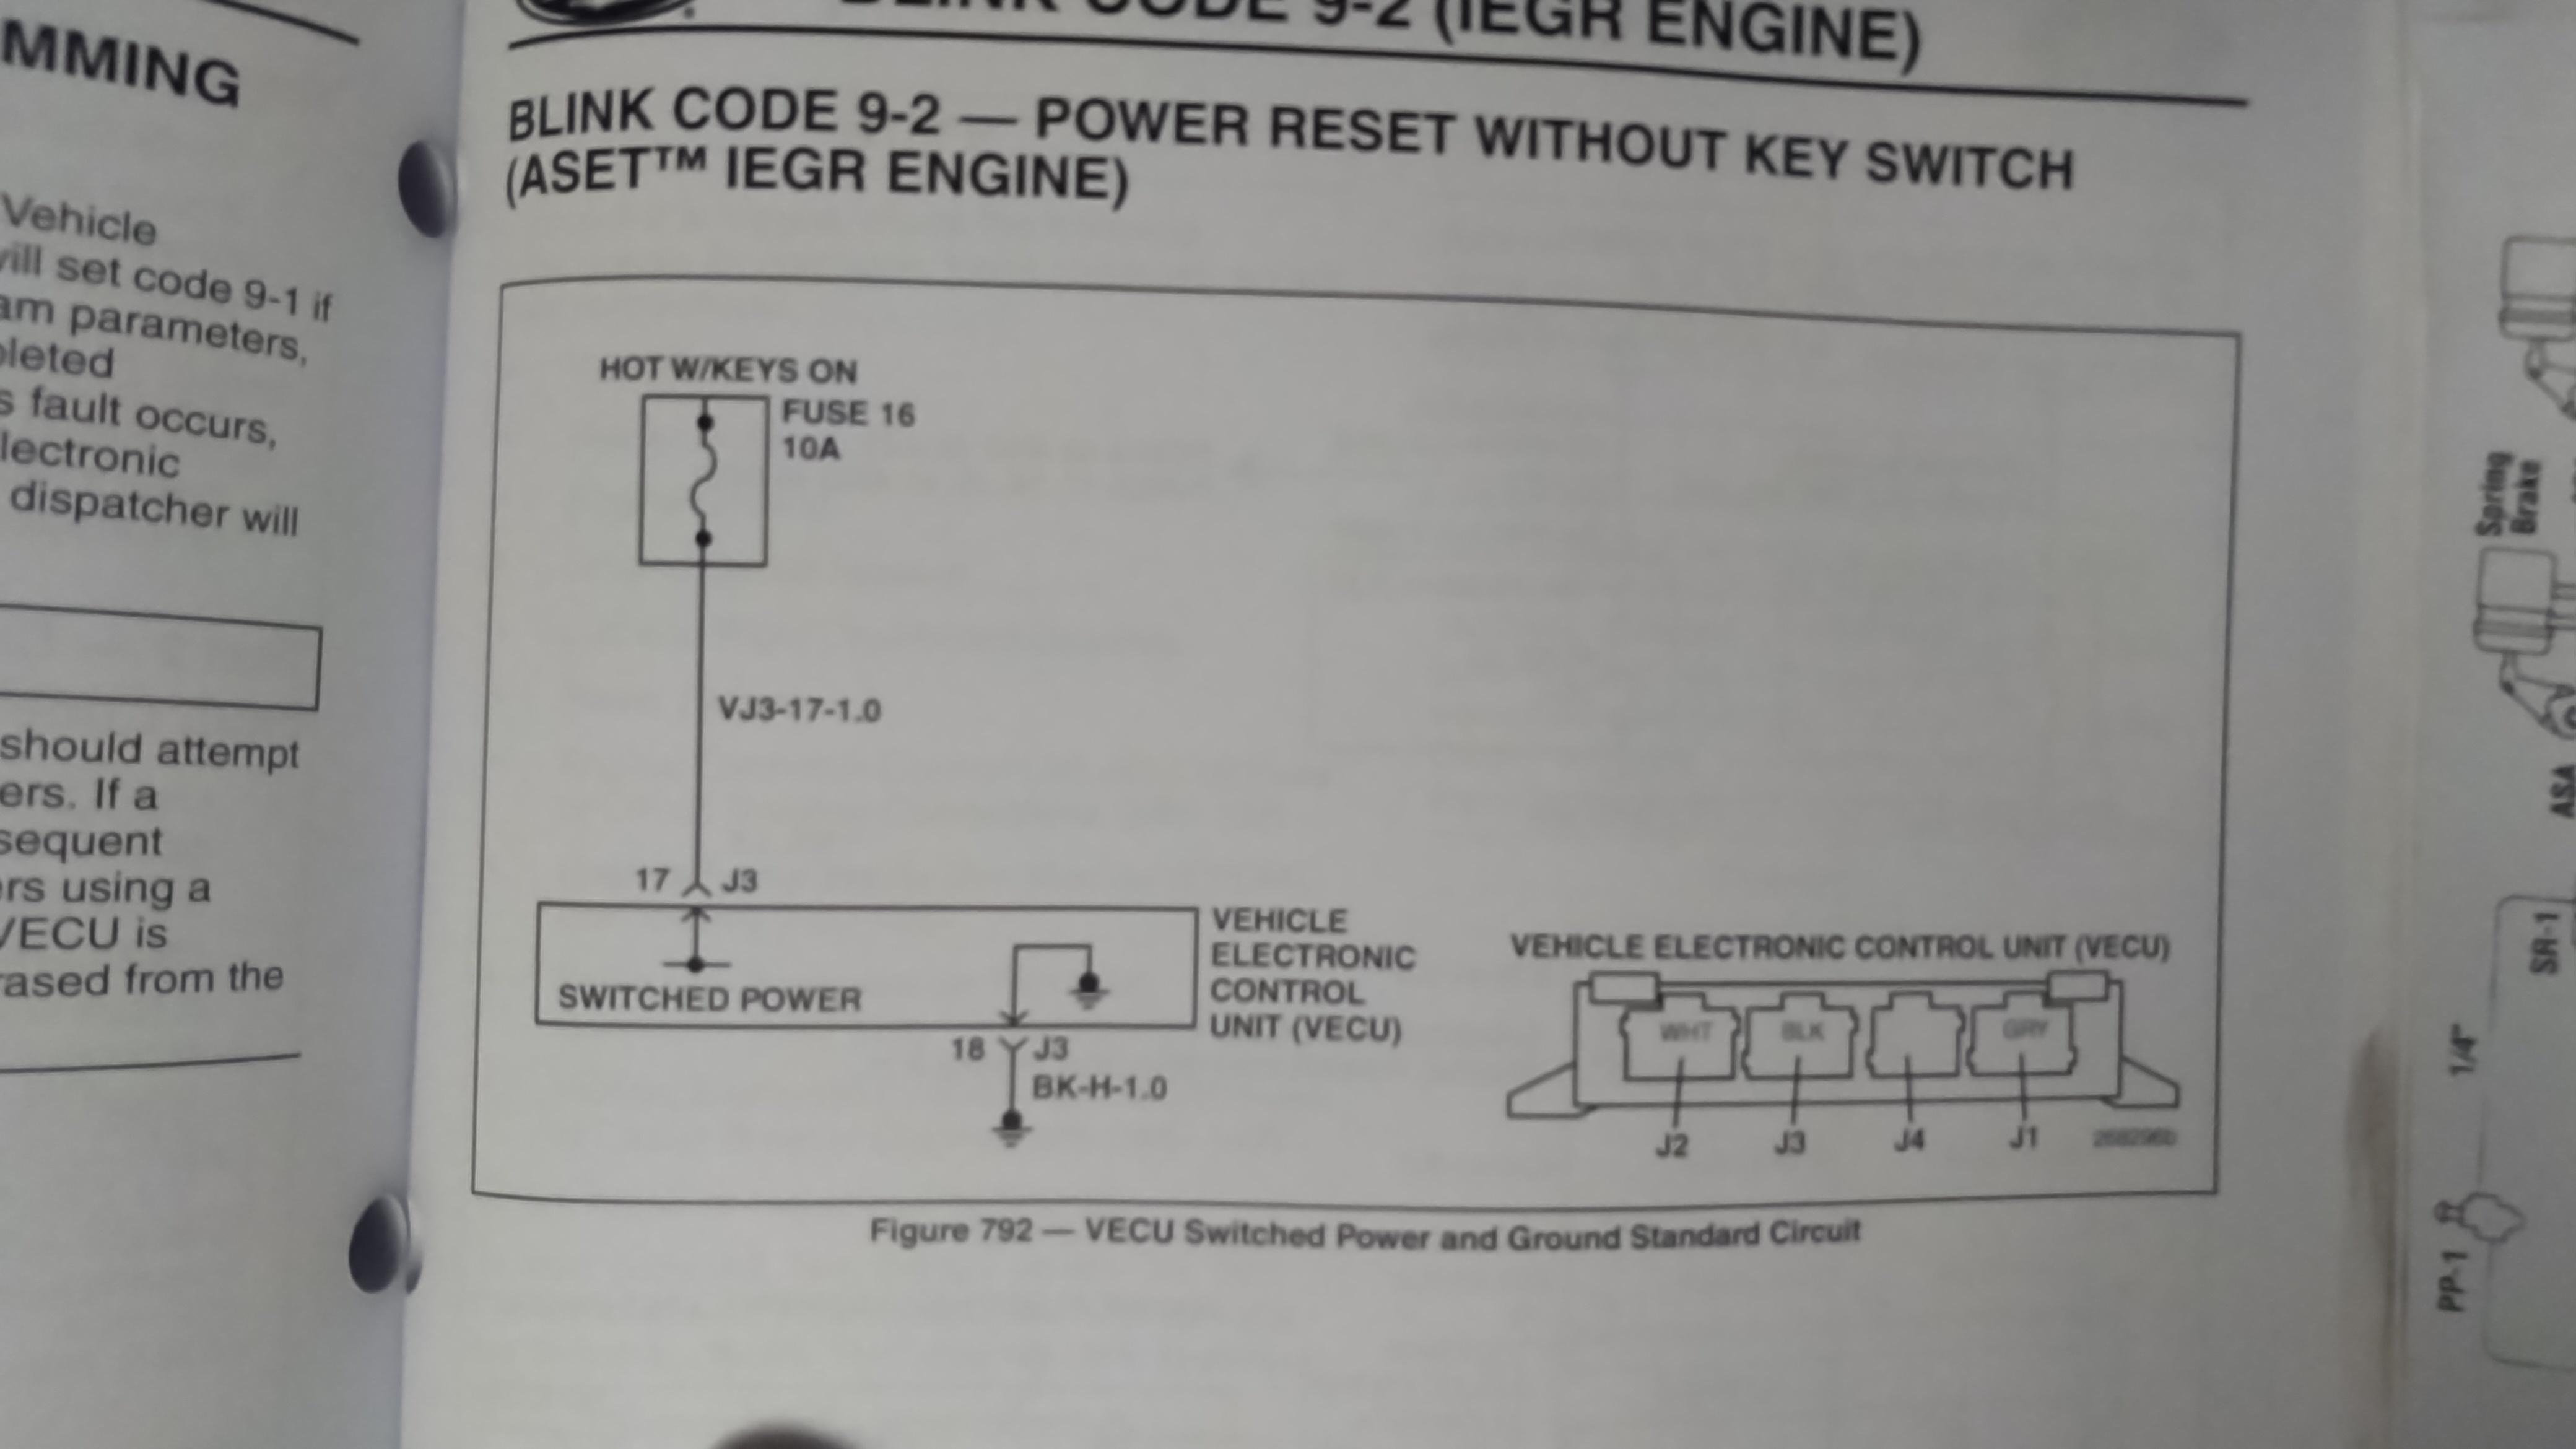
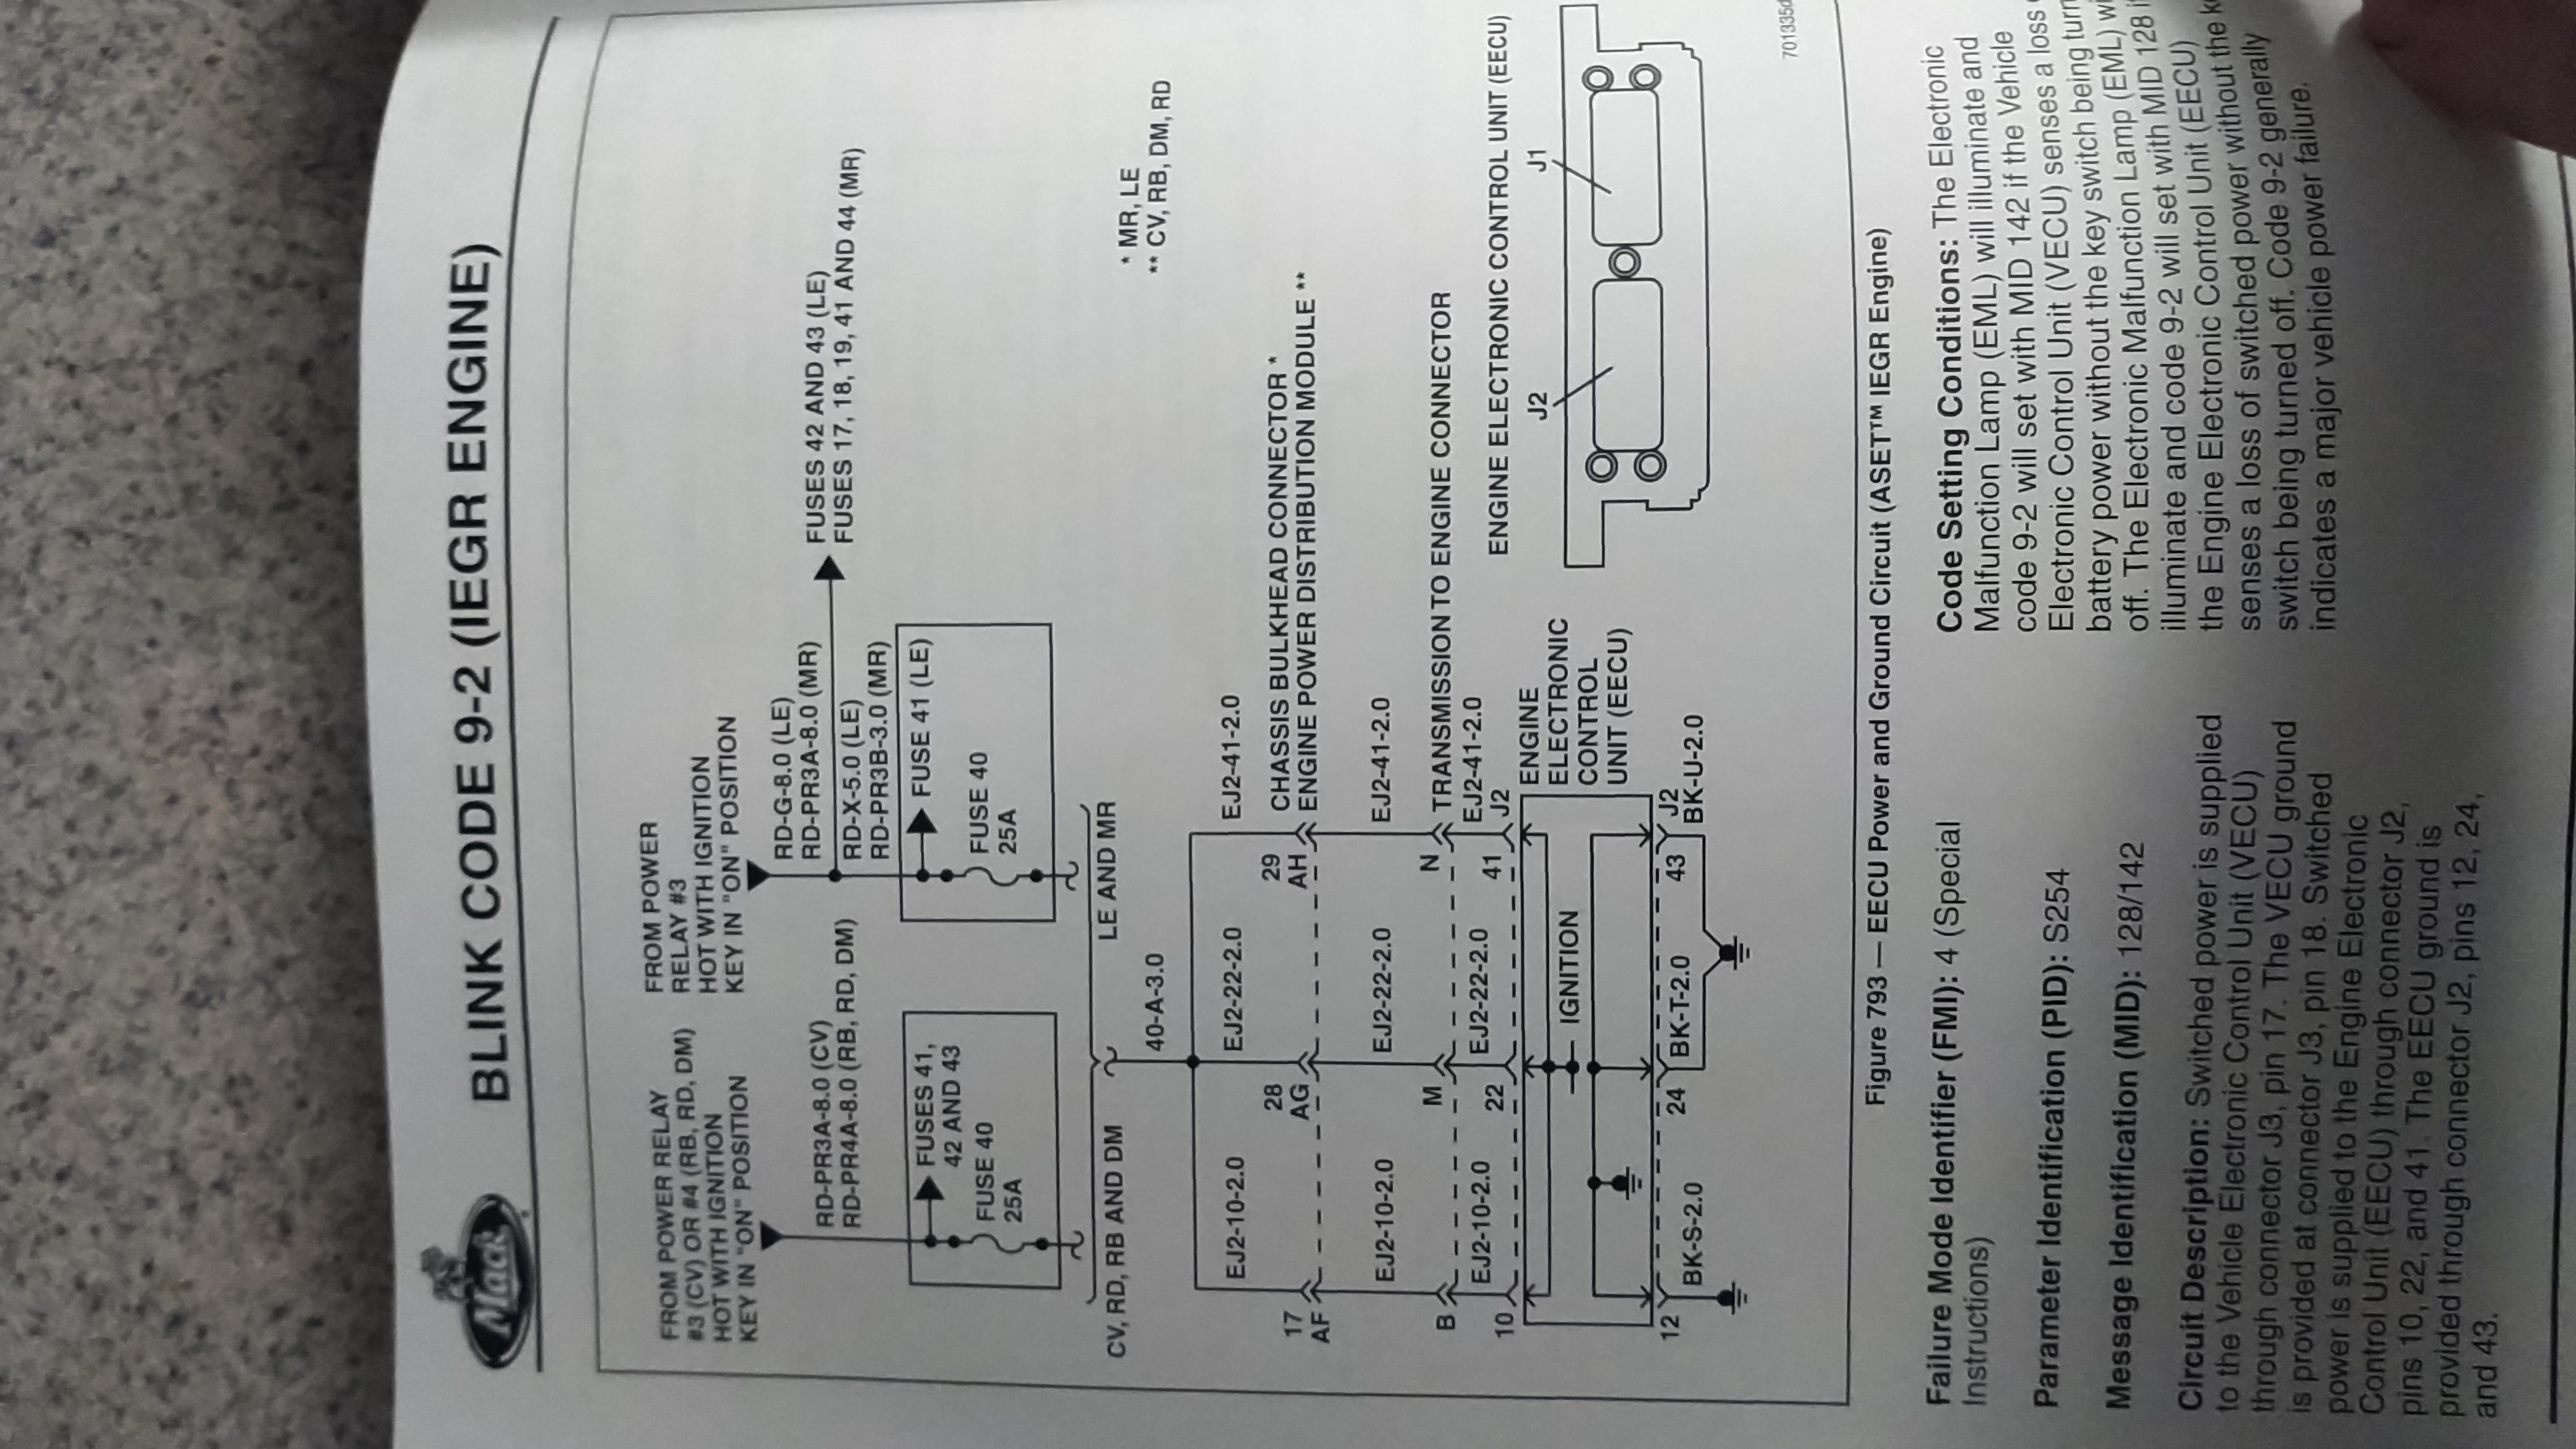
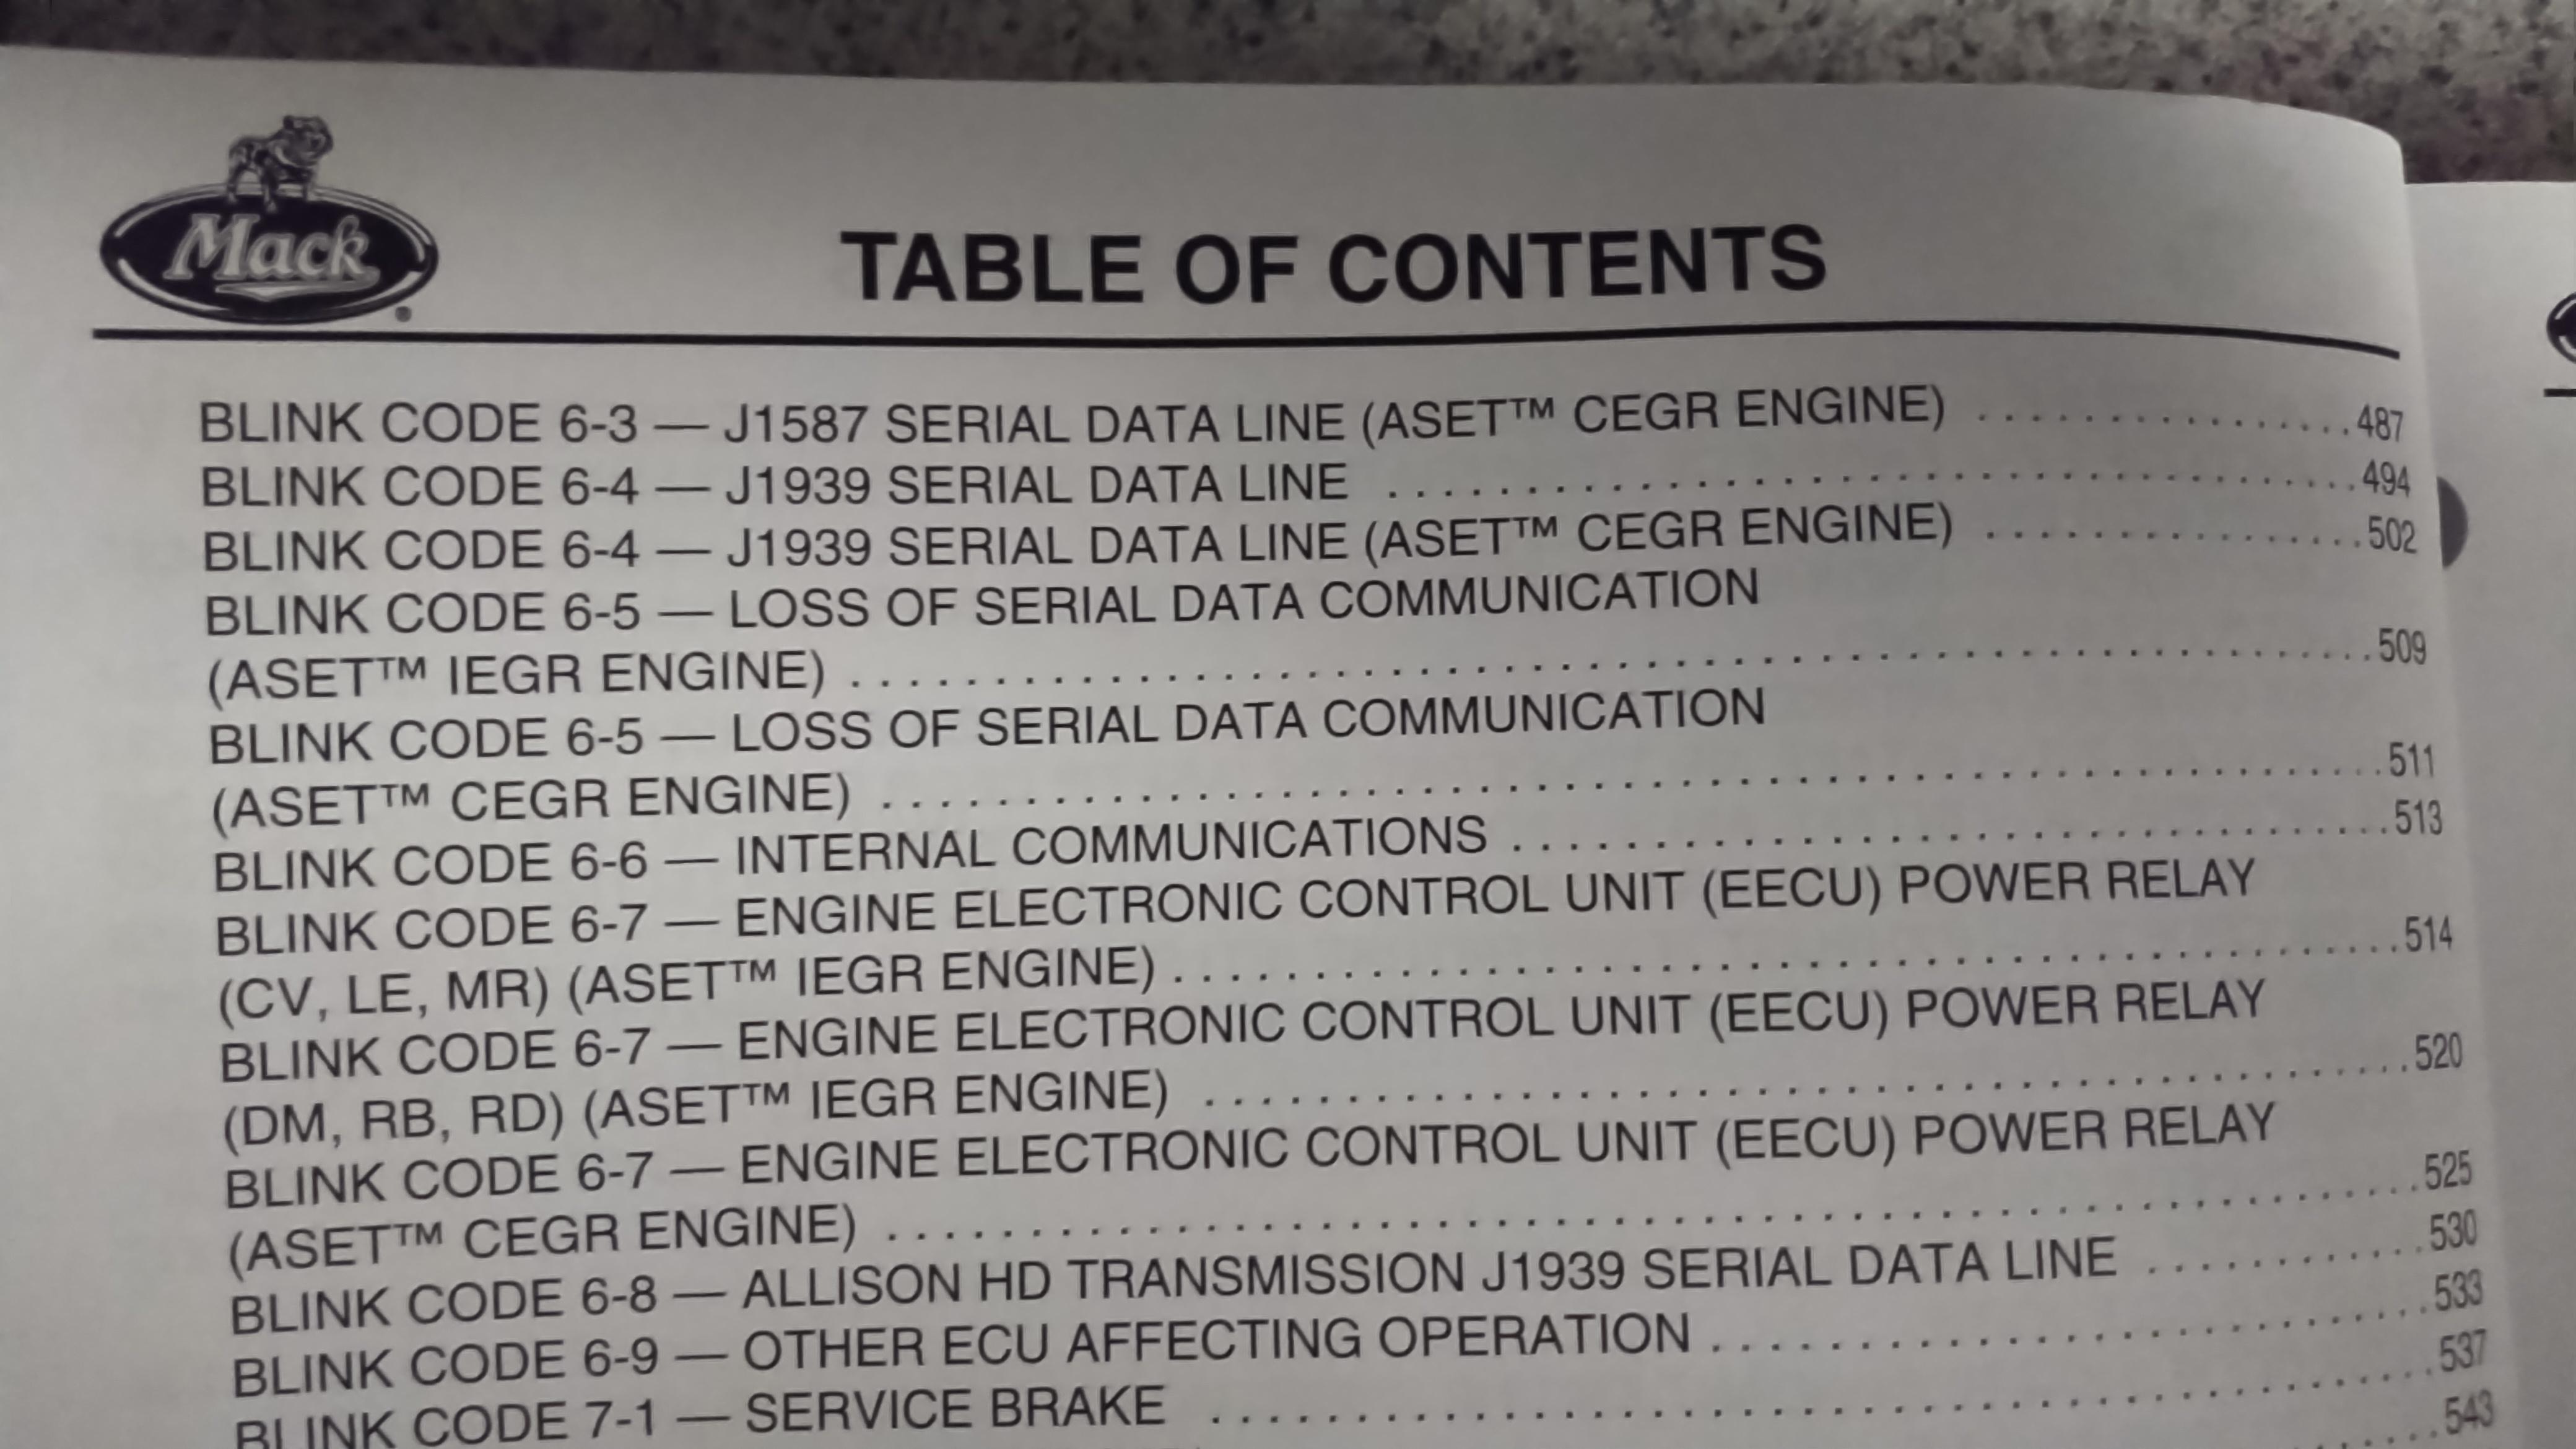
Appears your VECU power is dropping out. This is likely the trigger for the 6-3 code, as the VECU dropping out will obviously disrupt data communication. -
MR 688 electrical trouble shooting. No crank
JoeH replied to Ryanp's topic in Electrical, Electronics and Lighting
-
MR 688 electrical trouble shooting. No crank
JoeH replied to Ryanp's topic in Electrical, Electronics and Lighting
-
MR 688 electrical trouble shooting. No crank
JoeH replied to Ryanp's topic in Electrical, Electronics and Lighting
-
So some Mack camelback trucks have a torque arm on the rear differential going to the right frame rail. It prevents the axles from walking. Check to see if you have one, check condition of the joints at either end. Replace if worn. Also, elephant pads aren't a terrible job, doable in a day, but they do take some serious torque to tighten down. Expect to replace all bolts, you will likely be torching some off. Few different styles of pads I believe. Some use a metal side insert some don't.
-
Remove one side, separate, sandblast/paint, bolt back together, install, shift cribbing to other side, & repeat.
-
This is the second truck I've done this to. Leave one side in to hold alignment of everything. Put jackstands/cribbing under everything on the other side, and pull the supported side out. Separate by driving a long 2x6 (cut the one end into a wedge) into one end. Lots of hard work involved, be careful you can kink the rails if you try separating them like a wish bone. If it's a dump truck you will have to pull the dump body off. First truck we did was an RD model, the cab had to get jacked up pretty high to let the frame clear. This one I linked is an MR, the cab tilts forward giving tons of room to work.


BMT Forum Logo
