


mattb73lt
-
Posts
1,427 -
Joined
-
Last visited
-
Days Won
146
Content Type
Profiles
Forums
Gallery
Events
Blogs
BMT Wiki
Collections
Store
Everything posted by mattb73lt
-
I think you're closer to 1500#'s or maybe a little more. When I swapped from a EN402 to a END673 all I had was a car lift rated at (supposedly) 3,000#'s. I did it by myself, no help. Wouldn't recommend it. I bent the lift and got it in without killing myself. The Cummins NH220 I've been messing with is 2,700#'s, quoted in the book I have for it. It's heavy and I don't mess around anymore. I borrow a 5,000# lift from a friend, now. If you have to move or lift it, make sure you have the right capacity equipment. Be safe don't hurt yourself or someone else.
-

I need a new rear end
mattb73lt replied to D2Denny's topic in Antique and Classic Mack Trucks General Discussion
Is that a top loader axle? I was thinking of you swapped to a RAD508 (or similar axle) front loader and the went to a CRD117 carrier, it would give you a much wider selection of ratios to choose from. I run CRD117's in both my trucks with a 4.62 ratio and a TRTL720. One has 22.5 rubber and the other 24.5 rubber. Granted, I only had limited test run time on the truck with the 24.5's, but I was turning 1650 RPM's and was going 73 MPH in 5th Hi-split. Just some food for thought. -
B-73 Restoration
mattb73lt replied to mattb73lt's topic in Antique and Classic Mack Trucks General Discussion
Not sure, yet. I let him know the parts had arrived, today. I think we're probably 2-3 weeks out to start assembly. I'll reach out to you as we get closer to an actual date. -
B-73 Restoration
mattb73lt replied to mattb73lt's topic in Antique and Classic Mack Trucks General Discussion
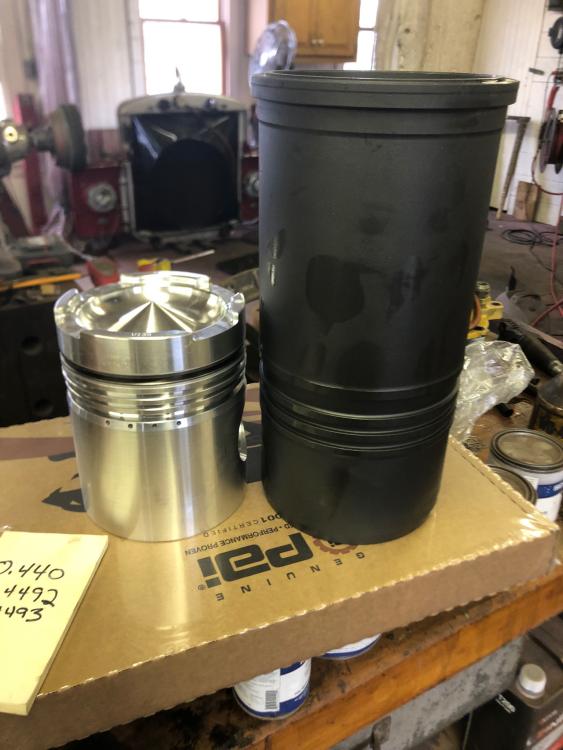
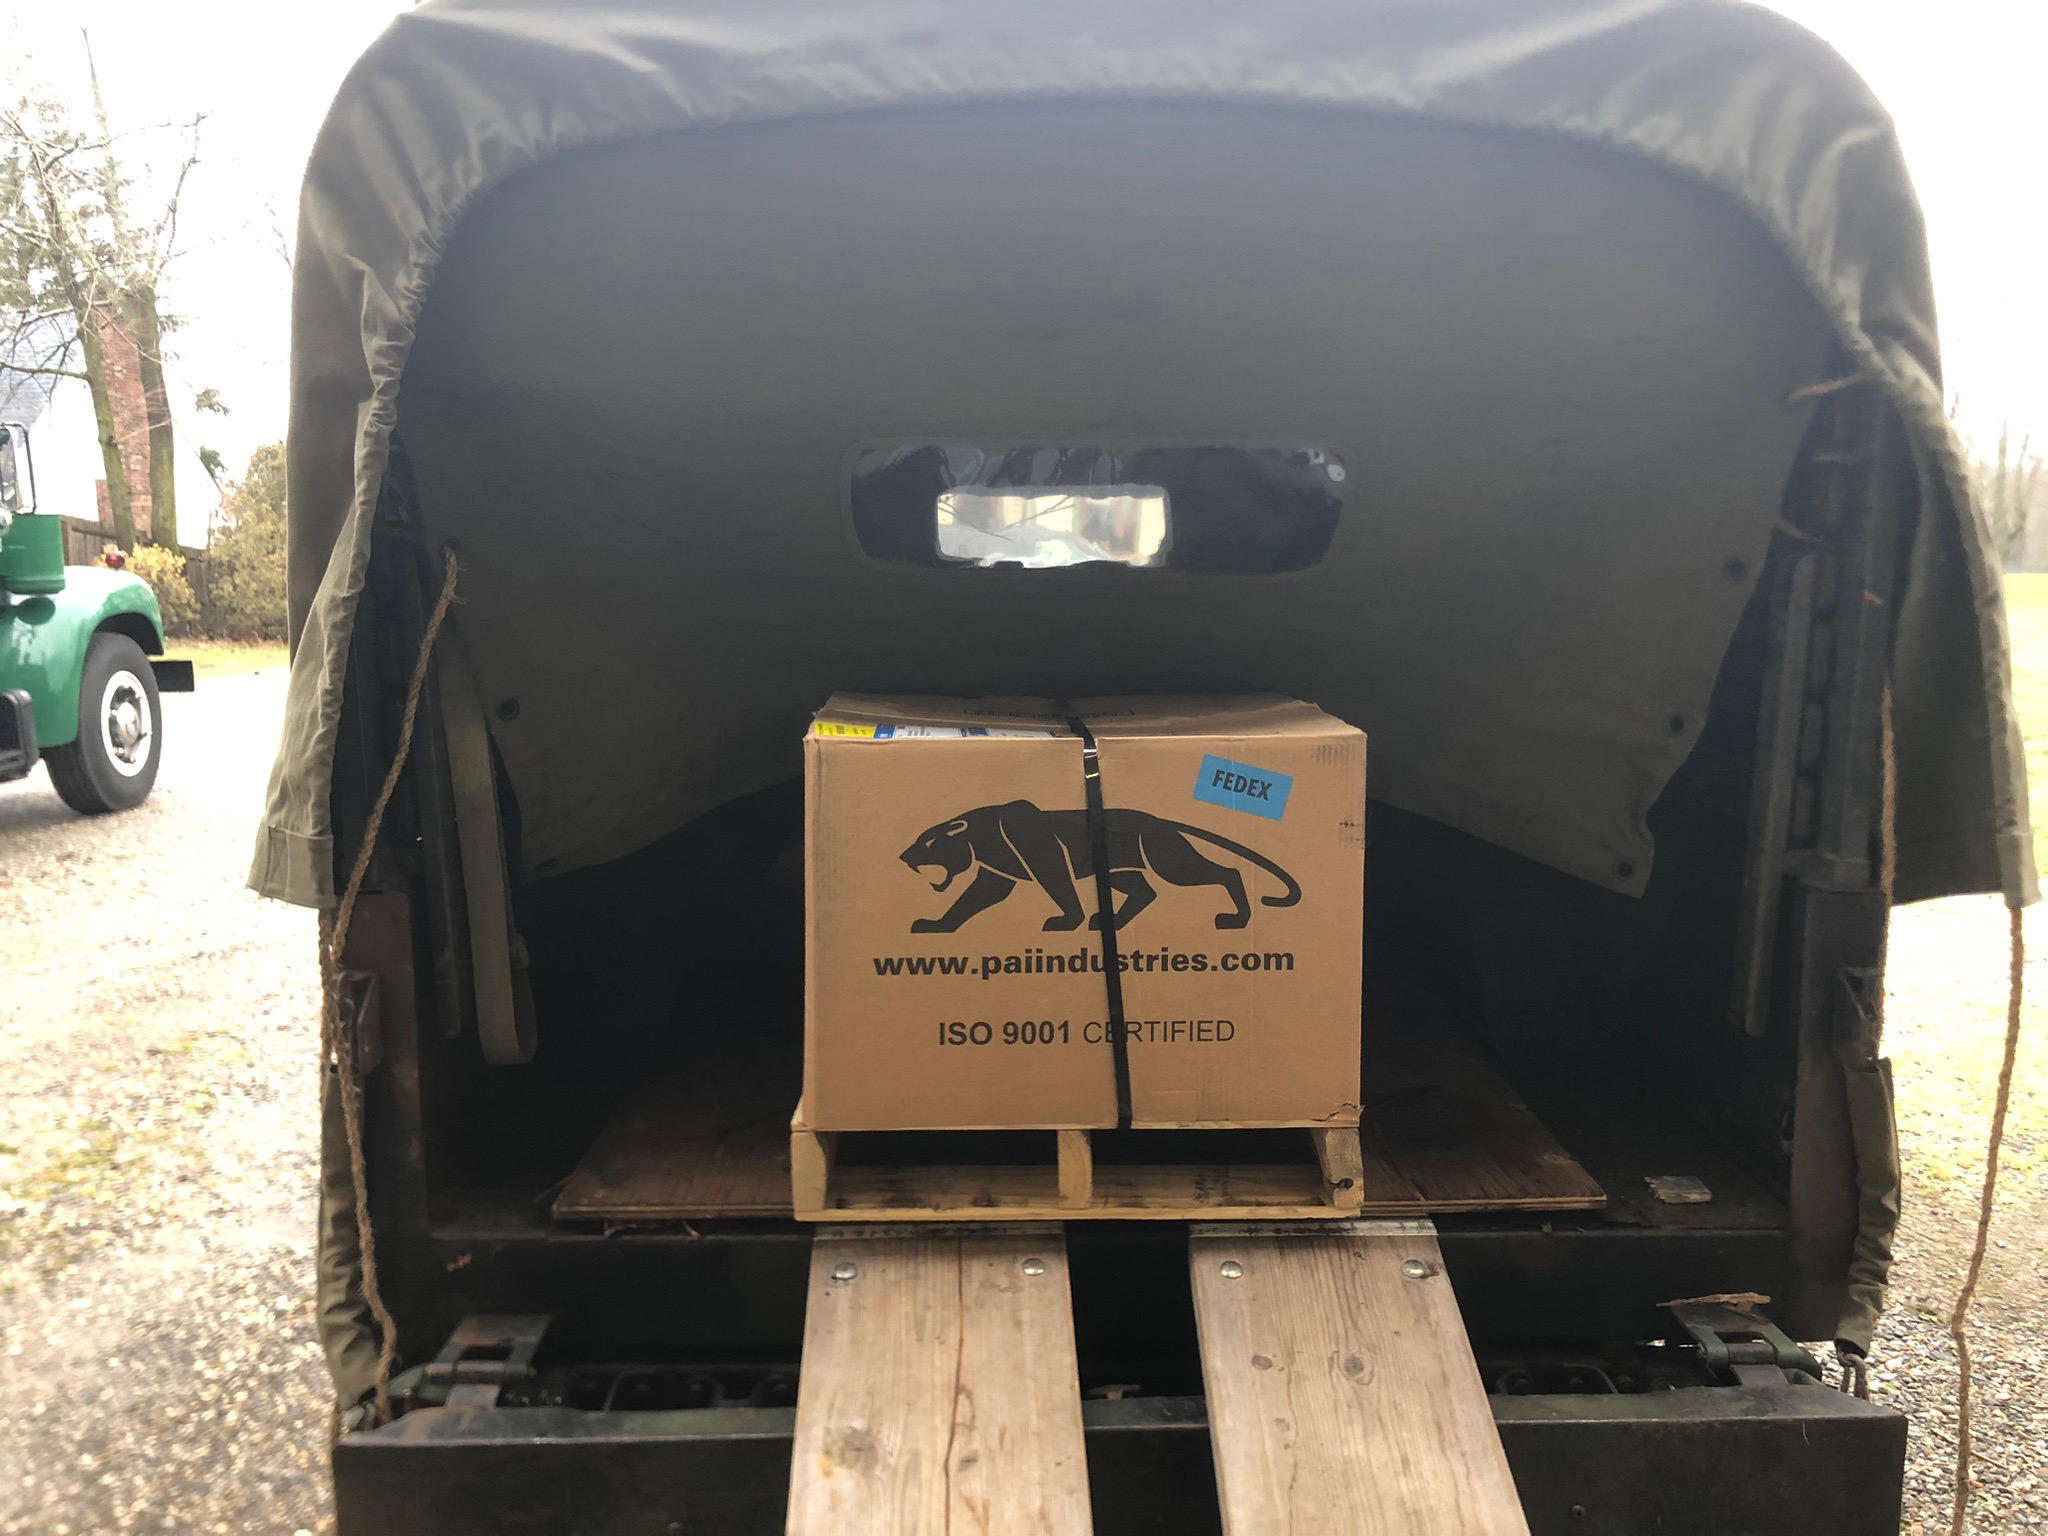
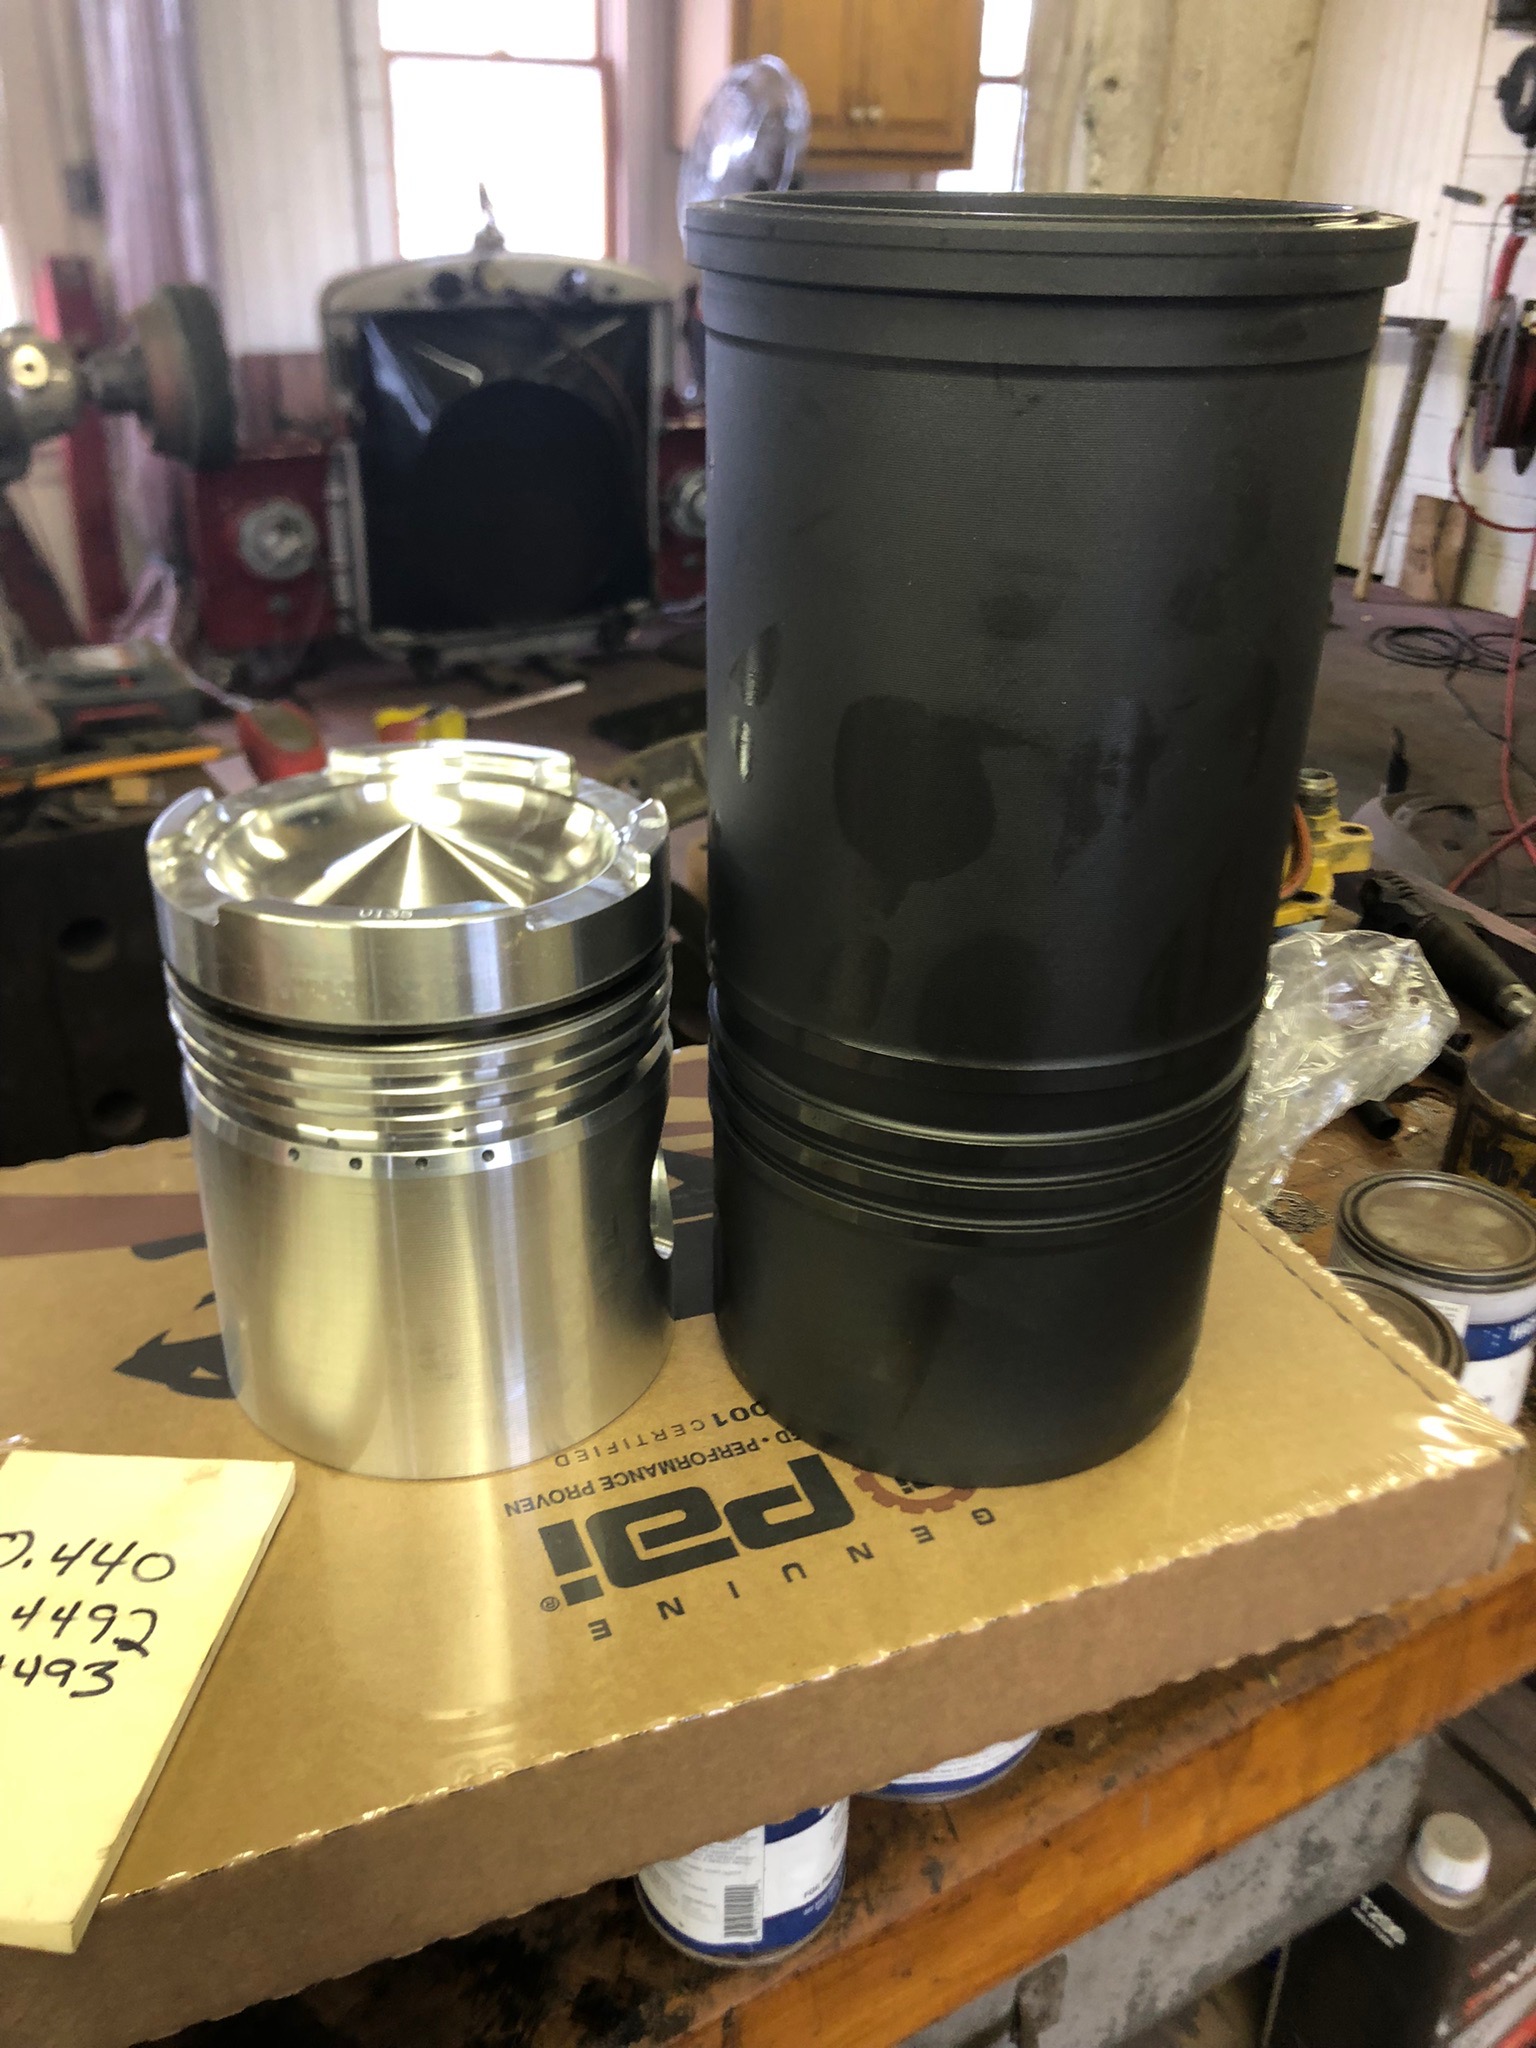
Christmas in January!!! The PAI liner kits and gaskets arrived today!!! Moving forward again, finally.
-
B-73 Restoration
mattb73lt replied to mattb73lt's topic in Antique and Classic Mack Trucks General Discussion
Yeah, no doubt!! It's last use killed it. -
B-73 Restoration
mattb73lt replied to mattb73lt's topic in Antique and Classic Mack Trucks General Discussion
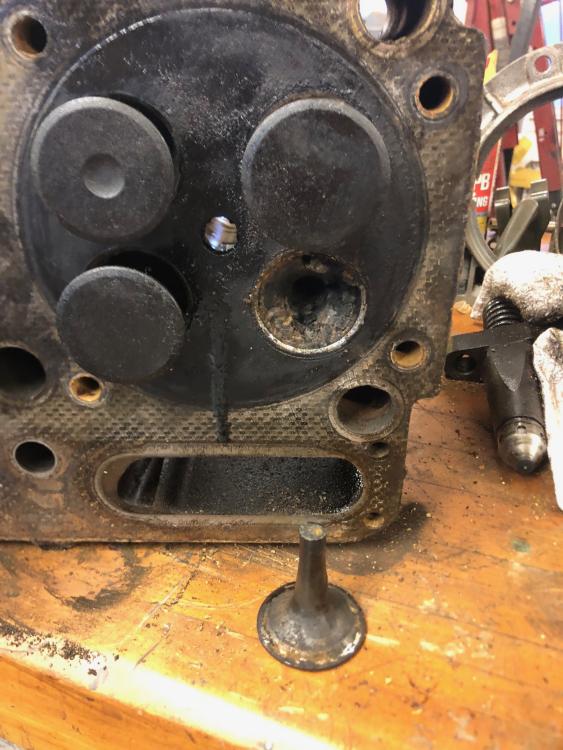
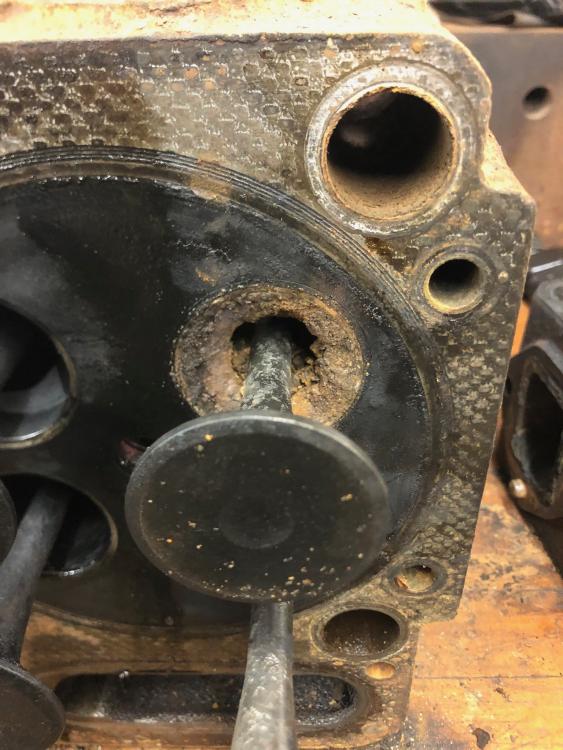
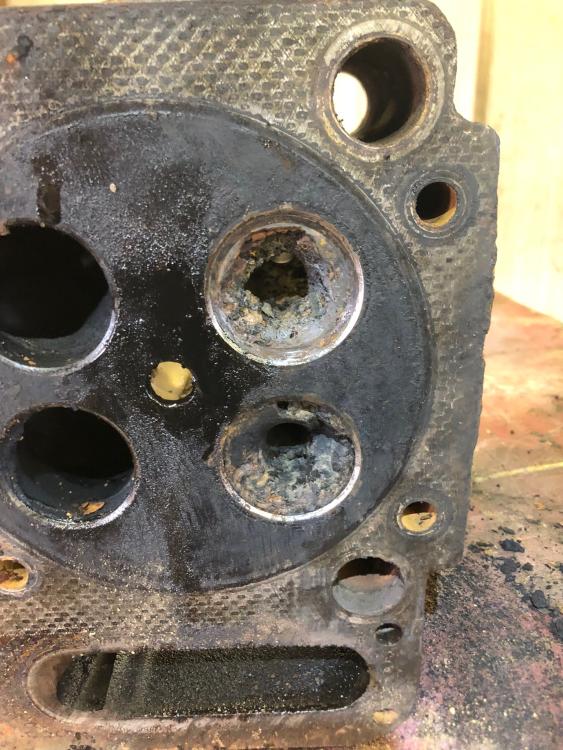
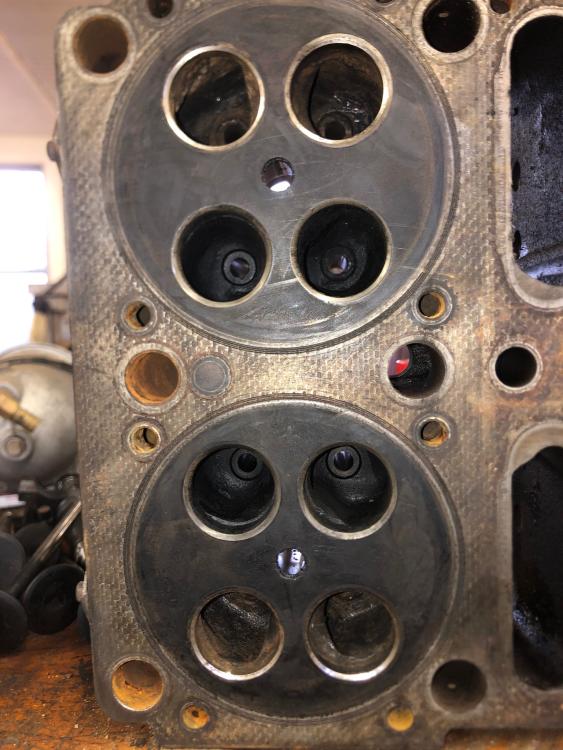
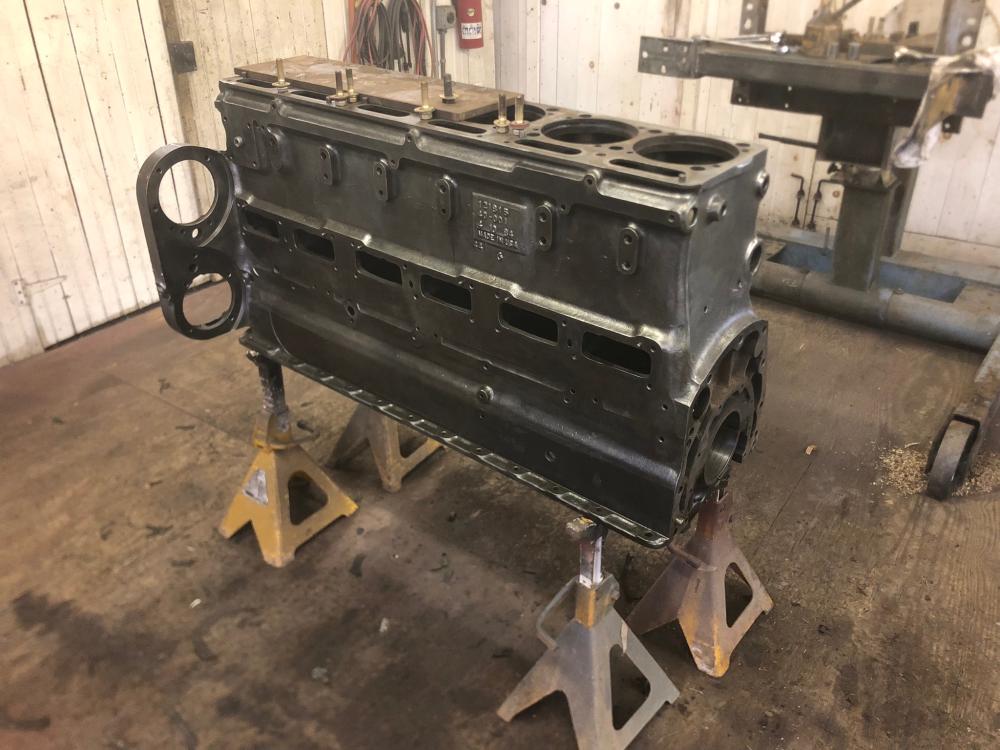
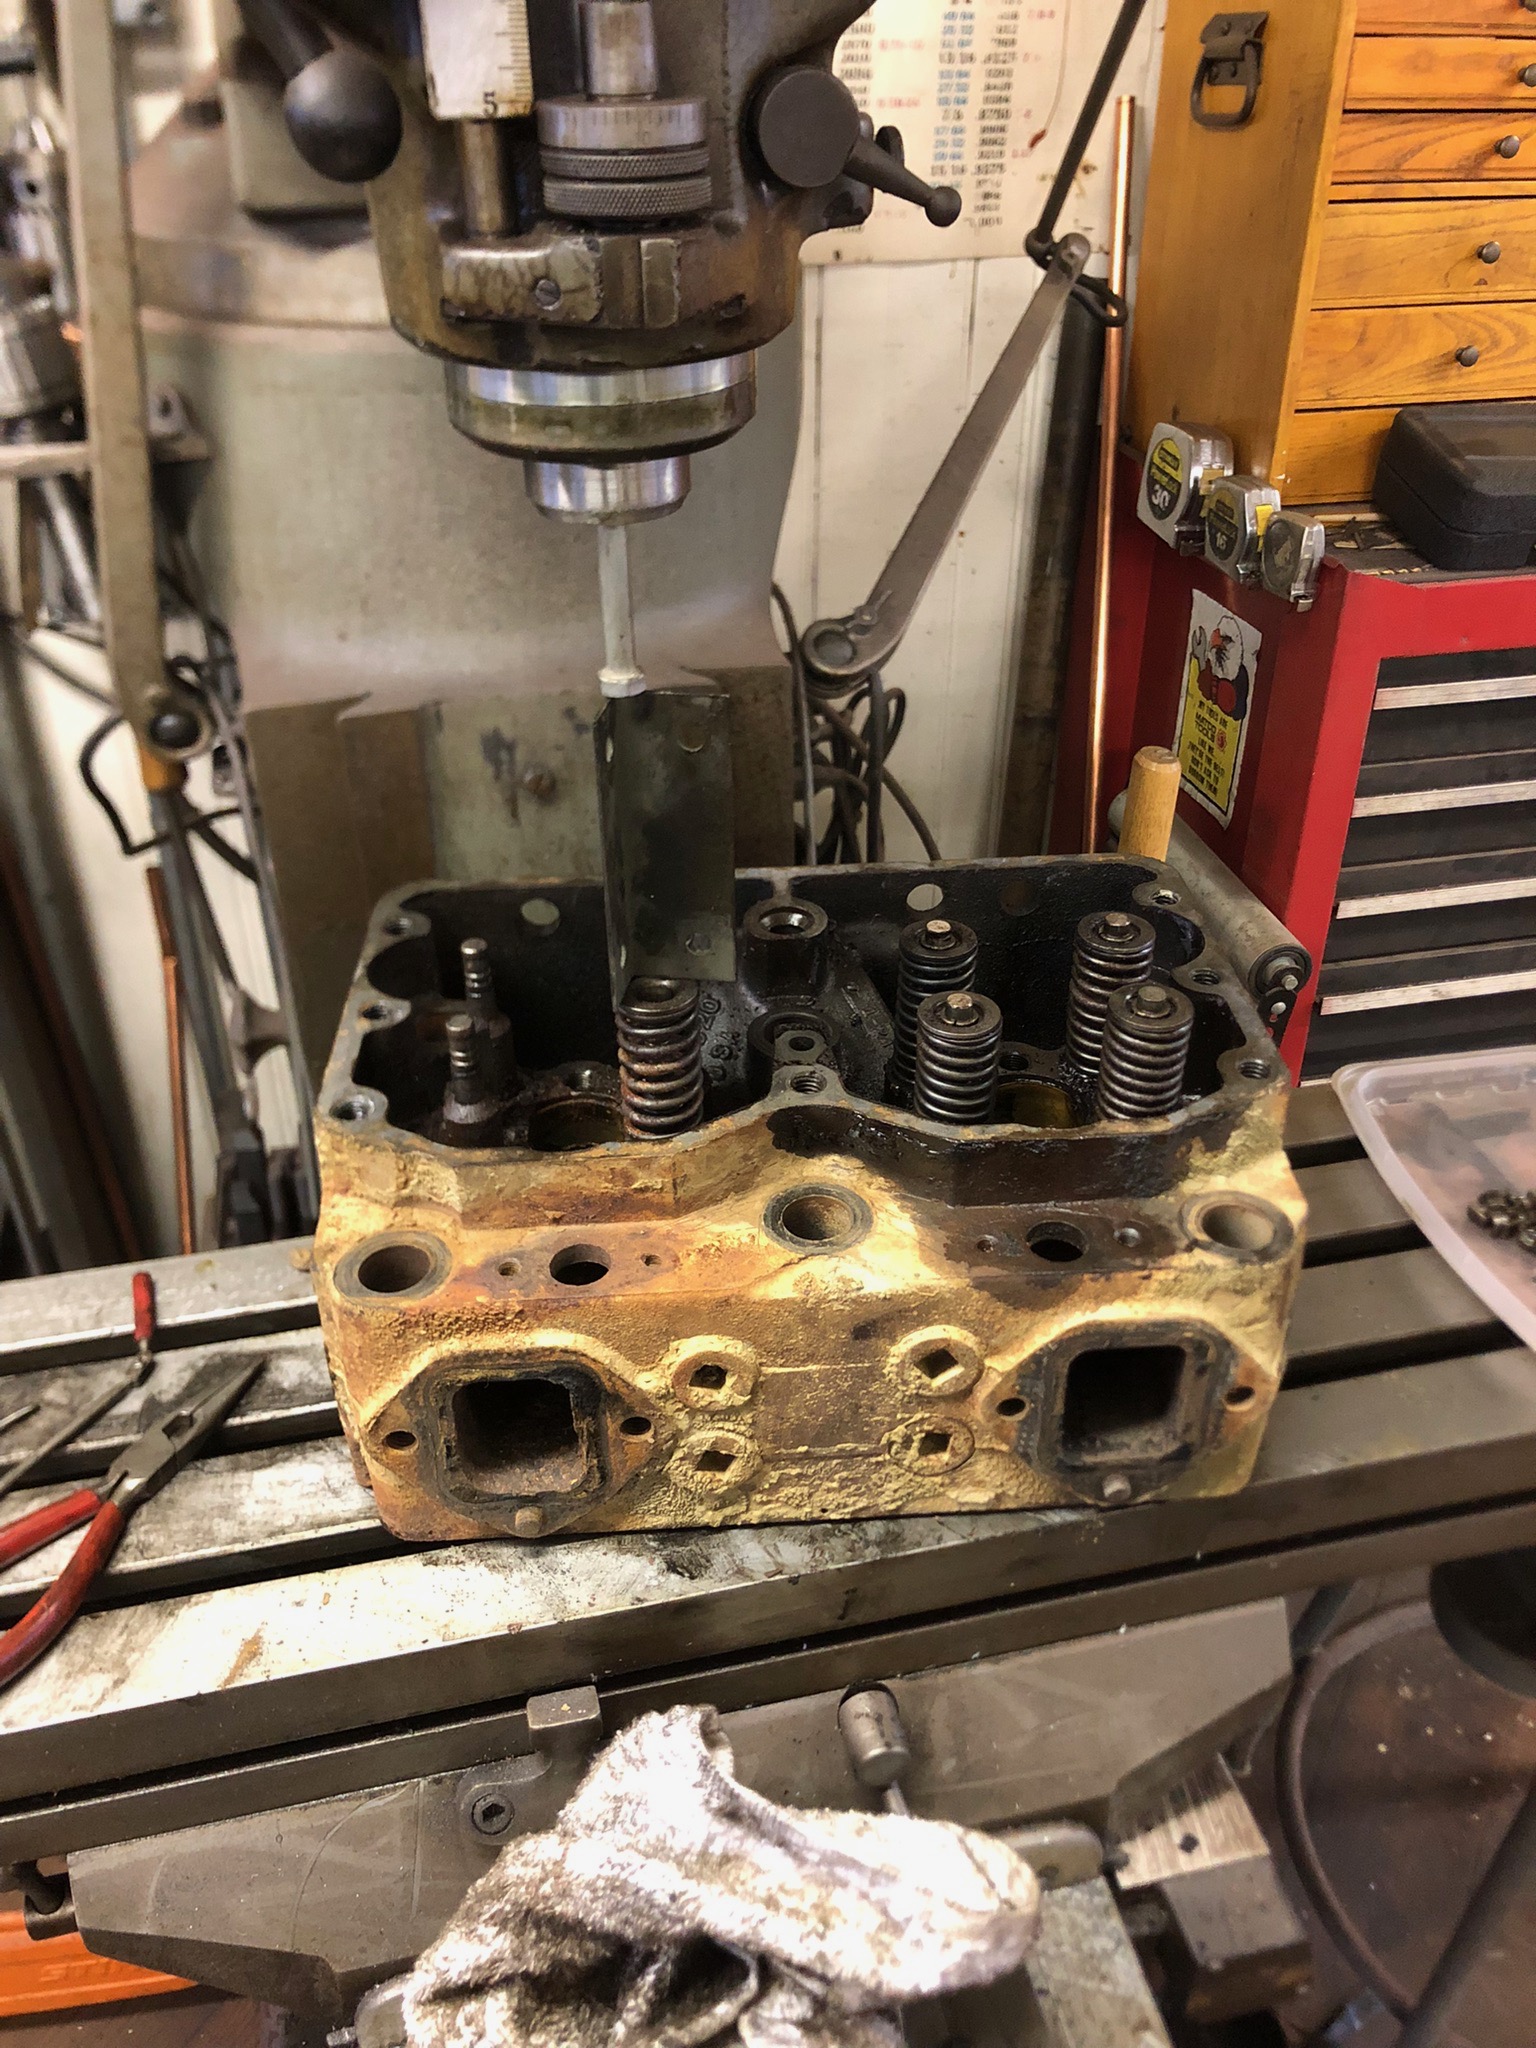
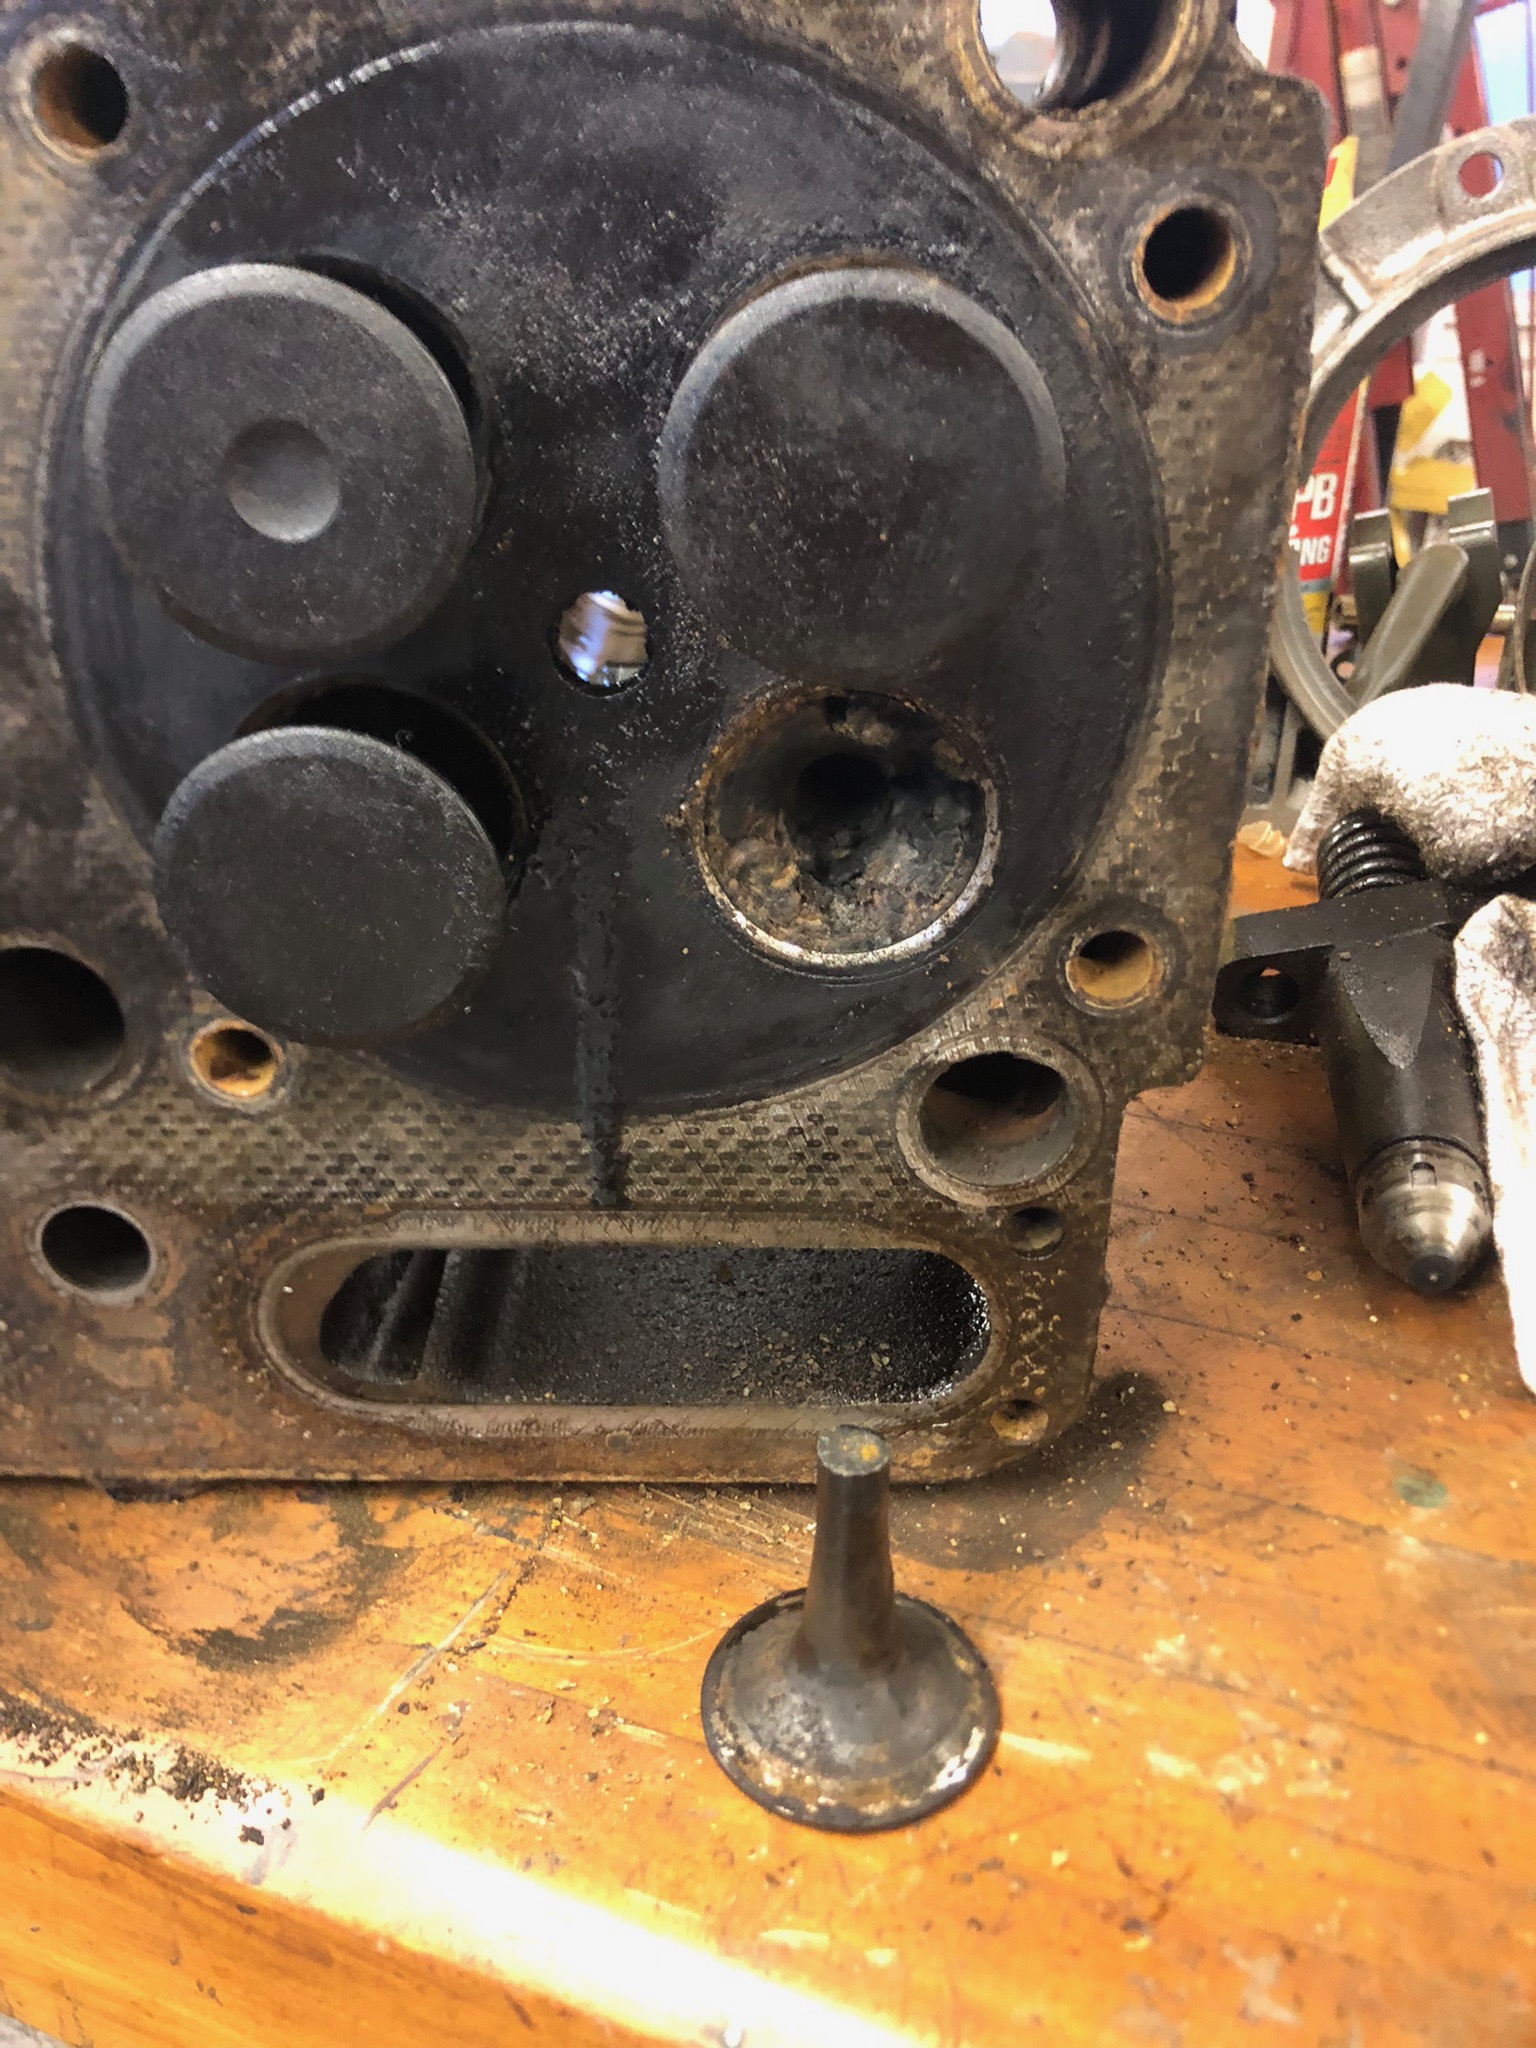
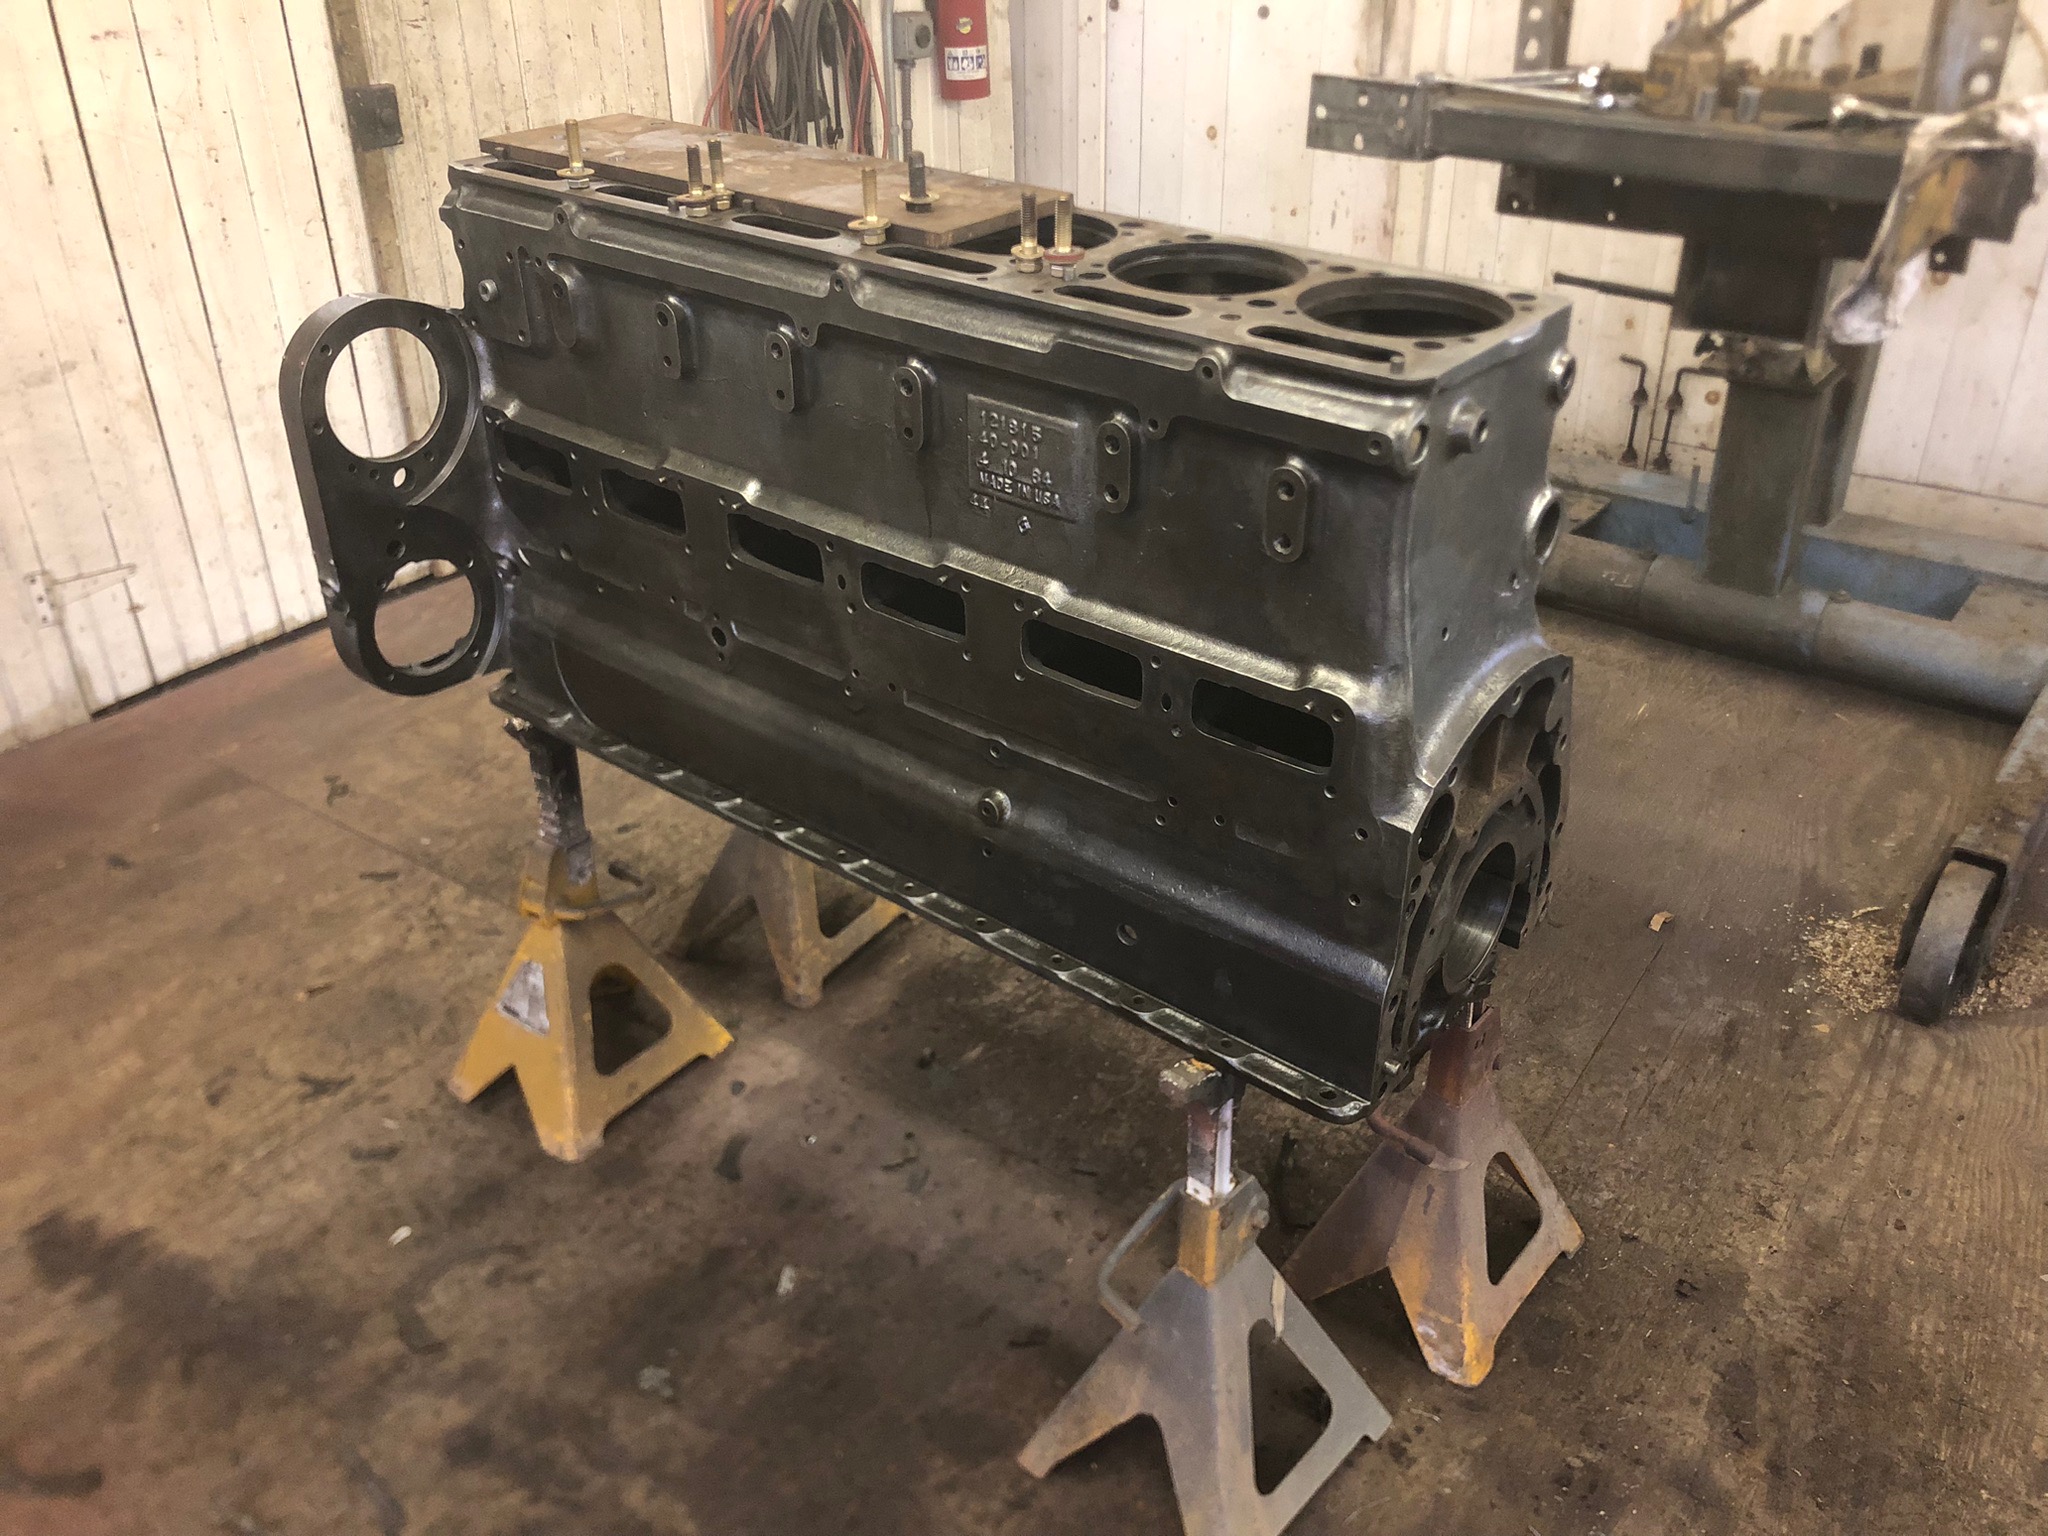
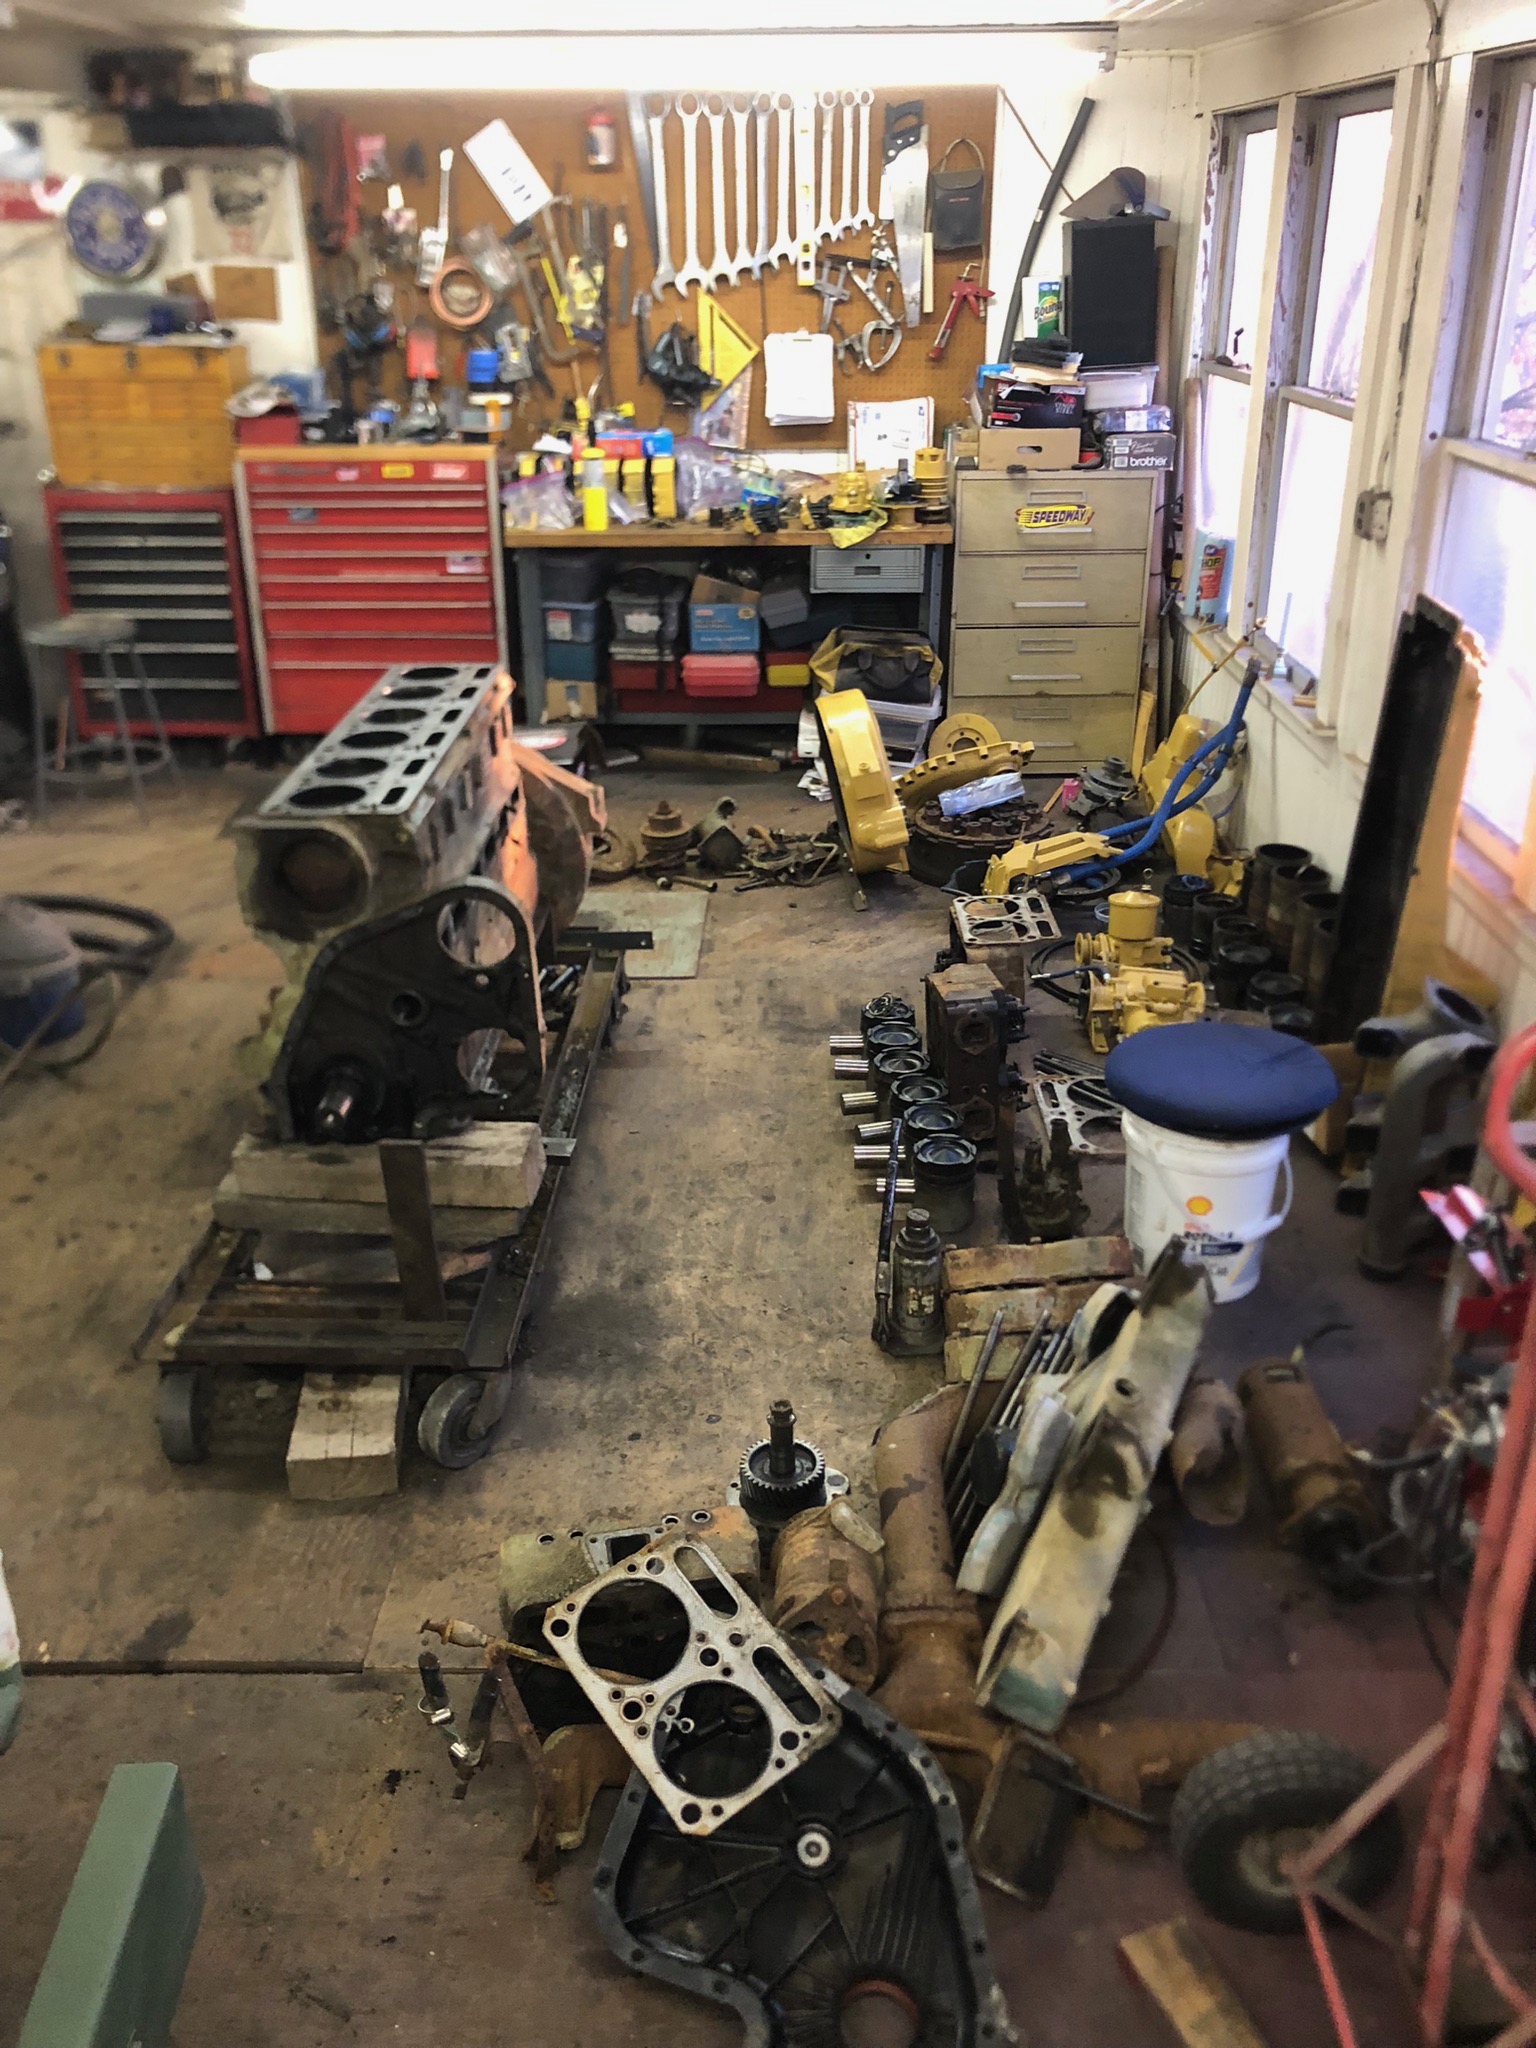
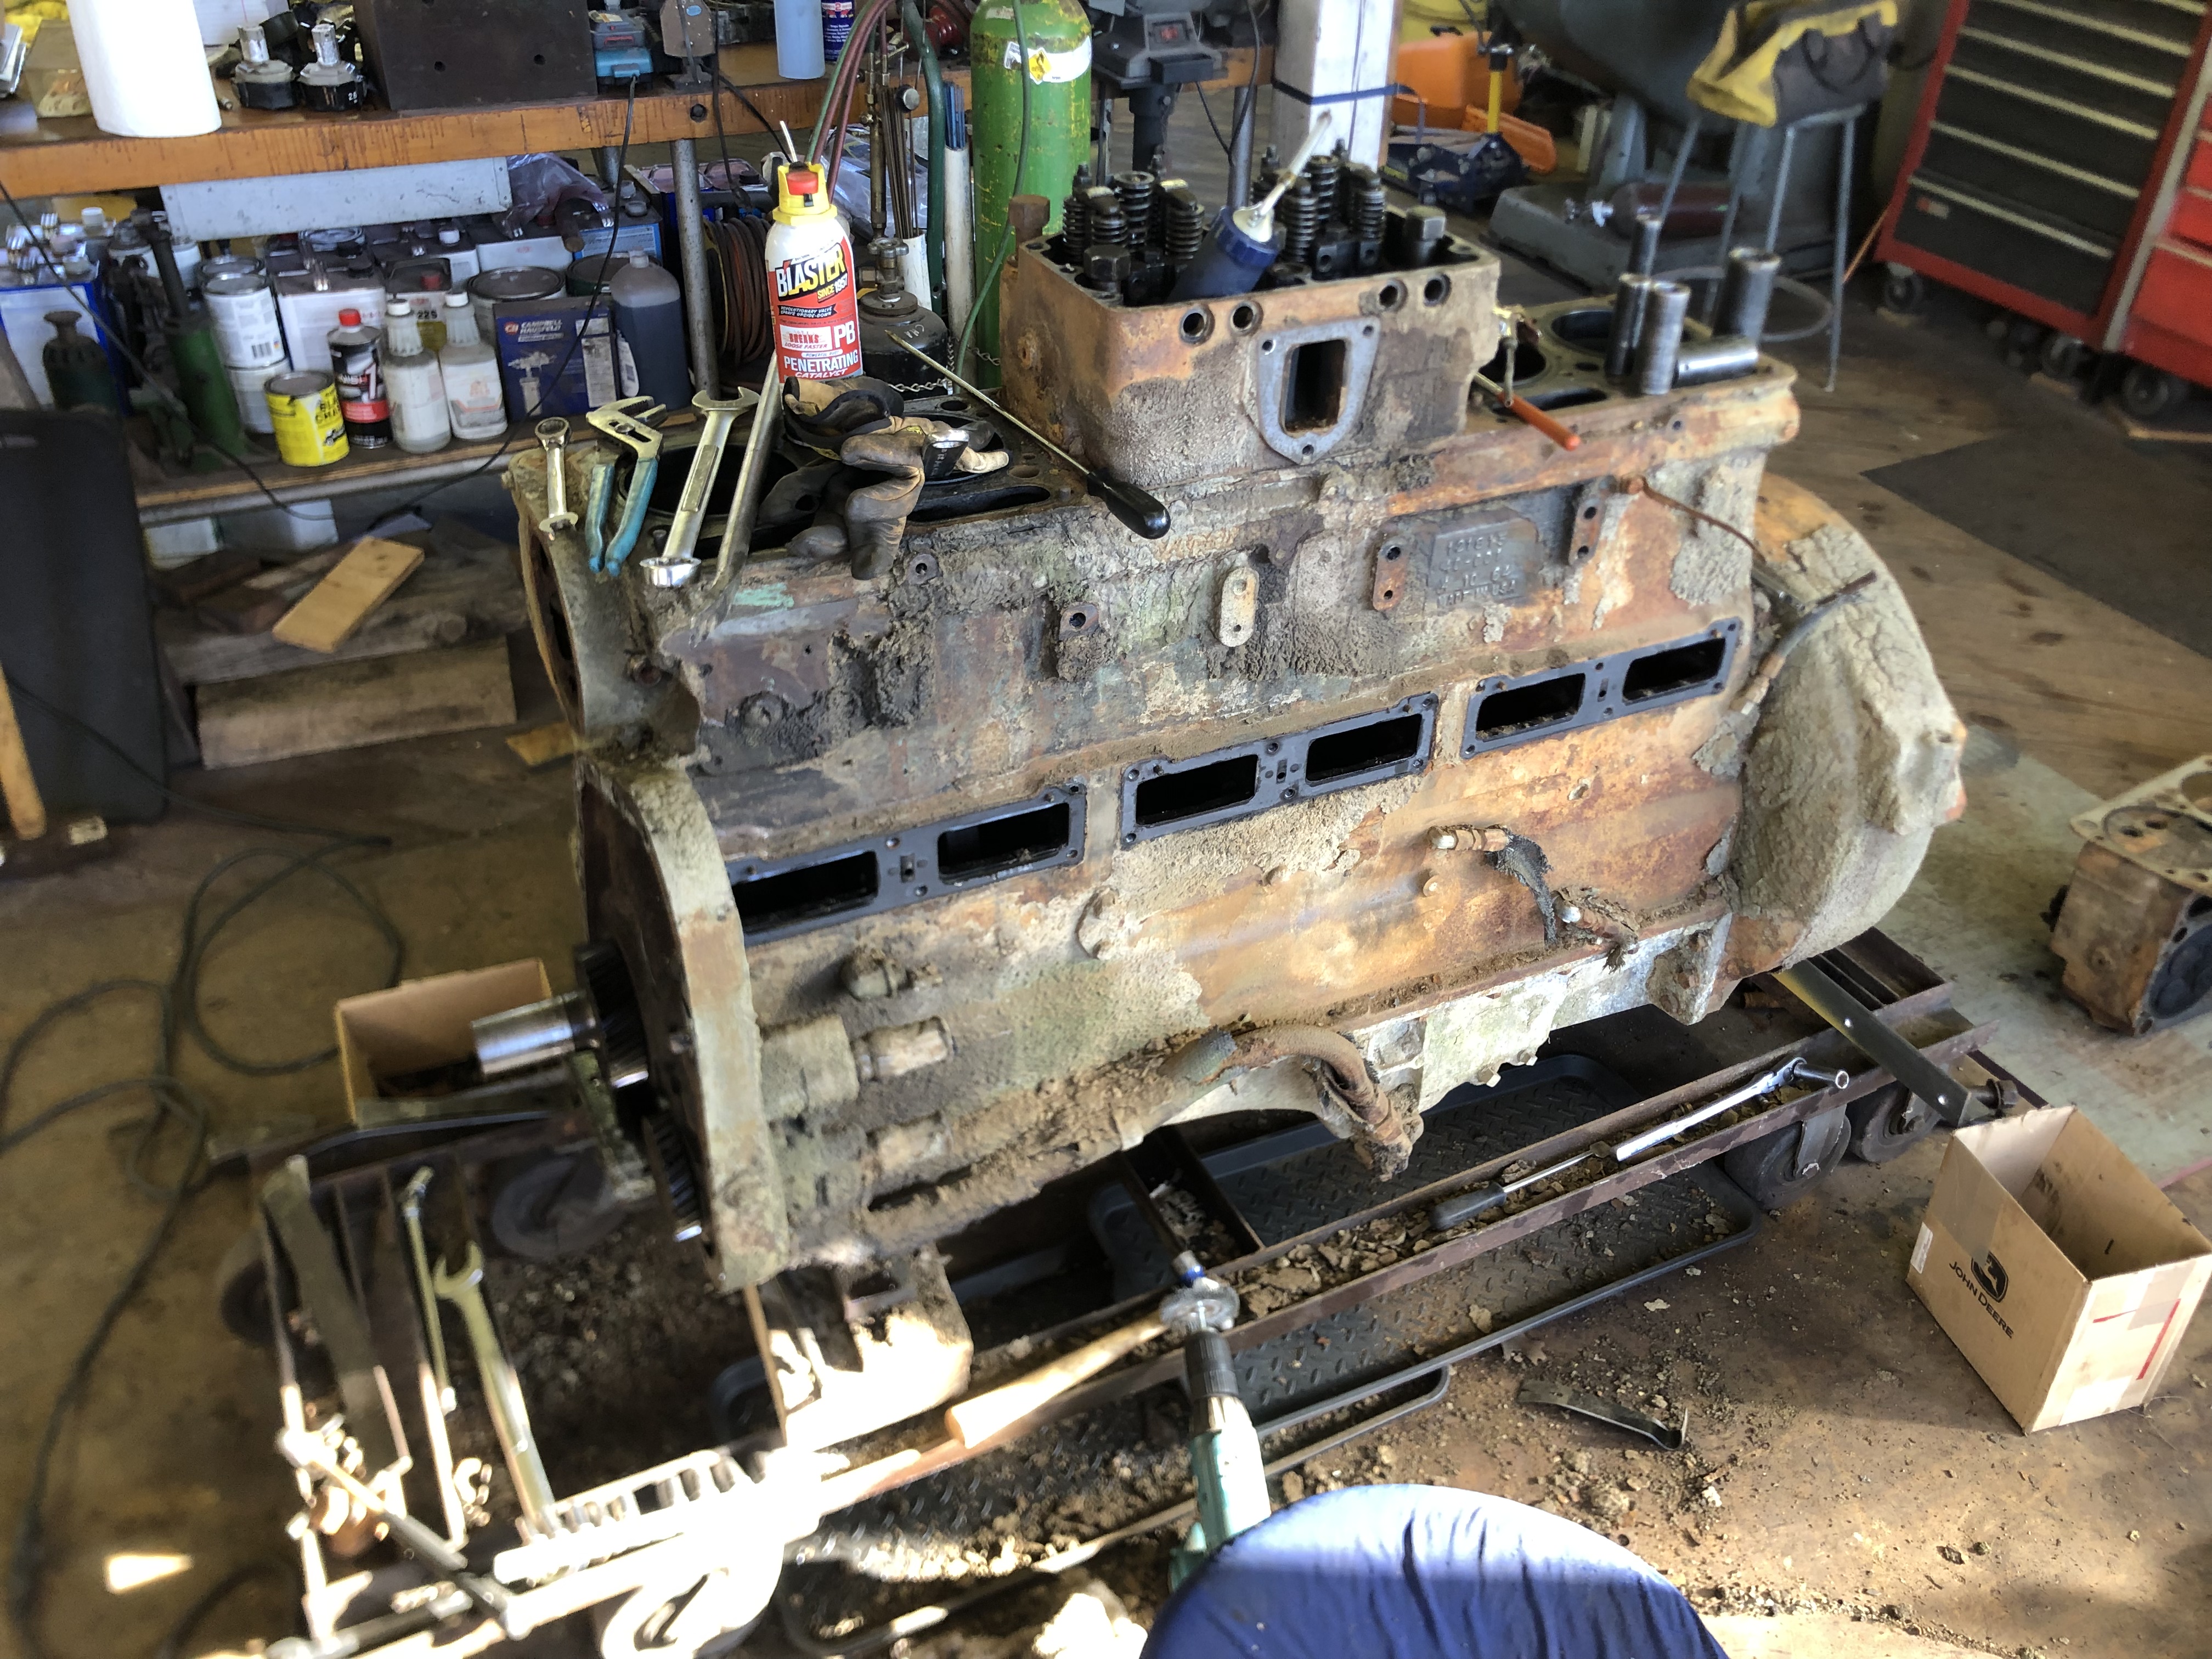
I've never seen heads so plugged up with carbon!! Or how did this engine even run?? Trying to keep these heads together with the donor block as they are matching with the 1964 dates. They went in the hot tank this morning along with block. Disassembled and cleaned them out beforehand. They'll need new valves and springs to start. We'll see about the guides and seats as we dig into them. I had a valve head literally drop off the stem as I tapped it out. Thank God no one ever tried to start it, as it would have self destructed in seconds. If it could even start!! The engine came out of a truck that was last used as a yard truck before it was scrapped. So it never really got hot or run hard and I think that was the reason for so much coking. The Piston/Liner kit and gaskets are arriving tomorrow. Holding off on the bearings until we're certain which crank/ block were using. It was a huge relief to find out everything for a NH220 can still be had, with a little searching. Ralph Mahoney & Sons has been a huge help. I think I'm a few weeks away from the reassembly and Rocky is cued to help in that area. And back on track to getting this huge project done and back on the road!!
-
B-21 Fire truck
mattb73lt replied to MorrisMe's topic in Antique and Classic Mack Trucks General Discussion
I never realized that they did both the fender extensions and the extended radiator shell to fit that huge Hall-Scott in there. I always thought it was just the radiator shell, but I've never seen one in person or close ups pics of one. Kind've like using B73/75 and B71 parts to fit it in there. I know a Cummins is 6" longer than a Mack engine, so maybe the Hall-Scott is about 12" longer? -
B-21 Fire truck
mattb73lt replied to MorrisMe's topic in Antique and Classic Mack Trucks General Discussion
This is the style it should have, level, flat and rounded. If it is more angular with sharper features and has a more upright stance like the radiator mascot, then it's probably for an R Model or later.
-
Hub conversion
mattb73lt replied to Puller270's topic in Antique and Classic Mack Trucks General Discussion
Not the easiest swap to do, but it can be done. Main problem, as you're finding out, is availability. Locating a set of hubs, front or rear, can be tough. I left the Dayton hubs on my B42, but swapped the rims to 22.5" on the FA505 axle. I like the look and the B model chrome hubcaps. On my B73 with a FA507 axle, I wanted to put Budd hubs on to run Alcoa rims because it has a lot of aluminum and stainless and I wanted that look. It was a whole separate project to do it, with a whole other project to add brake drums to the front hubs as they came off a truck without them. Matching up the the hubs to fit the axle/spindle arrangement can be problematic. It can be very time consuming tracking everything down and making sure it'll all fit. My best advice would be to be patient and network through everybody you know and sites like this. Be adamant and keep asking everywhere you go about them. Some will surface. As others have stated, you can also work an axle swap to make it happen.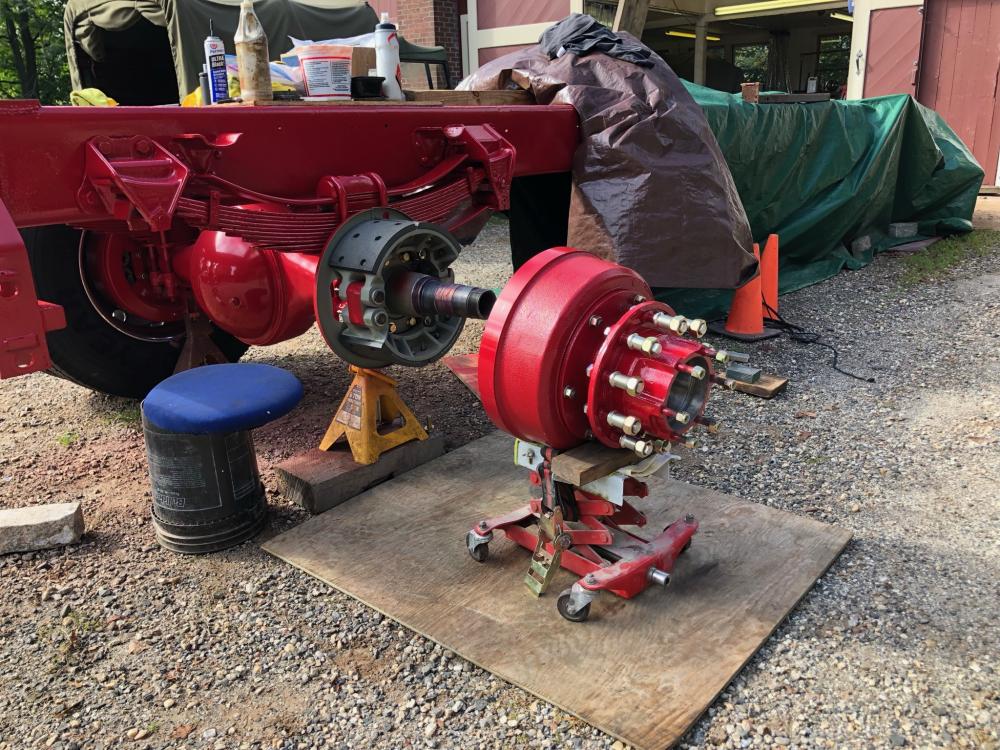

-
B-73 Restoration
mattb73lt replied to mattb73lt's topic in Antique and Classic Mack Trucks General Discussion
Oh, I will go through that drill again. Both the bell housing and flywheel!! -
B-73 Restoration
mattb73lt replied to mattb73lt's topic in Antique and Classic Mack Trucks General Discussion
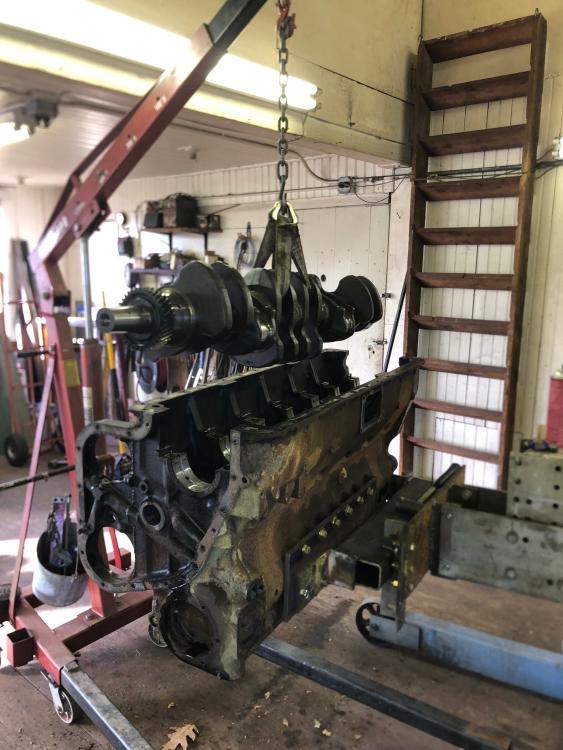
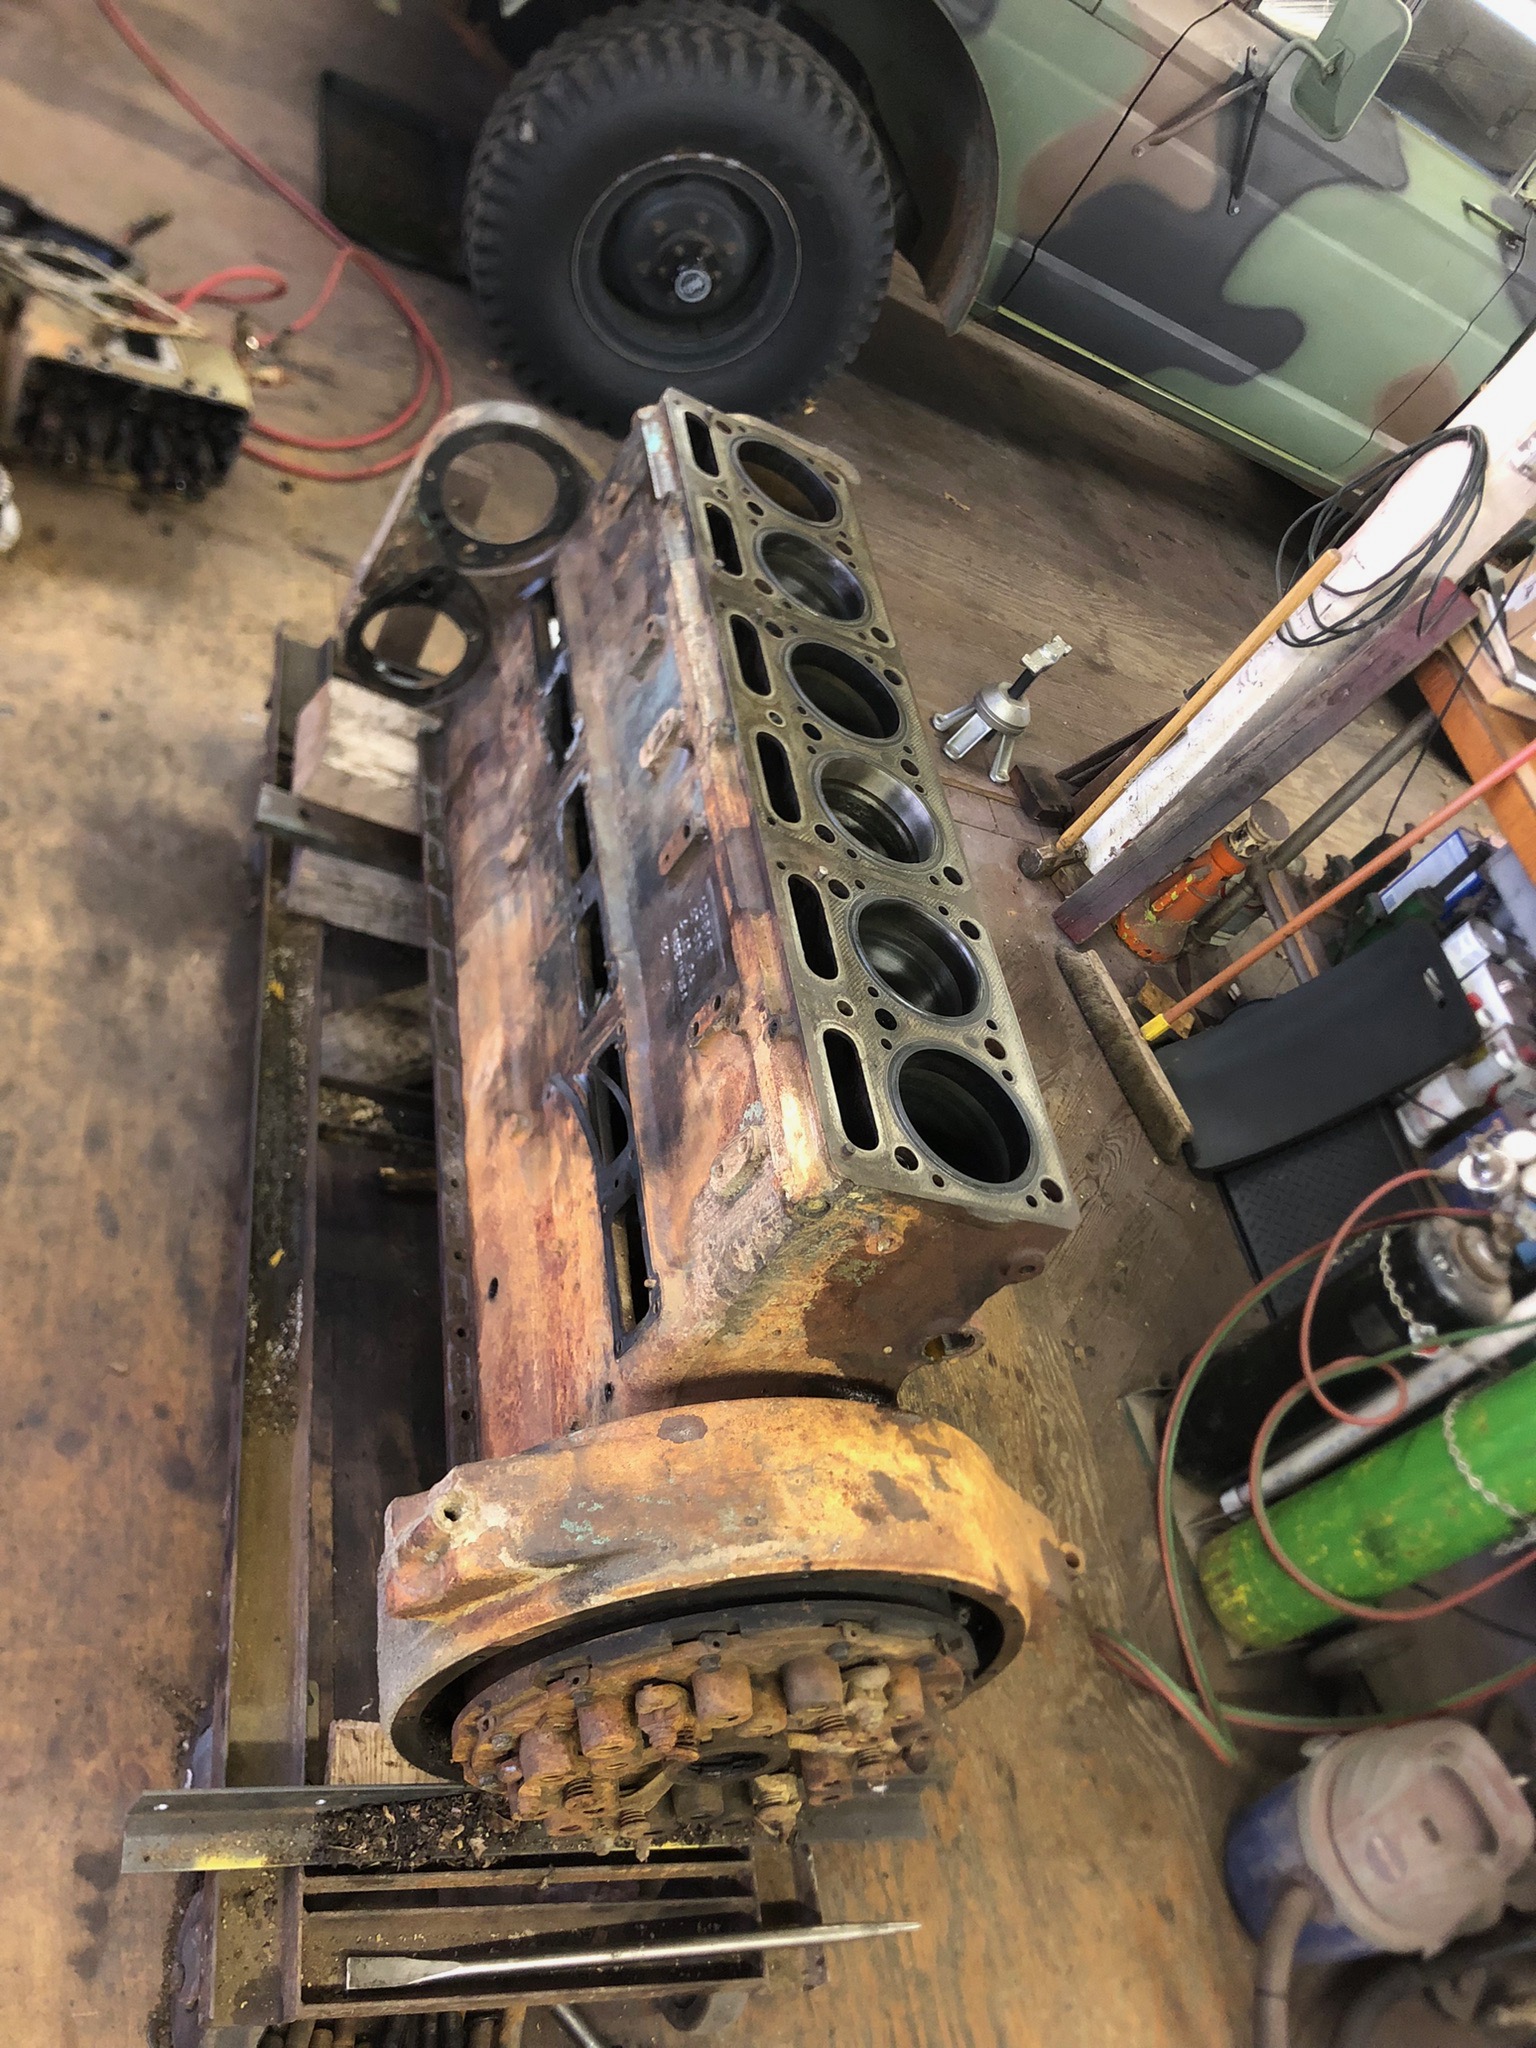
Block #2 is ready for the machine shop. I think this one will be the candidate for the rebuild. It's newer and has less issues than the other one. I'll probably use the heads off mine and combine a lot of both engines into the new one. I cleaned the exterior of this one with a wire wheel on a 4" angle grinder after scraping all the crud off it. The only issues I've found was in the bell housing area. Two broken bolts and one of the dowel pins had walked it's way out.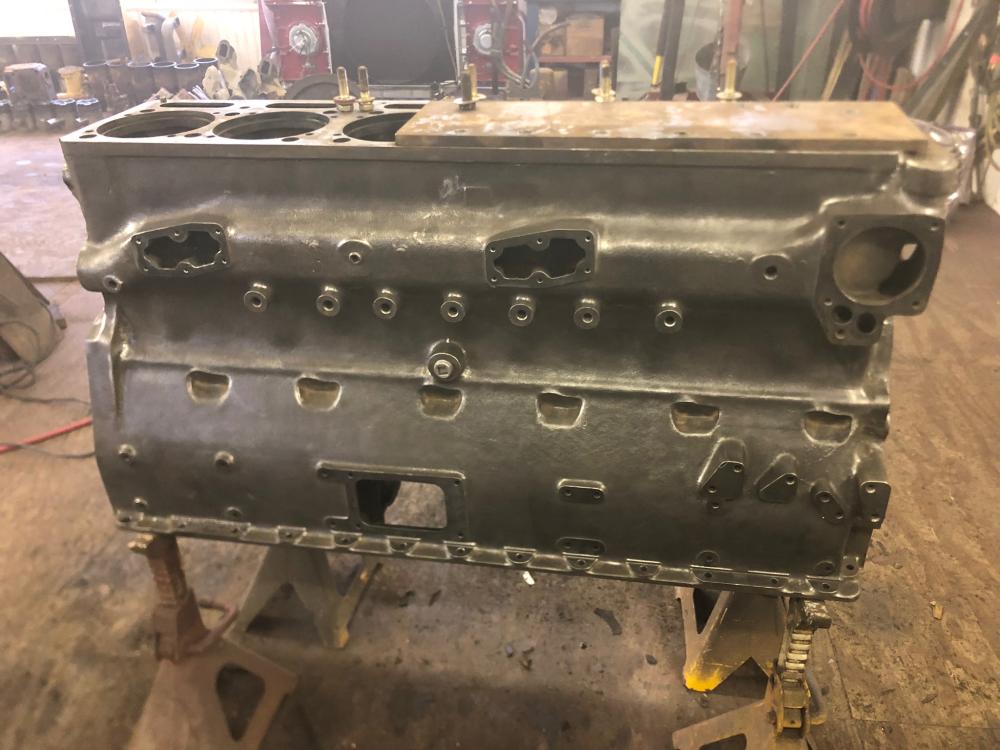
-
B-73 Restoration
mattb73lt replied to mattb73lt's topic in Antique and Classic Mack Trucks General Discussion
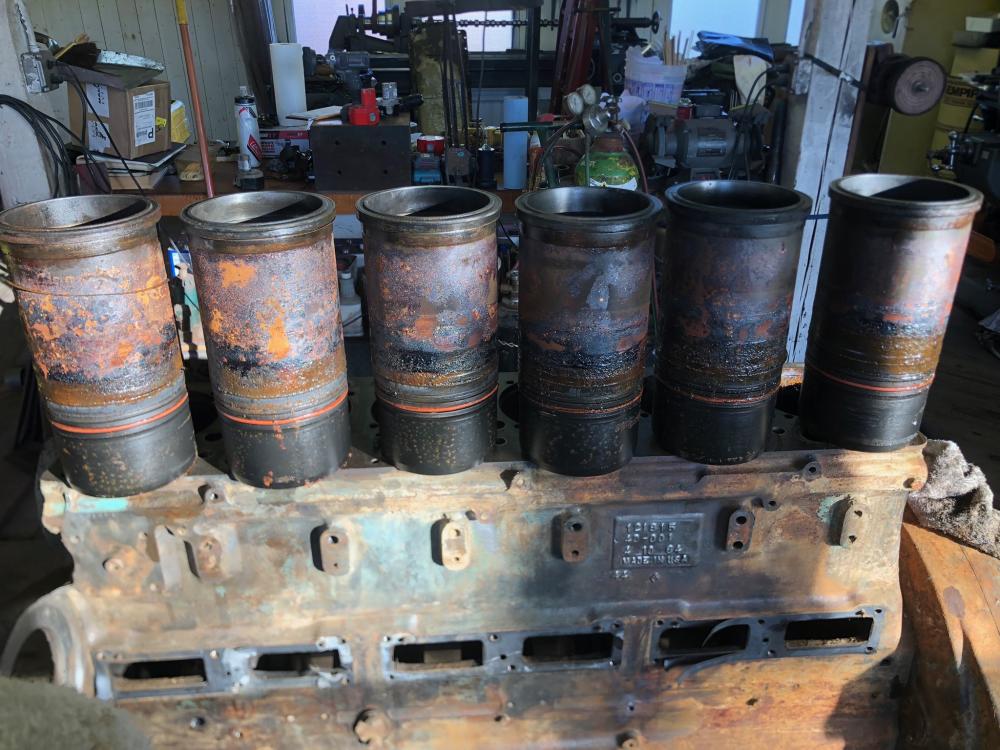
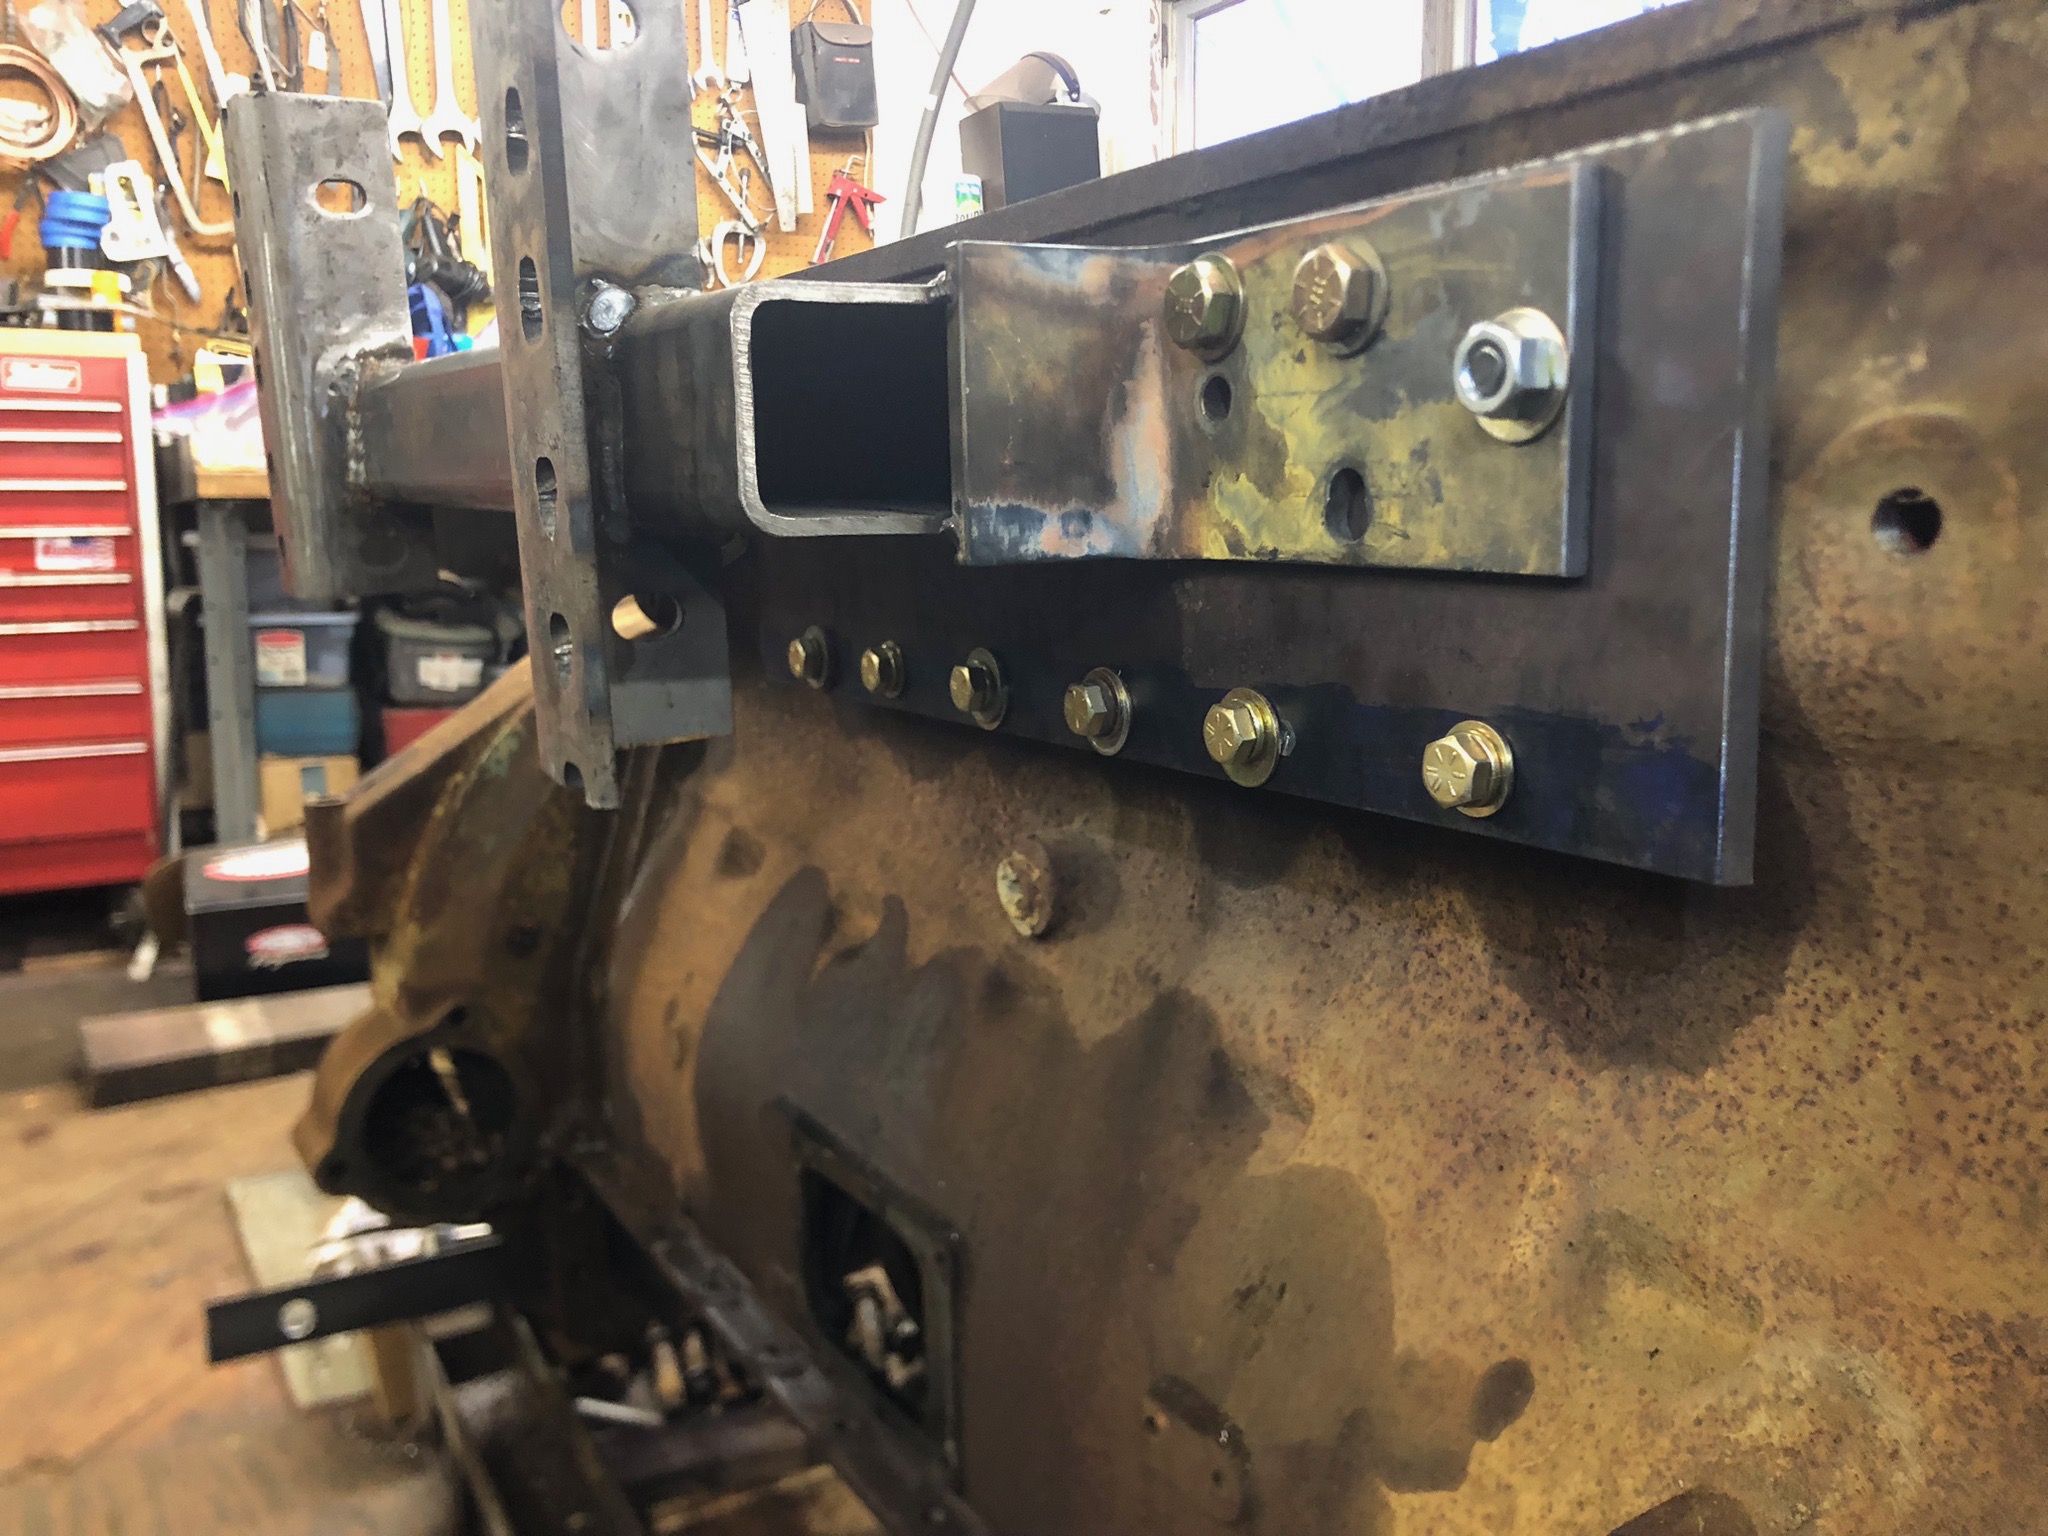
Still plugging away on getting things apart and inspected. Talked to the machine shop last week and the block should be heading into the hot tank this week. I need to head there and swap some parts out from the donor. I did de-sleeve the donor. While slimy and crusty, the block still seems to be in better over all shape. The lower bores are pit free and look good. There is a light frosting of surface rust on some areas, but it cleans right off. I did place an order for a sleeve and piston set from Mahoney & Son, so we'll see what comes of that. I have a pretty good list of part numbers to acquire for the rebuild, both current and superseded numbers. I was able to borrow a heavy duty engine rotisserie and that makes life soooo much easier working on this engine. Spent a day fabricating a mounting plate for it as my friend didn't have one that fit a 220 directly. I think once the machine work is done and all the required parts are collected, it should assemble pretty quickly and be back on the road by spring.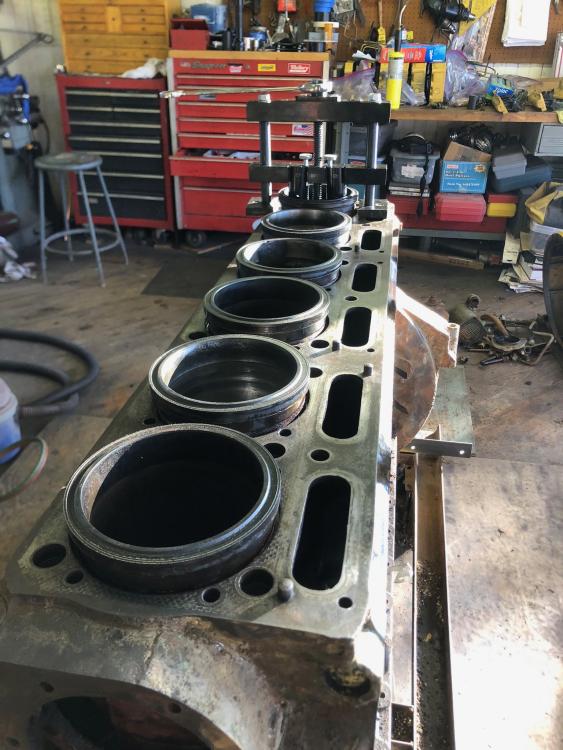

-
Coca Cola LJ Mack colors
mattb73lt replied to 1961H67's topic in Antique and Classic Mack Trucks General Discussion
Once it get back on the road my plan is to run it for a while, but probably put an under frame muffler or resonator on it to quiet it down a little. The insert in the stack helps, but it's still pretty loud. -
Coca Cola LJ Mack colors
mattb73lt replied to 1961H67's topic in Antique and Classic Mack Trucks General Discussion
That looks really nice. Is it a straight pipe or is there a muffler somewhere? -
B-73 Restoration
mattb73lt replied to mattb73lt's topic in Antique and Classic Mack Trucks General Discussion
I think the "Loaner" runs hot!?!?!? Set fire to my mixture of ATF and Marvel Mystery oil heating up the cylinders while trying to un-stick the engine after sitting outside forever. After letting it sit for a few days it popped free allowing me to disassemble more of it. IMG_4308.m4v -
B-73 Restoration
mattb73lt replied to mattb73lt's topic in Antique and Classic Mack Trucks General Discussion
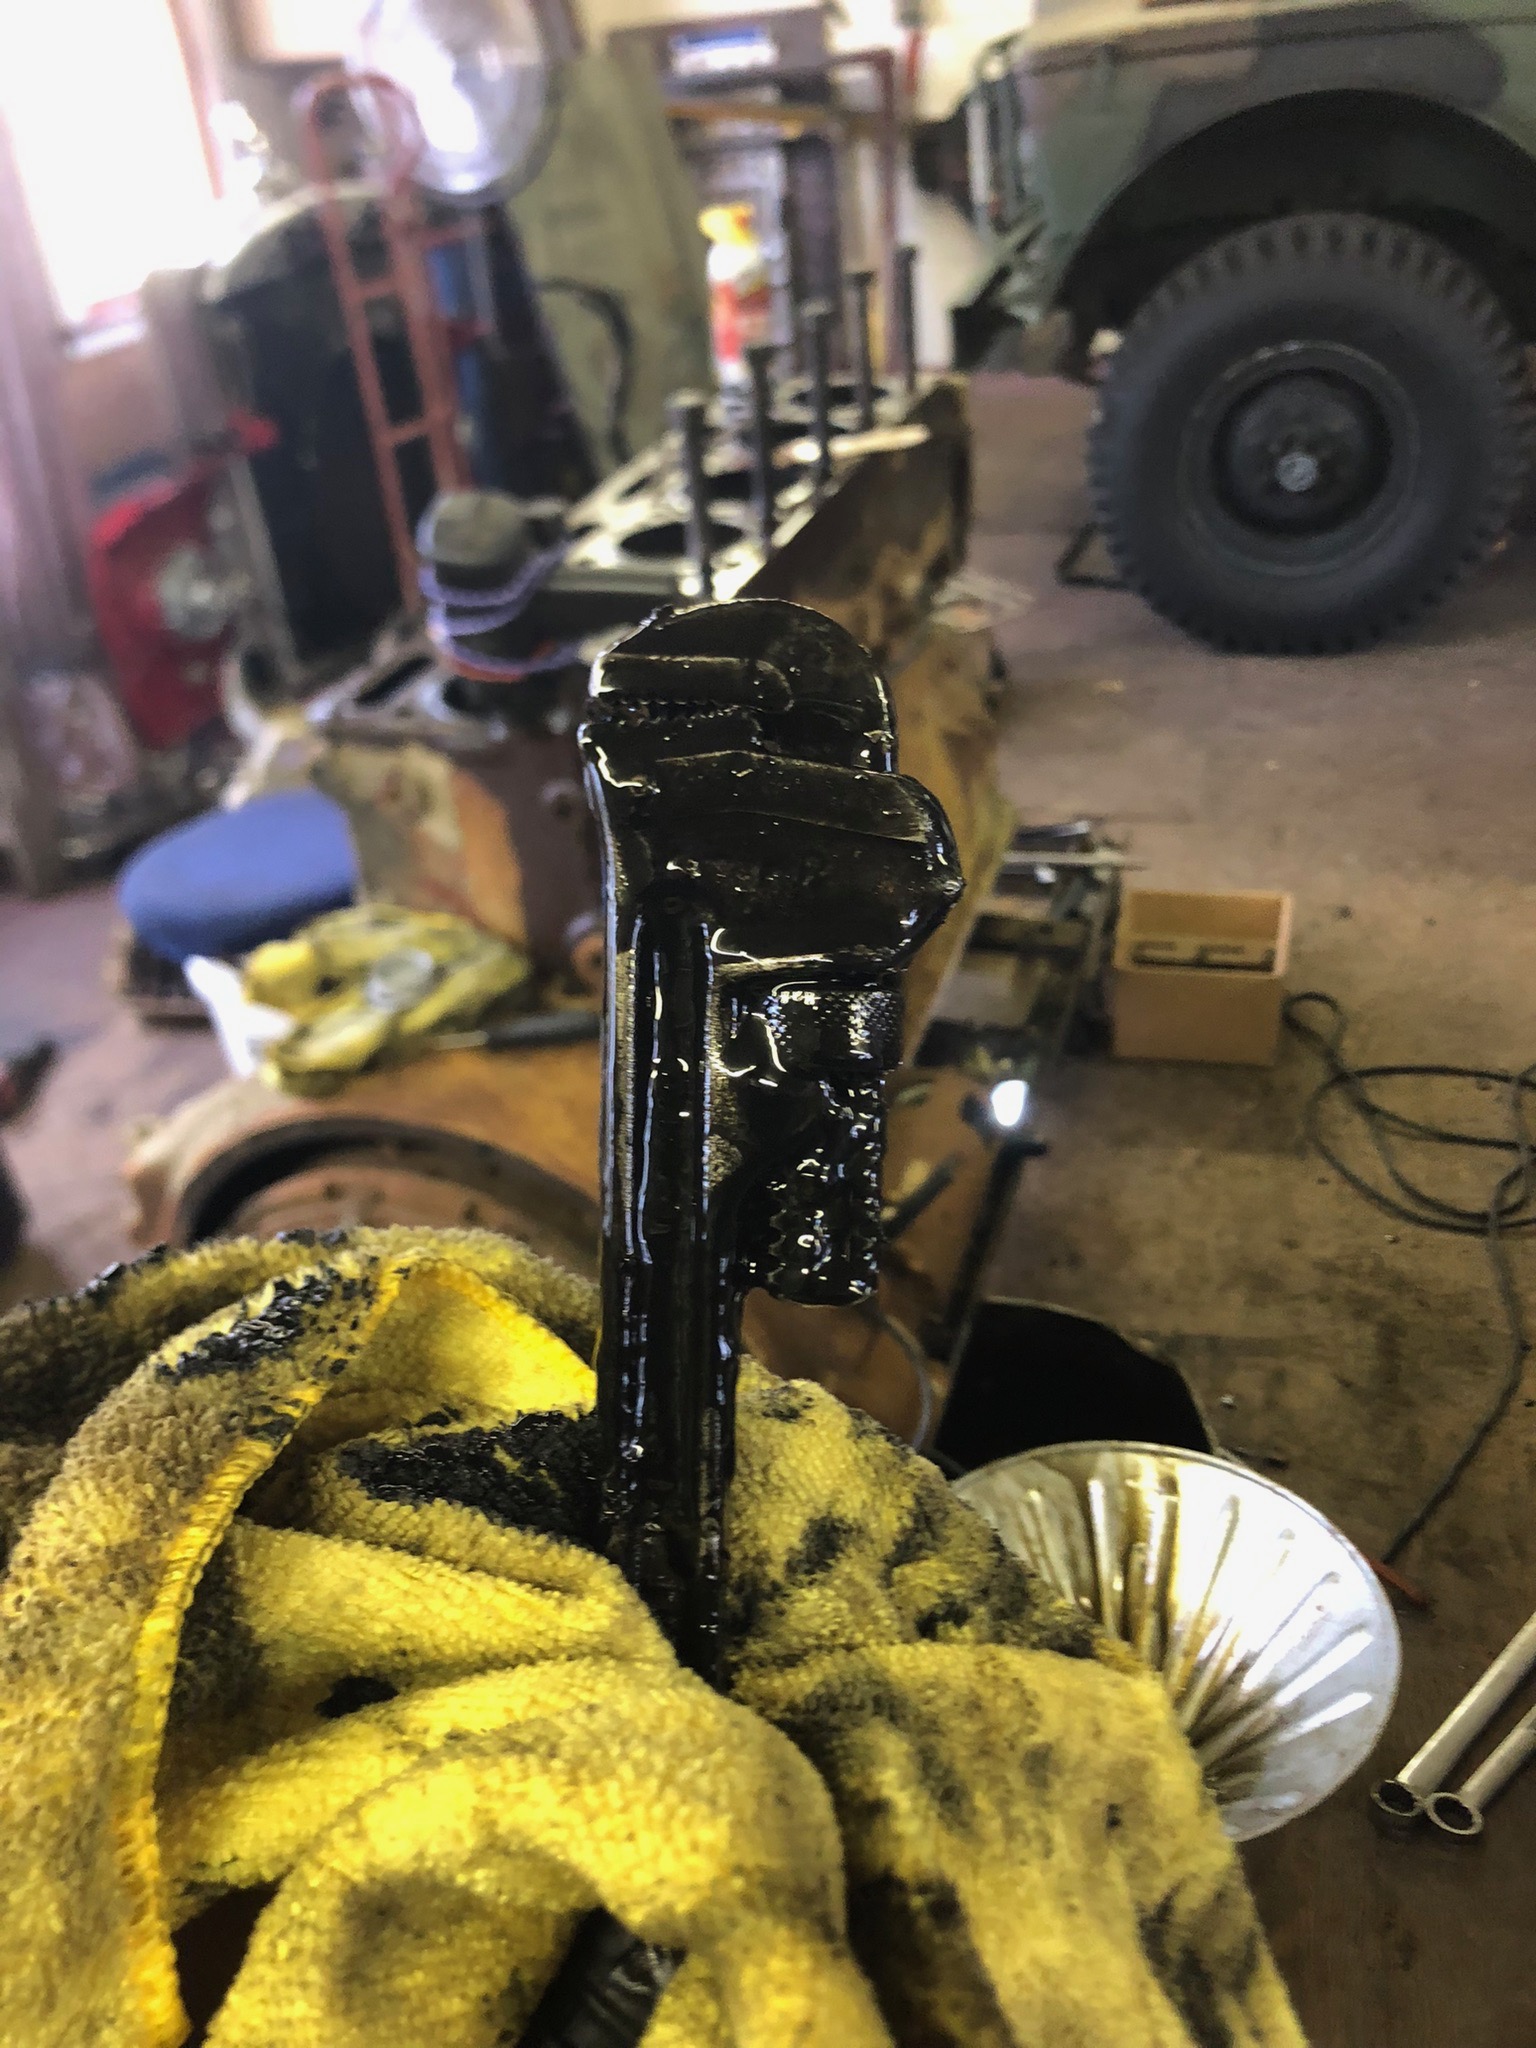
Yeah, so am I. Nothing yet from the machine shop. I did harvest a lot of parts out of the "Loaner" 220, though. Lots of Cummins parts laying around the shop. Found a 6" pipe wrench laying in the pan??? I wonder how long that's been in there?


-
H Model Restoration
mattb73lt replied to h67st's topic in Antique and Classic Mack Trucks General Discussion
Excellent work!! Looks beautiful. -
Coca Cola LJ Mack colors
mattb73lt replied to 1961H67's topic in Antique and Classic Mack Trucks General Discussion
Pretty soon he's not going to be able to stand up in there like that!! He's getting big. -
B-73 Restoration
mattb73lt replied to mattb73lt's topic in Antique and Classic Mack Trucks General Discussion
Here’s another quick video of it running just after I got it hooked up several years ago. It’s in really good shape with little wear on the ways. It still pretty tight, overall. 7075352D-39FA-4BC3-A8E1-D5A039AC6163.MOV -
B-73 Restoration
mattb73lt replied to mattb73lt's topic in Antique and Classic Mack Trucks General Discussion
Yes, if you look at the video, you’ll see a large pulley in the center of the line shaft with no belt on it. That would be the one for the belt with the twist for reverse rotation. The clutch lever pushes in both directions to engage one or the other drive pulley off the same shaft. The way this is set up I can only drive in one direction. You need a longer run to make that twist and I don’t have the space to do so. -
B-73 Restoration
mattb73lt replied to mattb73lt's topic in Antique and Classic Mack Trucks General Discussion
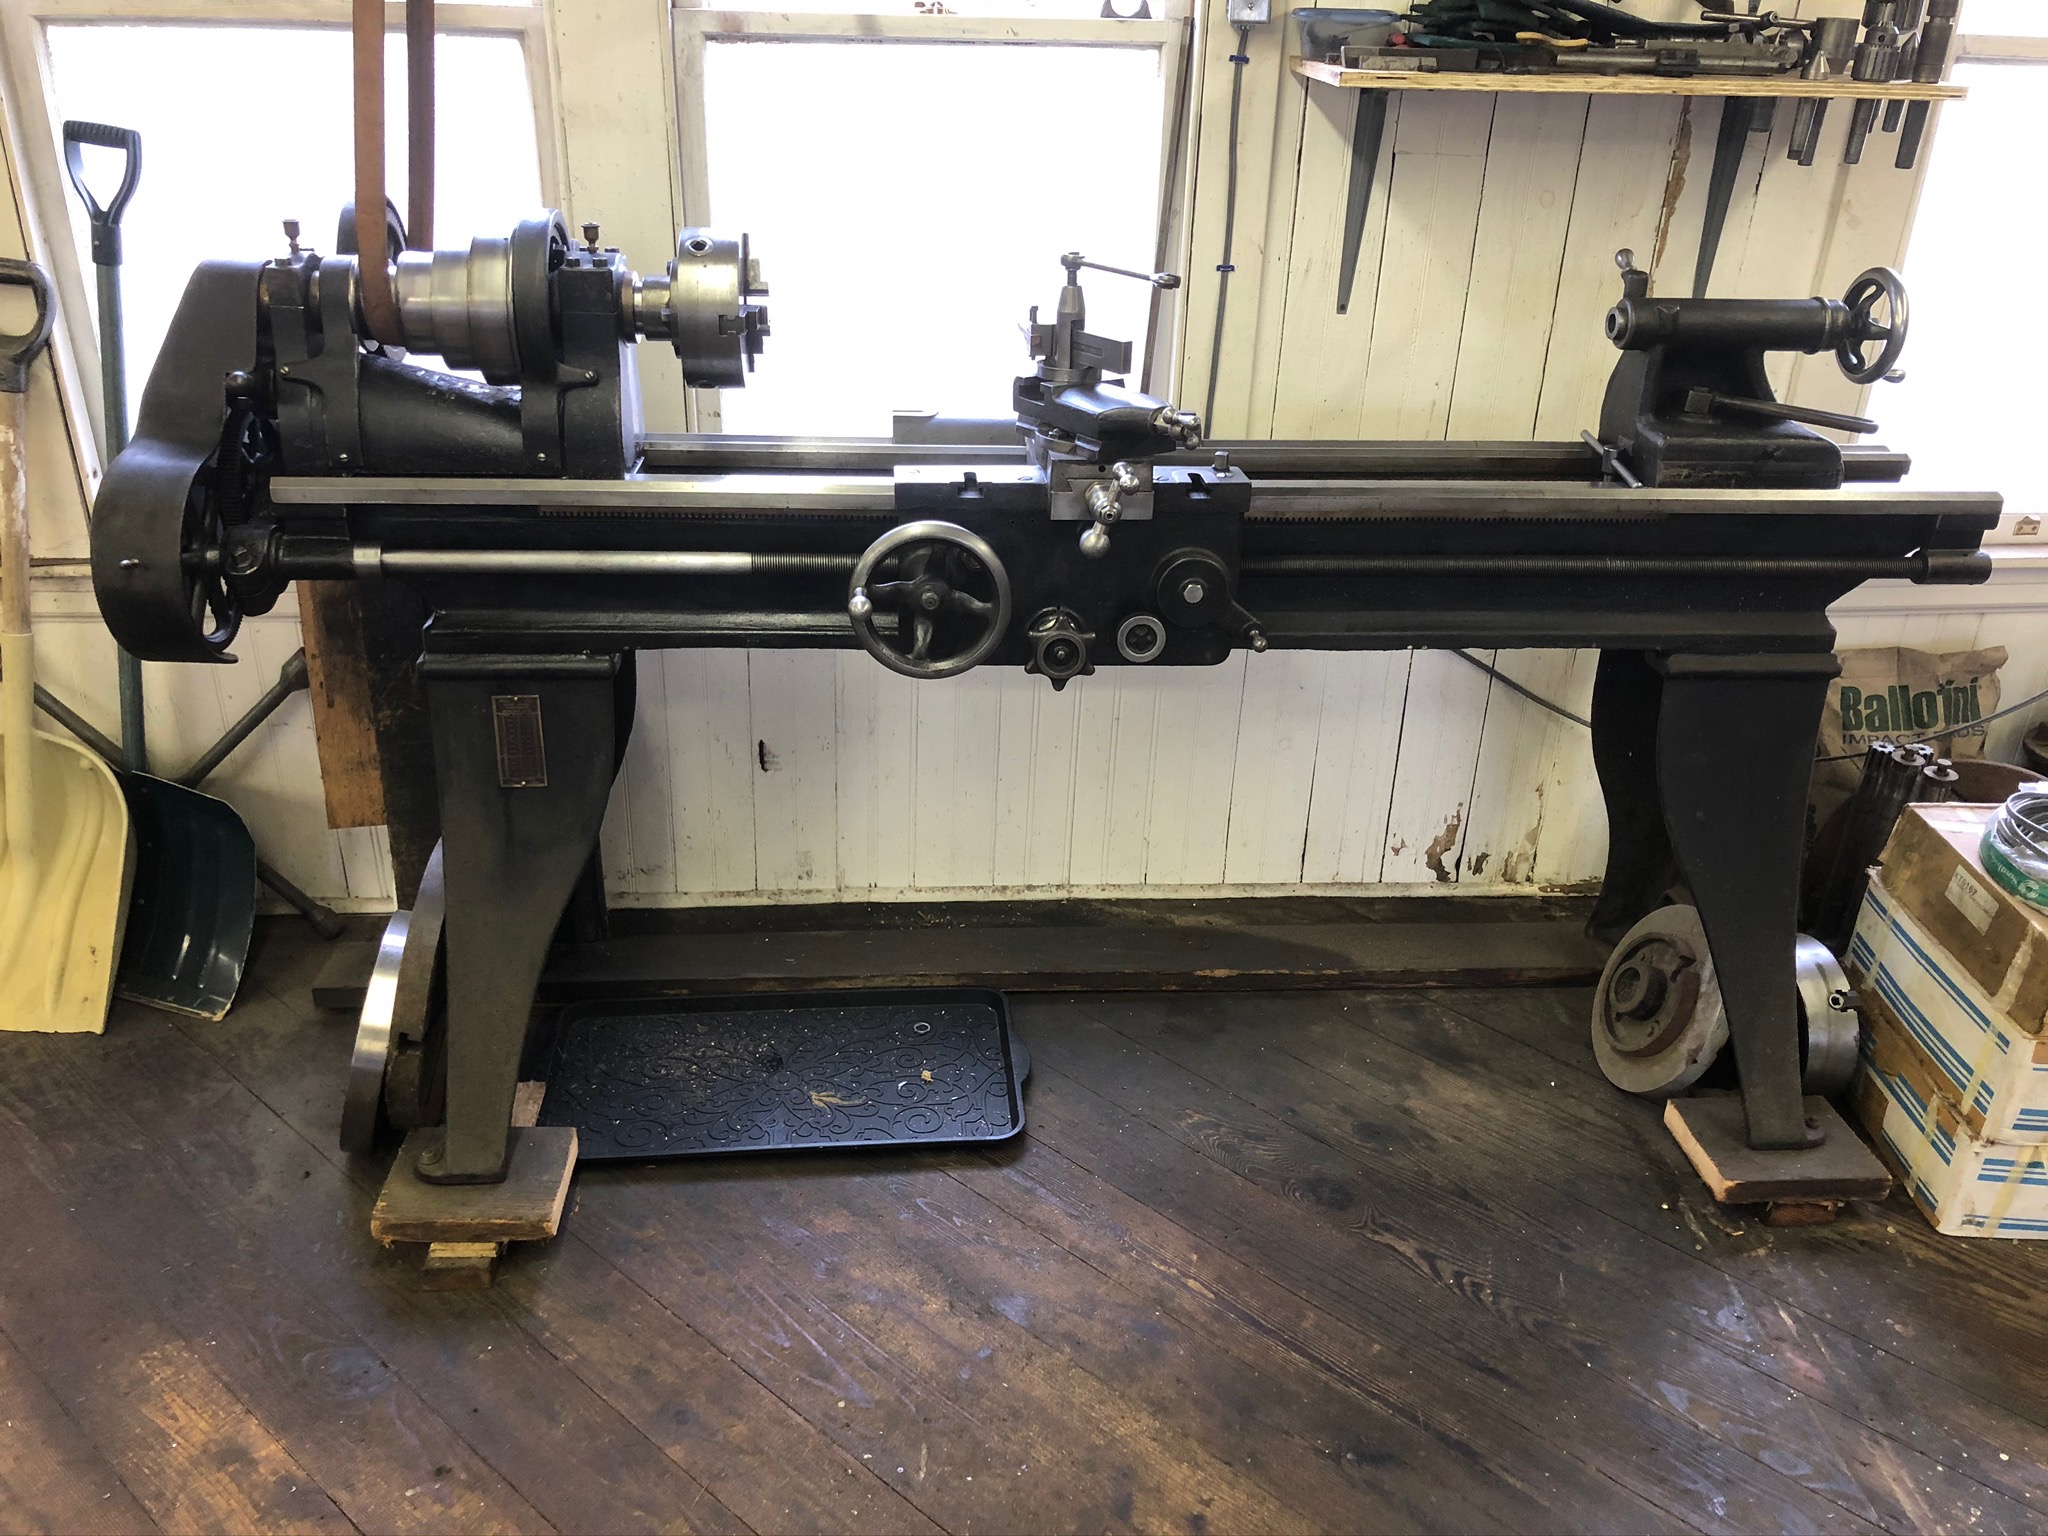
IMG_2099.m4v This is the lathe running with one of the brake drums on it. It required a 3" spacer under the headstock for clearance. That's why the side cover is open for the lead screw drive. It just fit and truing up the drum before I turned it wasn't easy due to it's weight. The white handgrip above the drum is the clutch lever for starting and stopping the lathe. -
B-73 Restoration
mattb73lt replied to mattb73lt's topic in Antique and Classic Mack Trucks General Discussion
I've wondered that too, thinking of that time period. Could've been steam, gas, water or electric. I was in a mill once up near Cooperstown, NY. It was a wood shop that was powered by a 20' wide water wheel. When they opened the sluice gates, the waterwheel would fill and start to turn. The whole mill was set up with line shafts and flat belts. You'd pull individual levers near each machine to activate them. Once the water wheel came up to speed the whole building came alive. it was really amazing to witness. -
B-73 Restoration
mattb73lt replied to mattb73lt's topic in Antique and Classic Mack Trucks General Discussion
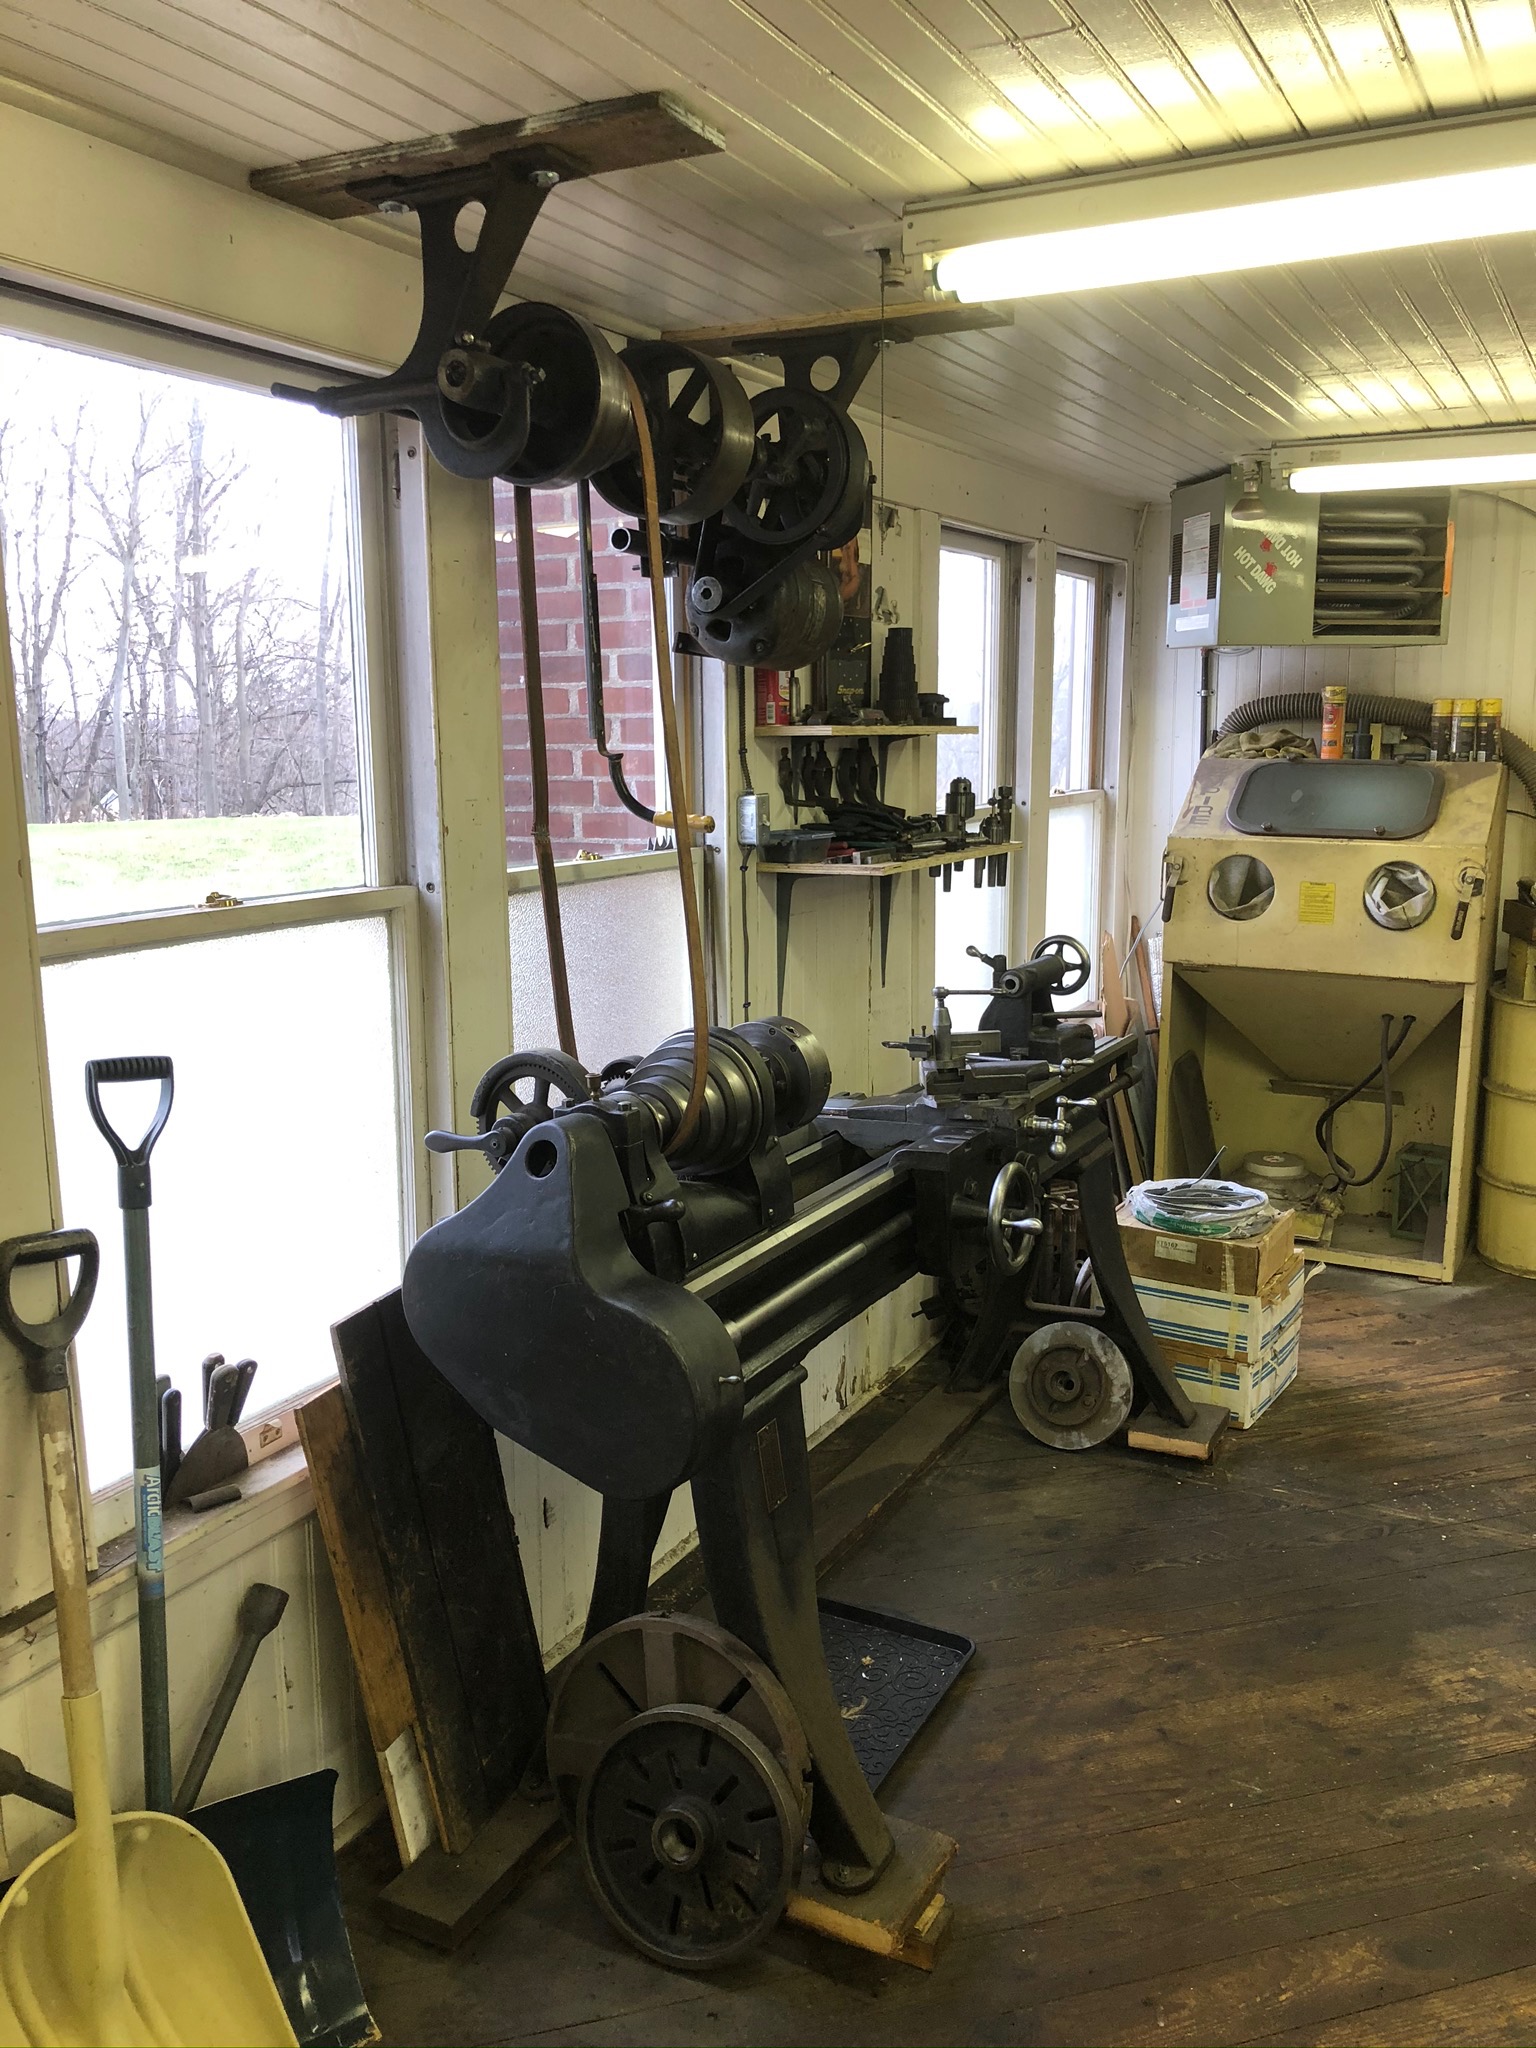
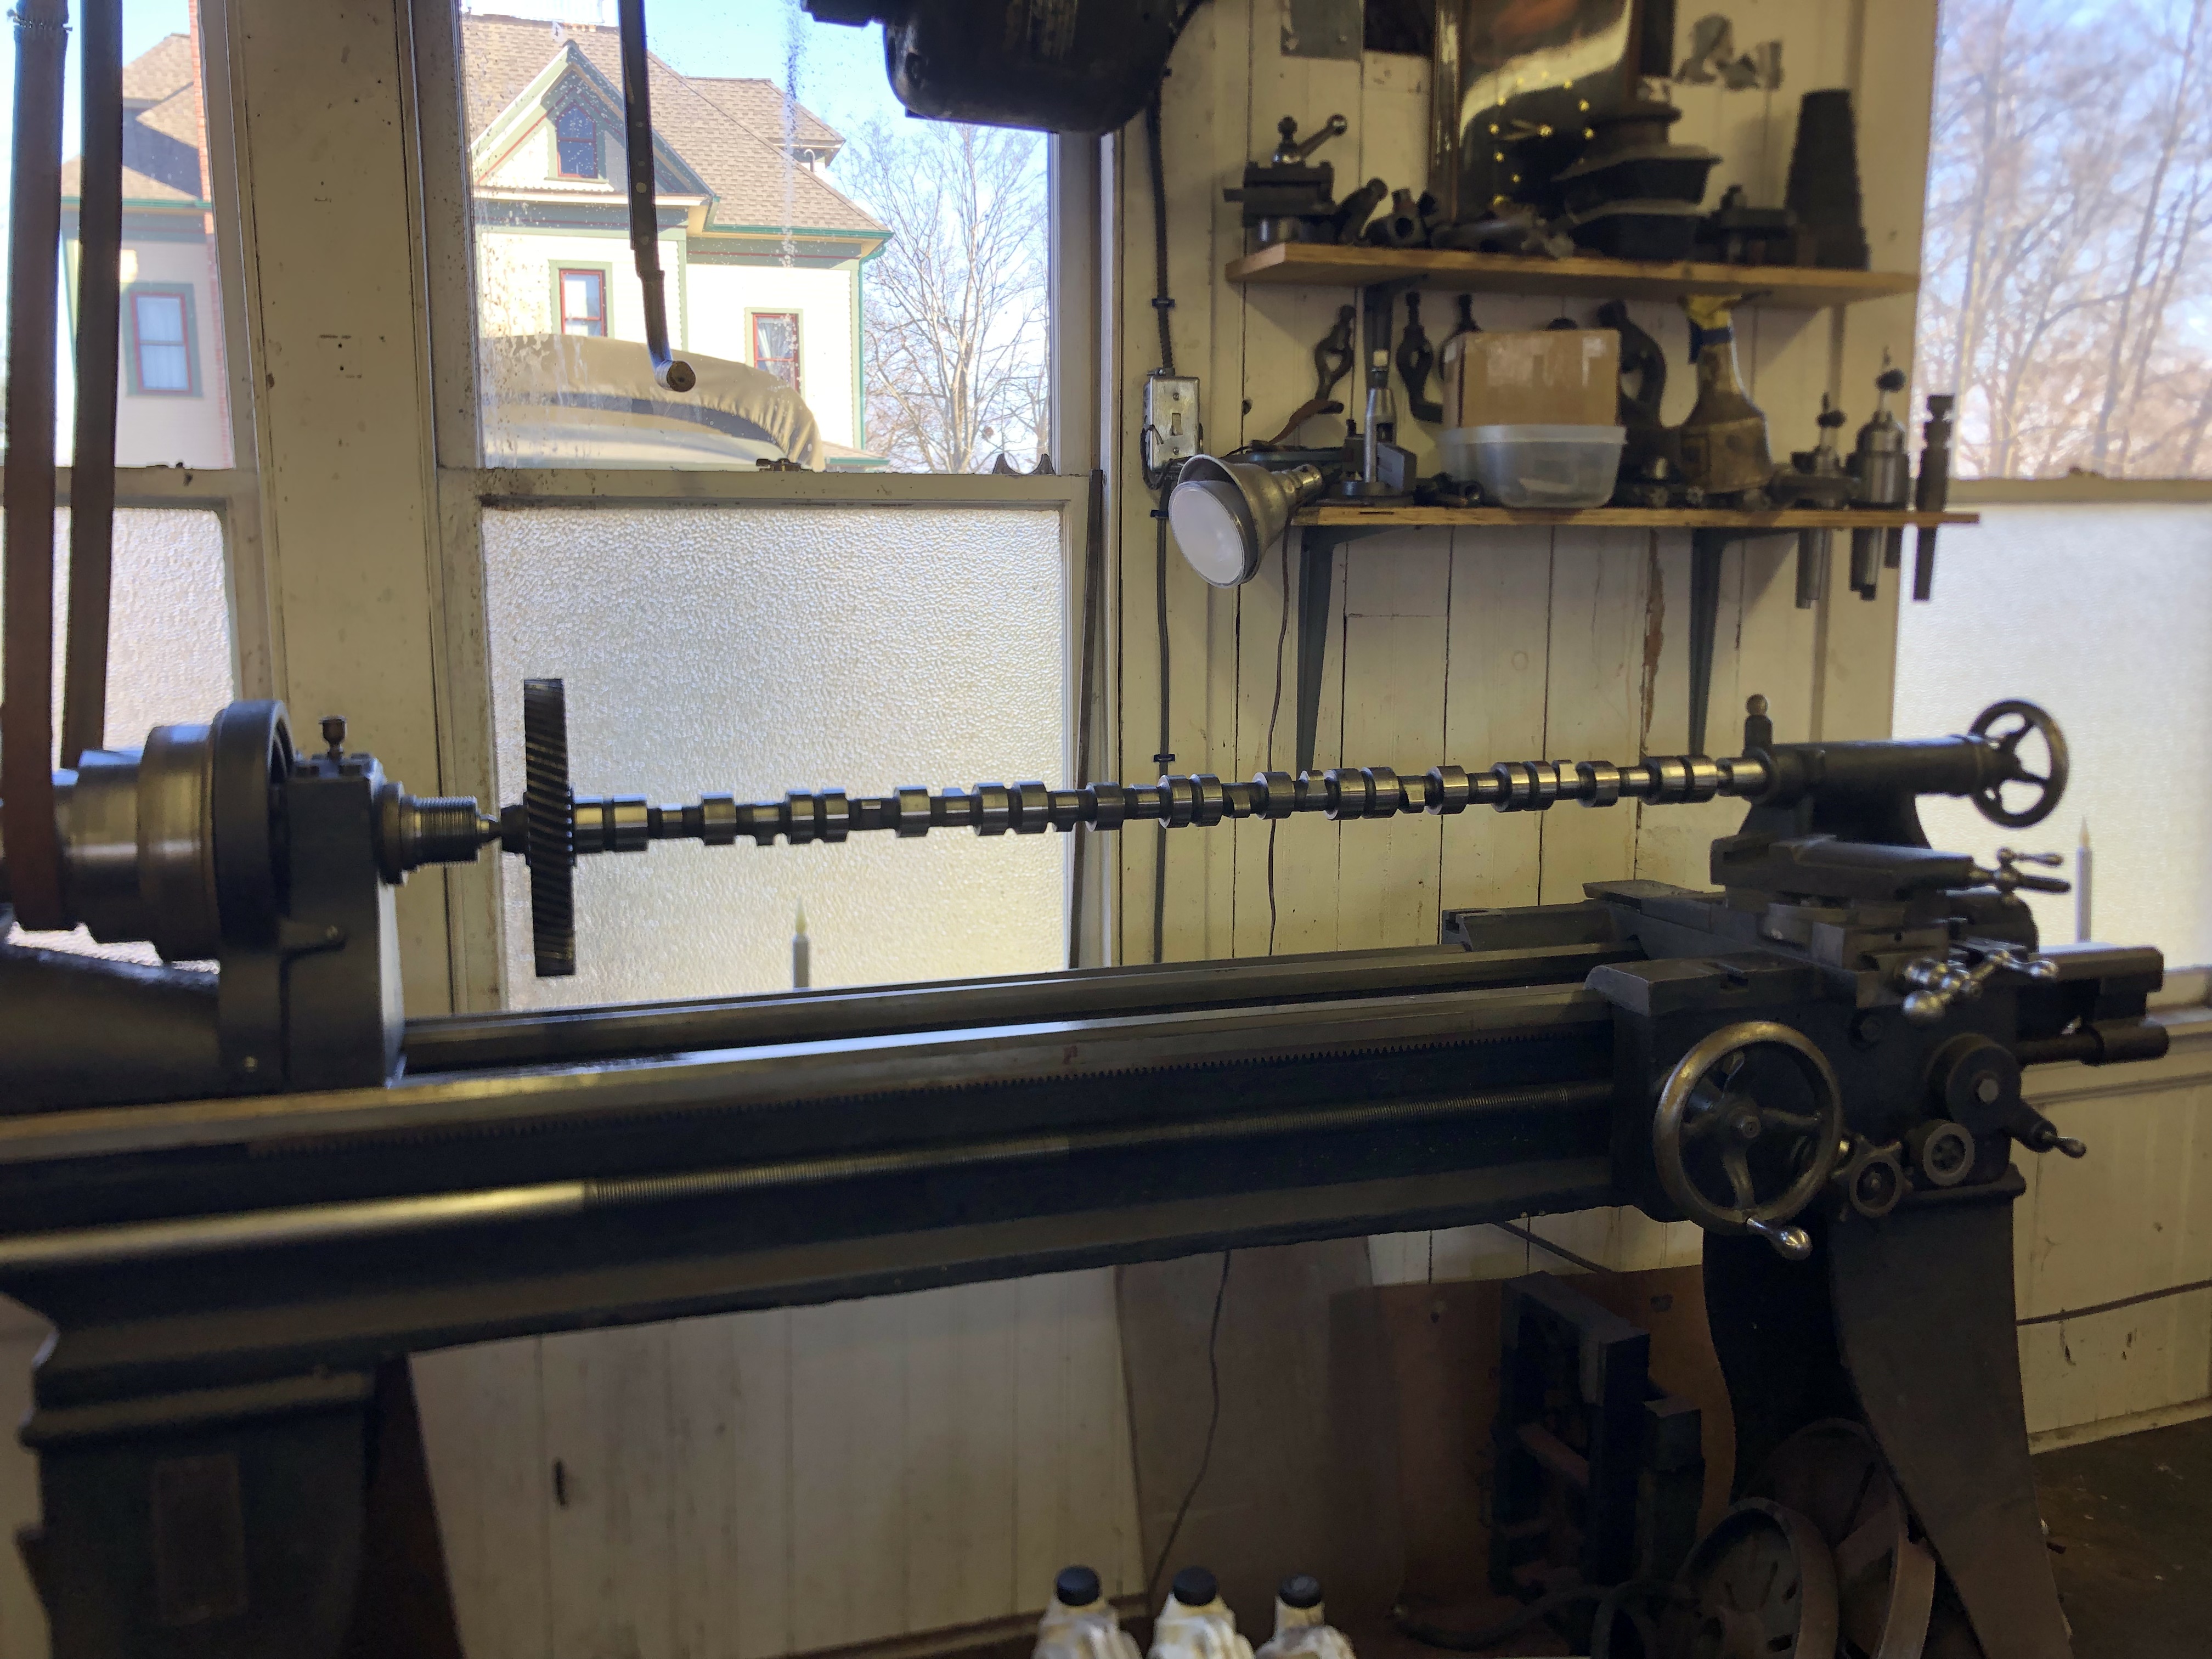
It's a South Bend, believe it or not, from 1916!! Got it from a gentleman I worked for in high school. It was his father's and he used to build race cars. It's very complete and had a lot of accessories/attachments that came with it. It sat in my shop for a long time before I hooked it all up. Not the easiest lathe to set up due to having to mount the drive pulleys to the ceiling. I wouldn't want that crashing down on you while you work. Certainly not the most modern one I've operated and I'd love to have a more modern one, but the price was right. It certainly comes in handy for the work I do. The biggest thing I've turned were the 85# front brake drums for the B73 to open up the pilot holes. Here's a few pics of it.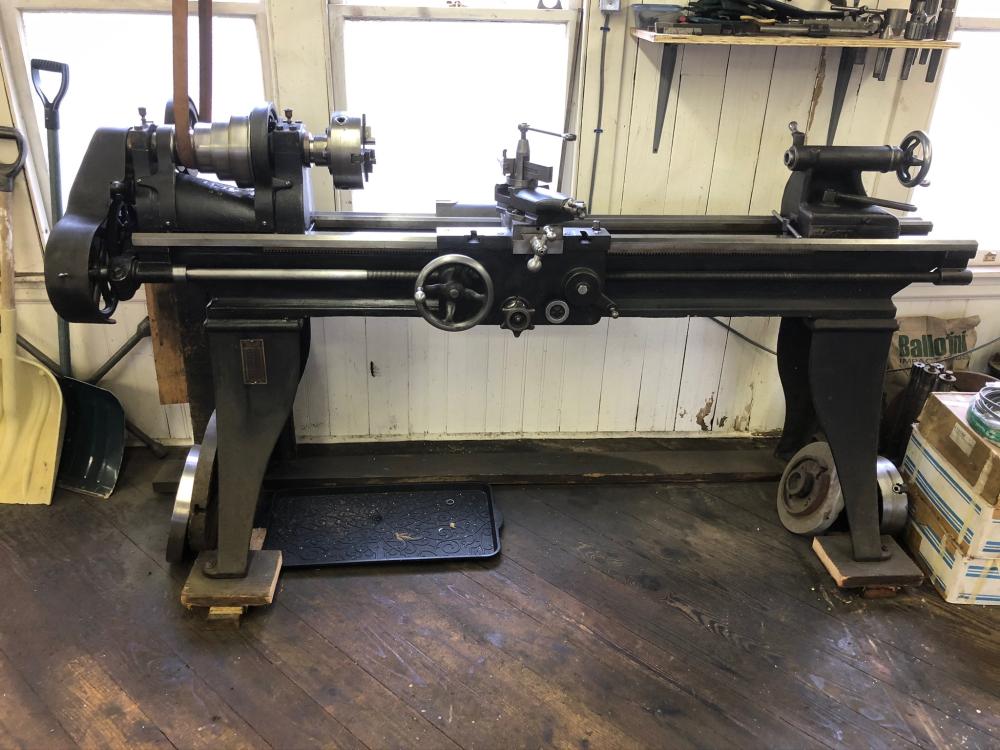

-
Very nice. Excellent work and a great storage area, too!!
-
B-73 Restoration
mattb73lt replied to mattb73lt's topic in Antique and Classic Mack Trucks General Discussion
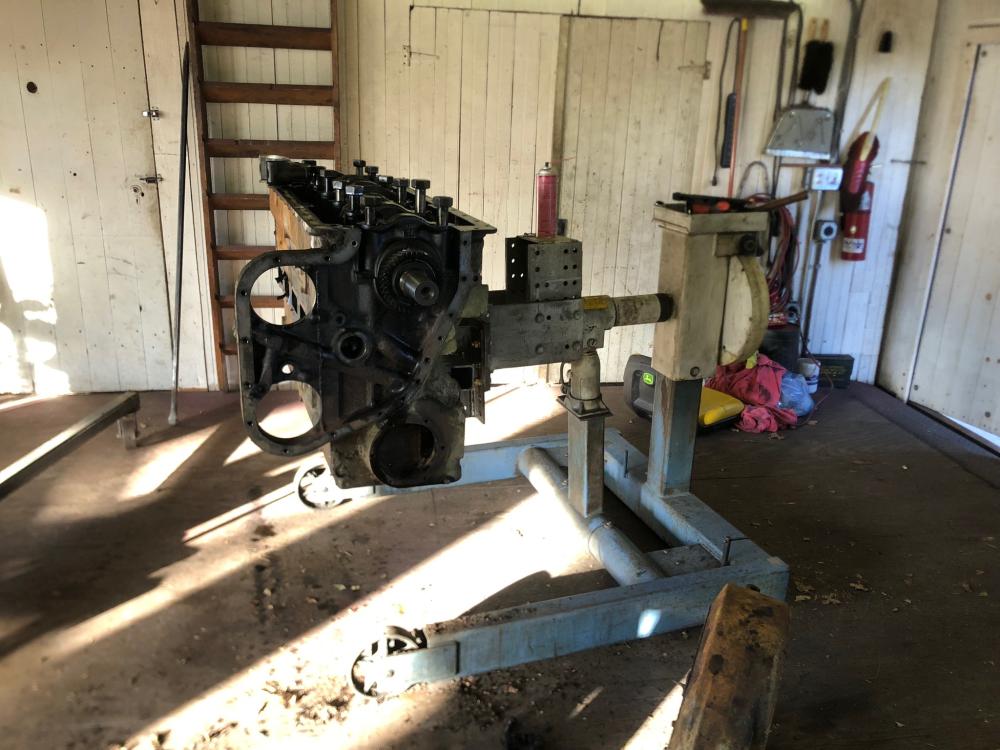
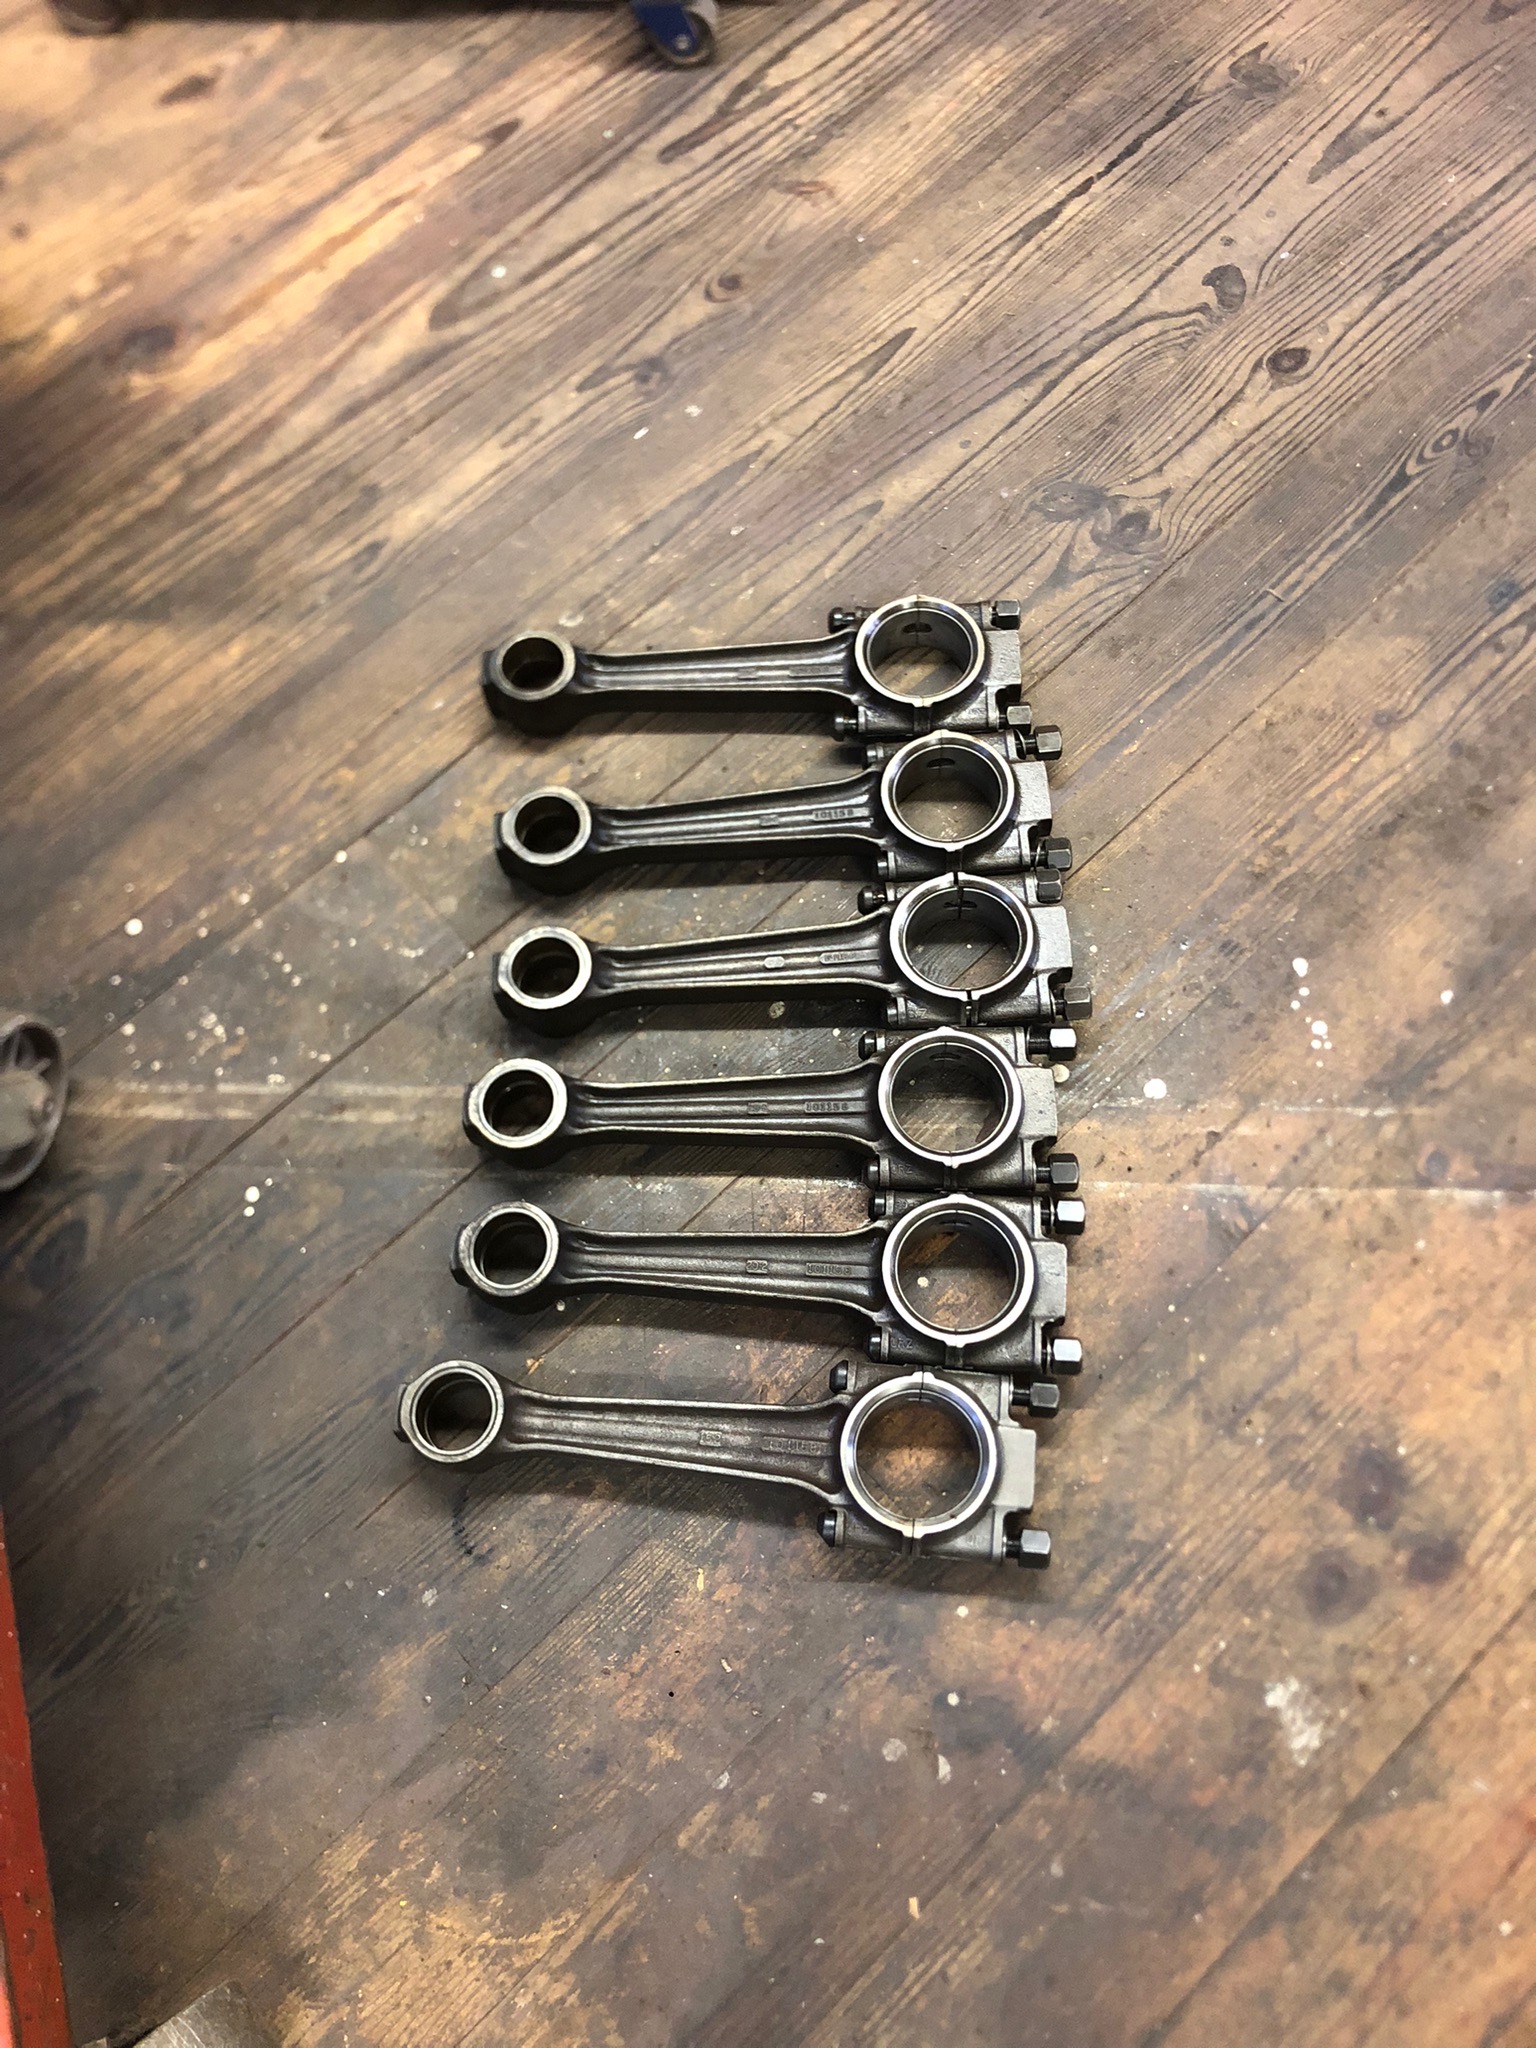
Gutting this 220 out. Removed the important camshaft today. Quite the effort to get to it. Threw it on my lathe to spin it by hand and clean it. Pushrods are all serviceable, saving about $800+ for new ones. Getting to the connecting rods tomorrow. As crusty and gummed up as this block is, it seems in better shape than the one I have. The deck is really clean and it is newer, 1964 vs 1959. So it could become a runner if mine proves bad or uneconomical to rebuild.


BMT Forum Logo
