


mattb73lt
-
Posts
1,424 -
Joined
-
Last visited
-
Days Won
146
Content Type
Profiles
Forums
Gallery
Events
Blogs
BMT Wiki
Collections
Store
Everything posted by mattb73lt
-

Adding a sleeper to a b model
mattb73lt replied to Mean Green's topic in Antique and Classic Mack Trucks General Discussion
Yeah, smaller ones aren’t too bad to sand and buff, but larger ones can be a problem. Sometimes it’s better to just re-shoot. It looks great, though! Nice progress! I had to re-shoot my whole dashboard after getting a drip from my gun in the metallic paint. It was a really nice finish, but I couldn’t hide it. The finish on the second attempt was even better. So the mistake can sometimes help. -
Adding a sleeper to a b model
mattb73lt replied to Mean Green's topic in Antique and Classic Mack Trucks General Discussion
How bad is the run? If it’s not too bad, you could wet sand and buff it out versus a reshoot. -
B-73 Restoration
mattb73lt replied to mattb73lt's topic in Antique and Classic Mack Trucks General Discussion
I’d love to, but I need to prove it out before launching so far from home, that’s a good four hours. Next year it’s on my list, finally!!! -
B-73 Restoration
mattb73lt replied to mattb73lt's topic in Antique and Classic Mack Trucks General Discussion
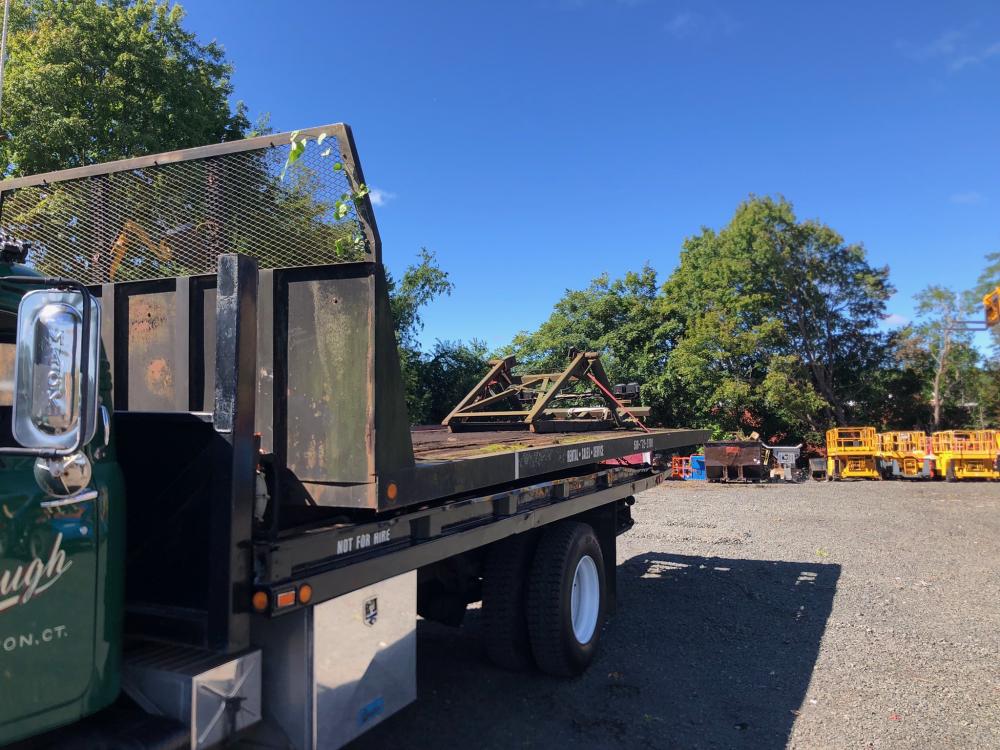
Again, thank you all very much for the comments. Moving day, again. Dug the deck out of my friends yard, loaded it and brought it home. I think it's been stored there at least 7 years. Need to temporarily rob the tail lights off it to wire up on the truck. Monday or Tuesday I'm running the truck over to a local garage to do a VIN verification for DMV. On 10/11, I've got an appointment with them for registration and plates. Hopefully that goes without too much trouble. I'll start getting it more roadworthy with driving and adjusting things as I start to focus on the deck, hydraulics and some minor structural repair work. I'd like to get the bed mounted and working before the snow flies.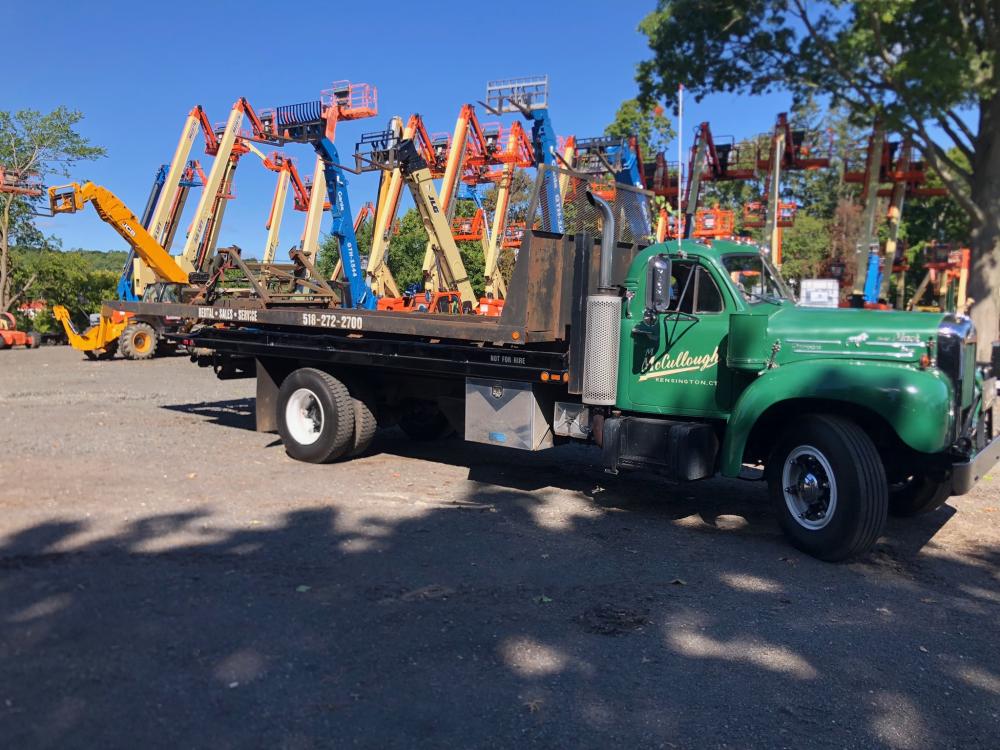
-
Coca Cola LJ Mack colors
mattb73lt replied to 1961H67's topic in Antique and Classic Mack Trucks General Discussion
I know what you mean with their passing. I knew so many when I was younger. My Godfather was a Navy LST Captain in WWII in the Atlantic and Pacific Theatre. One of my neighbors was a 18 year old Marine on Iwo Jima, stayed in the Reserves after WWII and was called up for Korea and served in the Chosin Reservoir. Several members in the volunteer fire department I was in as a 16YO served in WWII, one in the Battle of the Bulge. I always knew I would join and to fly helicopters was my ultimate dream. Joining was a way to fulfill it. Becoming a Trooper was part of my sense of service. One career played well with the other, but caused a lot of personal sacrifice. I never imagined where those jobs would take me, but I always knew there was risk involved in both. That was really the first time I ever wrote anything about it down. They were my "jobs" and just what I "did" to make a living and secure my future. But, now, looking back, Holy Shit I can't believe I did that and experienced what I did. Somehow, to me, it pales in comparison to what the "Greatest Generation" did during WWII. Today, 9/21/2022, marks nine years since I returned from my last tour in Afghanistan.
-
B-73 Restoration
mattb73lt replied to mattb73lt's topic in Antique and Classic Mack Trucks General Discussion
Well, thank you all very much. I'm a little speechless from all the great comments. They are very much appreciated. This restoration has certainly been a true labor of love, as I've always wanted one of this model with this style cab. I'll have to say that all my previous projects have helped with this one and it has been my goal to try to make it my best one yet. Additionally, I don't think I'll do another vehicle this in depth. It's just very consuming and I want to get out and drive these things. A little about my background and where I think I got the skills. I was brought up around old cars and trucks. Learned a lot from my father at a young age, as he was always fixing other peoples cars and trucks on the side. I was always very mechanical and in technical high school I took four years in Machine, Tool & Die training. After graduation I went off to technical college and after two years, became an FAA certified Airframe & Powerplant Mechanic. That schooling, I feel, was one of the best courses I ever took. Teaching me so many levels of skills, from wood work, Dope and Fabric, sheetmetal, riveting and all manner of power plants from old radial engines to modern turbines , including all their subsystems. Hydraulics, pneumatics, avionics and all manner of aircraft systems. I went into the Army after that to become a helicopter pilot and start my flying career. That is a whole other chapter of my life, and what I truly love to do. It's also given me the means to have this hobby life which is my second love. All of this is second to my wife though, who has been very supportive of what I do and my hobbies. It's taken me so long to get to this truck due to my other careers. I found this way back in 1998 just before I was about to start the modification and restoration of my B42. I got that done in 2000. I was the Chief Pilot for the State Police, then, and was in the middle of purchasing their first new helicopter. We also had three Cessna 182's that we flew. All the while with the State Police I was serving in the National Guard and flying CH-47 Chinooks. In July, 2001 we picked up the brand new helicopter for the State Police. Two months later was... 9/11. That single event had ramifications for me that lasted for over 17 years. First it was endless overtime with the State Police. I worked 12 hour shifts, 7 days a week, from 9/11 to Thanksgiving Day without a day off. Right after 9/11, I was flying into Ground Zero with search and cadaver dog teams, along with supplies to sustain them. I walked the ground around the twin towers while they were still burning. The sights, sounds and smells have never left me. Two of my close Trooper friends and guys I worked the road with, have passed from cancers they picked up there. From there, it was more overtime and increased military training as my other career started to pick up. In February, 2003, I was called up and served my first tour overseas for 15 months. Came home, back to the state police and more overtime and military training. In 2009, called up for the second time and was away for a year. Came home in 2010 and had enough time with the State Police to retire in June with 21 good years. My military career was so busy at that point the next week I was full-time in the National Guard as an Instructor Pilot teaching new pilots how to fly Chinooks. Then, called up for the third time in 2012 and coming home in 2013. From 2003 to 2013, I was away from home for five years. Two tours in Afghanistan and one in Iraq. In 2018, I got word that I was facing a fourth tour in 2019. I couldn't put my wife through that, she went through two of my deployments, and I didn't want to myself. I put my paperwork in for retirement there and retired with 32 years of Active and Guard service. When I knew I was going to retire, I put my resume together and put some feelers out for jobs with friends in the civilian sector. A few months before I retired, I fell into a job with a trucking firm here in Connecticut, flying two of their three aircraft, a helicopter and a twin engine turboprop. The best part is, it's an on-call type job. No real schedule, except when the bosses need to fly. I usually know one to three days out for flights. But, pop-ups do happen when I'm in the barn. A quick cleanup and I'm at work in about 35 minutes. I joke with my friends that I'm getting paid to restore this truck. For my Australian Friends: When I was in Afghanistan in 2013 we were stationed in a place called Tarin Kowt. Once there, we were assigned to an Australian Special Forces Unit as direct support, along with a detachment of Apache attack helicopters and Blackhawks. After a few weeks of running re-supply and support missions, our Chinooks became their Go-To aircraft. First because of our lift capabilities, especially due to altitude and hot weather, and second due to our accuracy in timing and placement on the battlefield. A typical Australian mission would be to insert 40-60 troops (20-30 per Chinook) on an objective, depart to a safe area for 20 minutes and loiter, incase they needed immediate extraction. Then retire to Tarin Kowt for four hours and then go back out to extract them. On 22June2013, we had a mission into the Char Shenai(SP?) Valley, a chronic hot spot of enemy activity. I was Air Mission Commander for my element of Chinooks and the lead aircraft for the insertion. We make the insertion and go to our loiter point. As we arrive, we're re-tasked with going back to Tarin Kowt and bring out the Quick Reaction Force(QRF), another 40 troops, to the objective area as the radios blow up with activity with troops in contact. We do that as our QRF(2 additional Chinooks) are being loaded for resupply(ammo, water & food). We insert the QRF into the objective, then move some of the initial troops closer to the objective for security. In the midst of all this chaos, a call goes out for an urgent 9-LINE (a Medical Evacuation), somebody has been injured seriously. The Apache's are in action during all this, too, shuttling back and forth reloading and staying ready for action. An Apache escorted Medical Blackhawk comes out and does the evacuation right in the middle of this mess. We're out there hours longer than planned, never shutting down and hot re-fueling every time we land at Tarin Kowt. Well into the day, we finally get the order to extract everyone. One of my duties as Air Mission Commander is to contact every aircraft and get a head count. I tally that up and give it to the Ground Commander, who's on my aircraft and making sure everyone is accounted who was inserted. I get the numbers and I'm short. I do it again and make sure the crews are accurate. I'm still short. The Ground Commander is standing behind me, listening on a headset, when I hand him the count. The radios are silent on the way home, every aircraft has heard the count and tallied it up themselves and know we're short. That was the day the last Australian soldier was killed in action in Afghanistan. We lined the ramp at Tarin Kowt up to the ramp on the Australian Air Force C-17 that was sent to bring his remains home shortly after that day. I read much later when I was home that he earned the Victoria Cross for his actions that day, their highest award for valor. A very sad day we lived through with our Australian Brothers. Sorry for the endless post. -
Coca Cola LJ Mack colors
mattb73lt replied to 1961H67's topic in Antique and Classic Mack Trucks General Discussion
I thought that was belt driven. Hadn’t seen this angle before or that it was a direct drive. I did notice some subtle differences between our two 220’s, though. -
B-73 Restoration
mattb73lt replied to mattb73lt's topic in Antique and Classic Mack Trucks General Discussion
Thanks! Is there more to it? As much as I've chatted with most of you, I've only met a few from here and FB. -
B-73 Restoration
mattb73lt replied to mattb73lt's topic in Antique and Classic Mack Trucks General Discussion
Thanks for all the great comments. This has certainly been a long haul to bring this one back. I certainly can't compete with Matt Pfahl, volume wise. But he has seen some of my work and his comments and help are greatly appreciated, especially considering the quality of work he and his crew produce. -
B-73 Restoration
mattb73lt replied to mattb73lt's topic in Antique and Classic Mack Trucks General Discussion
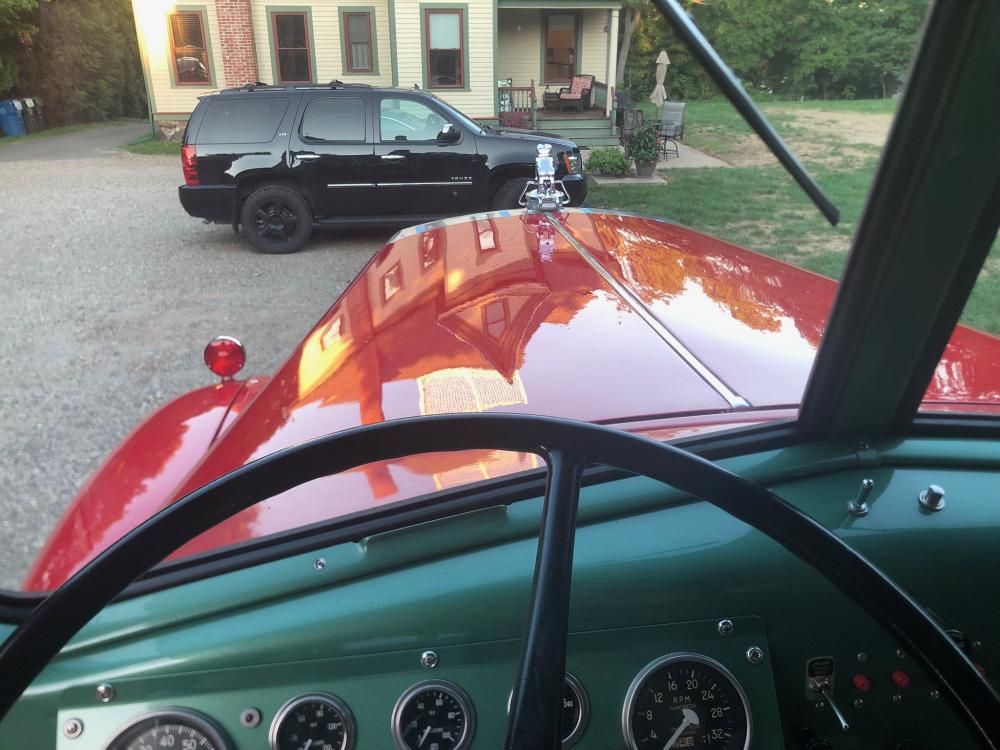
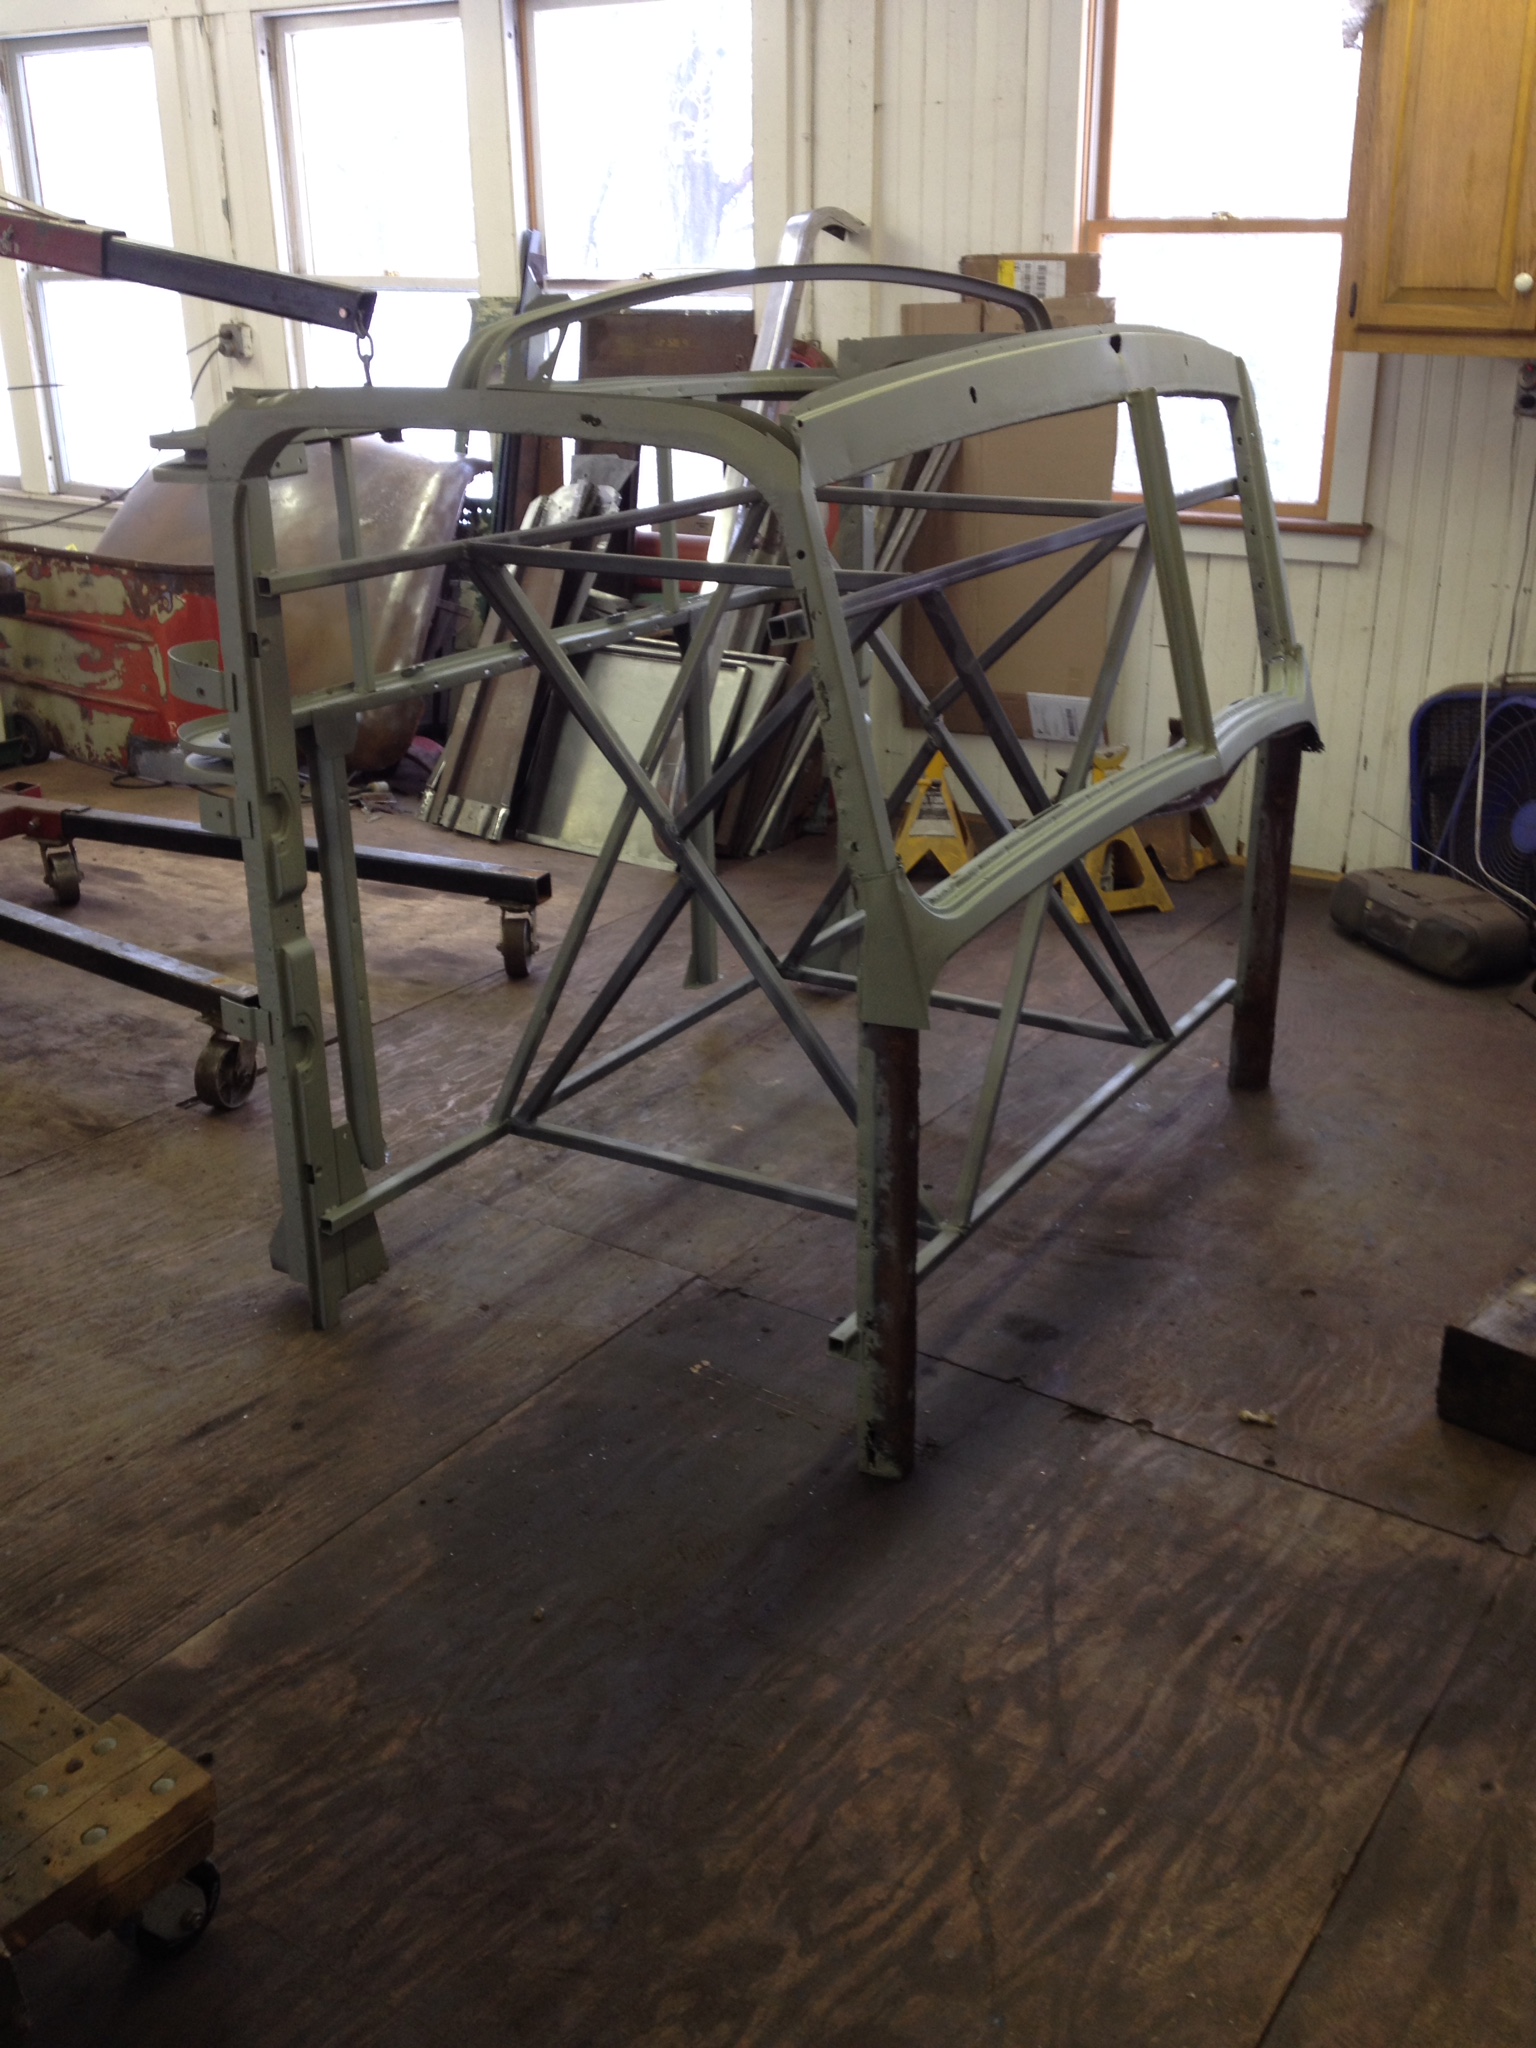
A view that was a long time in coming, but so much prettier than when it came home in '98. I need to make a bunch of anticipated adjustments to get the hood to fit right, to the radiator and the air intake tube. That'll take some patience and time. Very happy though to see the cab profile basically complete.


-
B-73 Restoration
mattb73lt replied to mattb73lt's topic in Antique and Classic Mack Trucks General Discussion
Excellent!! Glad you enjoyed your trip and had great weather. You really hit it right, it's been so hot up here. -
B-73 Restoration
mattb73lt replied to mattb73lt's topic in Antique and Classic Mack Trucks General Discussion
You're right about looking at the hood. On my green truck, every time I drive it, I see a few areas i should of put a little more effort in. But I'm the only one who ever notices them. -
B-73 Restoration
mattb73lt replied to mattb73lt's topic in Antique and Classic Mack Trucks General Discussion
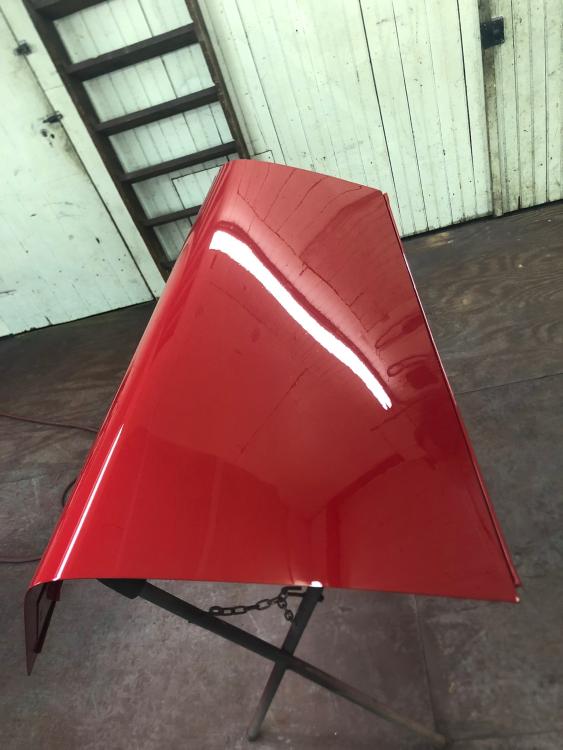
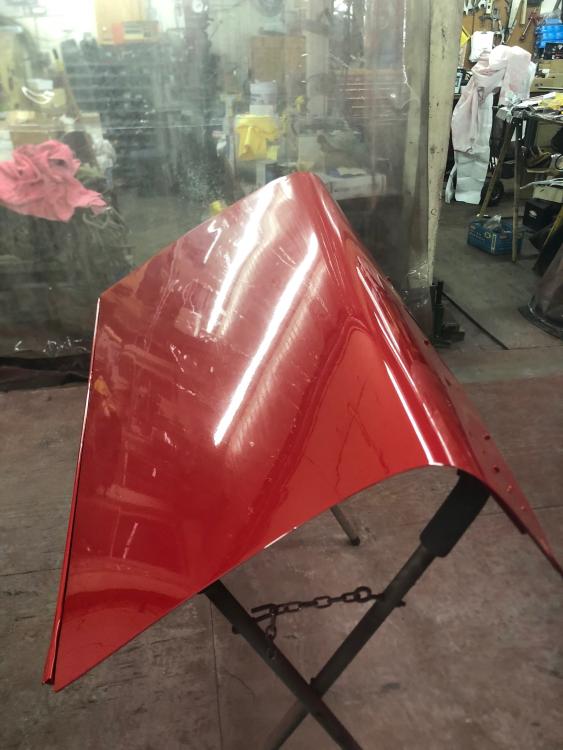
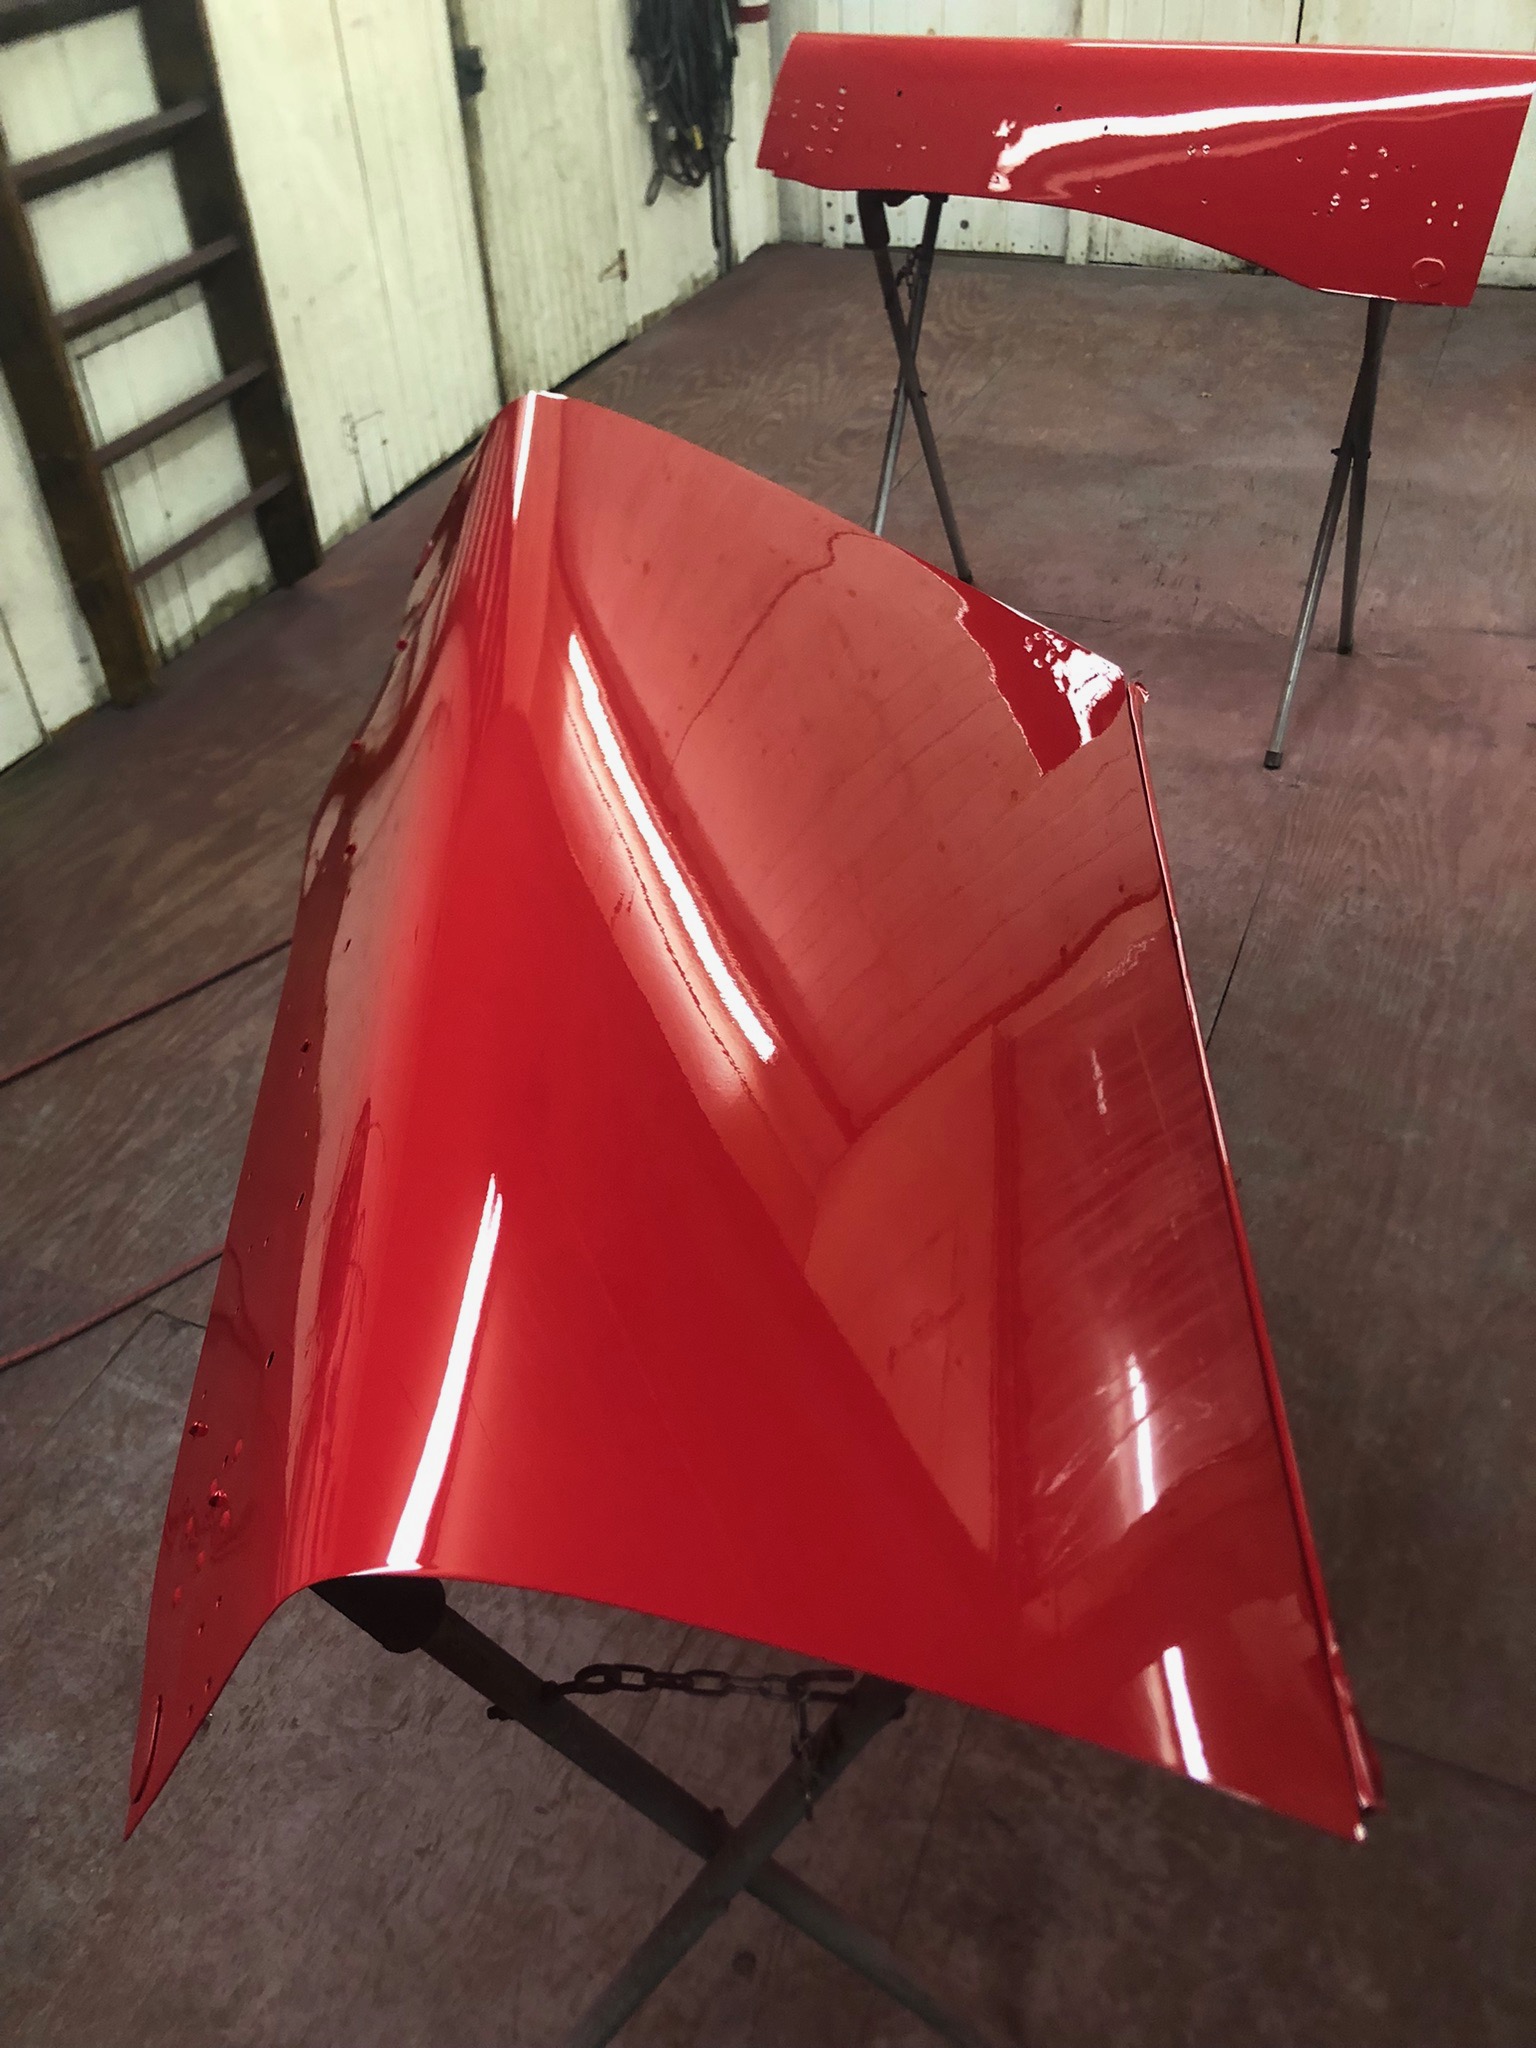
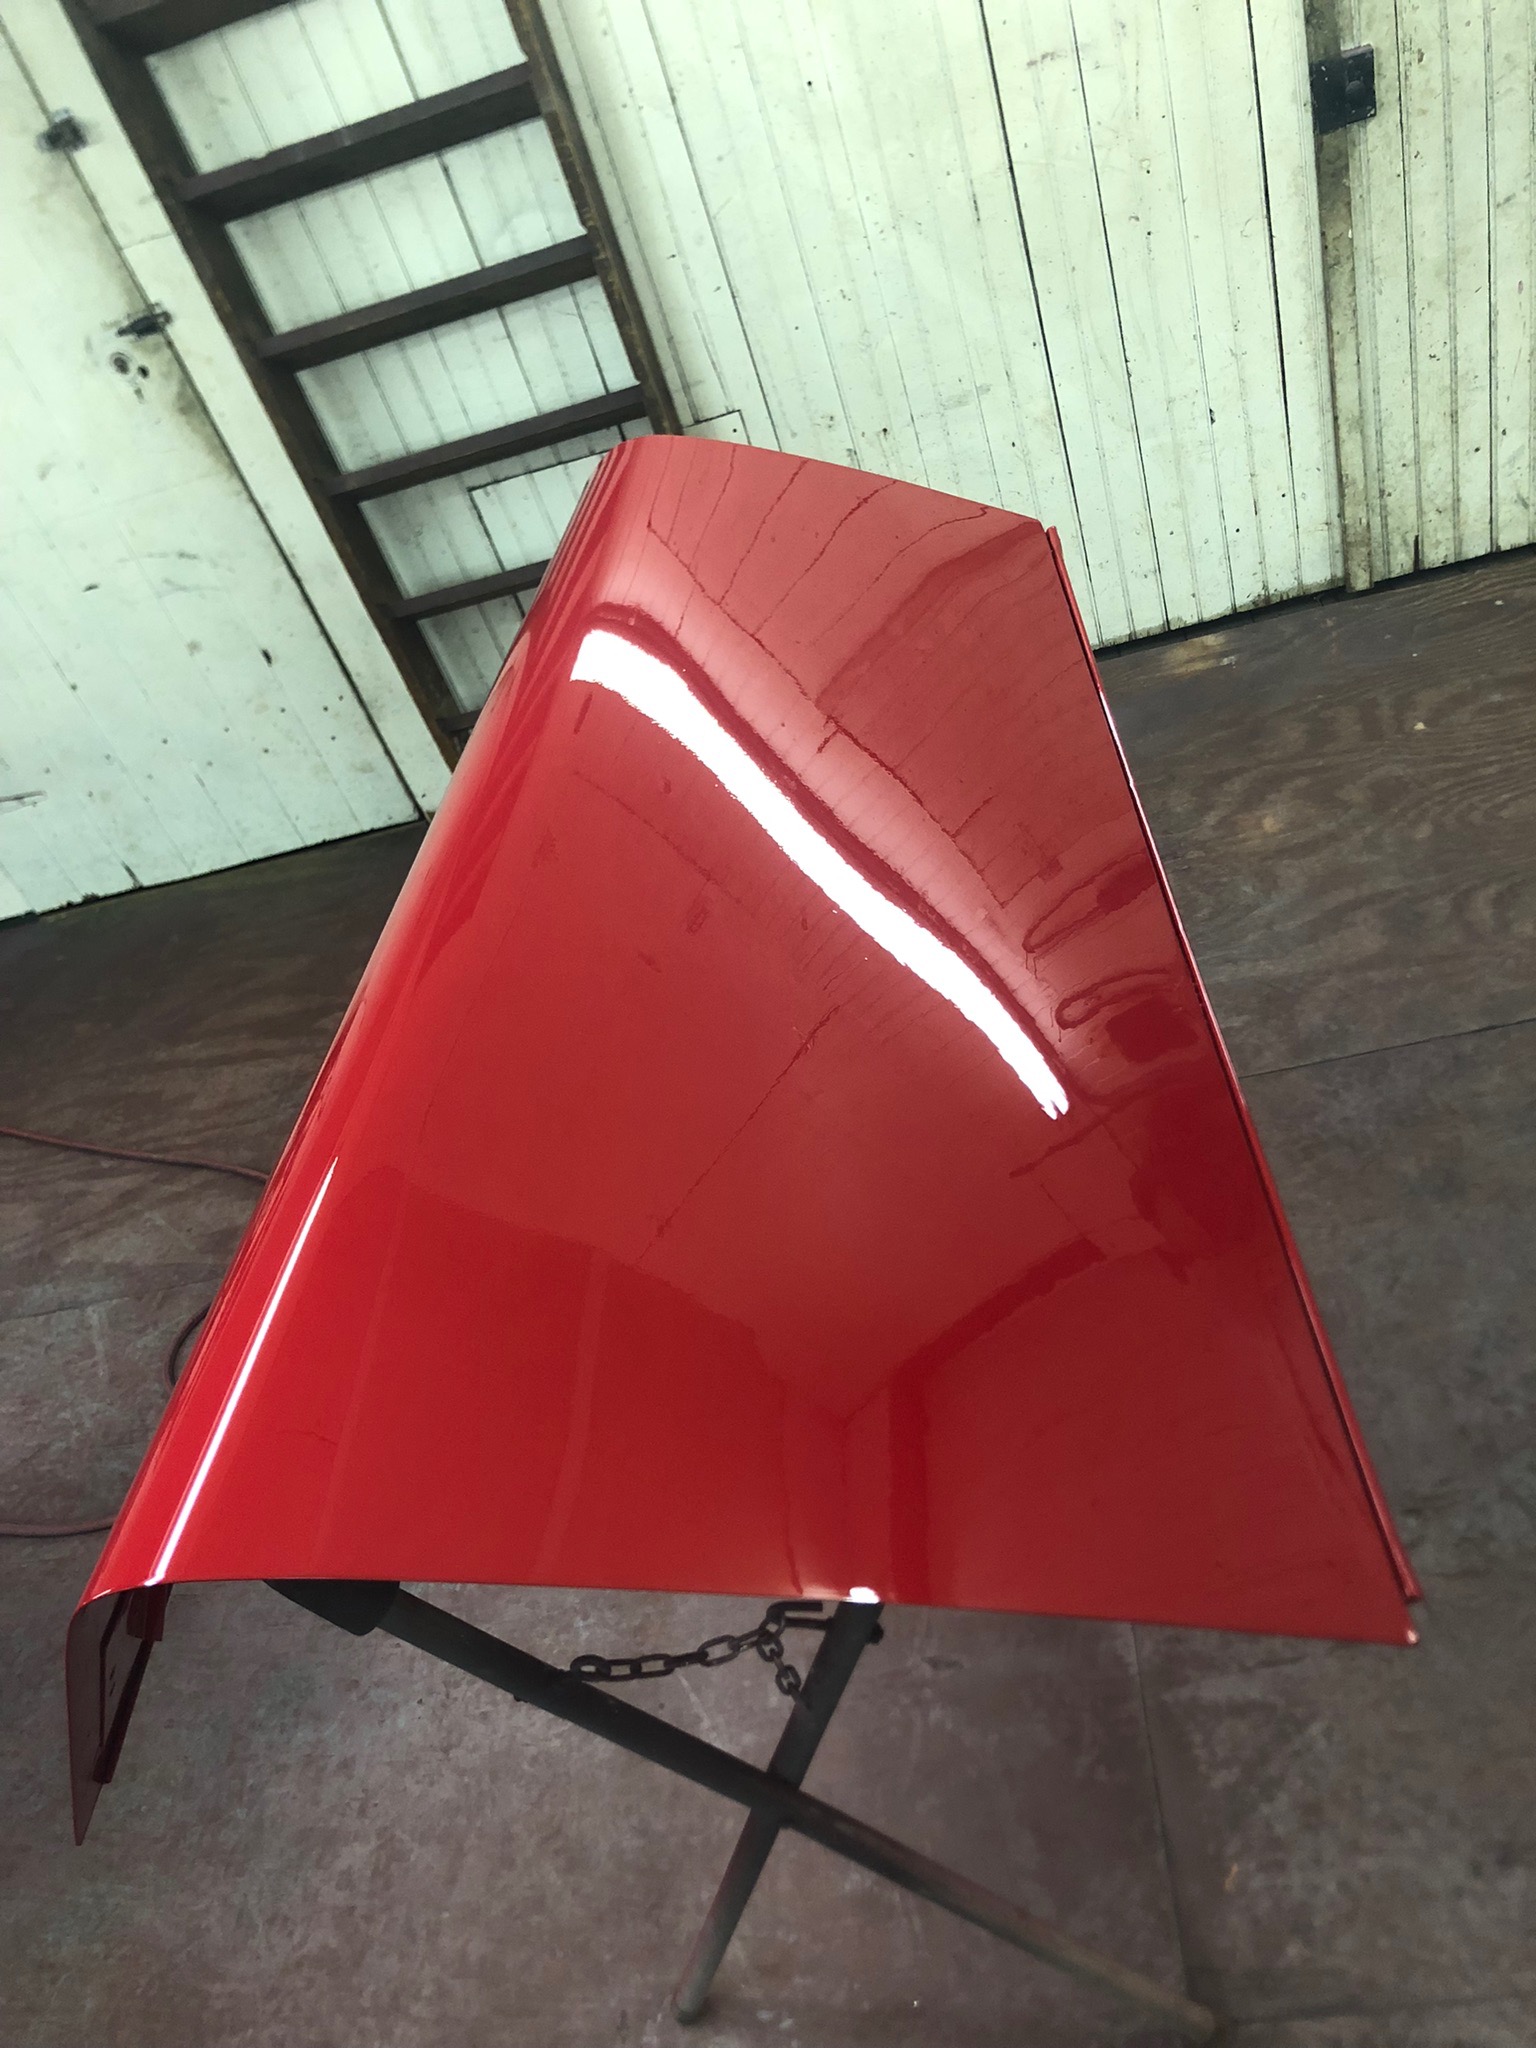
Got home late afternoon and had time to wet sand. I already had my painting bay ready from earlier efforts, so i burned some midnight oil and went ahead and shot both halves. Results were, again, spectacular with this paint. I wasn't trying to rush and just finished a little while ago. I'm very happy with them. A couple of dust specks on the passenger's side, but there's plenty of material to buff them out.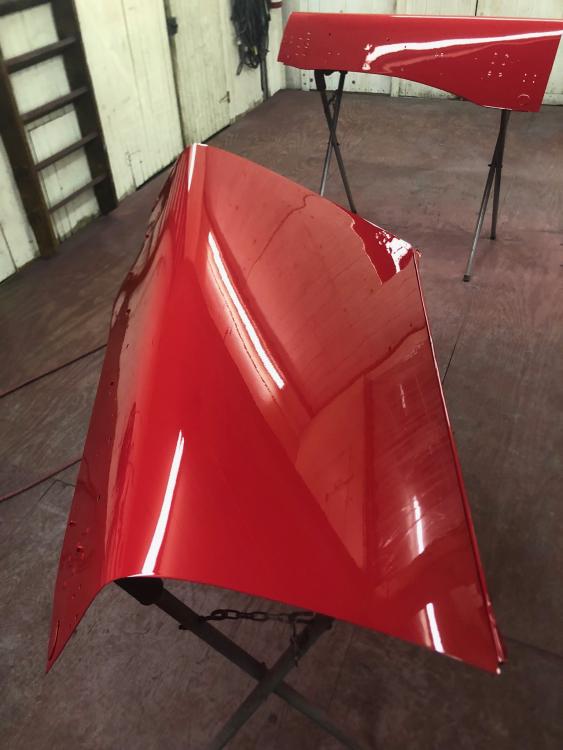
-
B-73 Restoration
mattb73lt replied to mattb73lt's topic in Antique and Classic Mack Trucks General Discussion
That about sums it up!! I did have a remarkable recovery, though! -
B-73 Restoration
mattb73lt replied to mattb73lt's topic in Antique and Classic Mack Trucks General Discussion
Well, I was going to wet sand this morning and paint the exterior of the hood this afternoon, but work just called and ran my train into the ditch. I did get the inside done and painted. This Concept paint is amazing, all I did was scuff the inside and shoot it and got an amazing finish. Hopefully I'll have enough time left today to at least wet sand.

-
Adding a sleeper to a b model
mattb73lt replied to Mean Green's topic in Antique and Classic Mack Trucks General Discussion
It's starting to look great!! -
B-73 Restoration
mattb73lt replied to mattb73lt's topic in Antique and Classic Mack Trucks General Discussion
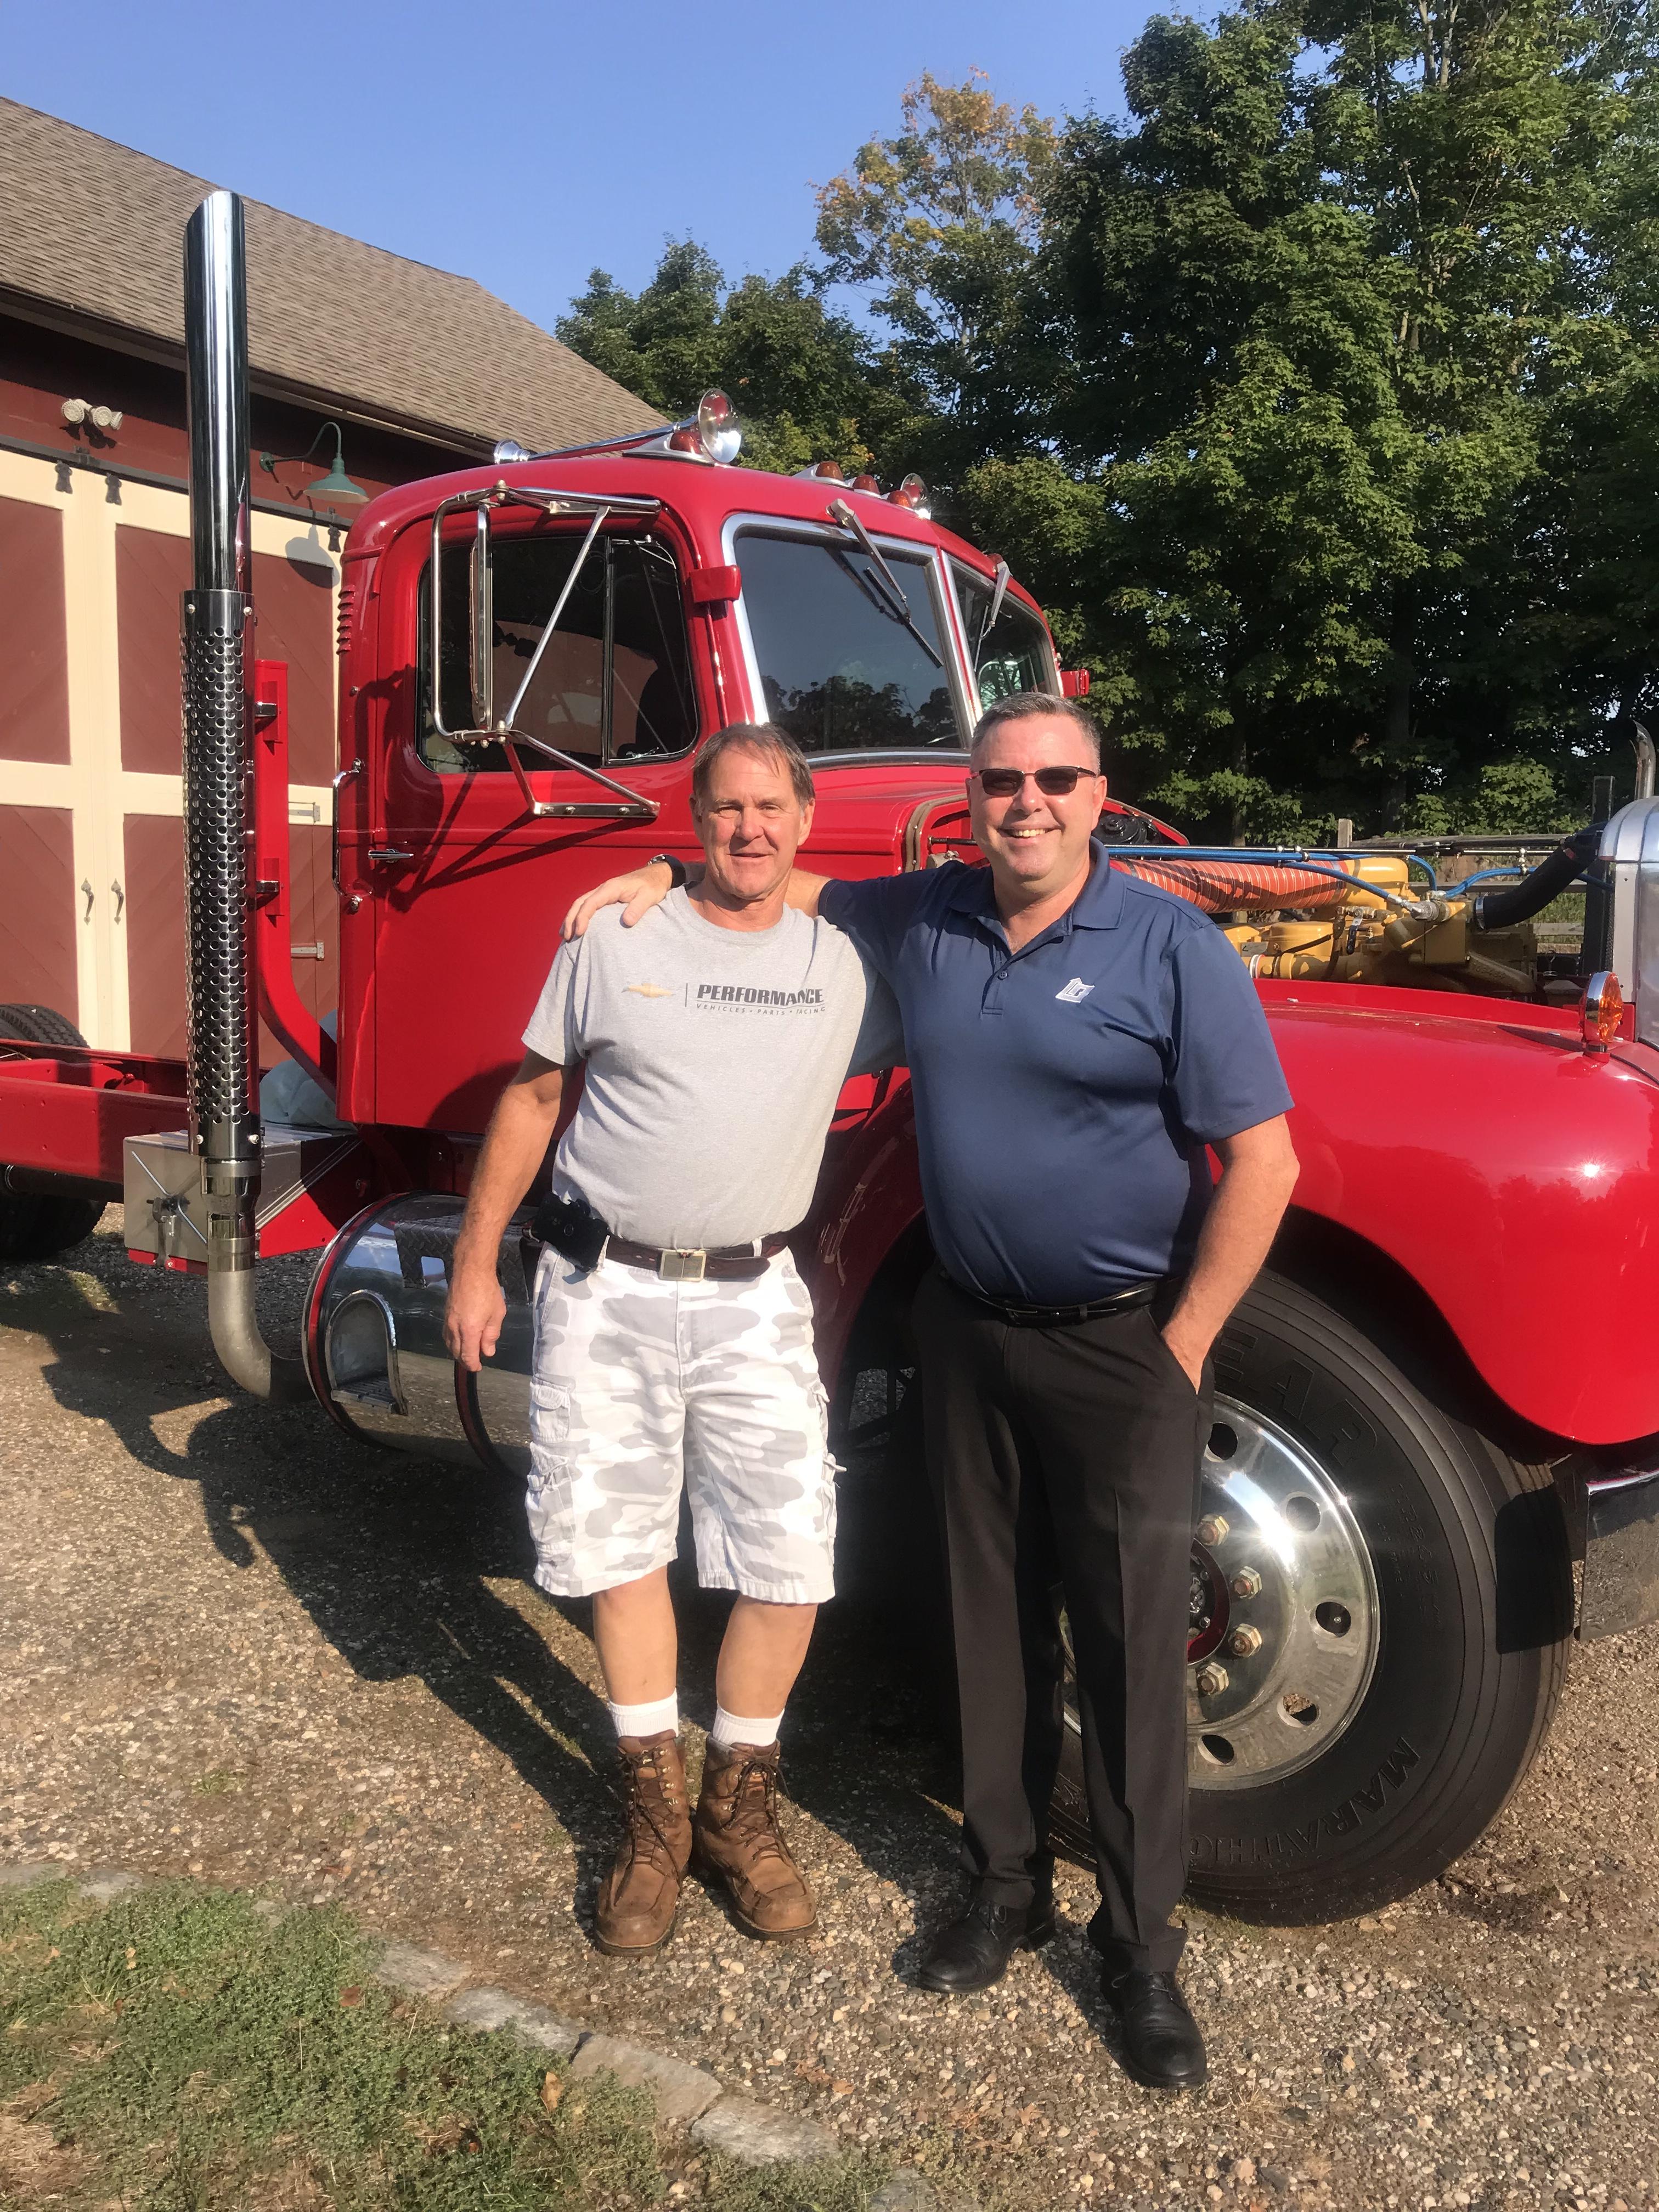
Dean on the left, Matt on the right. -
B-73 Restoration
mattb73lt replied to mattb73lt's topic in Antique and Classic Mack Trucks General Discussion
Had a visit from Dean (1961H67) and his wife all the way from North Carolina and on their way to Maine, stop in and visit. Great finally putting a face with a name.
-
B-73 Restoration
mattb73lt replied to mattb73lt's topic in Antique and Classic Mack Trucks General Discussion
That's not a bad idea. -
B-73 Restoration
mattb73lt replied to mattb73lt's topic in Antique and Classic Mack Trucks General Discussion
I did roll up some shop towels to put between the skin and bracing to give it some support, while holding the front and back edges as I worked those areas. Seemed to help. -
B-73 Restoration
mattb73lt replied to mattb73lt's topic in Antique and Classic Mack Trucks General Discussion
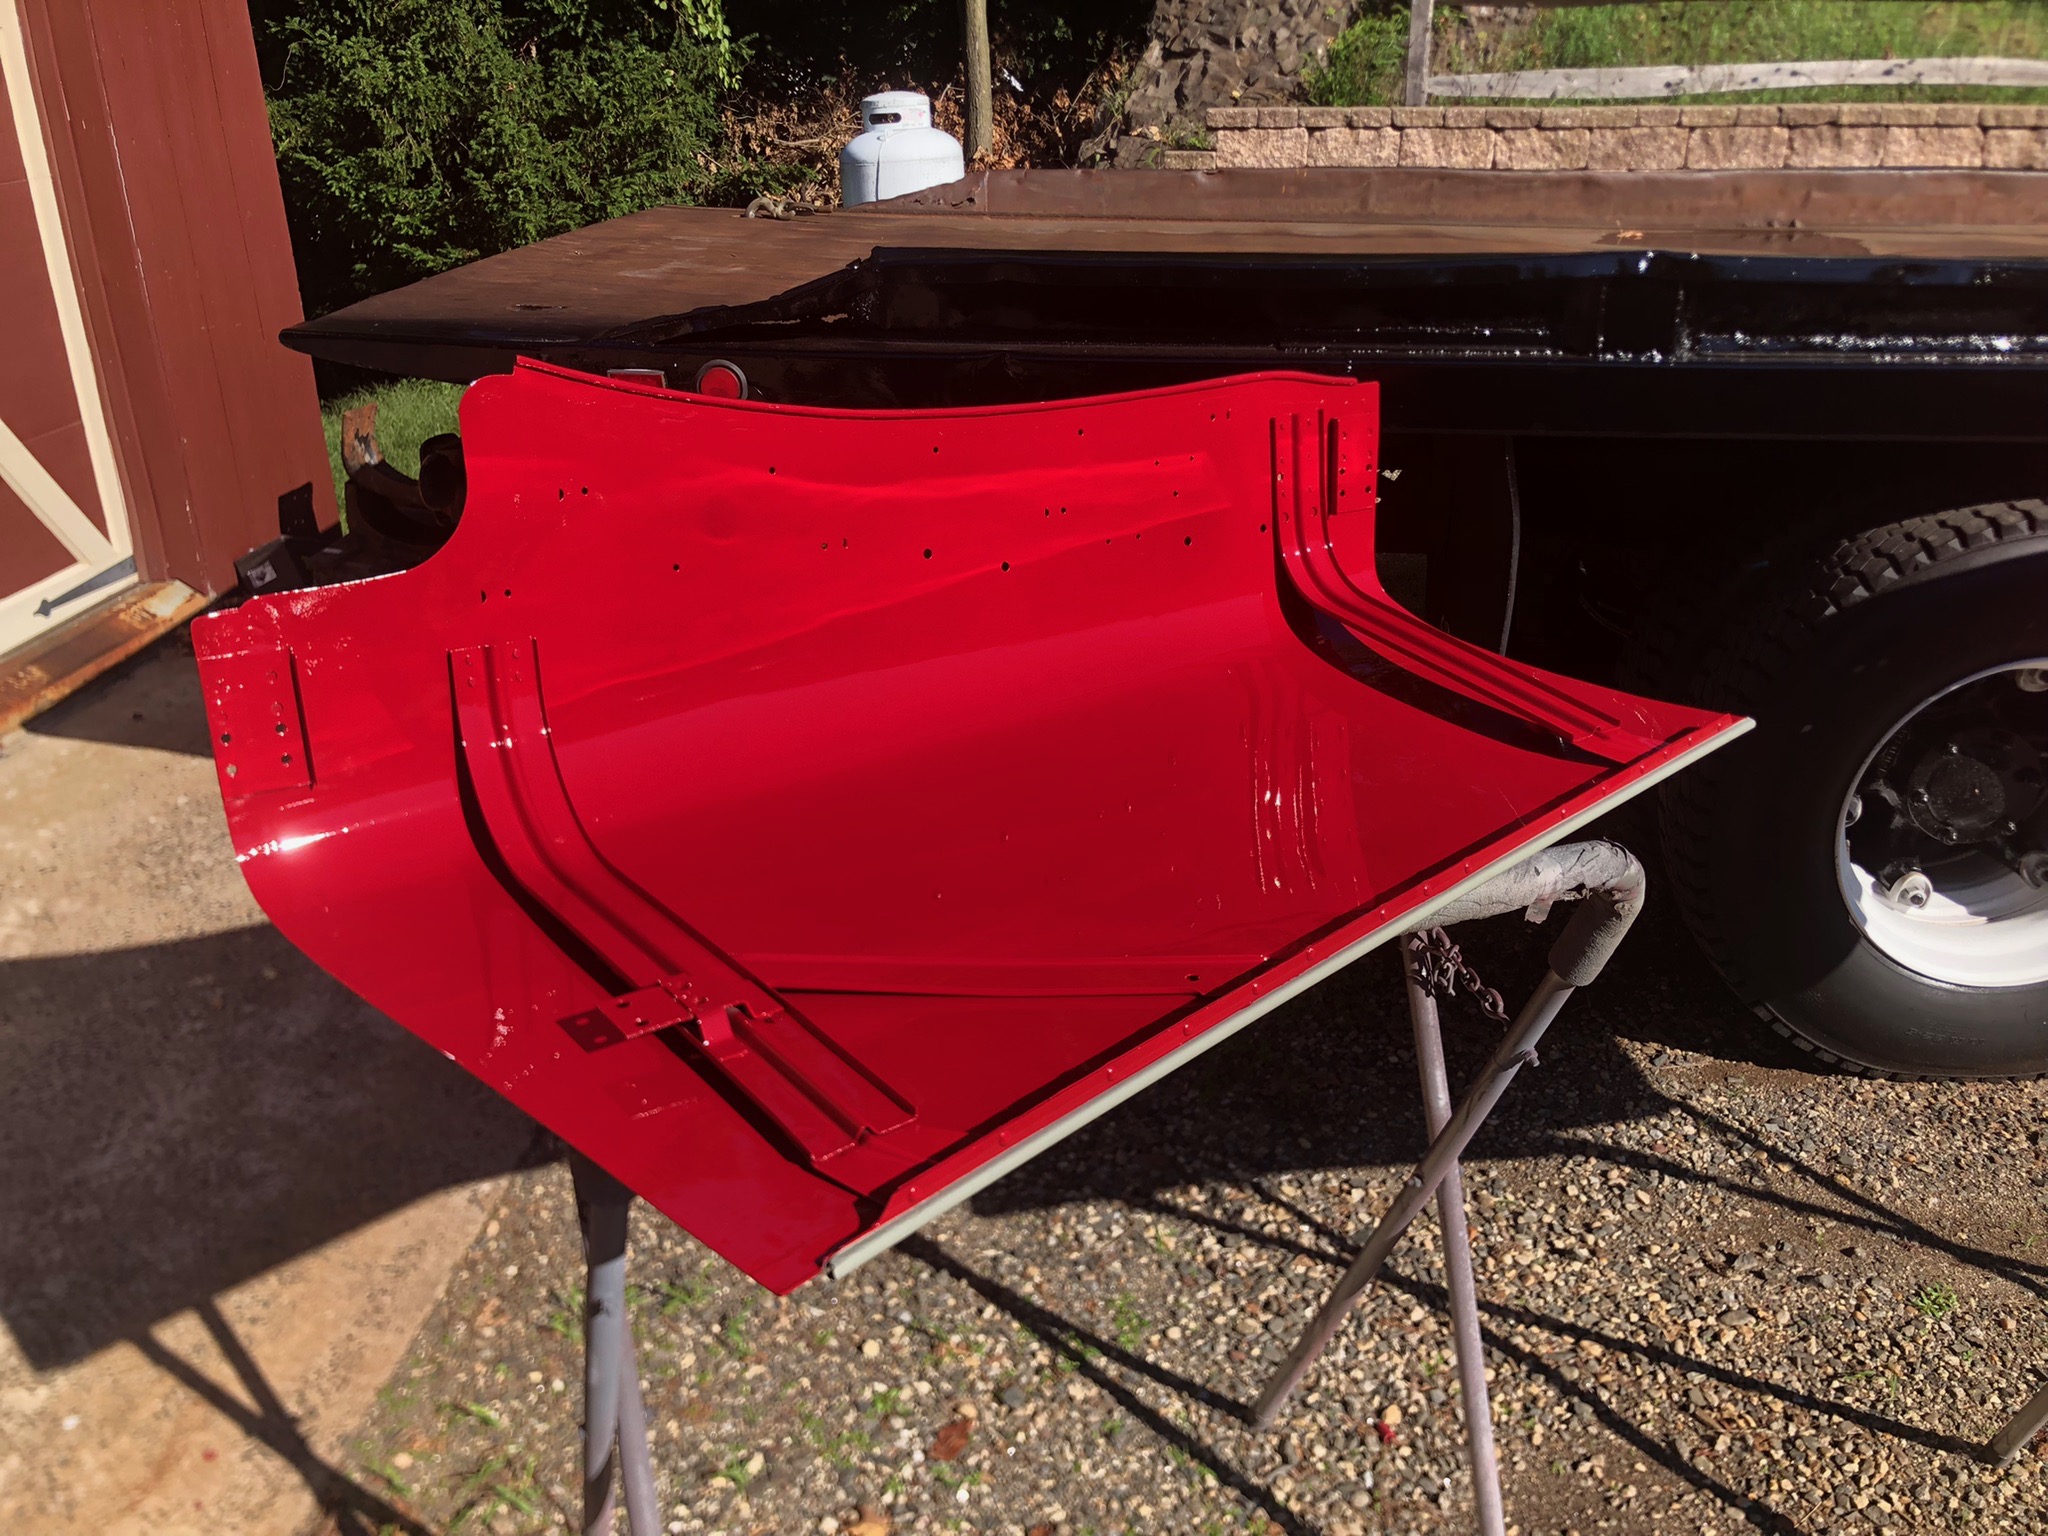
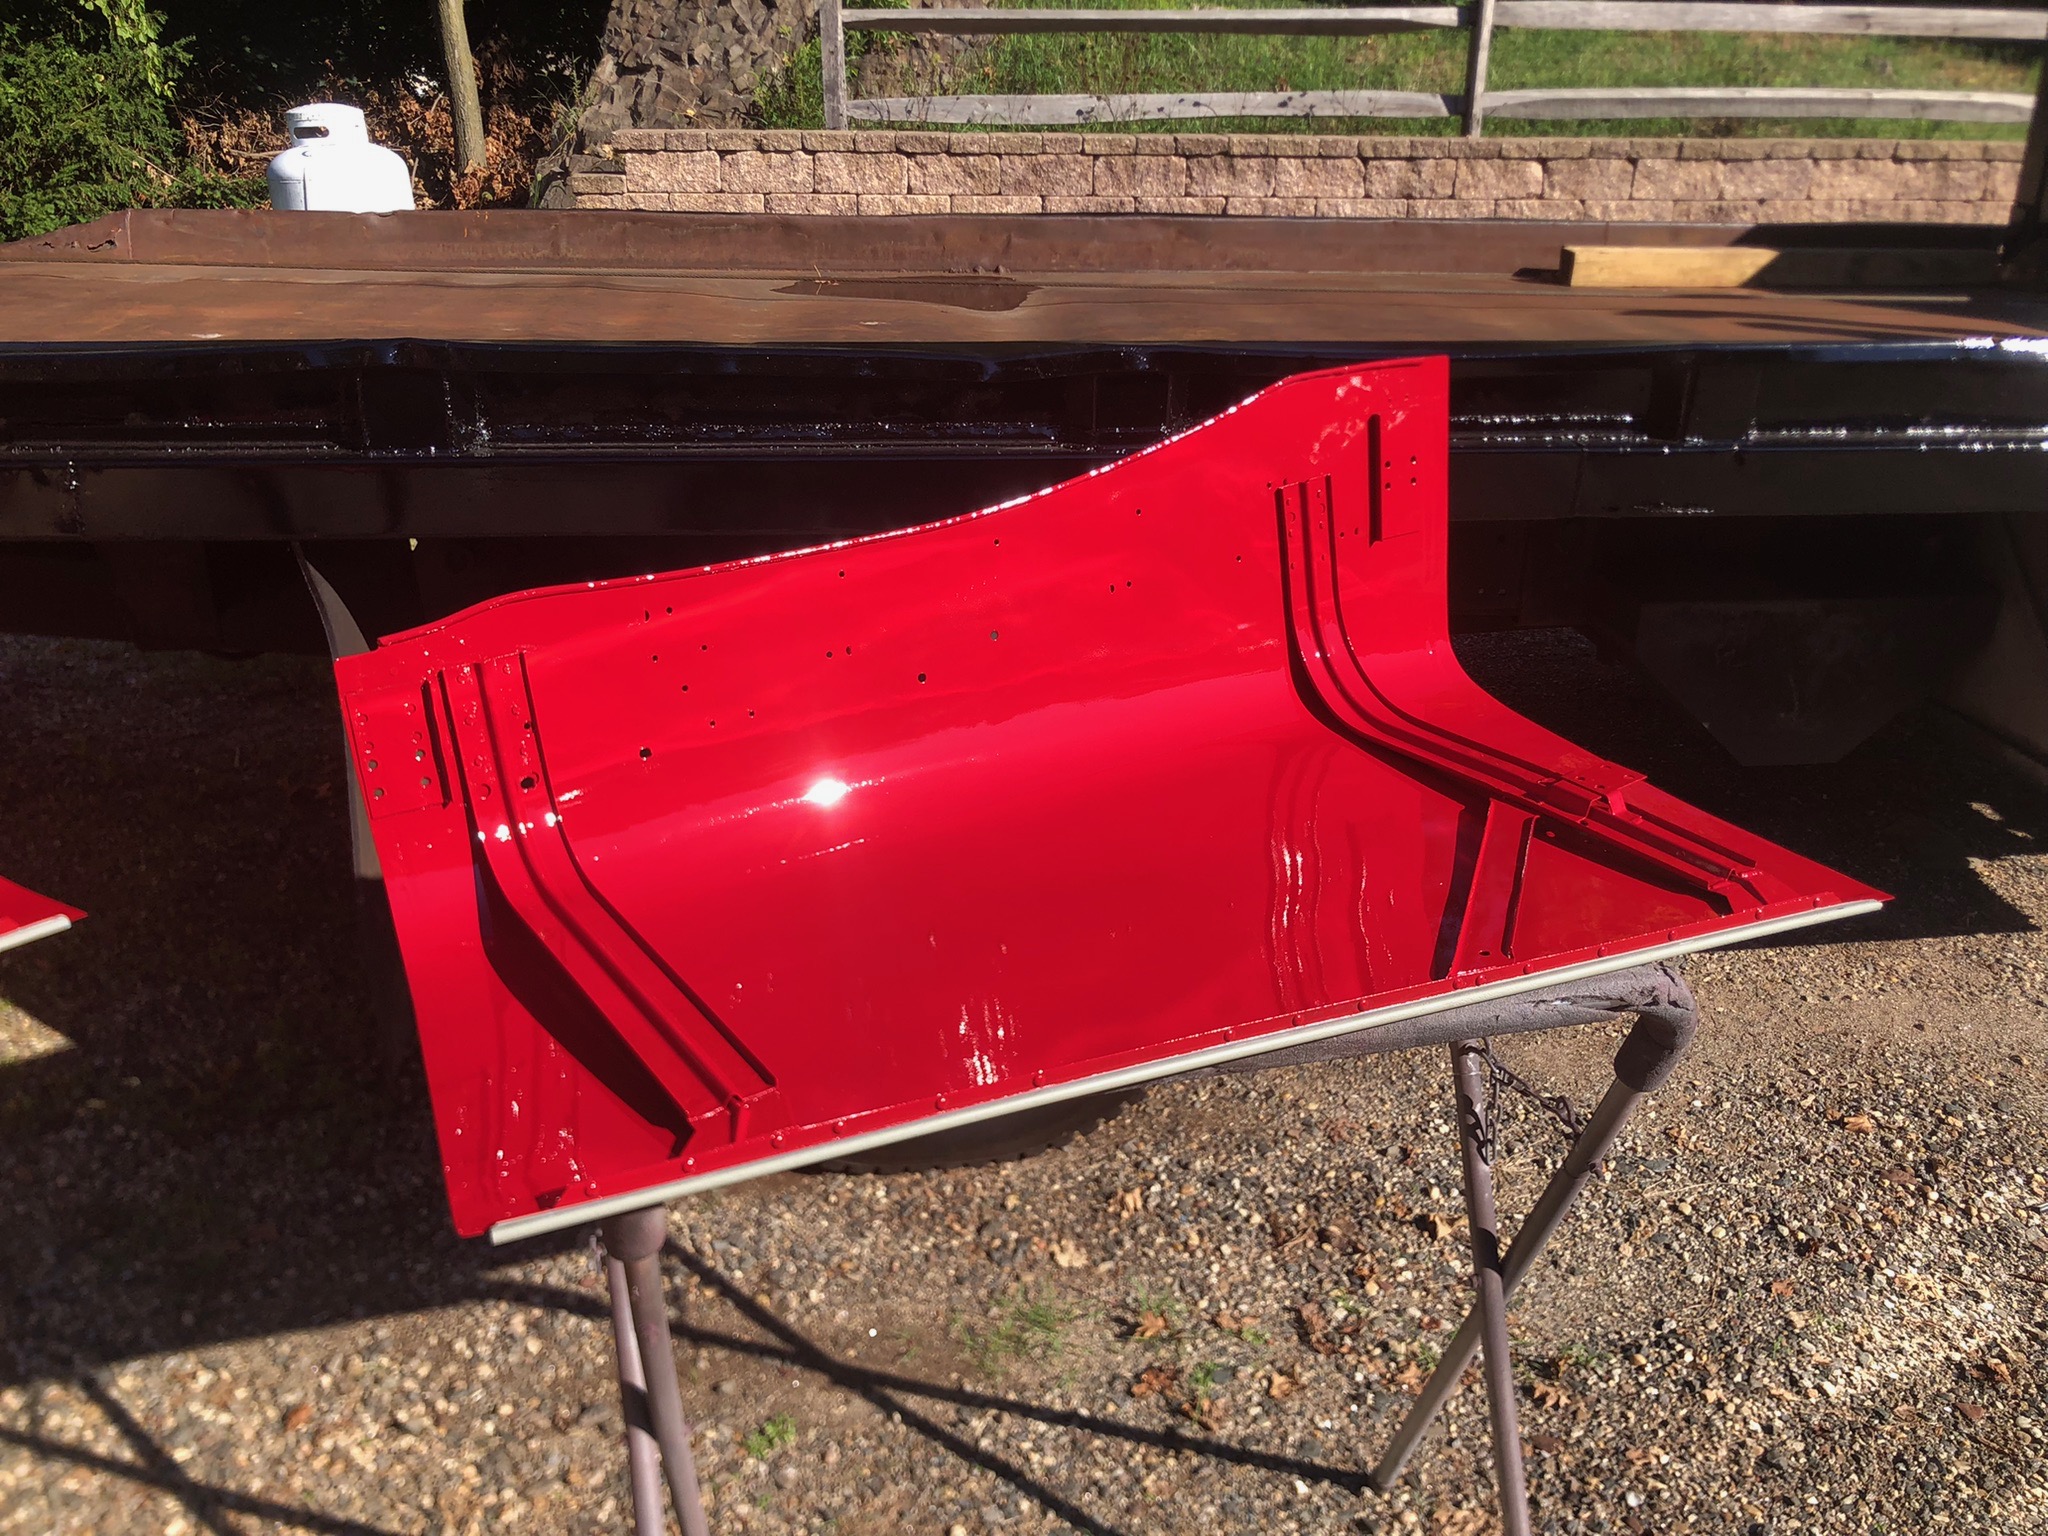
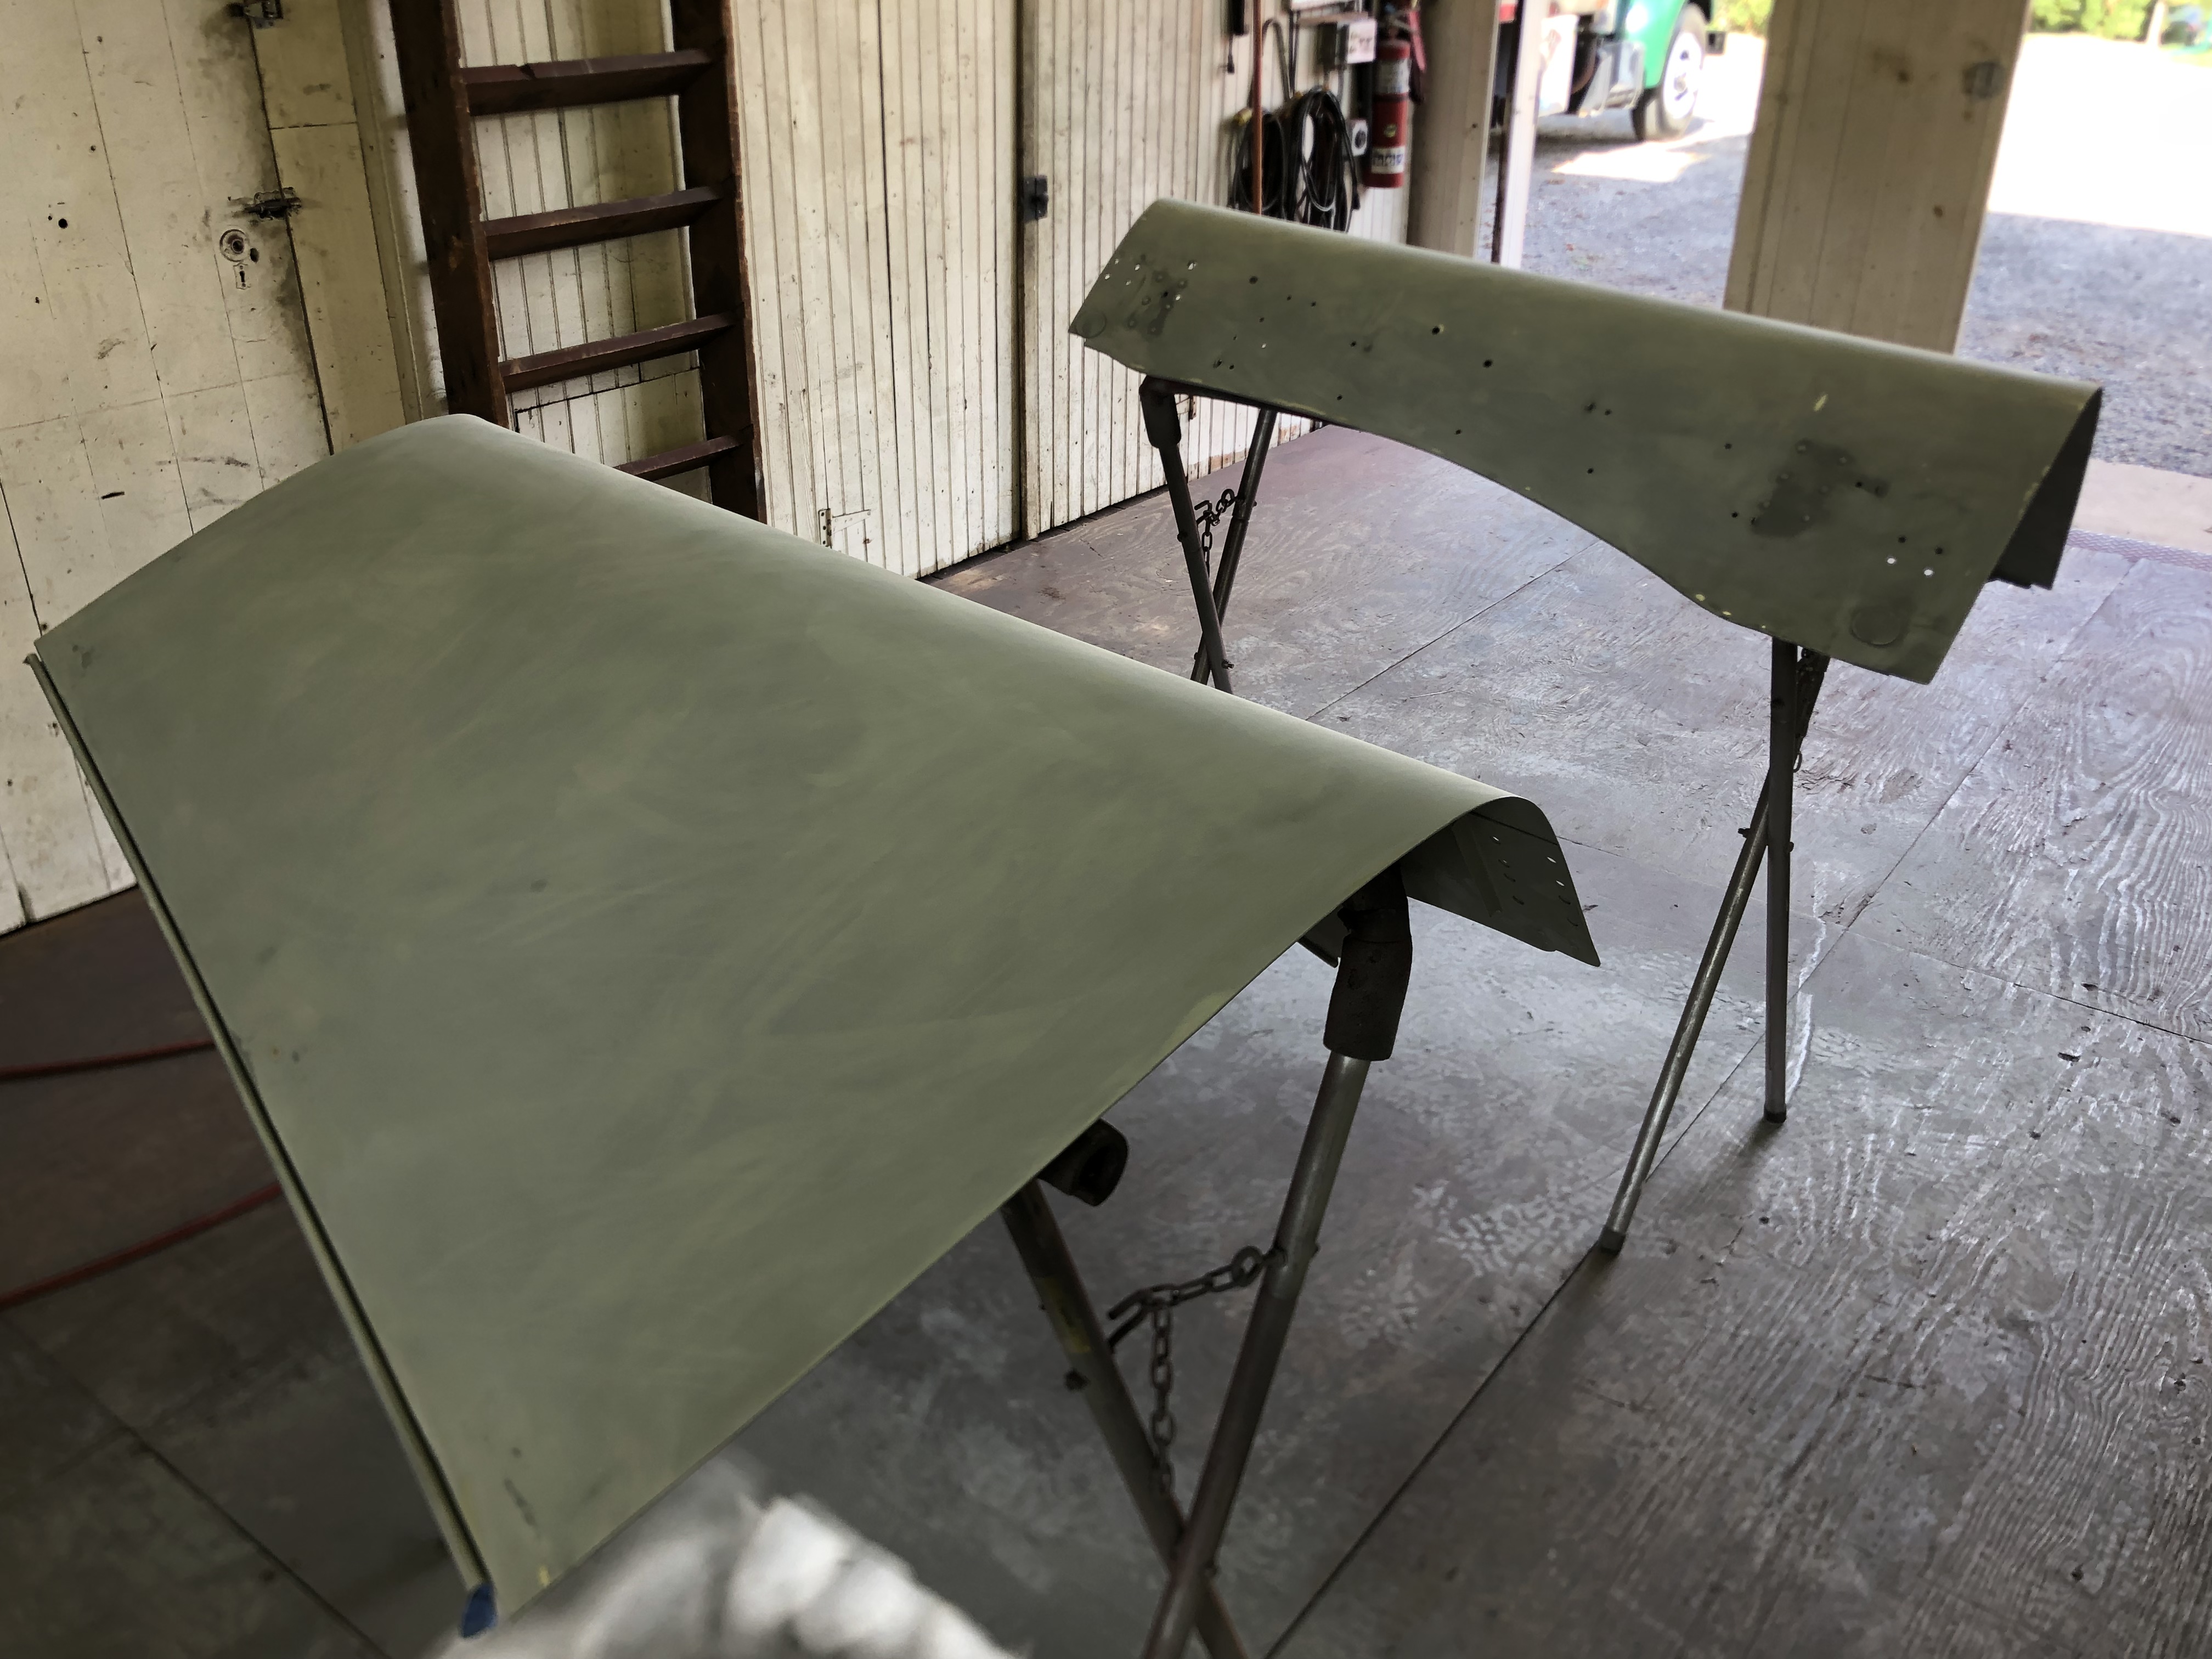
Three rounds of high build primer and block sanding got these hood halves about as straight and smooth as I can get them. First layer of epoxy primer/sealer. This will get wet sanded and one more coat before a final wet sand, then....color. Not the easiest aluminum panels to sand. The cowl and radiator give them a lot of rigidity, so when they're loose like this they deform if you sand with too much pressure causing waves in the primer.
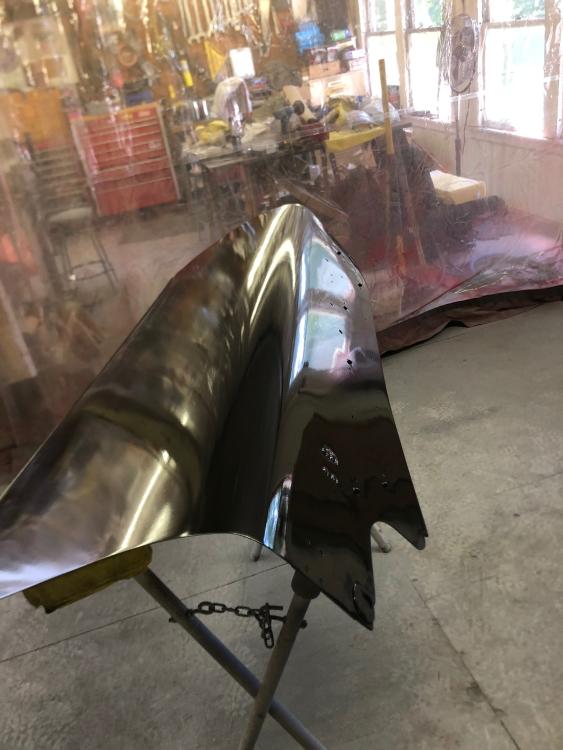
-
Coca Cola LJ Mack colors
mattb73lt replied to 1961H67's topic in Antique and Classic Mack Trucks General Discussion
I’ve been using a schematic, both air and electric from a B42 maintenance manual. It shows parts for both a straight truck and tractor. The electrical and air circuits are roughly the same for a gas or diesel truck. My air system was completely botched up and had way too many things that I wouldn’t need for my build. So I basically copied how my B42 was done, it’s really just a slightly larger version. Same with the electrics, then I just modified it for the alternator. I’ll try to take a picture of them for you, but don’t know if the resolution would be good enough. I would think if you could locate an LJ/LT manual, with air brakes, that would work, too? -
B-73 Restoration
mattb73lt replied to mattb73lt's topic in Antique and Classic Mack Trucks General Discussion
Yeah, I definitely dug deep into it!!
-
B-73 Restoration
mattb73lt replied to mattb73lt's topic in Antique and Classic Mack Trucks General Discussion
Working up the LAST two panels to paint, the hood halves!! Great feeling to be at this point. Still some small stuff to paint, but these two finish the cab!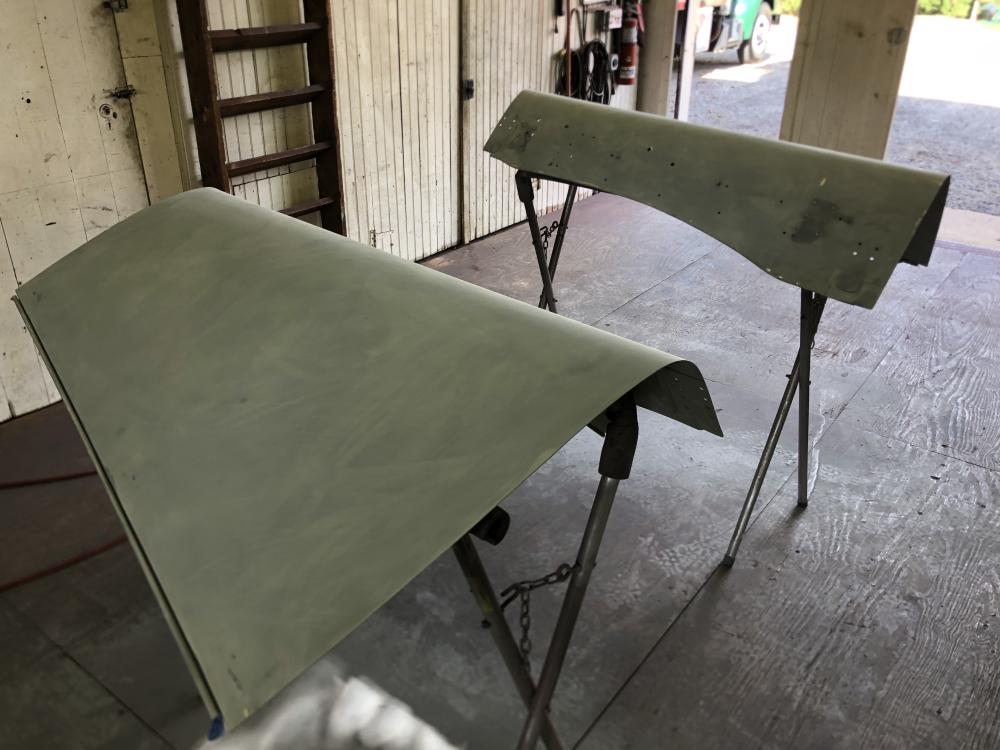
-
Brake lights should be hot at all times, not keyed/switched. Same with your turn signals for the hazard lights. If you've located the switch, test it with a test light to see if one side is hot, it should be. You can also jump the terminals on the switch and the brake lights should light. This sounds like it may be a feed issue if both the turn and brake light don't operate. If you only have single tail lights with brake lights that also operate as turn signals, the brake light circuit runs through the turn signal switch which causes them to flash. Check your feeds first make sure both have power and work out from there. If you have power to everything and you jump the brake light switch, your problem could be your turn signal switch. These are just reasonable suggestions and things to try, as we can't see what you're looking at or the condition.


BMT Forum Logo
