


JoeH
-
Posts
2,730 -
Joined
-
Last visited
-
Days Won
18
Content Type
Profiles
Forums
Gallery
Events
Blogs
BMT Wiki
Collections
Store
Everything posted by JoeH
-
I know heating oil trucks are set up that engaging the PTO sets the parking brake. In the age of computers, I suppose anything is possible. I could see the CPU thinking the truck is not parked could affect the ramp up.
-
To check camshaft I'd call the dealer and get cam part numbers for each VIN and compare. I'd assume the part number has been supercedes numerous times, so I'd ask for all the numbers to compare.
-
How is the journal cap? If the bearing spun I imagine there would be some wear on the cap and block journal faces. Not sure if this will affect this engine's ability to be rebuilt. May need to pull the crank to mic the journal?
-
In PA you lose your CDL the moment your medical card expires.
-
Also, check your bearing size. Is it standard? Or over/under of however they call it.
-
Part of the reason these trucks can run such a wide powerband is the oil pressure. The high volume/pressure keeps the bearings coated under the immense working loads. Glad you found your problem! I saw a video of a guy cleaning up a crank journal, a lot of the "roughness" might be copper etc from the bearing that fused to the crank. The guy in the video was able to scrape most of it off with a razor blade, hit it with some 320 grit then 600 grit, and it wound up still being within spec.
-
dual starter detroit flywheel housing
JoeH replied to glenbjackson's topic in Engine and Transmission
That's neat on the tank! Just gotta build in an extra passenger seat so you can carry 2 German blokes around with you. -
Nothing is ever easy it seems.
JoeH replied to Licensed to kill's topic in Antique and Classic Mack Trucks General Discussion
I'll put my lists/reminders so they're sticking out of my wallet so I can't miss them in the AM when I'm getting ready to get out the door. My dad is 70, and he's a list guy, always has been. The amount he gets done every day is impressive. -
Nothing is ever easy it seems.
JoeH replied to Licensed to kill's topic in Antique and Classic Mack Trucks General Discussion
A piece of paper with a list of small achievable tasks does a lot to get you out the door and moving. Evening before, write down a few doable tasks, cross out as you go. Next evening add a few more to the list for the next day. What ever you don't get done is carried over to the next day. -
Just be glad you aren't doing this on a DM cab, the rear head is halfway under the firewall, and the firewall comes right up passed the back of the tires. Very cramped!
-
Its a good thing this is such a durable engine, I've done this process numerous times. Its not fun. I've never seen a closed end cross foot, all the ones we have are open end and the square port is right by the open end, no handle length.
-
You're also dealing with a manual trans you said, so you have different sensor inputs and outputs. And you have a GU813 which is probably an mp series engine whereas I have a vmac III etech engine.
-
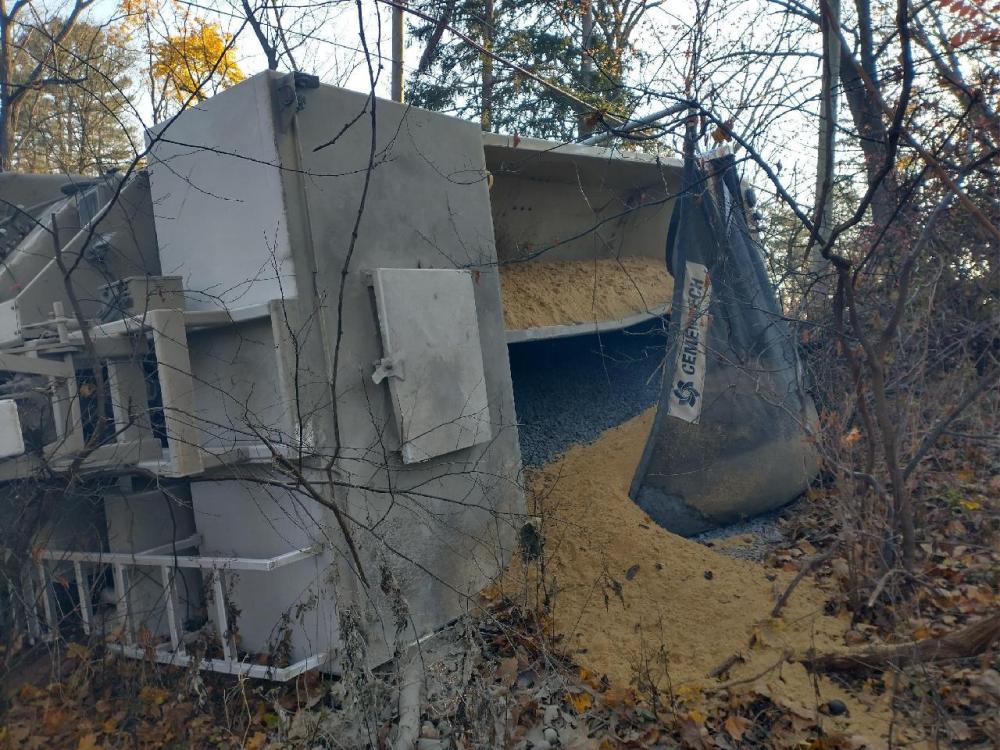
We scraped the sand out often one bin at the scene, but it still has a fair bit of stone in the one side. And the cement bin on the back is mostly full. Drivers job tomorrow is shovelling the materials off the truck before it goes to a collision center for evaluation. If the mixer body has to come off then it needs to be empty.
-
Hoping it gets new wiring harnesses, wires weren't in great shape before this fiasco.
-
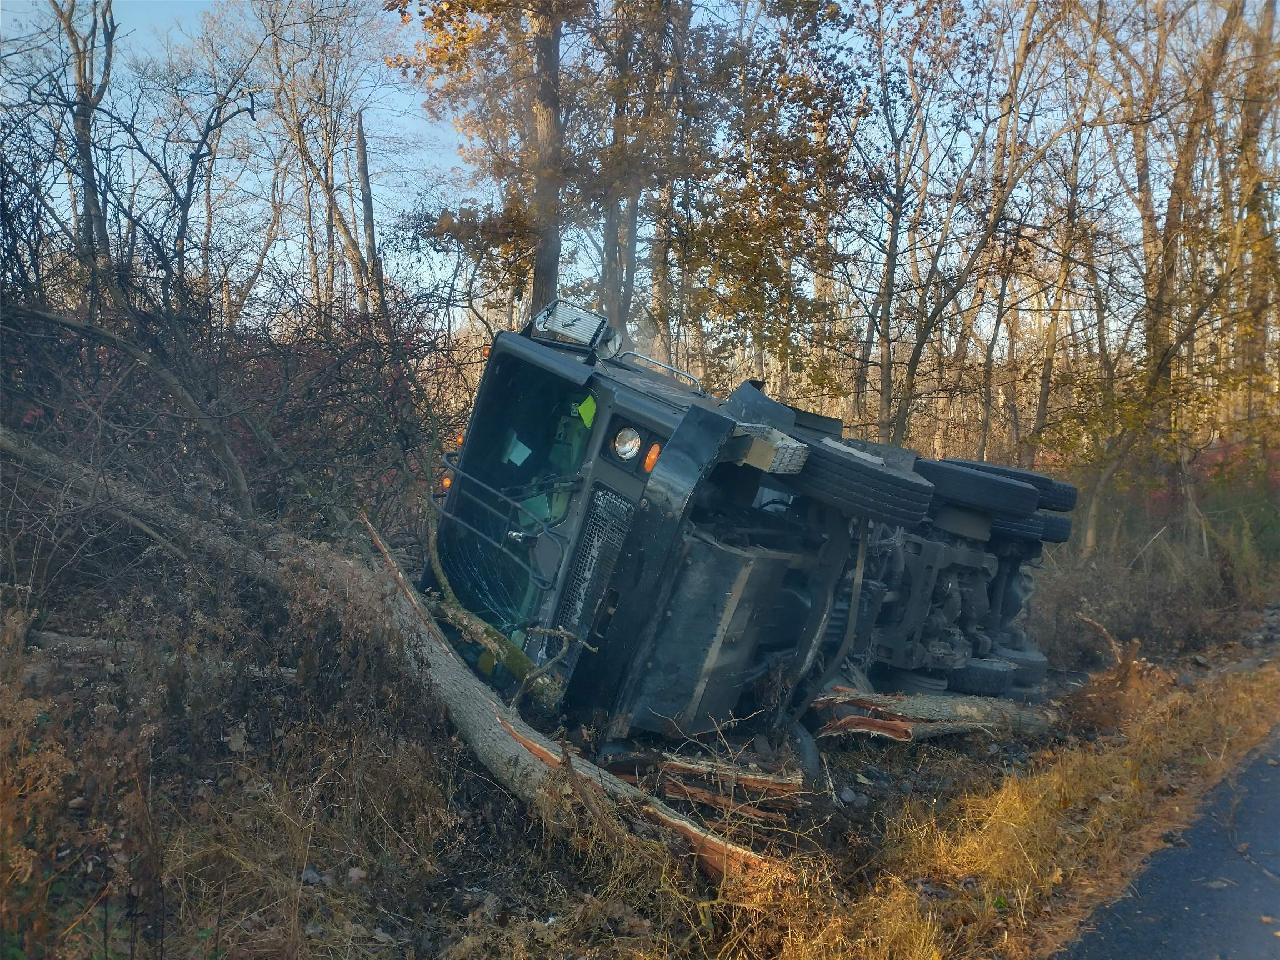
Shockingly almost nothing wrong with the mixer. Passenger cab corner took a heck of a beating. Its such a beefy frame I'm hoping the bones are all ok and it just needs a cab and miscellaneous small stuff. No spilled liquids, though it did tear a fuel line somewhere next to the engine, probably from the cab ripping 8 inches back and tearing loose from the passenger side hinge. No injuries, just a bruised ego on the driver. Just got sucked into a 4 ft ditch and fell over. And you can see the remains of that tree, which I'm sure put some hurting on that cab.
-
Annoying on a truck that runs a manufacturing process that requires multiple different materials to be set at specific flow rates in order to make a good product. It throws the flow rate ratios off, and we either have to adjust them or drive the truck far enough (50 yards?) And fast enough (5-10 mph) to satisfy the computer.
-
All I can think is the truck senses a component in the trans spinning from the inertia of the engine revved up and it triggers a code because in neutral/parked the trans sensors shouldn't sense any movement.
-
I have a 2003 MR688S that does the same thing, but it's accompanied by a trans code (Allison automatic) the code stays active and won't let the cruise throttle control "ramp up" for the PTO work until you put the truck in drive and go fast enough for the torque converter clutch to lock up. (5-10mph) restarting truck doesn't work. Gotta lock up the TCC.
-
So I bought these lev o gages and put them on a couple of my trucks last week so my driver went and did this.... I wasn't expecting the lev o gage to get maxed out so soon!

-
Crows foot won't do 12 point bolt heads.
-
In pa, bridge law applied unless you register for 73,280. I had a tractor with a short trailer, by bridge law I figured I was legal for about 63k despite axle ratings good for 80k. With 5 axles, steer, drive tandem, trailer tandem, I was not allowed to carry as much weight as a triaxle is allowed with only 4 axles and a shorter wheelbase? Really? Loaded I was 75k, all the tanker trailer could hold. If I had ever gotten pulled over and called out on it (I was pa only on that rig) I would have taken it to court and asked the judge to get an engineer to explain to me my above math.
-
1, stamped not cast; I couldn't say, my 79 has had thr sane pan forever. I have had a smaller pan crack pretty bad in a couple corners. 2; my 79 ESI+ has 3 filters, no spinner. My late 70's early 80's ESI engines have 2 filters. My 1995 and 2003 ESI engines have the spinners
-
I think you're right Paul. The American tip turbine engine is a headache to tear down, tight clearances under the radiator support arms that go to the firewall. There is a lot going on with those manifolds.
-
If it looked like a bathtub it must have been the + with 3 oil filters
-
ESI or ESI+?


BMT Forum Logo
