


oldmacktrucks
-
Posts
244 -
Joined
-
Last visited
-
Days Won
2
Content Type
Profiles
Forums
Gallery
Events
Blogs
BMT Wiki
Collections
Store
Everything posted by oldmacktrucks
-
Yes the outer rail would have to be replaced from the point where you cut it all the way to the back of the truck.
-
If you wanted to splice the frame the right way, you have to stagger the welds...in other words you would have to replace the outer rail 2 to 3 feet forward of the crack on the inner rail, so to do this you would have to cut the outer rail 2 to 3 feet forward of your cracks now, remove the outer rail (from the cut point back) and replace...its a lot of work to do it right
-
The bolt sticking out of the front is more than likely your slack adjustment (I know mine has the bolt and thats what its for) Back it off a 1/4 turn at a time counter clockwise...dont go too crazy because you dont want it too loose. The lack of grease would make it harder to release but not to the point where your prying it open. Back it off a 1/4, grease the jaws if your going to use a fifth wheel wear pad you DO NOT want grease on the plate or the trailer...its either the pad or grease NOT both. Back into your trailer and go from there...if its still hard to release back it off another 1/4 turn. When you go to release the jaws dont crank the landing gear down to the point where the trailer is lifting off the fifth wheel plate, that will also make it hard to release...and make sure you lock your trailer brakes then put a little reverse pressure against the trailer...then lock your tractor brake, the slightest forward pressure against the jaws will also make it very hard to release. Hope this helps...-Sean
-
Sounds like somebody at some time was pulling a trailer with a worn king pin and tightened the fifth wheel to take up the slack, and now you backed under a different trailer with a good king pin...and the fifth wheel is now to tight to unlock I've had this happen a few times
-
I remember your truck in your last post, I believe it was a brown slant nose RD if I recall, however when you asked for help last time you posted that you purposely withheld critical info while trying to rack our brains for help...like it was a test for us...I dont mean to be rude but when you have guys that are pitching in to help you its not polite to test us on our knowledge. As with that being said, yes I would fish plate your frame, or if you really wanted to do it right buy a set of rails for your truck and re-rail the broken side, but thats a lot of work. A good welder...and I mean good (I'm sure you know the difference) can repair those rails...I've stretched trucks since I was 15 and NEVER had a chassis crack. What I would do if you have the time is remove your outer rail, weld the inner rail, the splice the outer rail 3 foot forward of your crack and you should be fine, but once again this will require at least one new outer rail. -Sean
-

Tempature
oldmacktrucks replied to DCR's topic in Antique and Classic Mack Trucks General Discussion
I would say a 180 thermostat would work, but not sure about B-models. My old DM600 (the 73 truck) has shutters and a 180 stat and the heat cranks. My engine is an old 237. Hope this helps...if you do have a thermostat it might be stuck open, this has happened to me countless times -
Shes a big one alright, she's laid up for repairs, looks like they just painted the super structure...very interesting and cool pics! Wonder what she has for power...more than likely Sulzer diesels or Fairbanks Morse...gots to be big though! And I'm sure she likes her fuel LOL!
-
Just did some homework, as ships deff are one of my hobbies. The American Victory (the ship in the pic) is actually laid up for re-fitting...that would explain why she's sitting so high out of the water. Cool pic I must say!
-
That ship appears to be beached...its deff sitting on the bottom because the you can clearly see the bow thruster. They might be getting ready to cut her up...looks like the Edmund Fitzgerald, deff your typical great lakes cargo ship
-
Sounds cool...I had an uncle that was the head of the transportation museum here in upstate New York...he would have loved to see that, he was a "train man" so to speak
-
Great point, high voltage would mean less tampering! I dont know why people feel the need to cut into a trucks wiring harness, if you ask me I dont even like to add a CB without running the wiring to match the factory to a T. I see a truck that has a hacked wiring harness and I pass, even if its a good deal...I just dont have the patience anymore to deal with someone elses hack job. A nice bare bones factory (or done right glider kit) is good enough for me
-
Bailing wire is a must in a real mechanics tool box! I grew up with bailing wire and electrical tape, we fixed all of our own trucks...my uncle was an A mechanic for cummins years ago...now everything is ECM this and computer that...cant go wrong with the old technology in my book, which is why I bought an 89 glider kit, newer cab but trusty old components. Funny, I was also thinking lock-tite on the sleeves but my pump man (an old school Mack nut) was telling me to use a high temp RTV...not sure on this one
-
My buddy at the pump shop was telling me to install the injector in the new sleeve (with anti-seize unlike the factory) Then put the injector with the sleeve in the freezer or in a cooler with dry ice overnight to make it shrink, then take it out put some high temp rtv on the top and bottom of the sleeve and install it along with the injector. This is coming from a well seasoned Mack man...I've never seen it done this way but he said he used to do it all the time, I also mentioned to him about the lock-tite and he said to use a high temp silicone instead. Sounds like it might work, I know we use dry ice all the time when replacing trunions and it works like a champ. I'll be sure to post a follow up as soon as I get the pump and injectors back in the truck...I have to say in all my years I have never ad a sleeve pull out on a Mack, guess I was just lucky! The injectors were frozen in there bad...worst I have seen other than marine injectors and the engine is clean...no rust go fiqure
-
same here, always sent the heads out to have this done...well, worse case scenario I'll put it all back together and if for some reason the heads gotta come off, atleast its only the front head!
-
My sleeves look to be steel, I've honestly never had one pull out on me so this is all new to me. My book says it requires a tool, but they appear to bottom out on the bottom of the head, so I think I'm going to try the old brass punch and just go nice and easy and hopefully they will drive back in
-
Can I drive the new sleeve in with a brass punch? I see in the book it calls for a driver tool.
-
Pretty much what I have, I would have to assume that the sleeve bottoms out in the head just by the way it looked when the injector came out...the injector was bottomed out on the sleeve. I'll more than likely use a brass puch and drive it in slowly...hopefully it will work
-
Well, all the injectors pulled out of my 300 2 valve with the help of Shel's S-572 puller set. I did have 2 sleeves pull out on me as well. Do I need a sleeve driver to put new sleeves in, of can I just drive the in with a piece of round stock? How far do they have to go in, I was reading in the service book there is a special driver that sops the sleeve at the correct depth...could use some advice on this one
-
Pulling Injectors, Need Some Advice Please!
oldmacktrucks replied to oldmacktrucks's topic in Engine and Transmission
Sure...Shels Supplies and Equipment...phone number is (203) 934-8544 Address is 496 Boston Post Rd. West Haven CT. 06516 -
Pulling Injectors, Need Some Advice Please!
oldmacktrucks replied to oldmacktrucks's topic in Engine and Transmission
I have to admit, these were the WORST I have ever come across, I honestly thought I was going to have to pull the heads. Working in 15 degree weather after this one I think I'm going to treat myself to a nice southern vacation! 2 more to go, still have fingers crossed but with this puller I have the highest of hopes -
Pulling Injectors, Need Some Advice Please!
oldmacktrucks replied to oldmacktrucks's topic in Engine and Transmission
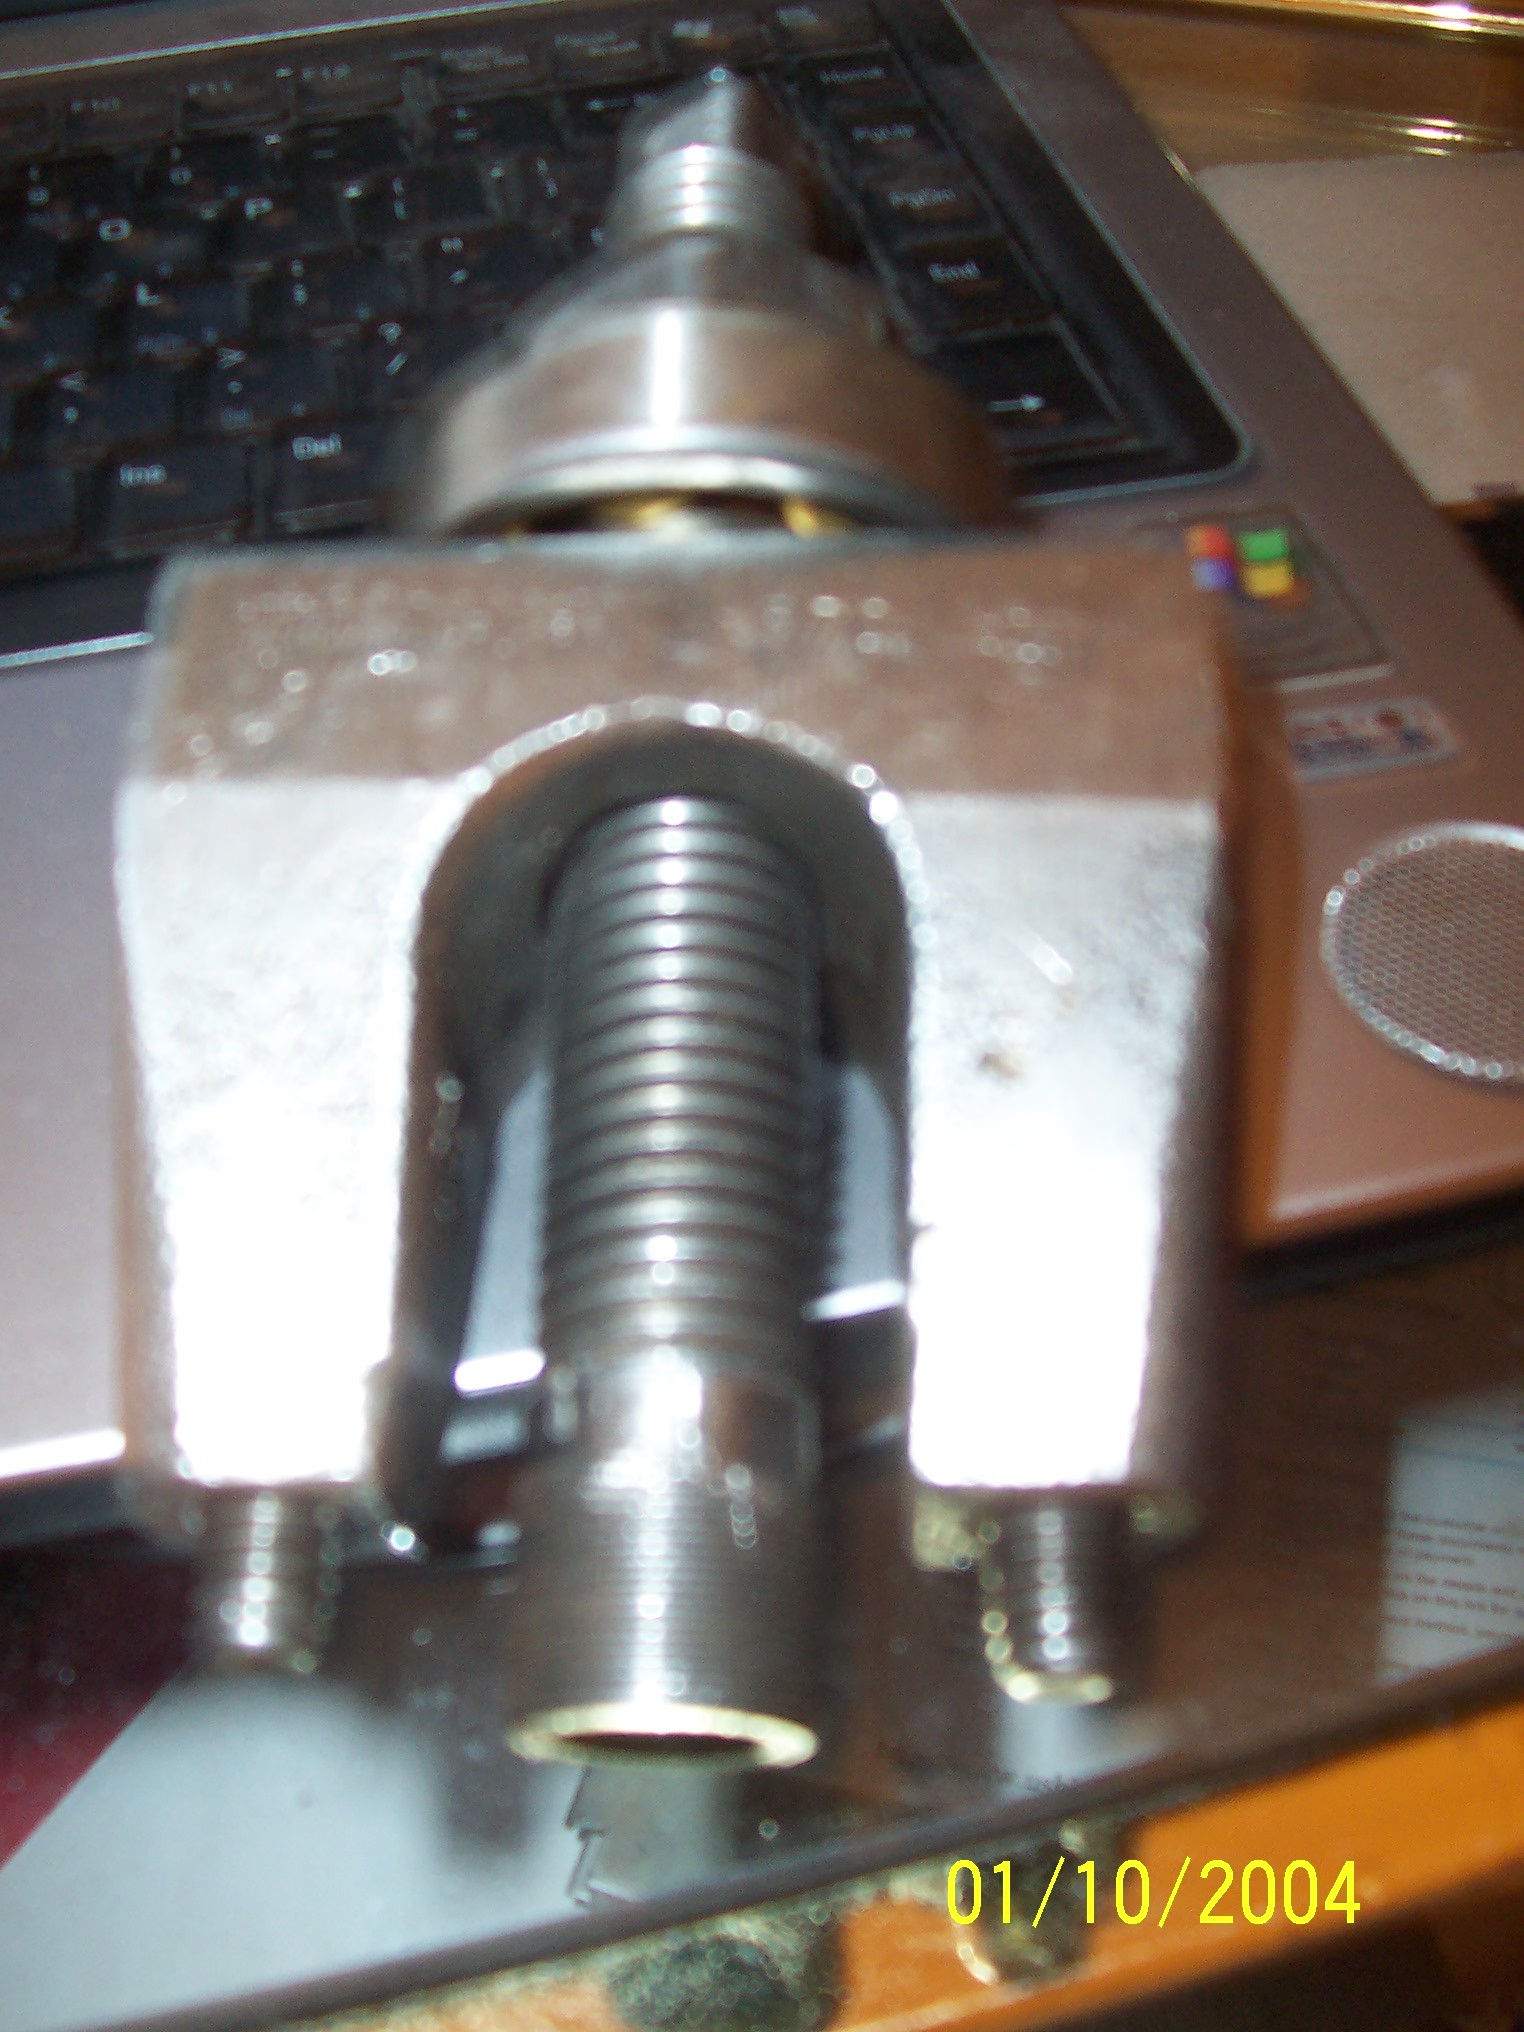
This is the puller
-
Pulling Injectors, Need Some Advice Please!
oldmacktrucks replied to oldmacktrucks's topic in Engine and Transmission
**UPDATE** Throw the OTC puller in the garbage, forget the slide hammer. I ended up using a custom puller from Shels Supply and Equipment, they are a custom machine shop in CT and they produce one hell of a stout product. I got 4 pulled so far, lots and lots of pressure but they did end up coming out. I actually broke the the threaded rod on the puller and now I'm waiting for a new one to be overnighted to me, this puller is machined out of a block of steel and fits over the studs, it has 2 allen screws that you thread down onto the studs to work the puller up as the injector comes out very very unique tool. I'll post pics of the puller tomorrow -Thanks for all your help guys, Sean J. Kelly -
Pulling Injectors, Need Some Advice Please!
oldmacktrucks replied to oldmacktrucks's topic in Engine and Transmission
Rob that sounds like the way to pull them, from the ears...I might have to ask if I can borrow a picture of your jig and try to duplicate it the engine is not a rust bucket, it was well cared for but it did come from Boston and we know they use a lot of salt, so I'm hoping for the best but expecting the worst. I soaked them with Liquid Wrench and I'm going to let it sit over night and hit it with some PB Blaster in the morning and again let it sit...maybe put a little heat on them tomorrow night and see what happens...be sure to tune in tomorrow for updates! -
Pulling Injectors, Need Some Advice Please!
oldmacktrucks replied to oldmacktrucks's topic in Engine and Transmission
As far as running the truck to operating temp, thats out cause the pumps already off I have a slide hammer I made years ago that I'm going to try tomorrow, I should have used that before the puller as the puller always tends to break the injector. I'll try PB and maybe even some Kroil Oil...I have 4 to go, 2 came out easy...keeping the fingers crossed on this one. Thanks guys for all the input...many minds make light work! -Sean -
Pulling Injectors, Need Some Advice Please!
oldmacktrucks replied to oldmacktrucks's topic in Engine and Transmission
neverseize is a must...have to thank the boys at Mack for not using it when the rebuilt the engine in 89 even though its in the service manual to use it

BMT Forum Logo
