


mattb73lt
-
Posts
1,370 -
Joined
-
Last visited
-
Days Won
144
Content Type
Profiles
Forums
Gallery
Events
Blogs
BMT Wiki
Collections
Store
Everything posted by mattb73lt
-

B-73 Restoration
mattb73lt replied to mattb73lt's topic in Antique and Classic Mack Trucks General Discussion
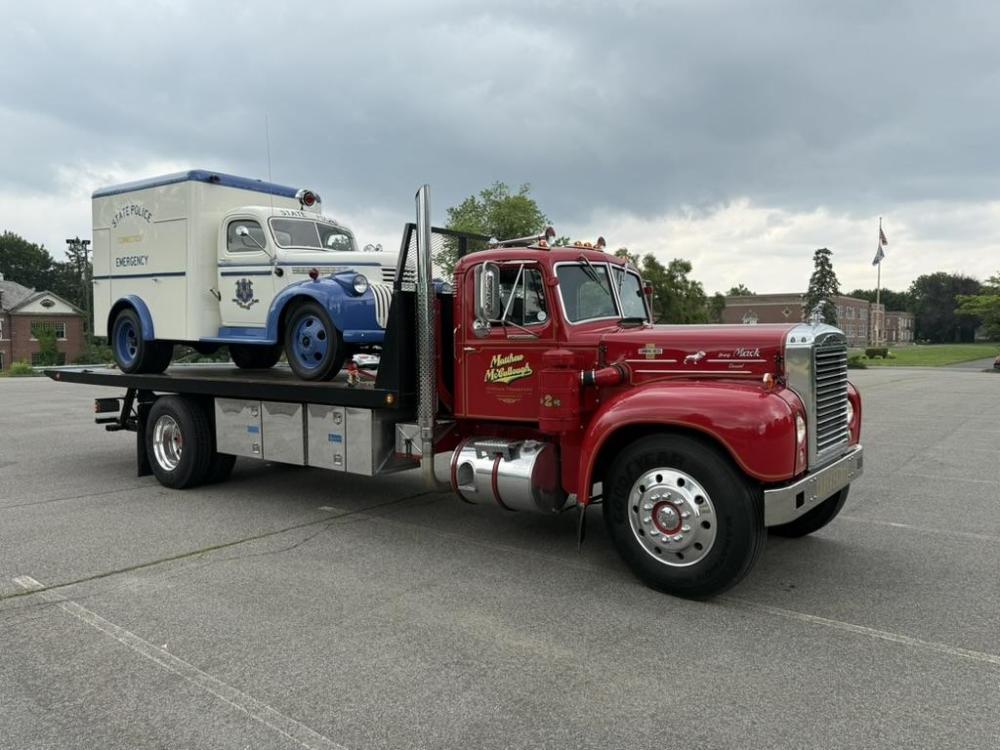
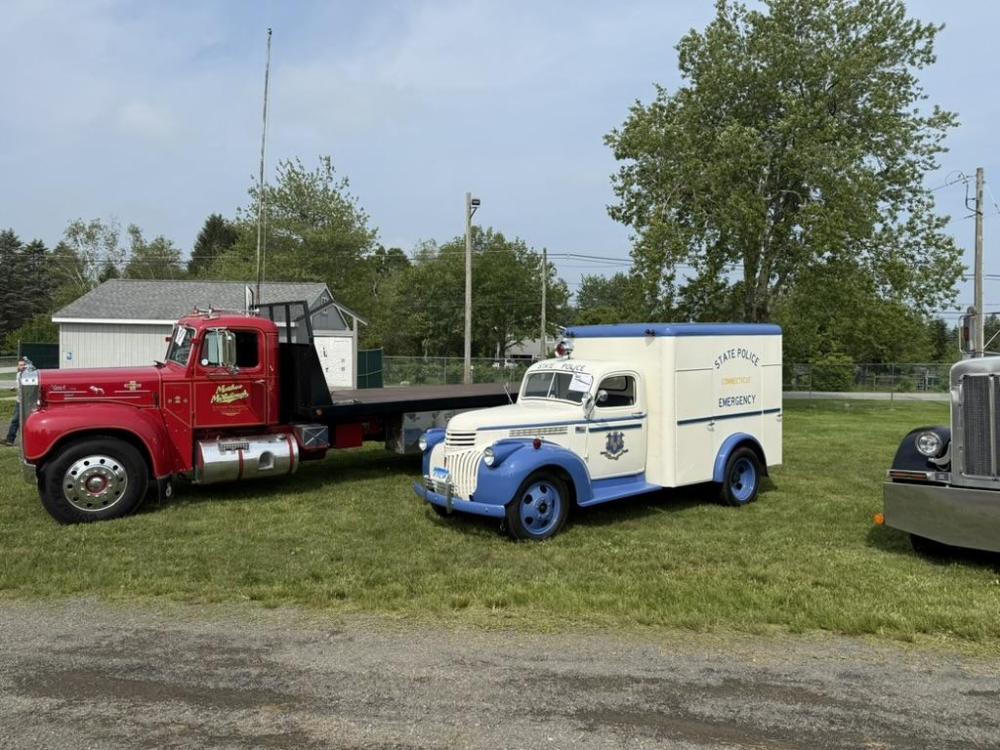
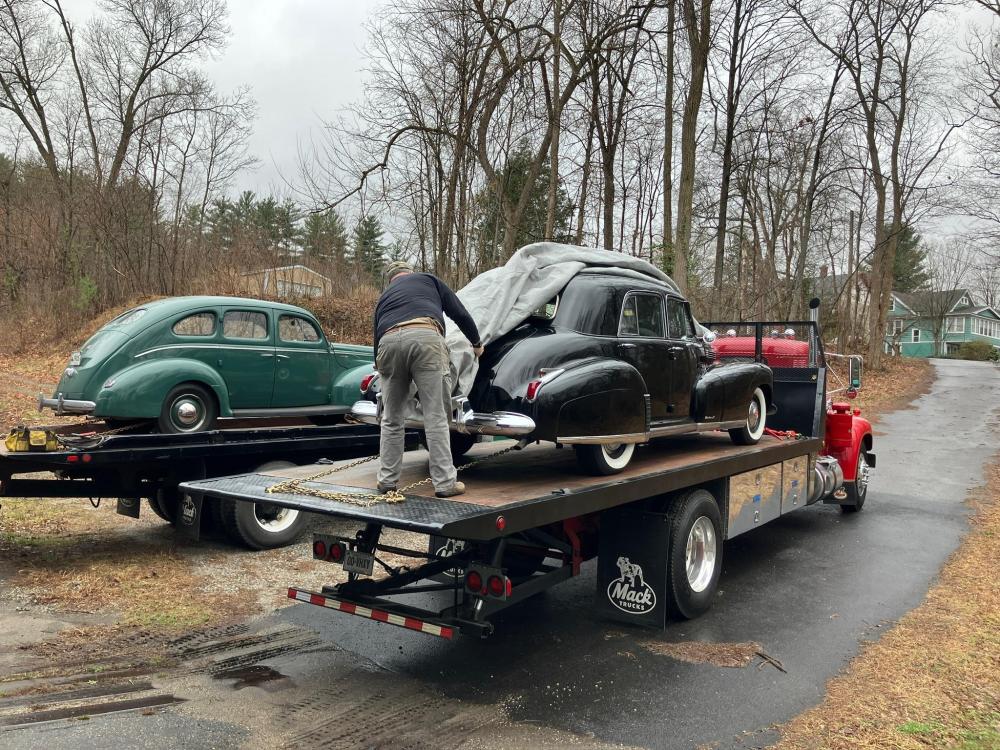
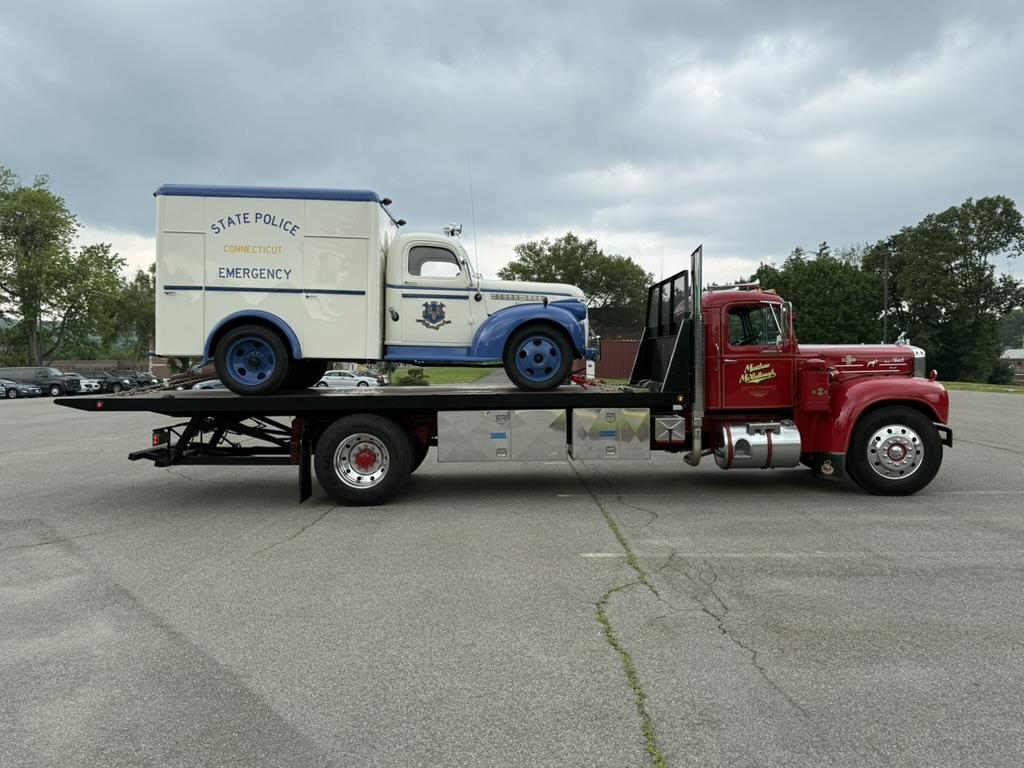
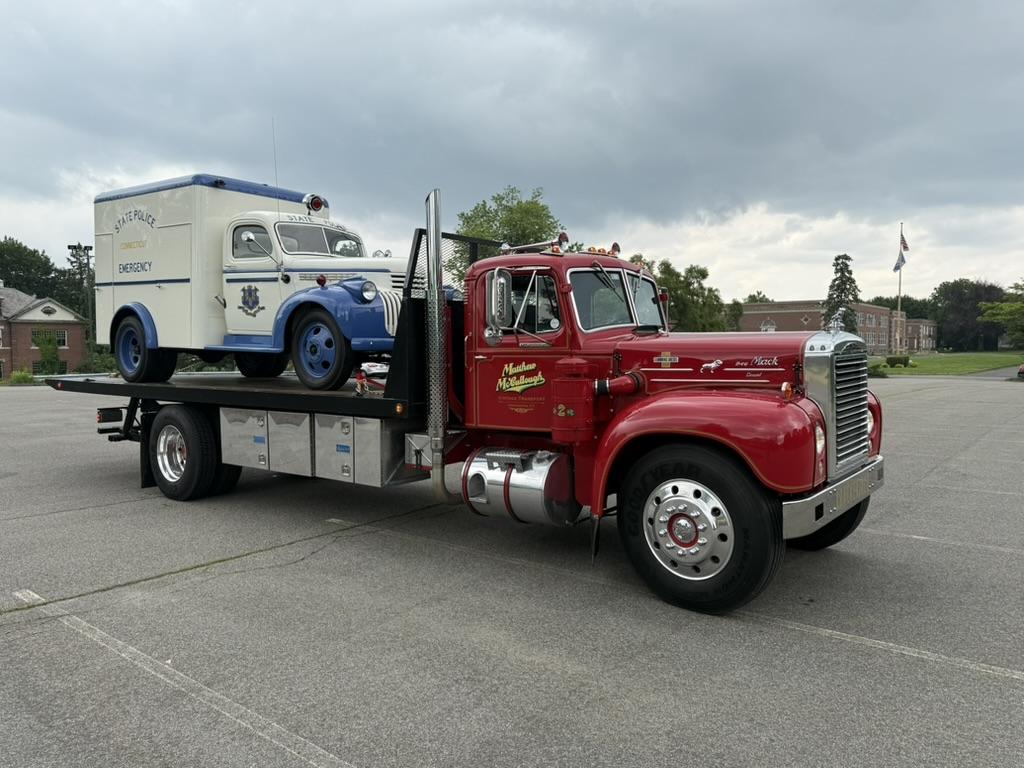
Hauled a 1942 Chevrolet Riot Truck with me up to the Bethlehem, CT show On Sunday. Cool little truck that was in service from 1942 into the 1970's, carrying teargas munitions and riot equipment. Only had about 6600 miles on the clock before a cosmetic restoration three years ago. The truck is part of the CT State Police Museum fleet i help out with. Great day and lots of conversations about both trucks.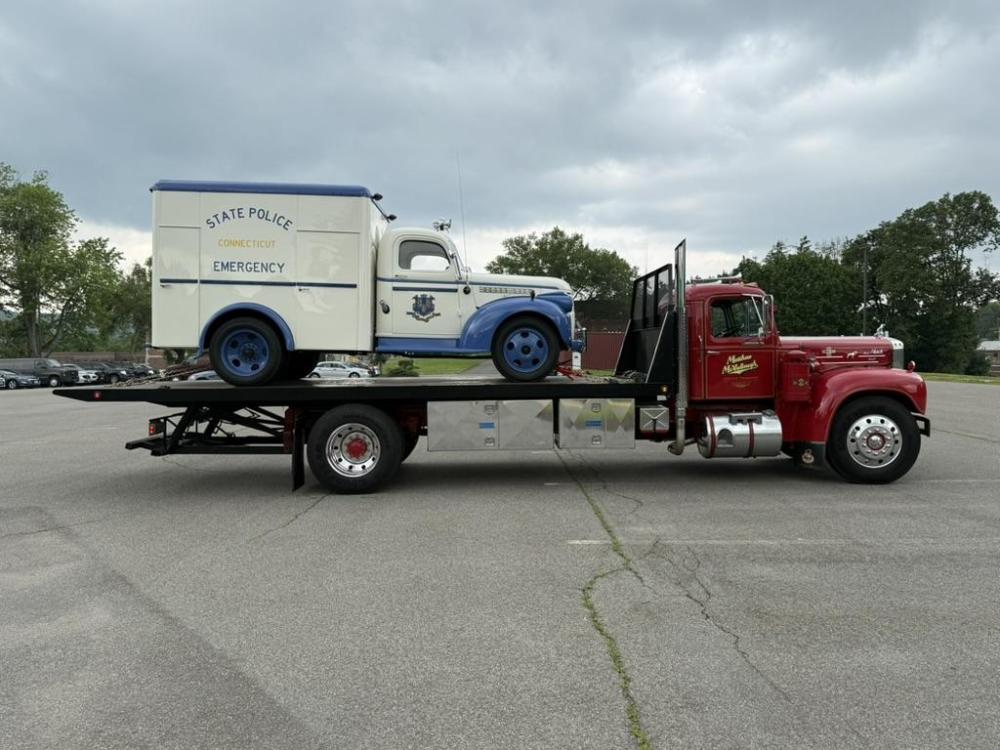
-
L J Mack Transmission ( Coca Cola)
mattb73lt replied to 1961H67's topic in Antique and Classic Mack Trucks General Discussion
When I was building my B42 and converting it to diesel I parted out a B61SX dump truck. I bought it mainly for the transmission. I didn't know a lot about B models back then. The transmission ended up being a TRDX-72. Which was a direct gear Duplex with a deep reduction in low range. You didn't split it. Five in low range, then five in high range. What some call a "dead stick" duplex. It did have a normal H pattern five speed for the main. Your transmission sounds like it works similarly, just with that odd gear pattern. That transmission was the only thing I didn't use from that part out. -
What should I name my Mack
mattb73lt replied to Mack_man's topic in Antique and Classic Mack Trucks General Discussion
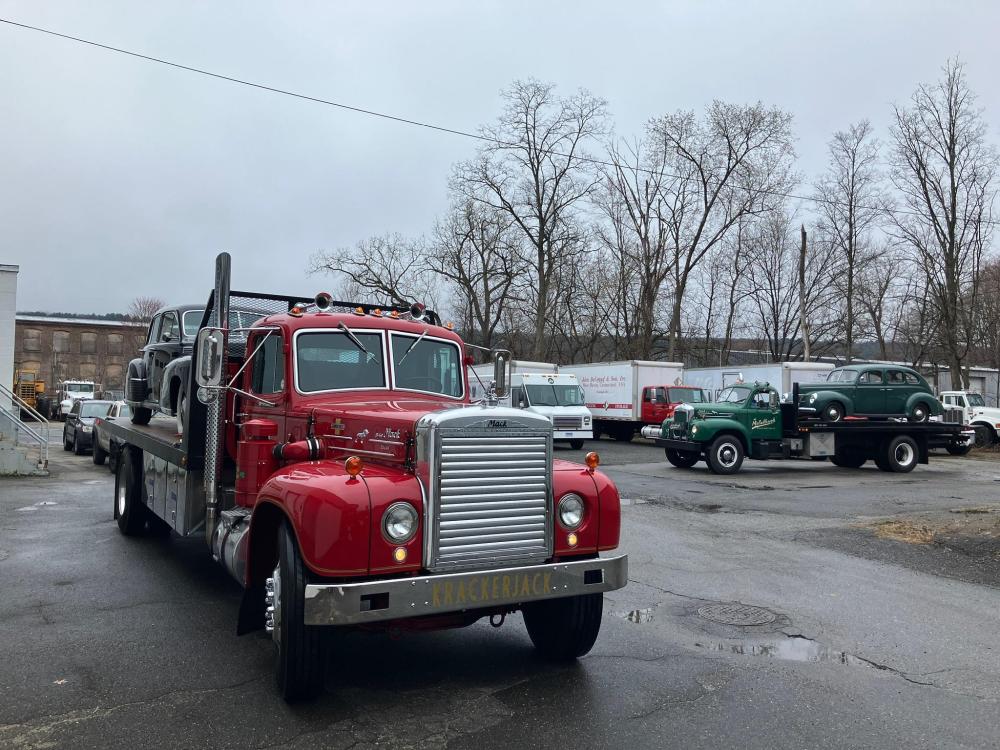
I renamed mine "KRACKERJACK" from a nickname that was on the picture I got from the original owner, so that was kind've easy. But, if you were to ask my wife it would be, "That Big Red Whore!!". She busts my balls about it every time I take it somewhere or work on it, "Oh, taking your red whore somewhere on a date??". It's all in jest, though and we get a good laugh out of it. -
Connecticut Construction Trucks
mattb73lt replied to BKrois's topic in Antique and Classic Mack Trucks General Discussion
Is that Bradley? I know runway 6/24 is scheduled for resurfacing, I thought it was later this summer. -
B-73 Restoration
mattb73lt replied to mattb73lt's topic in Antique and Classic Mack Trucks General Discussion
It's a great car, runs very well. Did a lot of work to it when it was my father's and he couldn't work on it anymore.
-
B-73 Restoration
mattb73lt replied to mattb73lt's topic in Antique and Classic Mack Trucks General Discussion
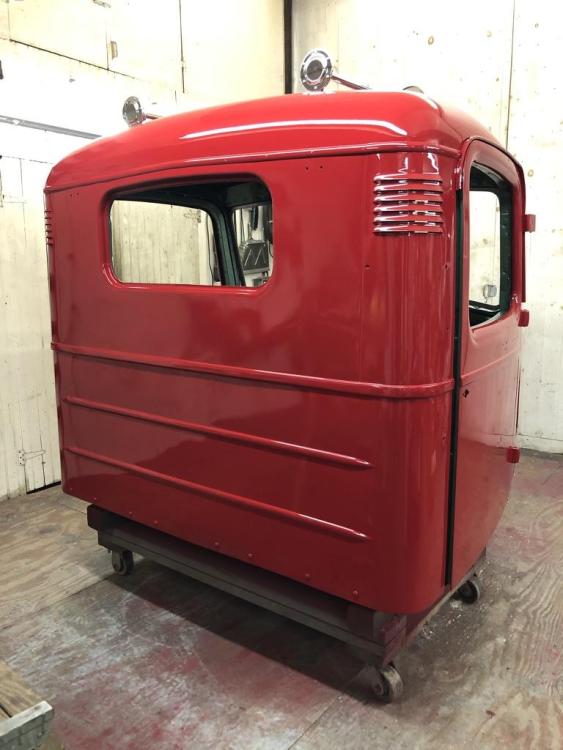
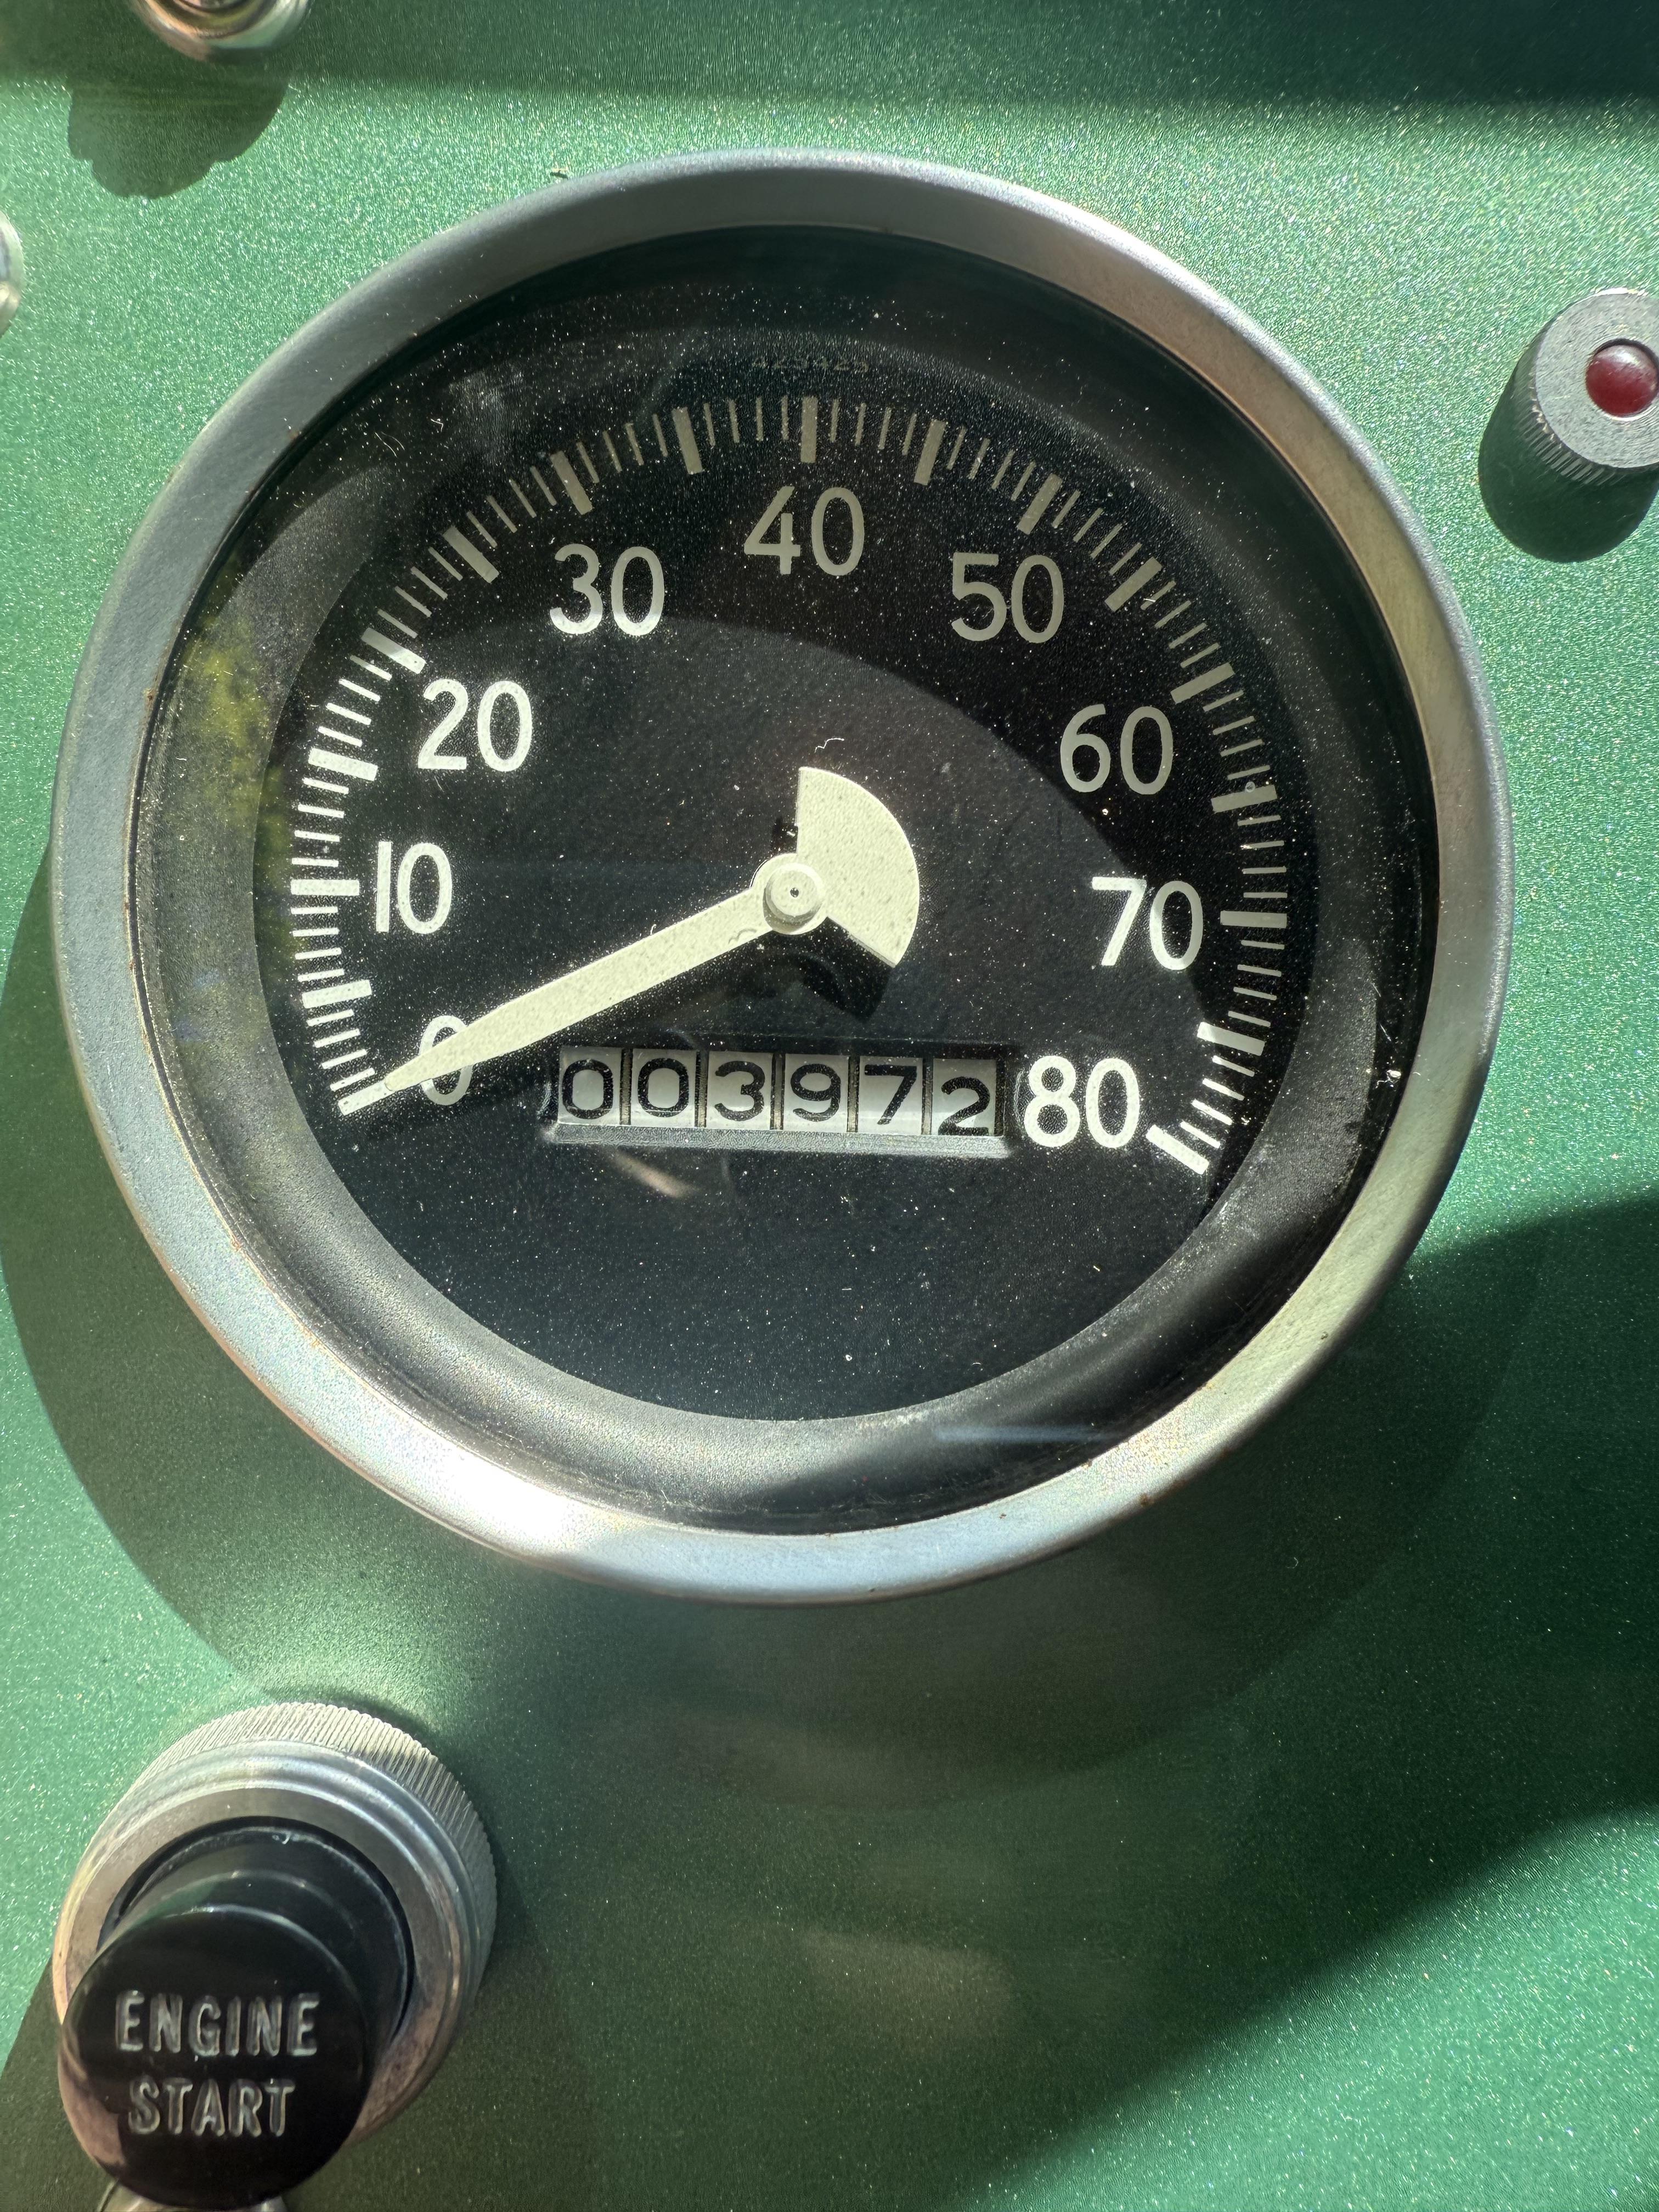
Two other things for that trip to Foxboro. One, there was heavy mist for the first part until just east of Worcester and that wiper system I built was awesome!! The intermittent wiper features were perfect and the first two speeds were all I used. Well worth the effort to design and install. Two, upon return to the house, the odometer showed 3,972 miles!!! With minus the first 99 miles when the engine blew up, have been completely trouble free. I built this truck to go places and it just amazes me that from a complete junkyard wreck it's all in one piece, looks this good and runs so well!!!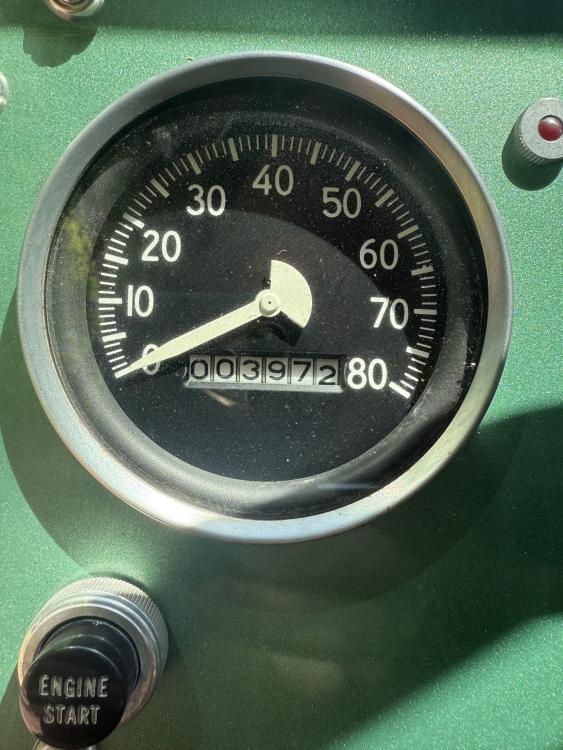
-
B-73 Restoration
mattb73lt replied to mattb73lt's topic in Antique and Classic Mack Trucks General Discussion
I talked to a lot of people Saturday. We'll meet up at one of these shows coming up! -
B-73 Restoration
mattb73lt replied to mattb73lt's topic in Antique and Classic Mack Trucks General Discussion
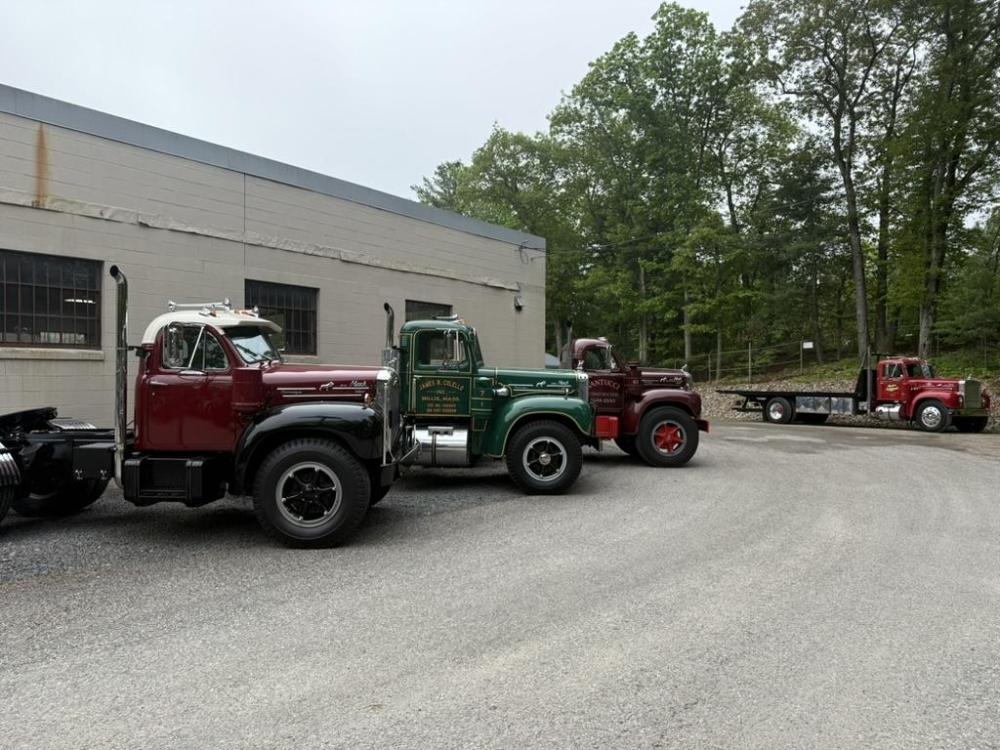
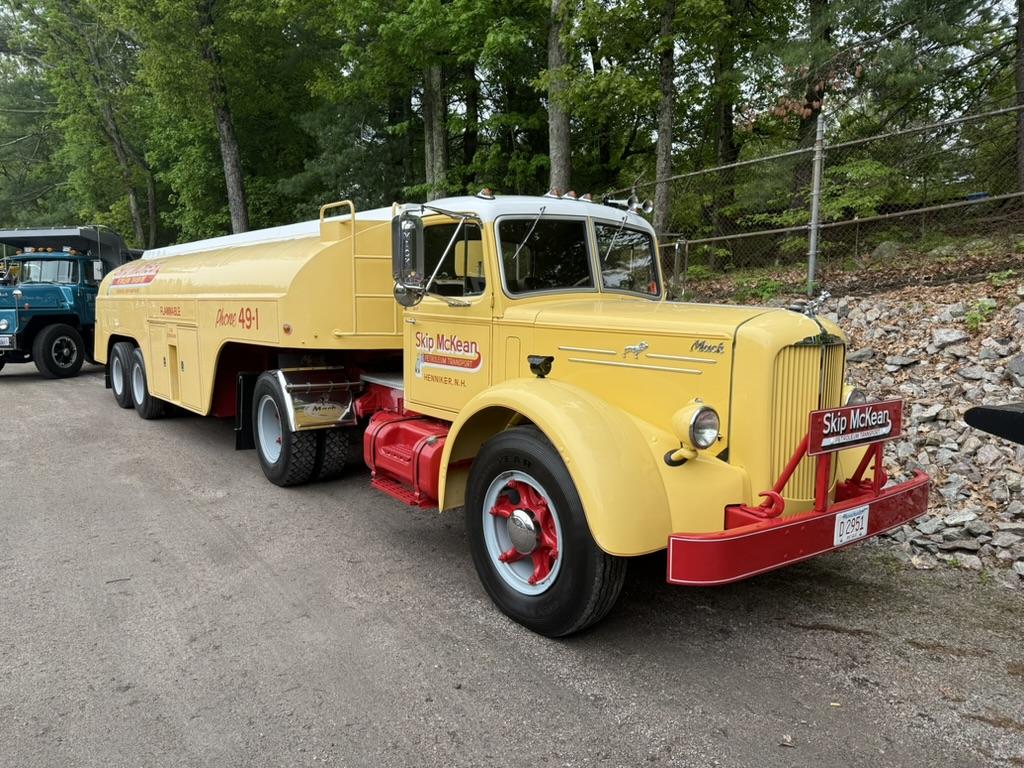
Made a two hour run up to Foxboro, MA yesterday to the Springbrook show put on by D. Rounds Trucking and G. Greene Construction. It wasn't on any of my lists of up coming shows, but timing wise it worked out with my schedule. It was held at their facilities which are adjacent to each other. Started out leaving the house about 6AM in heavy fog and drizzle, but by afternoon cleared up for a great ride home by 5PM. Lots of local trucks from the greater Boston area and a chance to see G. Greene's collection of restored trucks in a special built garage just to hold them. I'm so envious of that facility. My brother lives about a half hour away from there, so we got to spend the day together along with my nephew for a little while. Truck ran great and had no issues at all with it. It is very loud when you're in it for that long of a trip. It's going to get a muffler at some point. Still amazes me to see it in one piece and restored. other than the exhaust noise, it's so comfortable to drive with that big, roomy L cab. Another greatshow and day with the B73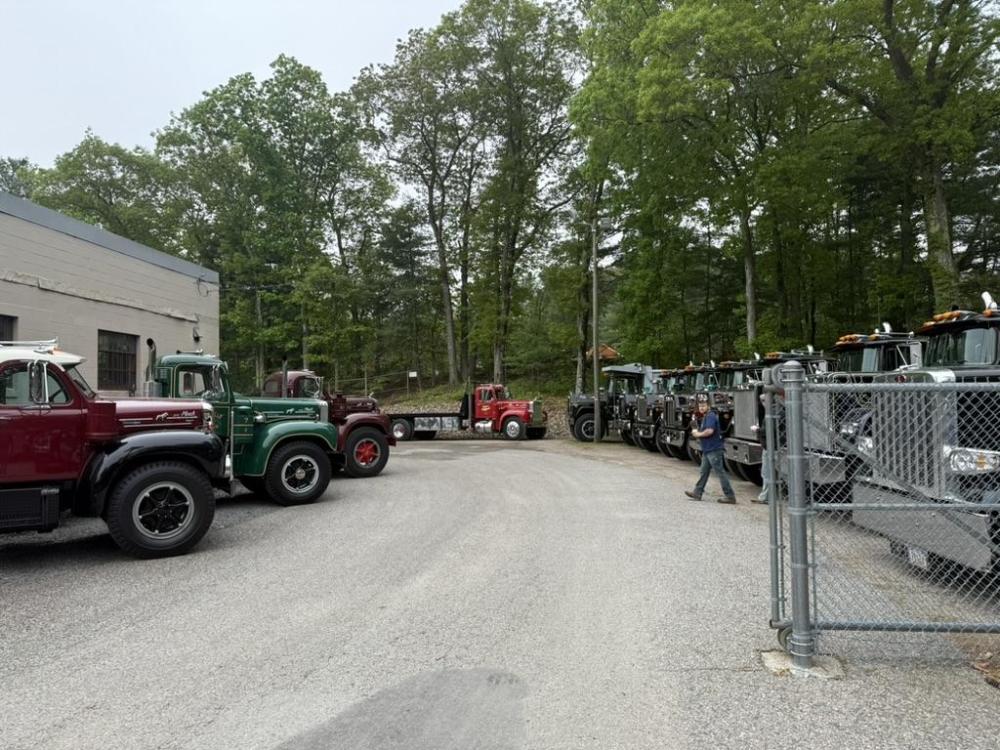
-
Coca Cola LJ Mack colors
mattb73lt replied to 1961H67's topic in Antique and Classic Mack Trucks General Discussion
Four generations....impressive!! Certainly is a family heirloom now!! And a beautiful restoration!! -
Coca Cola LJ Mack colors
mattb73lt replied to 1961H67's topic in Antique and Classic Mack Trucks General Discussion
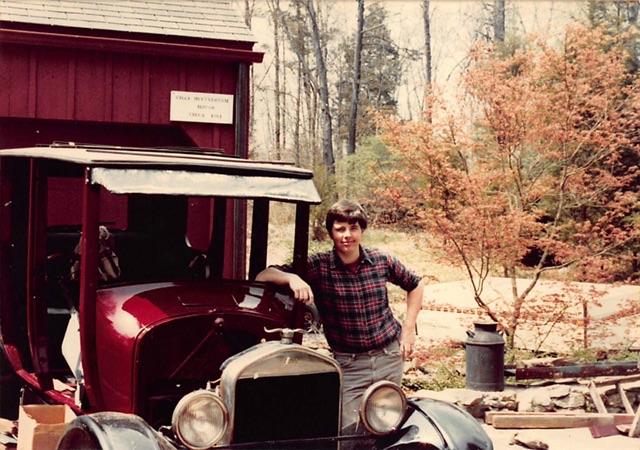
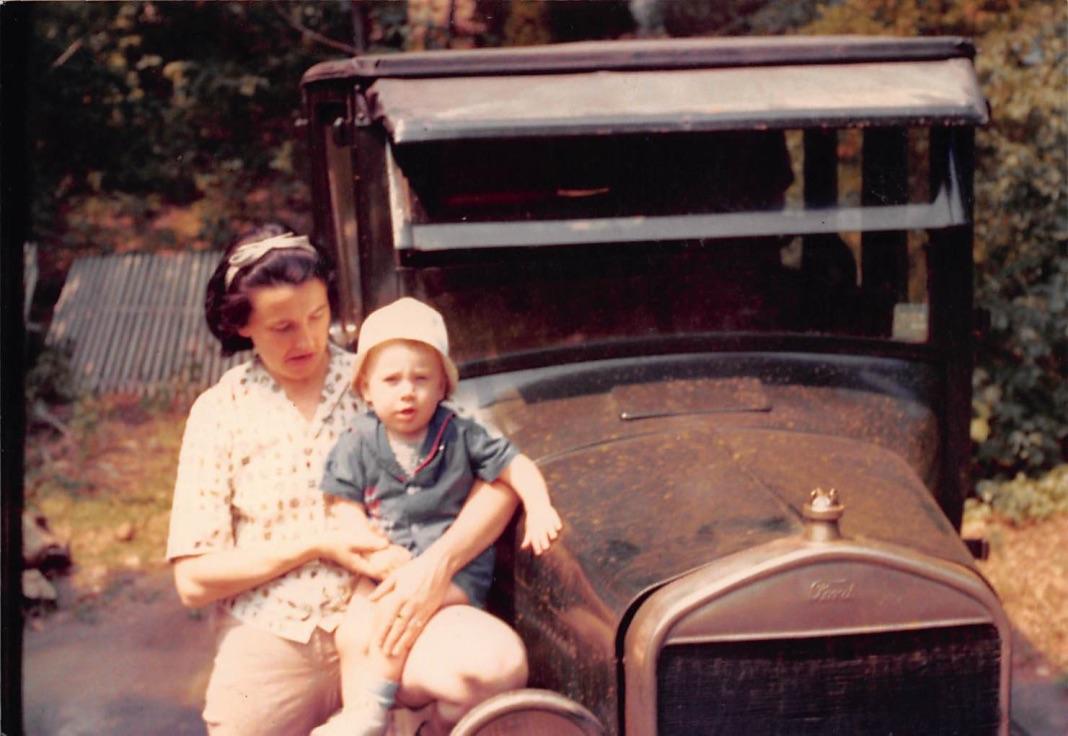
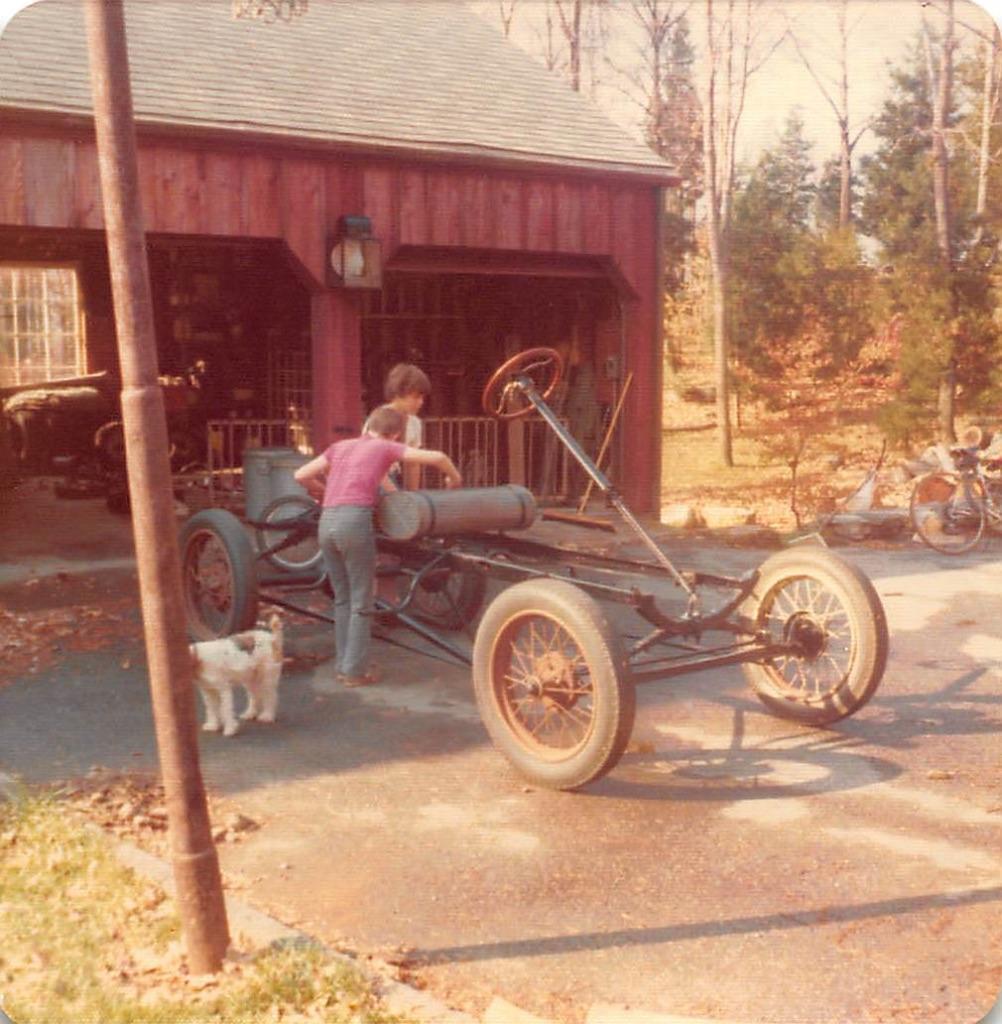
Lots of great memories and three generations surrounding the LJ. A similar story with me but surrounding a '27 Model T. I was kind of raised around it and still own it. First picture is when my dad brought it home in 1966, that's me with the hat, then a few in the '70's playing around with it. Up through '80's. It survived my teenage years, for a little bit it was a daily driver. First restoration was really sticking it back together, I had no real money for it. Second restoration was late '80's early '90's. My dad helped me re-wood about half the body. I've been all over New England in it and hauled it to Colorado on the back of the B42 to go on a national T tour in the Rocky Mountain NP in 2005.


-
Coca Cola LJ Mack colors
mattb73lt replied to 1961H67's topic in Antique and Classic Mack Trucks General Discussion
Awesome to see you out and about in the LJ. It's been a long road to bring it back to it's current beautiful condition!! The floods were so devastating to the whole area and you property suffered significant damage. But, it's getting better, albeit, slowly. A lot of work to get your land back into useable shape and building that new bridge. Your grandson has grown quite a bit during this. I remember a picture of him standing up in the cab a while back, now I bet he couldn't unless he stooped over!! Looks like he's becoming quite the helper with your projects and you've given him knowledge and memories that'll last a lifetime, too. -
Coca Cola LJ Mack colors
mattb73lt replied to 1961H67's topic in Antique and Classic Mack Trucks General Discussion
That's great to hear!! So glad it survived the storm disaster. Regarding the picture posting issue, it may be that your account has reached it's limit storage wise. I ran into this well into my postings on my build. I couldn't figure it out and edited some content out of my blog. I ended up contacting Barry to increase it by making a donation to the site. It helps keep the site going so we can all enjoy it. That may be the issue and I felt the donation was worth it to preserve my posting efforts and to help the site. -
B-73 Restoration
mattb73lt replied to mattb73lt's topic in Antique and Classic Mack Trucks General Discussion
Yes we did. A lot of rain coming this week. Dammit!! -
B-73 Restoration
mattb73lt replied to mattb73lt's topic in Antique and Classic Mack Trucks General Discussion
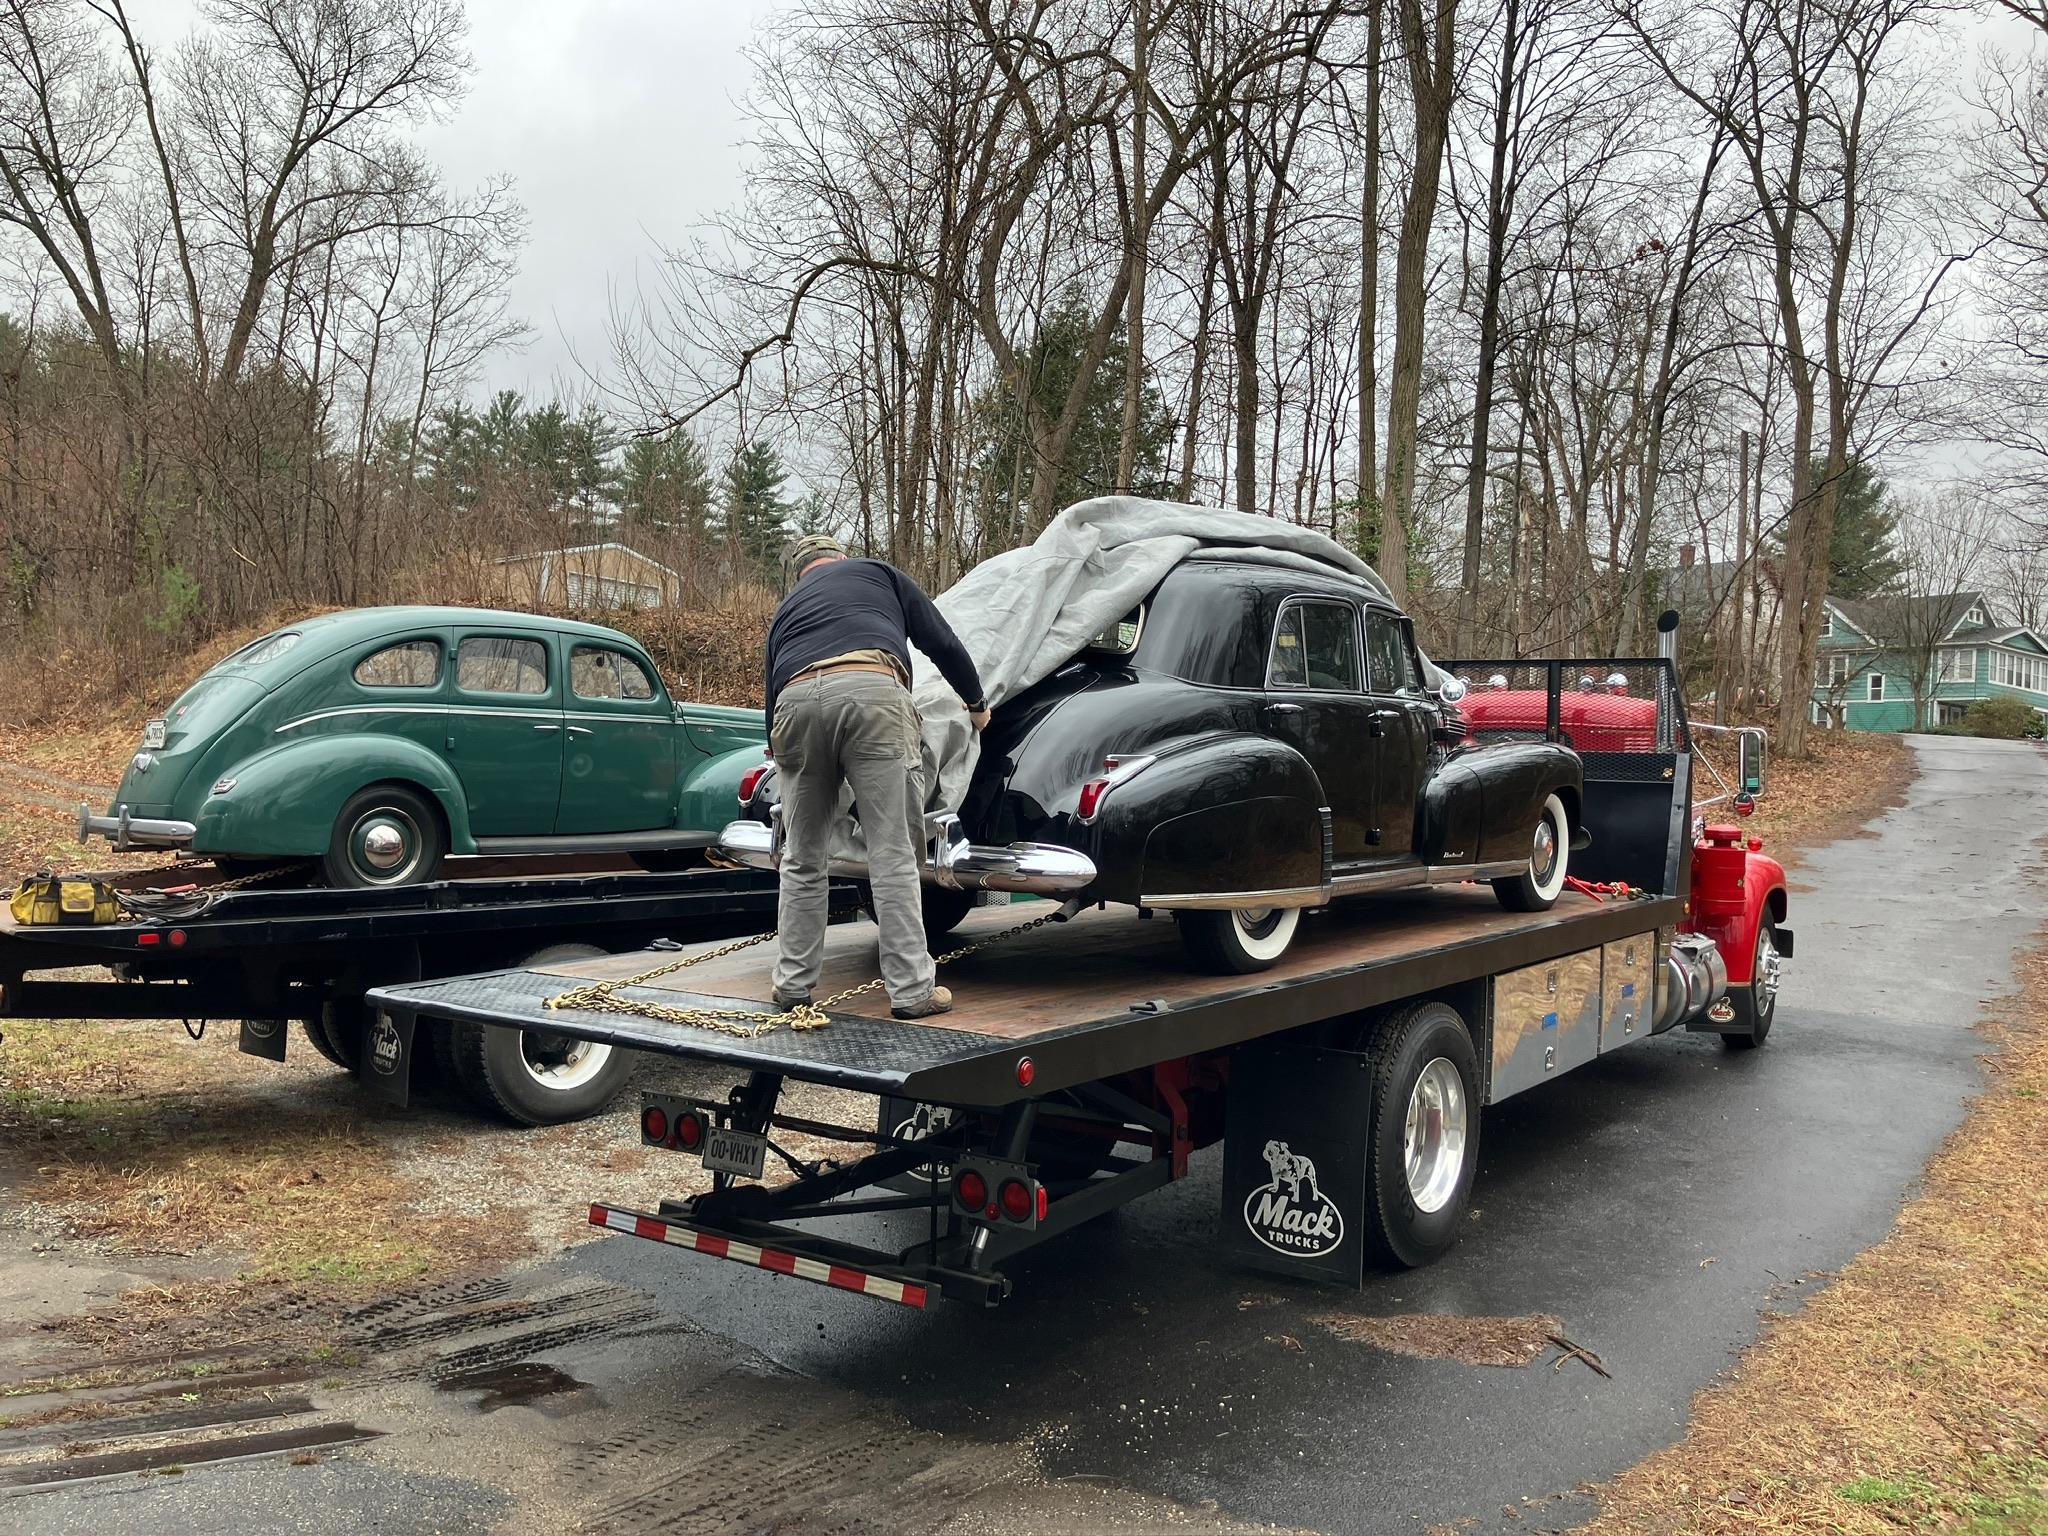
Just about five months in storage. Brought the toys out of storage and home today. Weather sucked, but due to schedules and needing two drivers, it was the best time. B73 fired right up after about four turns. A little issue with a sticky starter on the B42, then she fired right off. Now to chase a bunch of gremlins on the Caddy and the '40 Ford, mostly from disuse over the last few years of concentrating on finishing up the B73.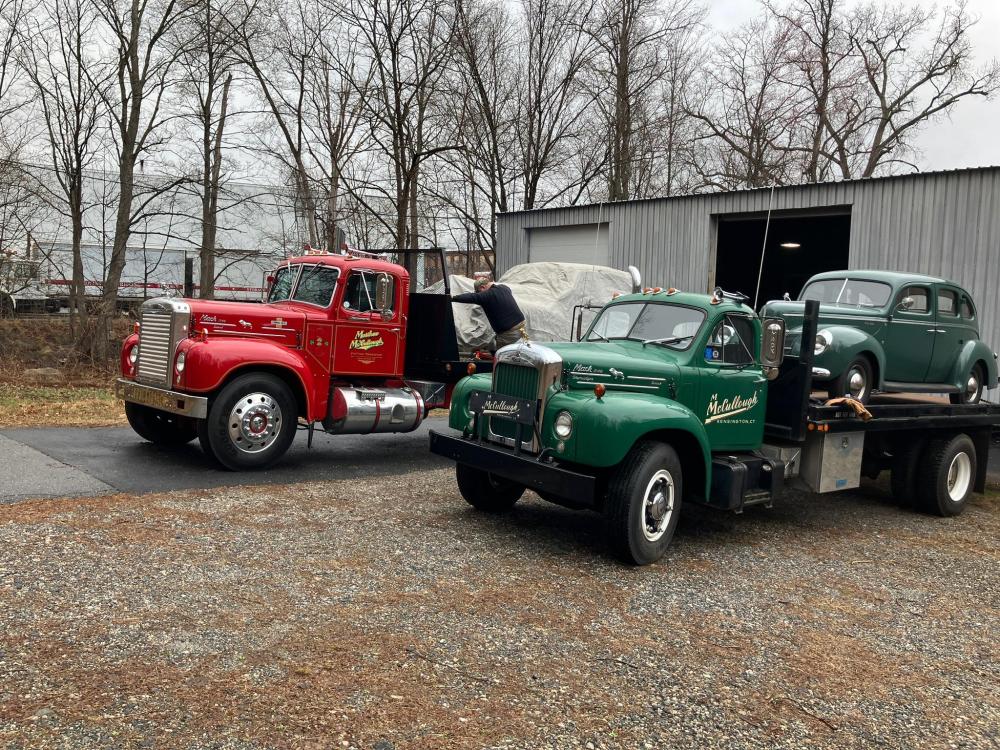
-
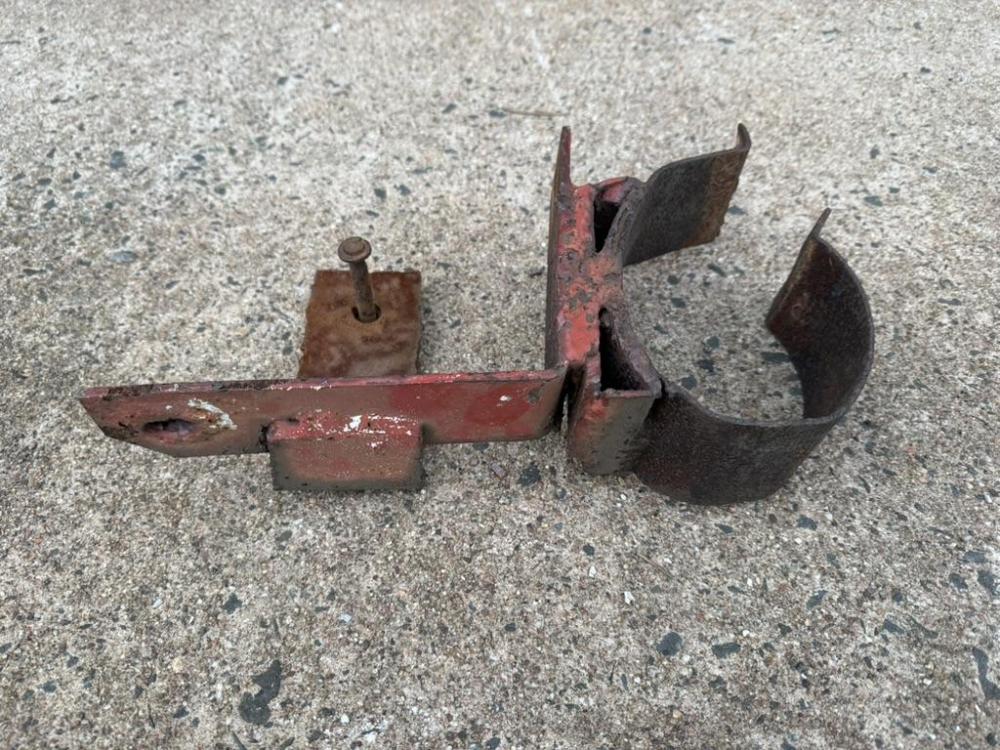
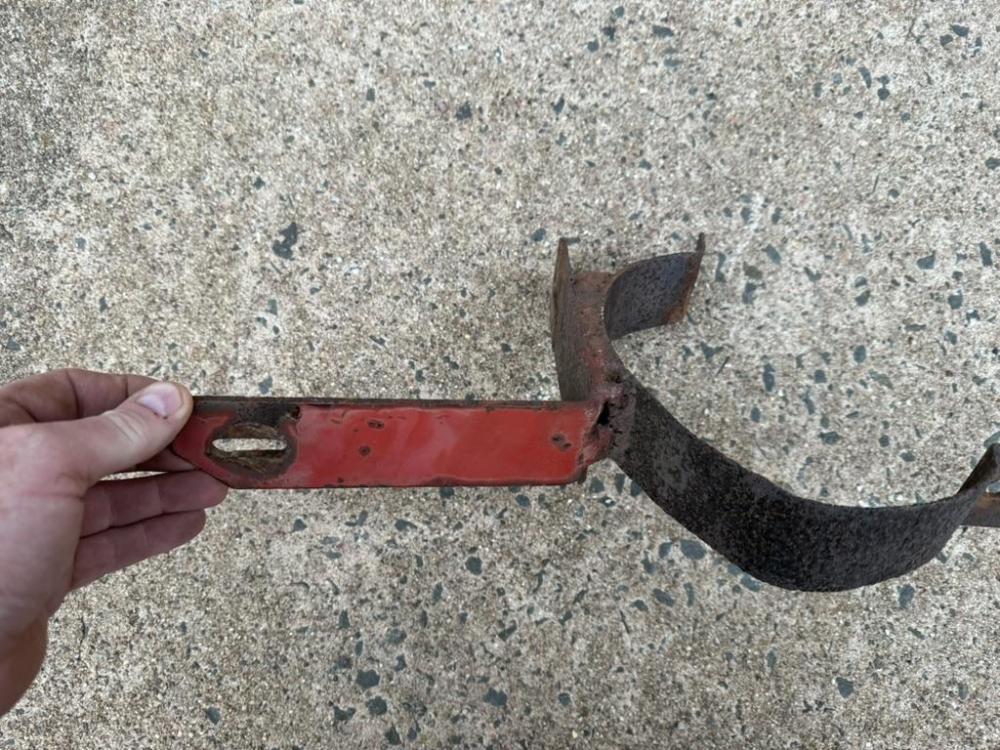
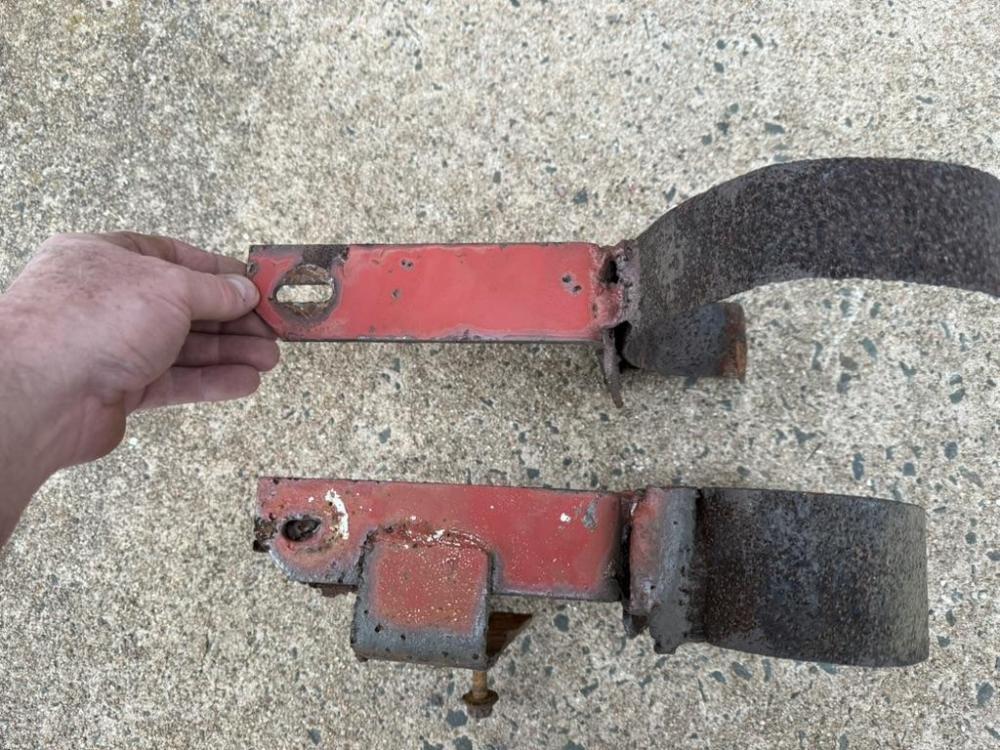
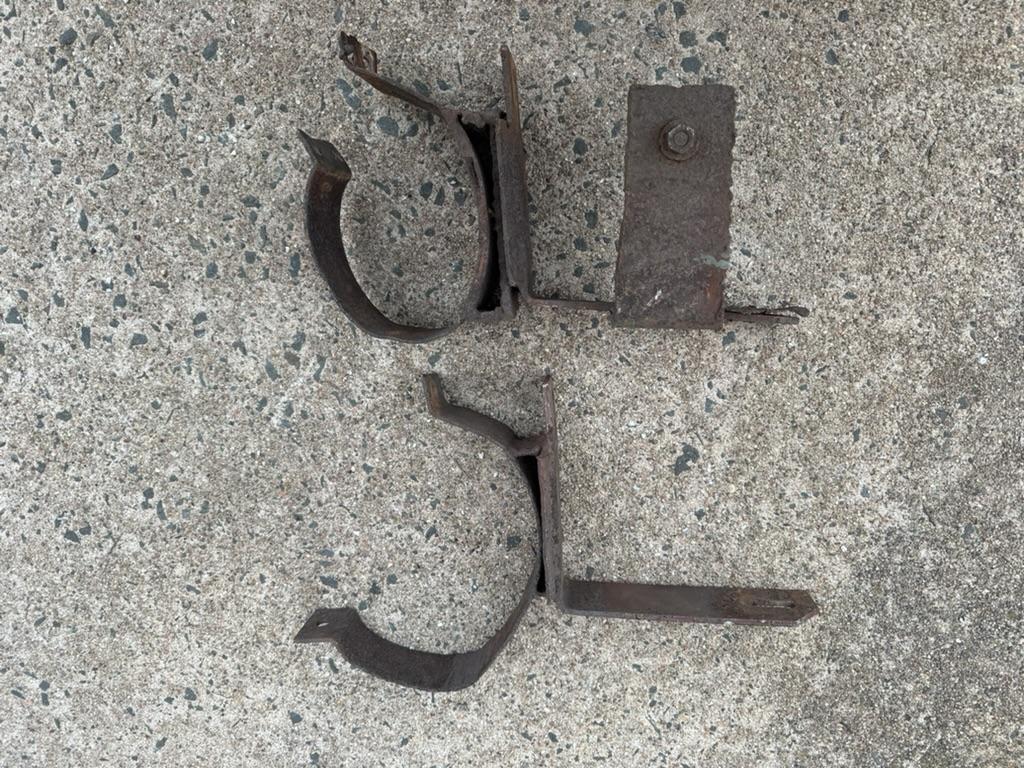
Mack LJ exhaust hanger
mattb73lt replied to reb87's topic in Antique and Classic Mack Trucks General Discussion
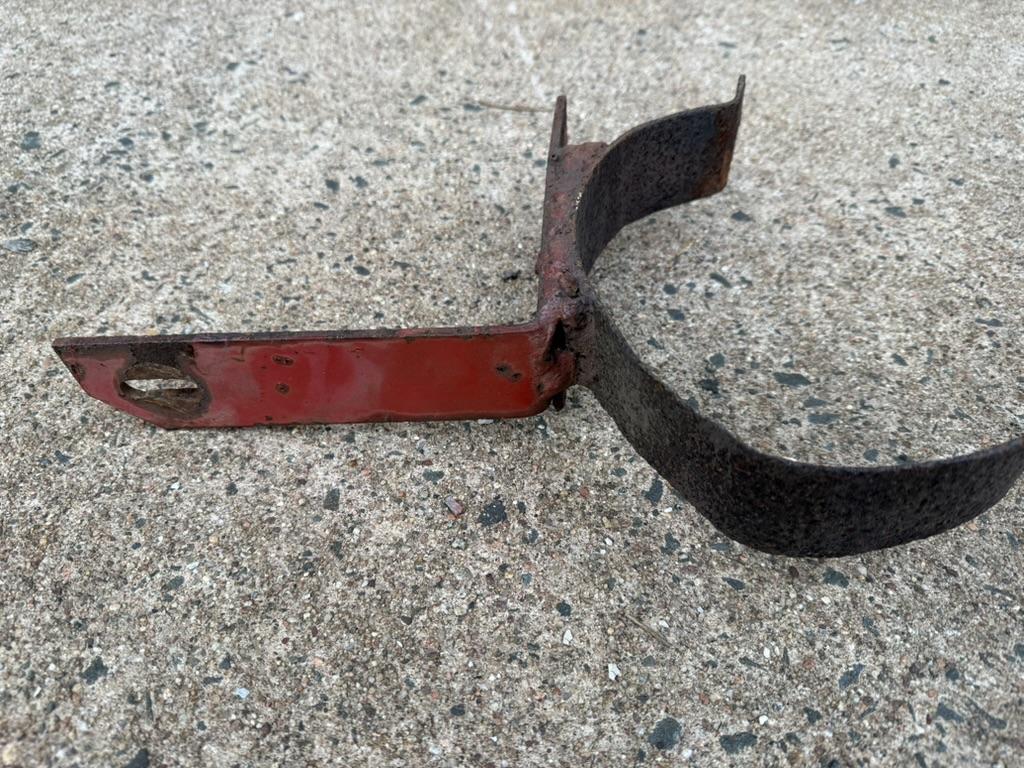
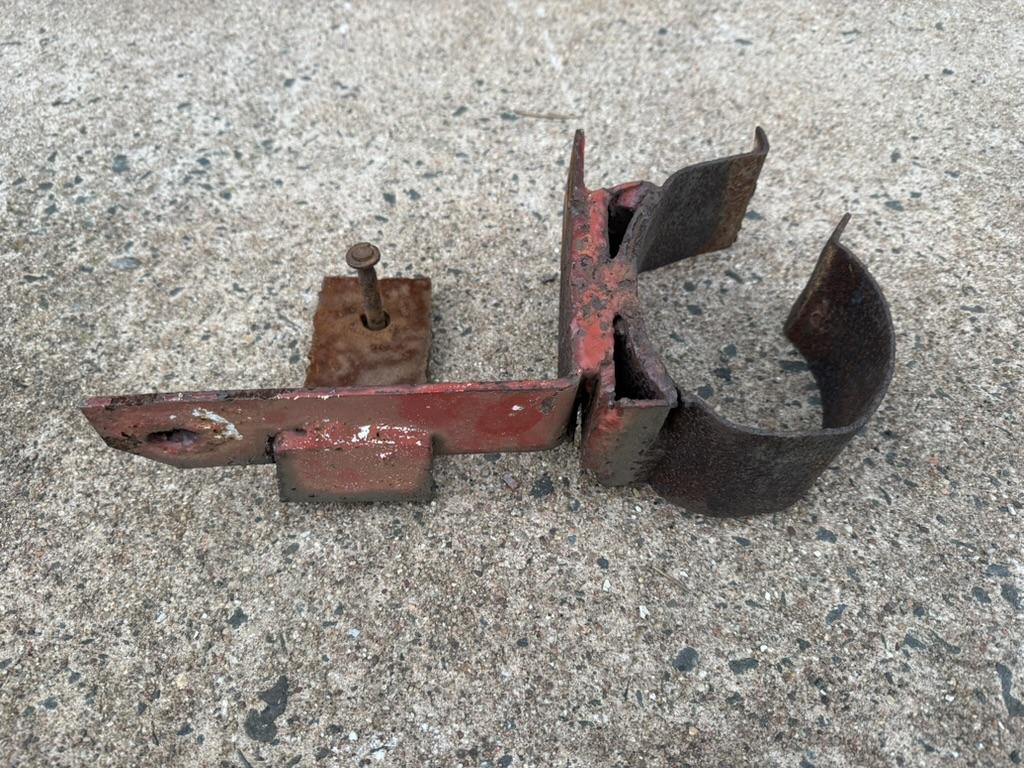
I found the brackets. The 90* base strap is the original part. The round clamps were added when someone added a vertical muffler to the truck from the original staight stack. The lower bracket has an added 90* bracket that bolted under neath the cab corner.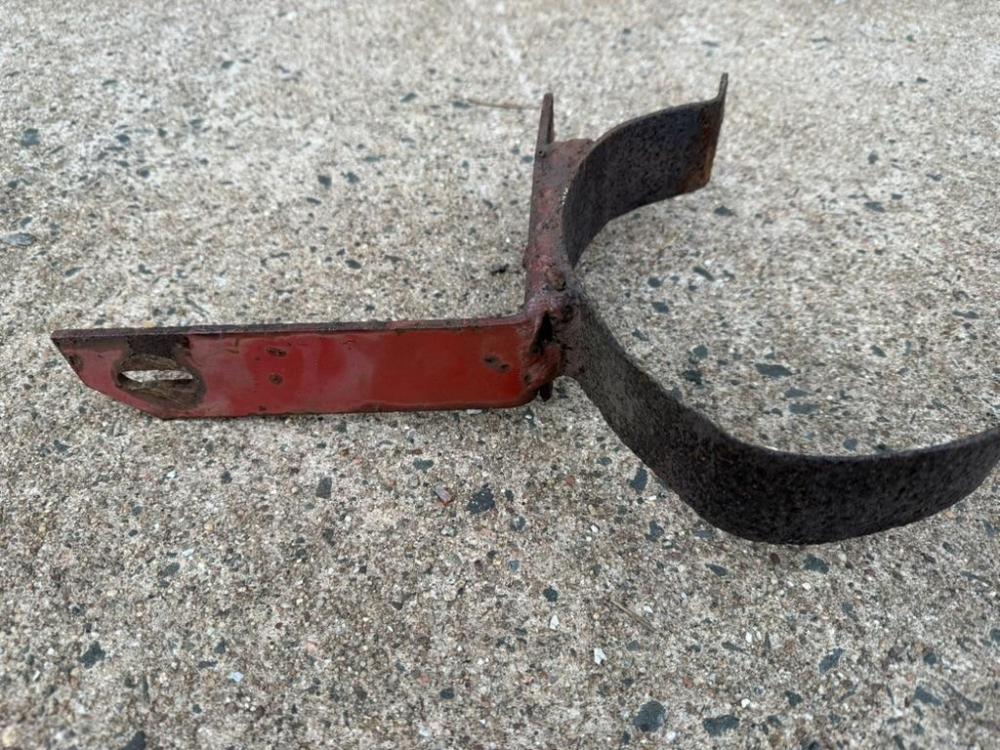

-
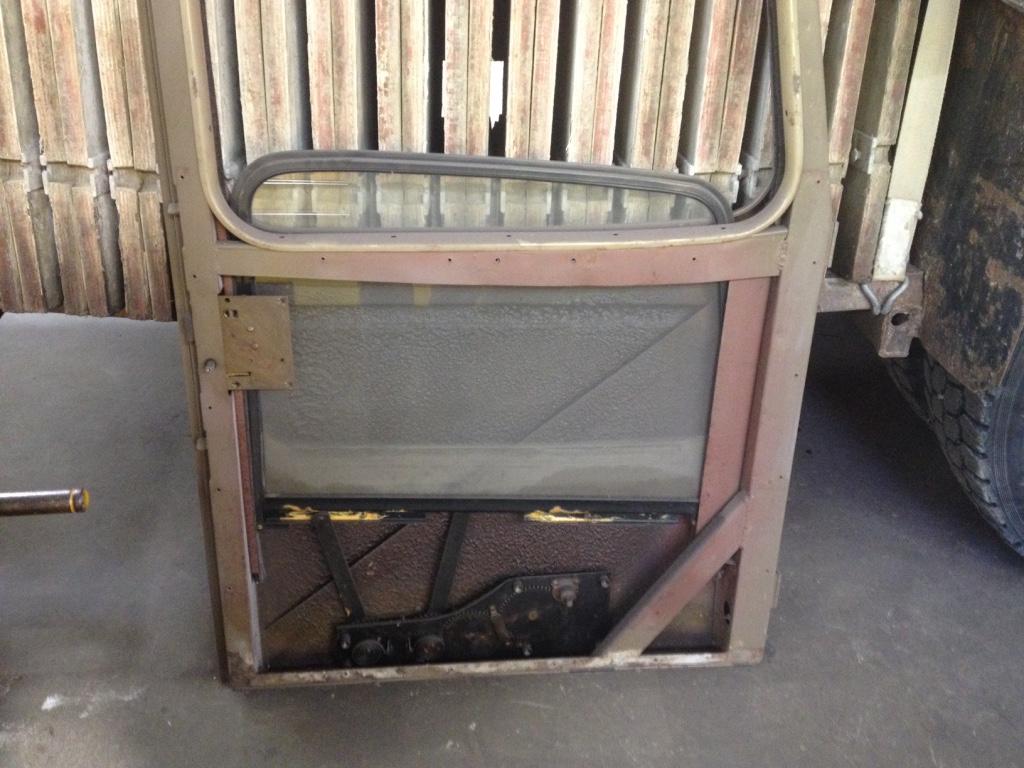
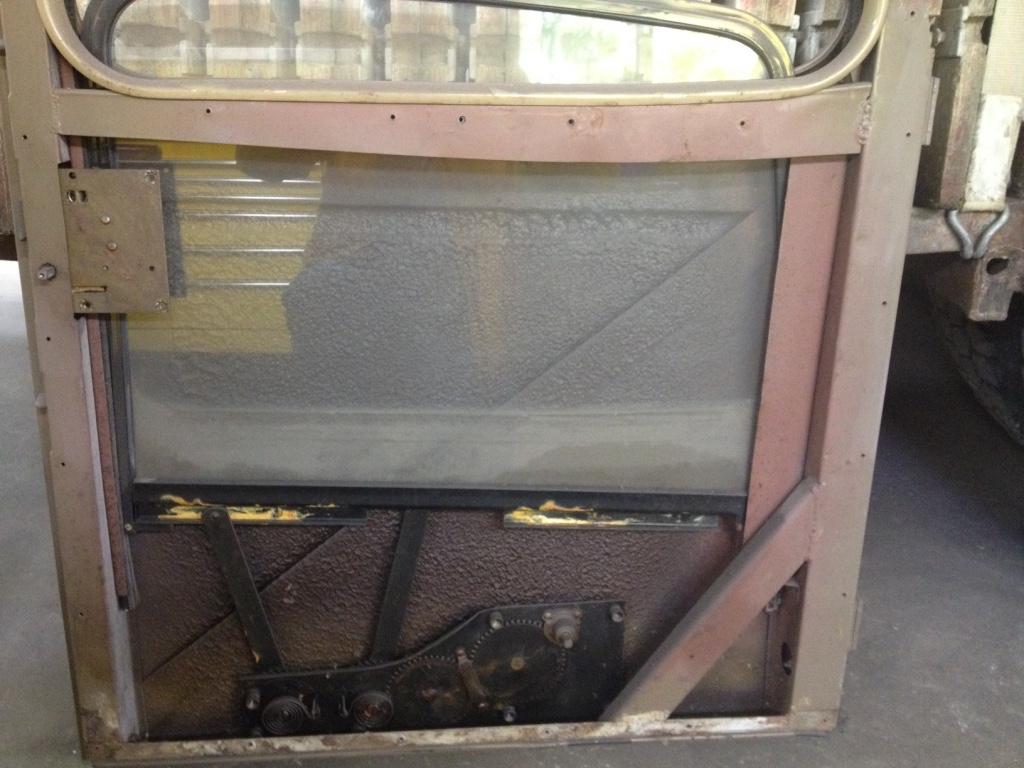
Mack LJ exhaust hanger
mattb73lt replied to reb87's topic in Antique and Classic Mack Trucks General Discussion
I deleted the brackets on my B73 and put the exhaust on a late model support arm. The later L cabs only seem to have had two brackets, one near the top below the louvers. The lower one was mounted to the lower internal cab frame in the corner. There were spacers inside the lower mount to make up the gap between the skin and the frame. I saved my two brackets, but they were pretty rusty and had been modified by previous owners. Let me see if I can locate them. Here's a picture on the corner of the cab with the skin removed. The upper bracket is still in place on mine. The two lower, short brackets below are for the grab handle. Then the lower frame of the cab. Second picture is after I painted it, but before I put two polished stainless bolts in the threaded holes as place holders. I left the bracket as it stiffens the area and if someone in the future wanted to add the bracket back. I've seen the schematic you posted before. The four bracket arrangement may have been for the heavier LJ-X versions like yours. I don't think regular LJ's had that type of arrangement.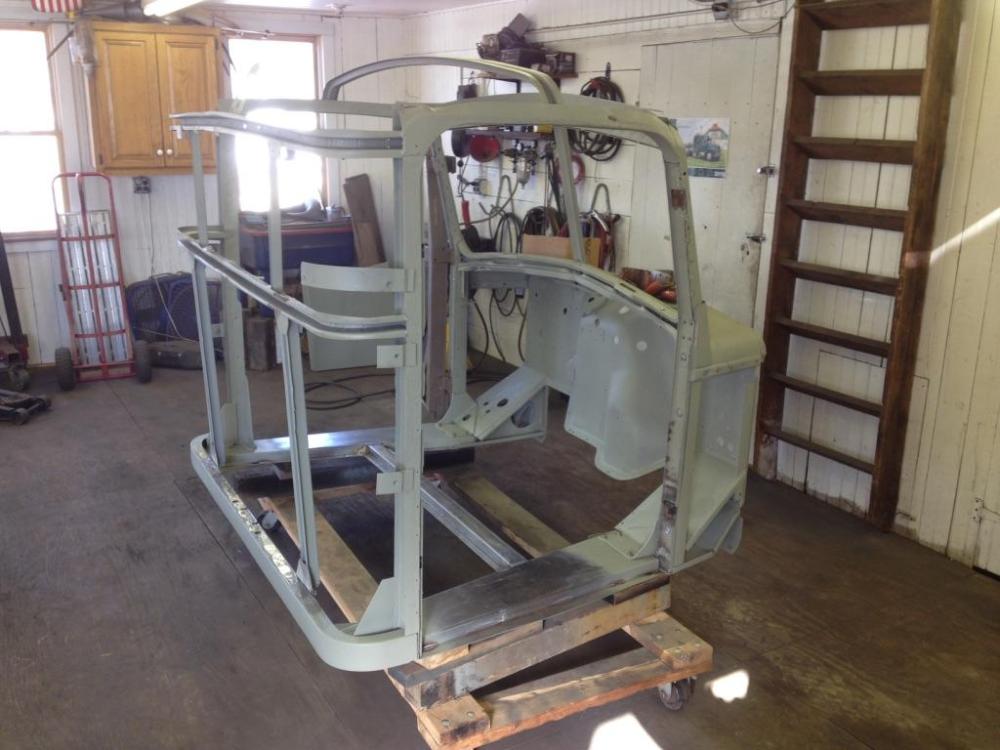
-
Update on the B Model Restoration
mattb73lt replied to Derrico's topic in Antique and Classic Mack Trucks General Discussion
I believe the main feed comes off the firewall mounted foot starter switch. Reason is I left the switch in place on my B42 when I converted it to diesel and ran a feed from the 12V starter to power it. Used it like a terminal block. The 6V trucks were early production and were the lighter gas jobs. A friend has an early B42 that is 6V. It was a pristine oil truck out of New Haven when he got it years ago. Kept inside during it's working time. The factory paint was literally like new. Now it's a rusted, faded truck laying in his yard. What a waste. He's one of those, "I'm going to fix it one day." guys -
1967 TRQ7220 Clutch
mattb73lt replied to The Heinz's topic in Antique and Classic Mack Trucks General Discussion
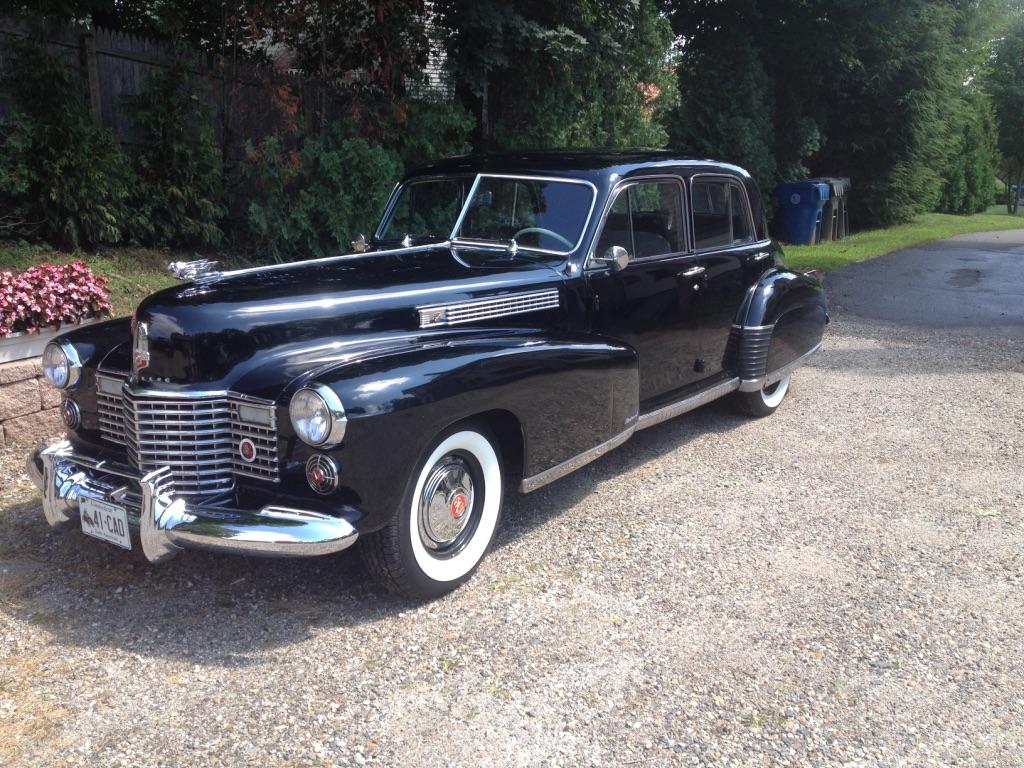
FT. Wayne Clutch and Driveline is another very good and helpful vender for old and obsolete parts.. They were very good with help with an issue I had with my double disc arrangement in my B73 and helping with my '41 Cadillac putting a larger 75 series clutch in it. -
1953 Mack LJ
mattb73lt replied to reb87's topic in Antique and Classic Mack Trucks General Discussion
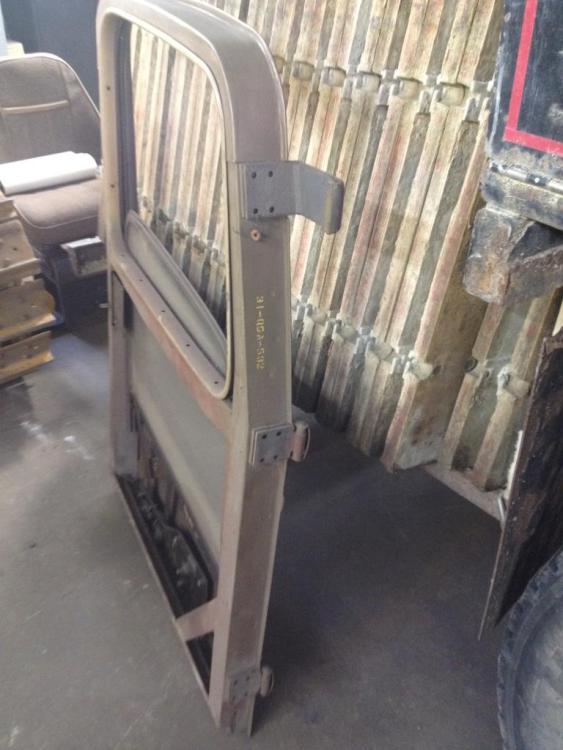
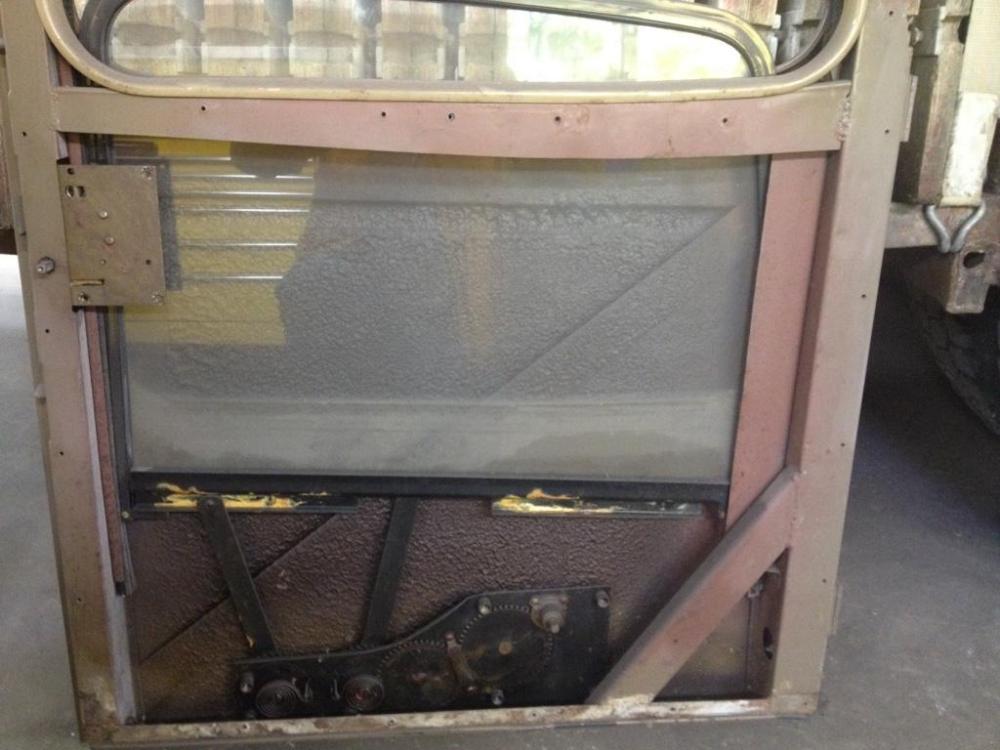
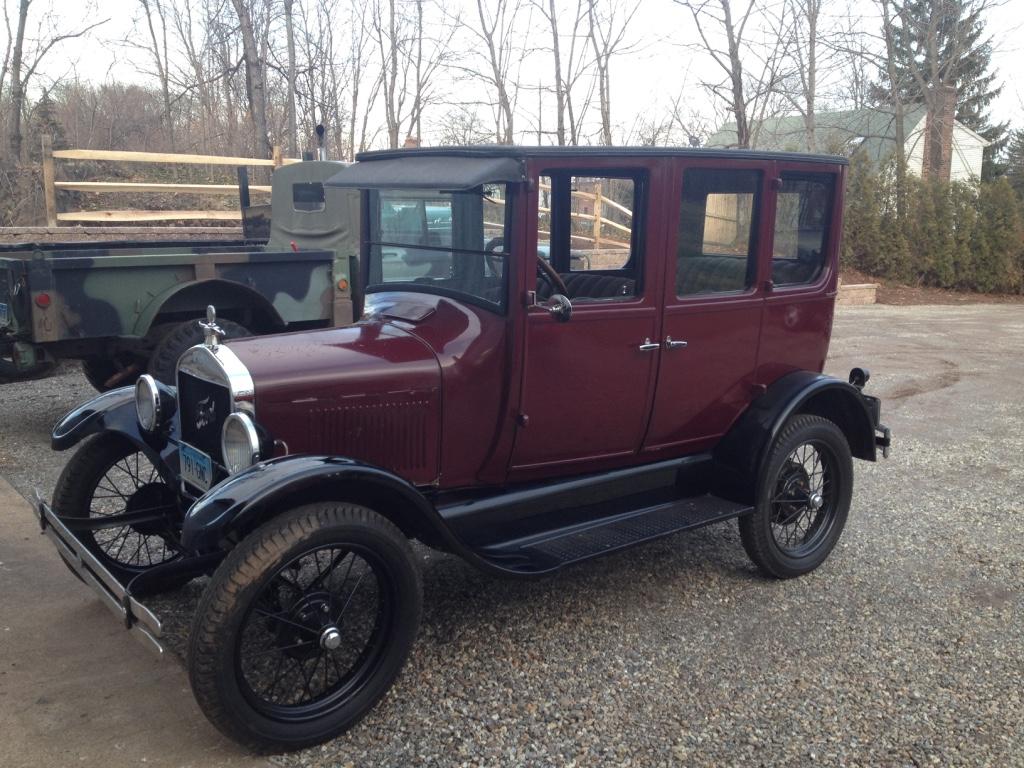
My 2 cents on the hinge arrangements. In my efforts to bring my L cab back, I found about eight different hinge arrangements for the doors. Most had, and early production, two hinges and no vent window. About '48 (might be earlier) they added the vent window. X versions and late production (B73,75,77, C600) had the three hinge arrangement. LM's and off road versions had four or more hinges. Spacing of the hinges can vary even more, but this is usually only on the very heavy off road versions. LT's had two hinges. If it has three, it's usually a cab swap or replacement late production cab. On the lock side of the door there are two dovetails and the lock centered in between. The jamb side has the female receivers to support the door when closed. Lock and inside door handle arrangements are numerous over the production run. I attached pictures of the NOS LJX driver's door I located and used on my B73. Very early door with the single window and three hinge arrangement. It only needed one modification to accept the vent window setup and that was removing the forward glass channel. I'll also say take all of that with a grain of salt. The factory did a lot of stuff to satisfy it's customer's, so custom or one-off versions are always possible. Variations on the production line are out there.
-
90’th Birthday
mattb73lt replied to SFD 427A's topic in Antique and Classic Mack Trucks General Discussion
Wow LOOOOONG wheelbase on that truck. I always loved the look of that B series. I grew up around the Weston, CT VFD and was a member for 9 years. That dep't had a 1934 BG pumper they bought new and they still own. In the 80's I was a member of the Muster Team and we drove all over the area to muster in CT, NY, MA and over to Long Island. Great truck and we won a lot of trophies with it. The dep't had Matt Pfahl do a complete restoration to it several years ago and it's better than new, now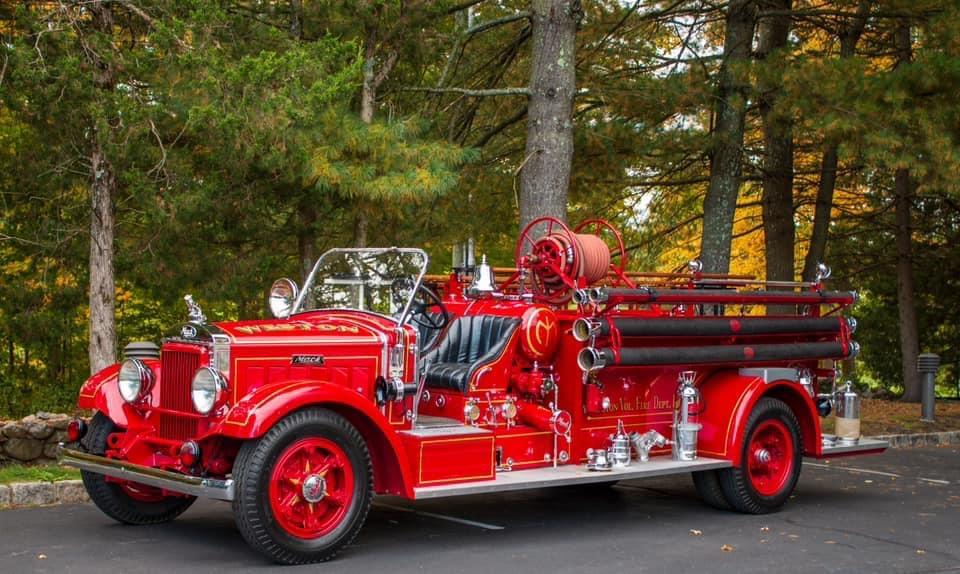
-
Connecticut Construction Trucks
mattb73lt replied to BKrois's topic in Antique and Classic Mack Trucks General Discussion
I recall seeing this particular B81 on probably one of it's last jobs before being sold. Mid to late '90s in Hartford at the Riverfront Recapture Project, when O&G took over the project after George Tomasso Constr. crashed and burned on it financially. The state fired Tomasso and O&G finished it. The truck sat around the site with a lowboy attached to it, I'm not sure if it was that trailer or another. -
Mack B873sx restoration
mattb73lt replied to hicrop10's topic in Antique and Classic Mack Trucks General Discussion
WOW!! That looks great. It's going to make a great foundation for the rest of your restoration. -
I run a Sheppard box in one truck and a Garrison unit in the other. Both receive 15W40 and work fine. Somewhere in my Sheppard Instructions it does call for Engine Oil for a fluid. What ever I put in the crankcases goes in the reservoirs. Makes servicing easier as I only carry one oil for them.
-
Transmission change
mattb73lt replied to Iron Man's topic in Antique and Classic Mack Trucks General Discussion
What engine did you put in? Duplex, Triplex, Quadraplex are all available if it's a Mack motor. You could fit almost anything into it with some effort. -
Coca Cola LJ Mack colors
mattb73lt replied to 1961H67's topic in Antique and Classic Mack Trucks General Discussion
Excellent, great progress and you're closing up on having it done. If you can't post pictures from you're computer, try making a post then editing it from your phone and adding them from there. I've had to do that numerous times to post pictures. I don't know if it's a formatting issue or something. Also, I've waited a few days after taking pictures to post them then dropping them in and they go, no file size issues then. No idea why that happens , I didn't reduce the file size.


BMT Forum Logo
