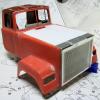
Pawel Posted May 12, 2011 Share Posted May 12, 2011 Hello everybody!About 15 years ago, when I was very young, I bought a model kit and built a model of an American Truck. Here's what it looked like:Of course there were LOTS of problem with this model. My craftmanship was poor back then, so there were many things to fix, but what's worse, the company that made the model kit (ITALERI is the name - from Italy) didn't care for accuracy at all.Time passed and I started thinking about rebuilding my truck. Then I started looking for reference - I like my models to be accurate. And then it all started. First I learned about THE MACK LEGEND - what unusual machines they are and how many fans and followers they have. Then I learned ITALERI really messed it up - they basically took a Freightliner frame and put something like a R-series cab on it with a Superliner hood. After a long consideration I decided to go whole nine yards and build a correct model of a Superliner. That meant building many parts myself. Other parts I will canibalize from the kit - there are not many, but some parts are usable.I'm aiming to build a model of an early Superliner, with round headlights, drop-front Cruisseliner frame and powered by a Cummins engine. It is to be configured as a tractor and have a 60 inch Able Body sleeper. Now there's a problem - I live in Poland, where the American trucks are a legend - you hear about them, but you almost never see them. The trucking technology is pretty different in Europe, and I've only seen a Superliner in person once - so there's a good chance I will make mistakes while building. So here's my request: Please, if you see any errors or inaccuracies in my build, report them to me. I can't promise I'll fix everything, but at least I'll know.So now let me show you what I got so far:The Cummins motor:The cockpit:The frame:The front suspension:The rear suspension:The brakes:Thanks for reading - I'm really counting on you! Have a nice dayPaweł 1 Quote Link to comment https://www.bigmacktrucks.com/topic/19052-mack-rw-superliner-scale-model/ Share on other sites More sharing options...
David Posted May 12, 2011 Share Posted May 12, 2011 I've never worked on any models so I was surprised by the detail of the parts you showed. I've noticed on my trucks that when Mack installs a vendor drivetrain (Cummins/Roadranger) they still put the mounts on the bellhousing and not on the flywheel housing. Also on the Superliner the shifter goes through the floor under the dash not between the seats. Good luck. Keep sending pictures. Quote Link to comment https://www.bigmacktrucks.com/topic/19052-mack-rw-superliner-scale-model/#findComment-77690 Share on other sites More sharing options...
Pawel Posted May 12, 2011 Author Share Posted May 12, 2011 Thanks a lot for your comment, David!I caught the detail with the tranny mounts (being mounted on the bellhousing). I just had a really hard time locating a picture of the mounts themselves. Here's what it looks like in my model:Just in the corner of the picture you can see my take on the mounts, without the imitation of the rubber yet.As for the shifter - are you sure? The pics I have from the product folder show the shifter between the seats - maybe a little more toward the front than in my model, but not drastically.By the way - I'd like all people, who have photos of the innards of an early Superliner to post them here - it would really help me. At the moment the details of the radiator and the details of the brake system (valves and lines) are most badly needed. Thanks in advance and have a nice dayPaweł Quote Link to comment https://www.bigmacktrucks.com/topic/19052-mack-rw-superliner-scale-model/#findComment-77698 Share on other sites More sharing options...
vision386 Posted May 12, 2011 Share Posted May 12, 2011 http://www.aitruckmodels.com/pages/kitsparts.htmlHello Pawel,and welcome to the site! i am somewhat of a modeler myself,but being on the road leaves limited time for this hobby! i am impressed with the added details injector lines,etc. on the engine! your skills must have improved over the years! i have sent along a link that may be of some help,this company makes many of the parts you asked about,and the quality is second to none! it is possible to make a model of most any Mack in existance,only limits are imagination and budget! but many parts are available separately,and Dave does do special request type orders,as i am sure both reference materials and "aftermarket" building supplies are hard to come by in Poland? hope this helps,and good luck with your project!.....Mark Quote Mack Truck literate. Computer illiterate. Link to comment https://www.bigmacktrucks.com/topic/19052-mack-rw-superliner-scale-model/#findComment-77700 Share on other sites More sharing options...
mowerman Posted May 12, 2011 Share Posted May 12, 2011 its looks great,,nice job,i dont know what your complaint is,except for the cummins.lol..thier a good motor.i drive one at work,but ofcourse i prefer the mack engine,they sound better,pull better,and get better mileage.all kidding aside,dont know why the model company chose to use the cummins..bob Quote Link to comment https://www.bigmacktrucks.com/topic/19052-mack-rw-superliner-scale-model/#findComment-77705 Share on other sites More sharing options...
Pawel Posted May 13, 2011 Author Share Posted May 13, 2011 (edited) Hello!Thanks a lot for your comments!Mark - thanks for the link, but I already know this company. I bought my rear suspension from them. Yesterday I repainted it and now it looks like this:Today, with internet, aftermarket goodies are quite gettable. It's a lot tougher with reference material. It's no big deal finding an overall photo of a Superliner, for example, but try to find out how a radiator, or a steering gear, or the front motor mount looks like - that's getting tough. That's one of the reasons I turned to this forum.Bob - my complaint, other than the old model starting to fall apart, was that it was an imposter, a wannabe - it tried to look like a Mack, but it had a Freightliner frame and many other minor things not in order. For example the cab - if you take a closer look, the side walls of the cab bulge outwards peculiarly. I had to narrow the cab 4mm, in order for the sides to fit flush with the hood.As for the Cummins - when Italeri (the maker of the kit) once made a plastic parts for the Cummins motor, they put it in almost every american truck they make, except for the Pete and Ken (they get a Cat). Similarily with the Freightliner chassis - their Western Star, their Superliner and their Ford 9000 all get the Freightliner chassis... the HORROR!!But I said - Mack is something special, right? So I want to show it! I almost have a Mack frame done. I decided to keep the Cummins/Fuller drivetrain, because I found enough reference for such setup on the net - must have been quite popular. But I'd be more than glad to see more photos of the real thing on this thread.Thanks again for your comments, have a nice dayPaweł Edited May 13, 2011 by Pawel Quote Link to comment https://www.bigmacktrucks.com/topic/19052-mack-rw-superliner-scale-model/#findComment-77741 Share on other sites More sharing options...
mowerman Posted May 13, 2011 Share Posted May 13, 2011 oh ok,i get it,you know i would have never noticed that..you definately know your stuff...bob Quote Link to comment https://www.bigmacktrucks.com/topic/19052-mack-rw-superliner-scale-model/#findComment-77769 Share on other sites More sharing options...
other dog Posted May 15, 2011 Share Posted May 15, 2011 I looked through my pictures and found these Superliners. If you think any of them would help you let me know and I can send it to you full size.Also, you probably know about this site-tons of pictures here!http://www.hankstruckpictures.com/trucks.htm 1 Quote Producer of poorly photo-chopped pictures since 1999. Link to comment https://www.bigmacktrucks.com/topic/19052-mack-rw-superliner-scale-model/#findComment-77845 Share on other sites More sharing options...
05Sierra Posted May 16, 2011 Share Posted May 16, 2011 Was searching truckpaper.com and stumbled across these superliners for ya 78 79 80 1 Quote Link to comment https://www.bigmacktrucks.com/topic/19052-mack-rw-superliner-scale-model/#findComment-77863 Share on other sites More sharing options...
Pawel Posted May 16, 2011 Author Share Posted May 16, 2011 Thanks a lot for your comments!Bob - maybe I know my modelling stuff, but I still have to learn my trucking stuff - hope to do that here on the forums!other dog - yeah, I know the site, it's great. Of the photos you sent, the bottom black superliner with round headlights looks interesting to me, as it's the early version.05Sierra - thanks a lot, those links are very interesting! One thing I suspected, but could verify now is the fact, that on early superliners you had two air tanks under the left battery box and only one under the right battery box. Does anybody know if there were air dryers on those trucks, and if so - where they were located?Thanks you again for help, now let me go and build something, have a nice dayPaweł Quote Link to comment https://www.bigmacktrucks.com/topic/19052-mack-rw-superliner-scale-model/#findComment-77885 Share on other sites More sharing options...
fifth wheel Posted May 16, 2011 Share Posted May 16, 2011 The 1st generation Superliners were built on Cruiseliner chassis. The air dryer is on the inside of the left frame rail just behind the cross member that is behind the cab.FW 1 Quote Link to comment https://www.bigmacktrucks.com/topic/19052-mack-rw-superliner-scale-model/#findComment-77887 Share on other sites More sharing options...
Pawel Posted May 16, 2011 Author Share Posted May 16, 2011 Neil, thanks again! I really appreciate your help. Have a nice dayPaweł Quote Link to comment https://www.bigmacktrucks.com/topic/19052-mack-rw-superliner-scale-model/#findComment-77889 Share on other sites More sharing options...
other dog Posted May 17, 2011 Share Posted May 17, 2011 here's a bigger picture. Quote Producer of poorly photo-chopped pictures since 1999. Link to comment https://www.bigmacktrucks.com/topic/19052-mack-rw-superliner-scale-model/#findComment-77922 Share on other sites More sharing options...
vision386 Posted May 17, 2011 Share Posted May 17, 2011 I found a few underhood Superliner pictures that may be of some help.............Mark Quote Mack Truck literate. Computer illiterate. Link to comment https://www.bigmacktrucks.com/topic/19052-mack-rw-superliner-scale-model/#findComment-77925 Share on other sites More sharing options...
Pawel Posted May 17, 2011 Author Share Posted May 17, 2011 other dog - thanks a lot, it's a real classic!Mark - very interesting photos! Do you know what kind of engines are those? My experience doesn't allow me yet to name them. But that's exactly what I'm here for - to learn!Thanks for sharing, have a nice dayPaweł Quote Link to comment https://www.bigmacktrucks.com/topic/19052-mack-rw-superliner-scale-model/#findComment-77958 Share on other sites More sharing options...
vision386 Posted May 19, 2011 Share Posted May 19, 2011 Pawel,the top two photos are Mack E-6 300 HP,backed by a Mack five speed trans. Bottom two are Mack E-6 350 HP,backed by a Mack 9 speed trans..........Mark Quote Mack Truck literate. Computer illiterate. Link to comment https://www.bigmacktrucks.com/topic/19052-mack-rw-superliner-scale-model/#findComment-78013 Share on other sites More sharing options...
David Posted May 19, 2011 Share Posted May 19, 2011 Pawel,the top two photos are Mack E-6 300 HP,backed by a Mack five speed trans. Bottom two are Mack E-6 350 HP,backed by a Mack 9 speed trans..........MarkMark is the first truck a Superliner I and a 2 valve? Looks like the second one is a Superliner II and a 4 valve. Quote Link to comment https://www.bigmacktrucks.com/topic/19052-mack-rw-superliner-scale-model/#findComment-78019 Share on other sites More sharing options...
vision386 Posted May 19, 2011 Share Posted May 19, 2011 Mark is the first truck a Superliner I and a 2 valve? Looks like the second one is a Superliner II and a 4 valve.Yes that is correct!.........Mark Quote Mack Truck literate. Computer illiterate. Link to comment https://www.bigmacktrucks.com/topic/19052-mack-rw-superliner-scale-model/#findComment-78020 Share on other sites More sharing options...
Freightrain Posted May 19, 2011 Share Posted May 19, 2011 I'm thoroughly impressed with your skill and going the extra mile with the little details.I have a little information to offer. I took some pictures of Stan's V8 Superliner a couple years ago. You'll note the shifter DOES come up from between the seats, not too far forward. It's a E9/500 hp truck. 2 Quote Larry 1959 B61 Liv'n Large...................... Charter member of the "MACK PACK" Link to comment https://www.bigmacktrucks.com/topic/19052-mack-rw-superliner-scale-model/#findComment-78027 Share on other sites More sharing options...
mowerman Posted May 19, 2011 Share Posted May 19, 2011 man,,,,certainly a beautiful set up,,last of the real bigrigs..nowadays there just plastic wanna be,s..what a pity,,hehe...bob Quote Link to comment https://www.bigmacktrucks.com/topic/19052-mack-rw-superliner-scale-model/#findComment-78043 Share on other sites More sharing options...
Pawel Posted May 20, 2011 Author Share Posted May 20, 2011 Hello everybody!Mark - thanks a lot for the clarification. I have yet to work on telling the truck engines apart!David - thanks, interesting remark.Larry - thanks a lot for your kind words, and for the beautiful photos. Although I can't use them for this model, who knows, maybe in the future I could tackle the late Superliner...Bob - I like the older trucks more, too!Thanks for all comments, have a nice weekend!Paweł Quote Link to comment https://www.bigmacktrucks.com/topic/19052-mack-rw-superliner-scale-model/#findComment-78111 Share on other sites More sharing options...
Pawel Posted May 24, 2011 Author Share Posted May 24, 2011 Hello everybody!It's time for a build update. I went on to tackle the sleeper. I got hold on newer Italeri sleeper. After a preliminary test-fit it looked like this:I didn't like it too much, and after I measured it it was a little wider than the trailer - I don't think that's OK. So I cut it, narrowed it and remodelled it a little. After I was done it looked like this:Now recently I painted the insides:Please take a look at what I got, and I'd be much obliged for any tips you might have regarding the interior, because I've never seen one in person, and I'm going to close the sleeper up soon - after that correcting anything could be tricky. Thanks in advance, have a nice dayPaweł Quote Link to comment https://www.bigmacktrucks.com/topic/19052-mack-rw-superliner-scale-model/#findComment-78328 Share on other sites More sharing options...
mowerman Posted May 24, 2011 Share Posted May 24, 2011 burgundy,baby,,,red wine,only way to go...oh welcome back by the way,,coming along very nice..you certainly have allot more patience than i do...after talking to you,i took out my dm600 model (parcially assembled) put it on the table,and thats as far as i got..lol good luck...bob Quote Link to comment https://www.bigmacktrucks.com/topic/19052-mack-rw-superliner-scale-model/#findComment-78341 Share on other sites More sharing options...
Pawel Posted May 25, 2011 Author Share Posted May 25, 2011 burgundy,baby,,,red wine,only way to go...oh welcome back by the way,,coming along very nice..you certainly have allot more patience than i do...after talking to you,i took out my dm600 model (parcially assembled) put it on the table,and thats as far as i got..lol good luck...bobYou mean the interior or the interior? The interior will have a custom grey color - the exterior will be red wine. Yeah I guess I'm patient, many people say that. But it's like muscle, can be built up by exercise. In case of patience the exercise would be modelmaking. I'd love to see photos of your kit plus your remarks, what you would like to modify, or what you see as not correct, stuff like that. I have a fellow modeller in Poland building a DM, they would sure be interested. Thanks a lot for your comment, have a nice dayPaweł Quote Link to comment https://www.bigmacktrucks.com/topic/19052-mack-rw-superliner-scale-model/#findComment-78416 Share on other sites More sharing options...
Pawel Posted June 3, 2011 Author Share Posted June 3, 2011 Hello!I've got some progress on my model to report - I put the sleeper together and now I'm working on the filler coat to smooth it before priming it:I'm also working on the frame, I installed cab mounts and the frame stiffener on the frame:The battery boxes, their covers and the air tanks slung underneath are also on their wayAnd finally I dechromed the details that will go on the cab roof with brake fluid. I'll rechrome them later, after filling the imperfections:That's where I have a question: What are those two snorkel-like things mounted between the three central bullet-lights on the cab roof? I like to know what I'm modelling, but I don't have an idea what they might be. Also please remember, if you see something you think is inaccurate im my work-in-progress pictures, I'd be grateful for pointing it out. Thanks for reading, and thanks in advance for your help, have a nice dayPaweł Quote Link to comment https://www.bigmacktrucks.com/topic/19052-mack-rw-superliner-scale-model/#findComment-78917 Share on other sites More sharing options...


Recommended Posts
Join the conversation
You can post now and register later. If you have an account, sign in now to post with your account.