


rhasler
-
Posts
1,907 -
Joined
-
Last visited
-
Days Won
54
Content Type
Profiles
Forums
Gallery
Events
Blogs
BMT Wiki
Collections
Store
Posts posted by rhasler
-
-
Looking at the literature from Bendix it looks like these are quite a bit different from what Rockwell had out. The Bendix brake doesn't have a power shaft (similar to an S-cam in operation) to wear out, hence no extenal slack adjuster. It looks to me like the entire caliper has to be replaced if the internal adjuster machanism seizes. Brake pads might be easy enough to come by and appear to be pretty simple to replace, but I have my doubts about how easy a caliper assembly would be to get your hands on. These also have brake wear sensors in them which probably means more electrical problems. I think Mack only started offering the Bendix air disc brakes in the last 2 years. I haven't heard anything good or bad about them but I don't know how many trucks were built with them. Maybe not a big enough number to base an opinion on.
-
Does anyone here have any first hand's on, with these conversions?
To me this looks the way to go in the future.
Thanks for your info.
I haven't personally seen any, but the Bendix website would probably be the place to look for info. I believe they are the manufacturer of the currently hyped setup. The older ones were Rockwell/Meritor. I would think the biggest factor would be parts availability. If no one else in your area, or the areas you run in, uses disc brakes I would expect that there would be a wait for parts when it came time to replace pads or discs. Keep in mind that the fewer trucks with this setup the less likely you are to find someone able to work on them correctly, and low parts availbility means parts that need to be replaced don't get replaced sometimes. I would hate put my life on an expensive brake system that I wasn't sure had been fixed correctly!
-
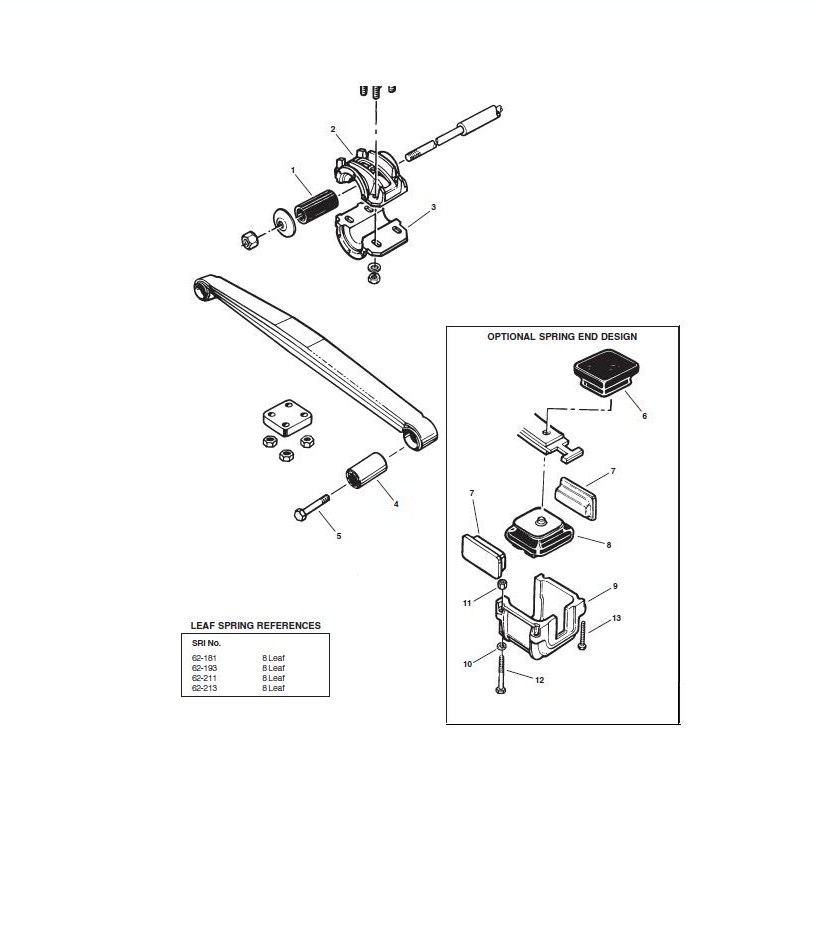
I think that is the one that I recall. never worked on on that suspension but It looks as I remember it. I recall it did have a few issues but never knew much about it to research it. I drove 3 trucks with this style and always liked how smooth they were (for a spring ride)when empty. they also had 4 dampers(one at each corner)
to help control the tandems... If I recall only the 2 or 3 upper springs made contact with the lower main springs when the truck was loaded. hard to explain but I think one spring was arched a little diffrent? correct me if im wrong?
Trent
I haven't had much experience with them either. I think the main problem with them was the bolts in the later version that used bushings would break. The fix was to line ream the axle housing hanger bracket eyes so that 1" bolts could be used instead of 7/8" bolts. Mack has a newer suspension the "M Ride" that is kind of similar to this. I think it's actually a Volvo design used priamrily on the VHD.
-
Here is some artwork of the ST suspension from the Euclid Parts Manual

-
the taperleaf I think had 3 or 4 springs and had a nicer ride than camelback. however IMO they were not as strong and seamed to be used more in On road tractors. Camelback is pretty bullet proof and parts are cheep. both did good in the off road but camelback could take overloads alot better. Nothing wrong with either and if its not going to be used for work the taperleaf will put less abuse on you and the truck. just my .02
Are you are referring to the Mack ST suspension? This suspension was set up similar to the camelback suspension. It had a trunnion & bushing, etc. like the camelback or SS suspension, but was only 3 or 4 leafs. The springs were attached to the axles at one time with buckets & cushions like on the SS, but later with eccentric eye bushings that allowed for axle alignment. These tended to be a problem if not maintained. At on time Mack issued a recall on the suspensions axle attaching bolts.
-
I had that problem. It turned out to 1 bad rear ABS sensor. Did it agian like yours. I took some ABS SAFE BRAKE Clean and cleaned the rest. Sovled my problem. Hope you get yours fixed.
My left front still throws a code every now and a agian, but has not went into safe mode cutting power. From my experience it goes to safe mode if it's a rear ABS ( but that is my guess).
Yes I've seen this happen with ABS sensors too. In our case the tip of the sensor was rubbed through causing the seonsor to short intermittantly when the teeth on the tone wheel passed it. Always reset the sensors when you have the opportunity (sometimes they freeze up in the mounting brackets and can be a real pain). Just push the sensor all the way against the tone wheel on the hub and it should be ok (this helps to keeps them from freezing up in the mounting bracket). The sensors will self adjust from there. Remember to clean the tip of the sensor and the tone wheel as well.
-
Mine you push and hold in the 2 odometer stalks ,all dash lights light up, and tach and speedo max out and reset.
Sometimes this doesn't work due to damage in the guage panel circuit. Most of the time all the other features work but the buttons are damaged. Even though they feel like they are ok they sometimes don't work for guage/bulb test or fault reading.
-
What is a 'FIC'...?
And...I wish my pockets were deep enough to up and rebuild the injection pump as a step of my troubleshooting process...dang.
It's the fuel Injection control (Bosch) module.
-
Starts with ether and runs well. Shut it off, wait 10 min., won't start. New lines from tank to primary filter - to pump. Had it sucking from a pail thinking it may be the pickup in the tank. Primer pump hardens but won't stay hard. Primary filter won't fill beyond 2/3 full. Thinking it may be the pump or electronic. I would be so grateful for any help. Nearest Mack dealer is 5 hrs. away.
Check the fuel system check valve on the right rear side of the engine above the air compressor
-
Sorry for any confusion. The wiring shown in the Jake installation manual is for a truck that was not built with the Jake harness integrated. I don't happen to have a wiring diagram for your year model handy, I do have one for a CH 1993-1994 with factory wiring for Jakes which should be set up about the same as on the RD with the biggest difference being wire numbers (which you probably can't read anyway due to fading). They may or may not be the same, I'm not sure. I have removed the extra wiring shown on the diagram so all you see is the engine brake wiring. The wire numbered 22-A-.8 is the first wire in teh circuit, it goes from the fuse to the jake switch and the relays. When the jake switch is turned on low power goes to pin 85 on the low relay, it goes to pin 85 on both relays in high position. Power goes through the relay and exits on pin 86 and goes to the clutch switch, form the clutch switch to the fuel pump switch, from the pump switch to ground. when this happens the relays (either the low if in low position or both if in high position) switch internally from pin 87a to pin 87 allowing power to flow from pin 30 through the relay and out to the jake solenoids. Some or all of this circuit may still be intact on your truck, you might want to check the jake housings on the left side to see if there are any wires connected to them and so on.
-
I think those should be your wires, but its been a while since I've looked at one. If I remember correctly there are two wires in separate weatherpack connectors on the right side of the cab bulkhead about halfway down the branch harness for the hood. You will need a jumper harness to connect from the cab wires to the pump. Check to see if the wires have voltage when conditions for brake operation are met (per the installation manual linked earlier), then see if voltage is gone when the clutch switch is open.
-
Don't forget to install the oil supply tube in the auxillary shaft (the shaft that drives the compressor). It supplies oil to the air compressor. It's a small piece of steel tubing about 1/2" diameter and about an inch long. It just slips into the back of the auxillary shaft or teh front of the aair compressor crankshaft.
-
Here is a link to the Jacobs Vehicle Systems installation guide for your engine brake. http://www.jakebrake.com/service/pdf2/018061C.pdf Page 10-13 shows the wiring system for the engine brake (both mechanical & VMAC). Your truck probably had the wiring there already, but this should give you an idea of what the circuit looks like. Since you found a switch on the pump you should be looking at the non-VMAC wiring. I can't remember the color of the factory installed wires coming from the cab to the pump switch, but I think they're brown. Hope this helps.
-
I don't know that engine but you could have defective "O" rings on the unit injectors. A lot of times they sit in a water jacket for cooling.
Rob
MMost likely from the injector cups (that the injectors sit in). They are sealed with an o-ring at the top of the cup & swaged into the head at the bottom. The cups have been something of a weak spot. I would suggest having a dealership check it out. It is an in depth repair requiring special tools and may still covered by your warranty.
-
If I was at work I could get you the Service bulletin #'s but I wont be back till Tuesday. Also has the engine ever had the injectors replaced? Some over fueling injectors could be the cause although probably not. Too much fuel or not enough air (boost) usually causes high exhaust temp. If you have any type of fuel heater make sure it is shutoff. Make sure the hole on the inside of the hood is lined up with the air cleaner housing hole and the rubber boot is sealing off the hot air off the engine.
Wastegate Turbochargers — Description, Operation and Troubleshooting SB 214-017
According to VMAC III Service Manual (publication # 8-211) there is a 3300 ohm resistor in the wastegate actuator circuit. An out of whack reading in the signal line will set code 4-5. Since you don't have a fault lamp this probably isn't the problem.
BMT Forum Logo

05 Granite With 370 Hp Engine
in Engine and Transmission
Posted
I would agree with Mackpro68. The guage he linked to would probably be far simpler to install with the added benefit of being a manual guage instead of an electric one. However, if you want the electronic factory guage make sure to have your Mack dealership turn on the option in the mainframe before downloading a new datafile if you have your ecu programmed. Regarding the fuel level guage-it's probably the sending unit in the left tank, but you may want to check any shutoff valves, equalizers, fill caps, etc to make sure everything is ok before spending money on a new sender. I believe on your truck the fuel level sensor is fault enabled-the eml (lightning bolt) will come on, with code 6-1 I belive, if the circuit has high or low voltage or open circuit, however it won't sense a fault otherwise. This means a damage float or arm on the sending unit will cause erratic behavior but not necessarily set a code.