

doubleclutchinweasel
-
Posts
2,605 -
Joined
-
Last visited
-
Days Won
37
Content Type
Profiles
Forums
Gallery
Events
Blogs
BMT Wiki
Collections
Store
Posts posted by doubleclutchinweasel
-
-
Thanks, Ron.Kent
Looks like a new one !
Ron
Stops like a new one, too! And, leaks a lot less!
You know, everything I'm doing on this truck turns into an "education". Nothing is simple! Everything reqires research, study, planning, and (finally) execution. And, the big parts are not usually the problem. Usually it's the little 1/4" bolts that hold the wires up out of the way that cause all the sweatin' and cussin'. Makes me feel old! I was out there last night, with the flashlight in my mouth (again) finishing up a couple of more air lines. Ten minutes to run the air lines, but two hours to get the old ones off.
Wait a minute... That's what we love about workin' on these old trucks, isn't it?!!!
More to come...
Kent
-
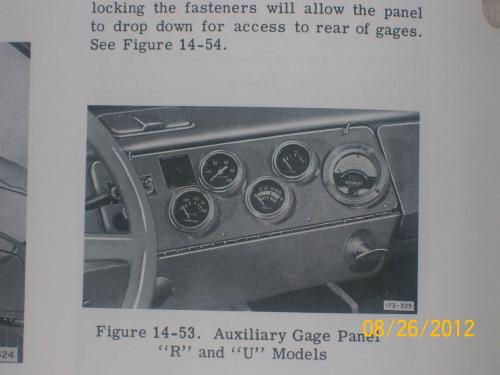
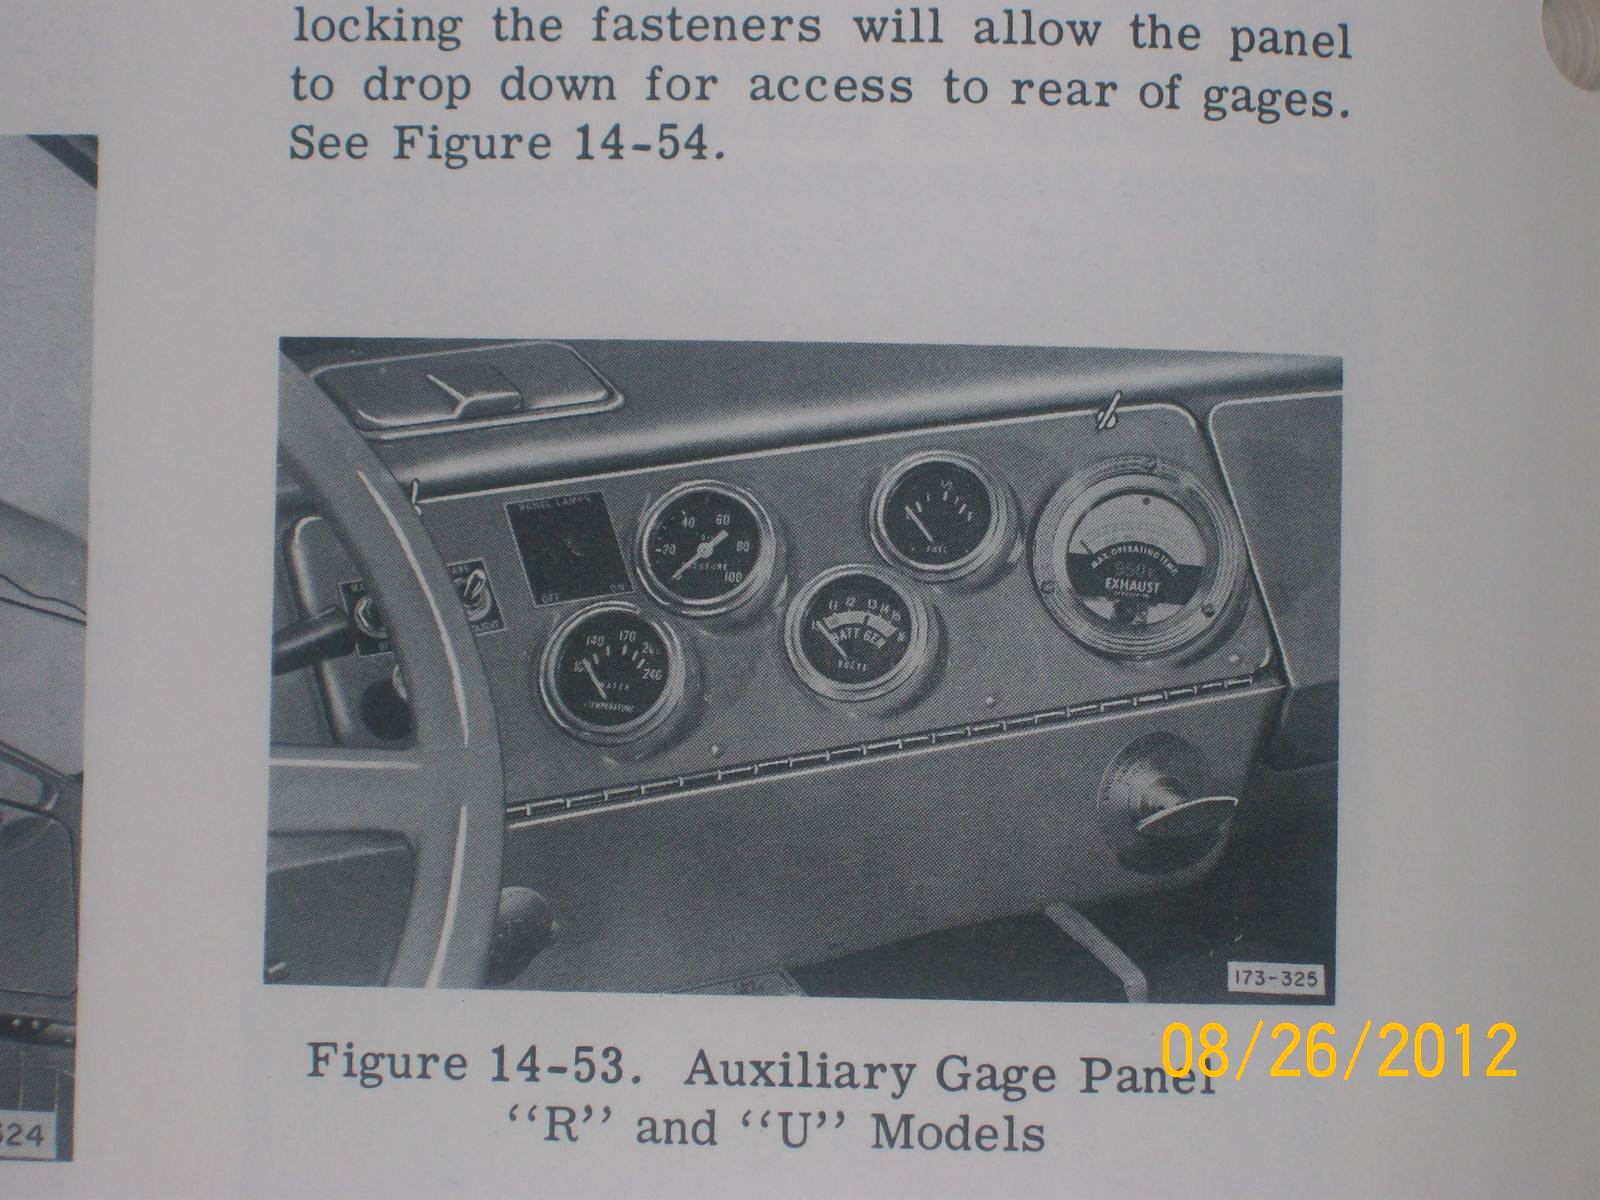
The manual states that "additional" gages could be mounted in this panel, or that the standard gages could be moved there, if there was a tachograph (or tachographs) installed in the conventional location in the main dash. Apparently, if there was one or two recording instruments installed in the main dash, there was no room left for anything else.So it's purpose was to house additional gauges that weren't part of the standard cluster. I guess optional could also be an unofficial name for it.
The angled gages do look really cool, don't they?!
Kent
-
In this book, they just call it "auxiliary" (see pic). Not sure what else they may have called it through the years...we are talkin' about Mack here!well the conversation i remember,,,we were trying to remember what they called that setup,,,,maybe optical version,,,too long ago cant remember was seen in a 1968 U model owners manual...bob
-
Nice job.
I just did some similar work on my R600, which originally had DD3 chambers. Looks like we may have used the same brand of chambers. Looks like the ones from Ranger Brake in Tennessee. I got mine from CarQuest. Talked to the son of the founder of the company. Pretty cool little family business. They made components for other brake folks for years, and then started selling their own. They still sell to the other guys from time to time, And, I liked the price!

I didn't notice how you handled the anti-compounding function (sorry). My truck had a PP-2 control valve instead of a PP-1. This valve has built-in anti-compounding capability, via a line tee'd off the service brake line. It is the one attached to the lower part of the valve. Of course, you may have handled this a dozen different way. If so, sorry for the distraction.

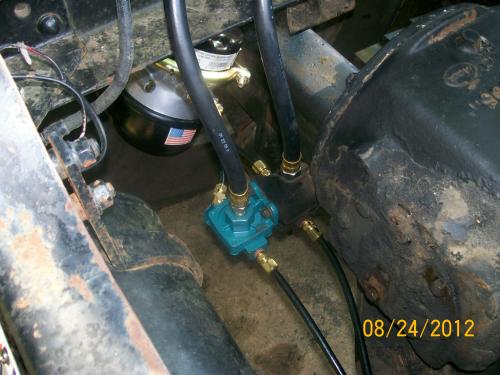
I used a Haldex-Midland-remanufactured Bendix QR-1 as a quick release valve, as well as a convenient place to tee the lines.

I still have LOTS of lines to upgrade!
Keep up the good work.
Kent
-
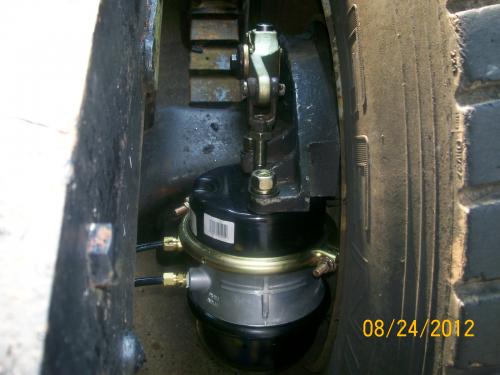
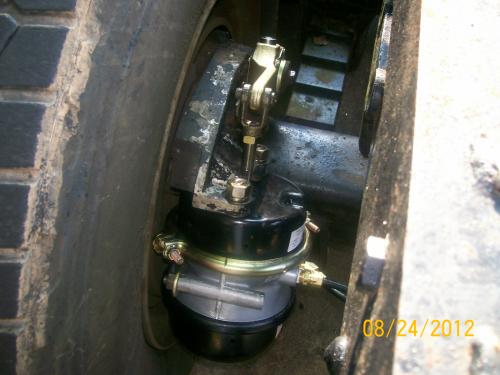
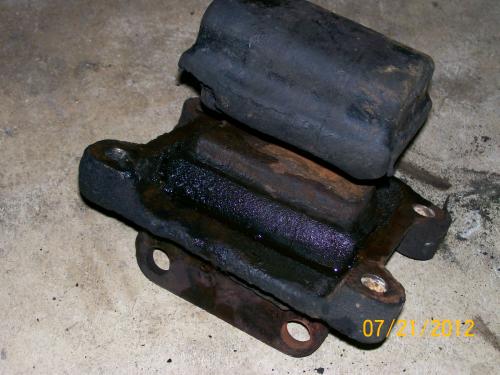
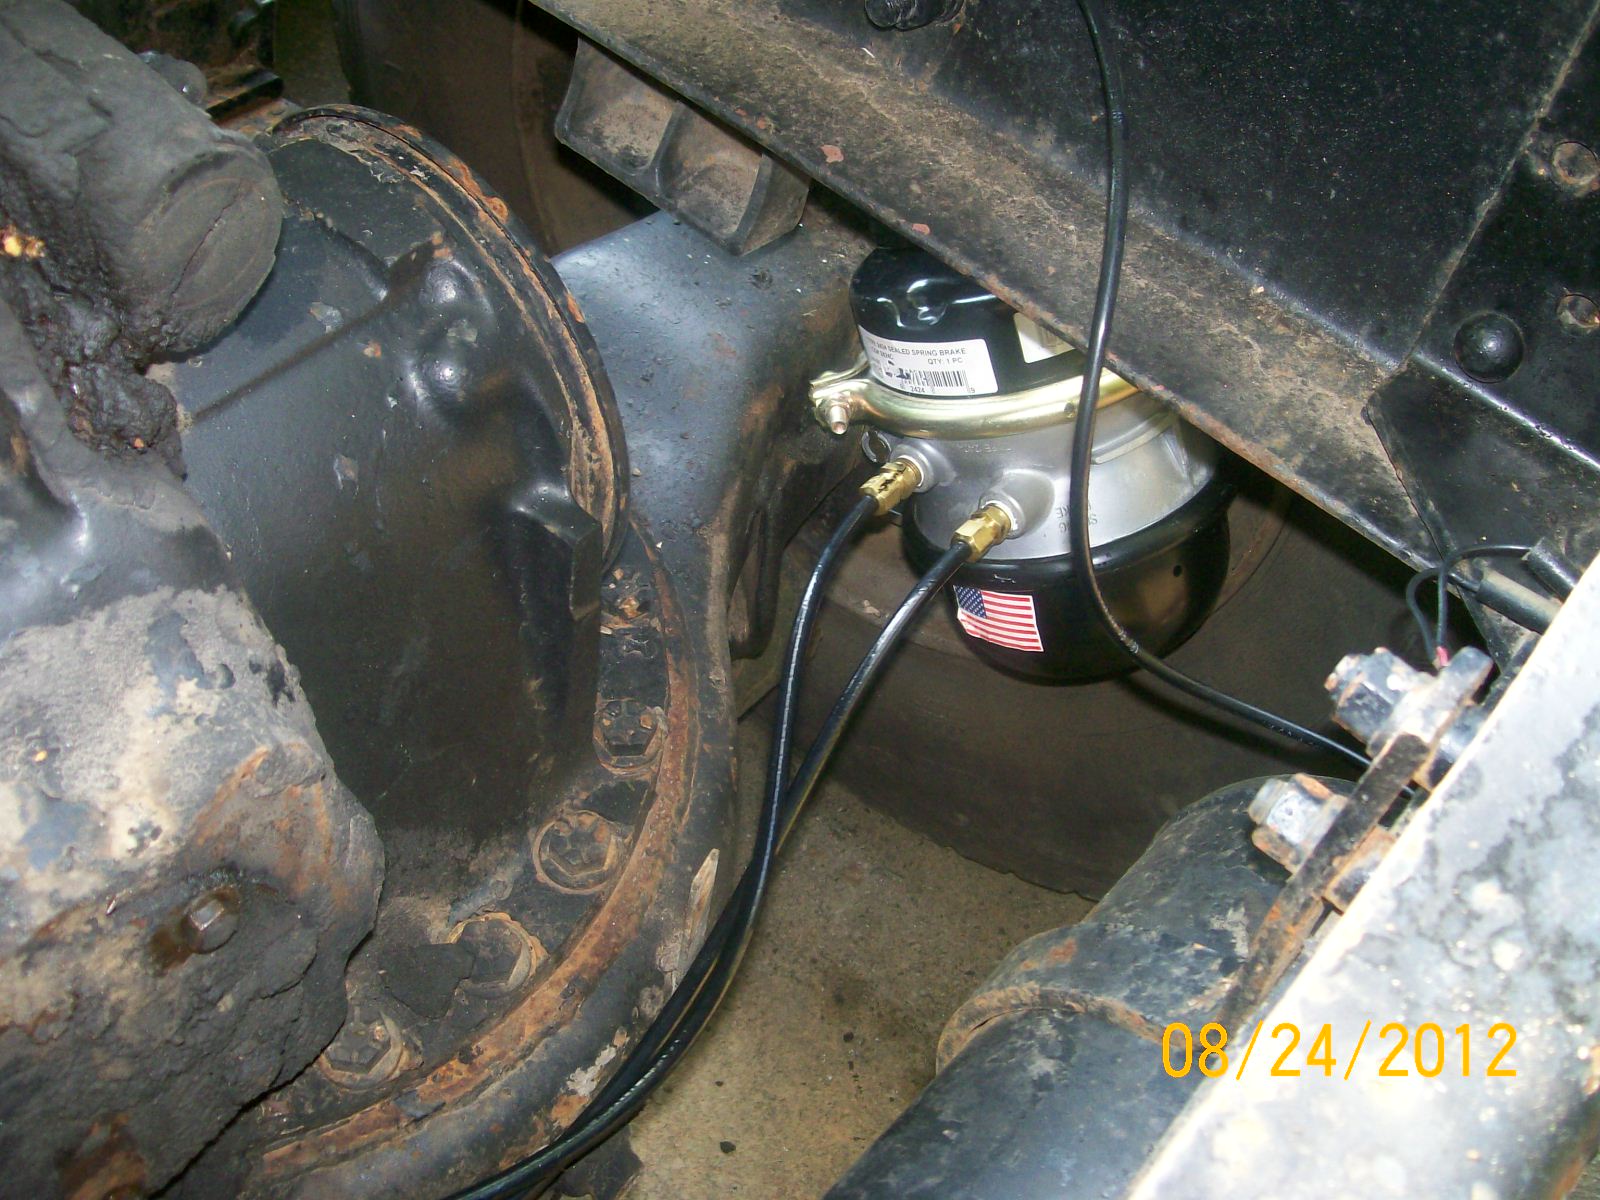
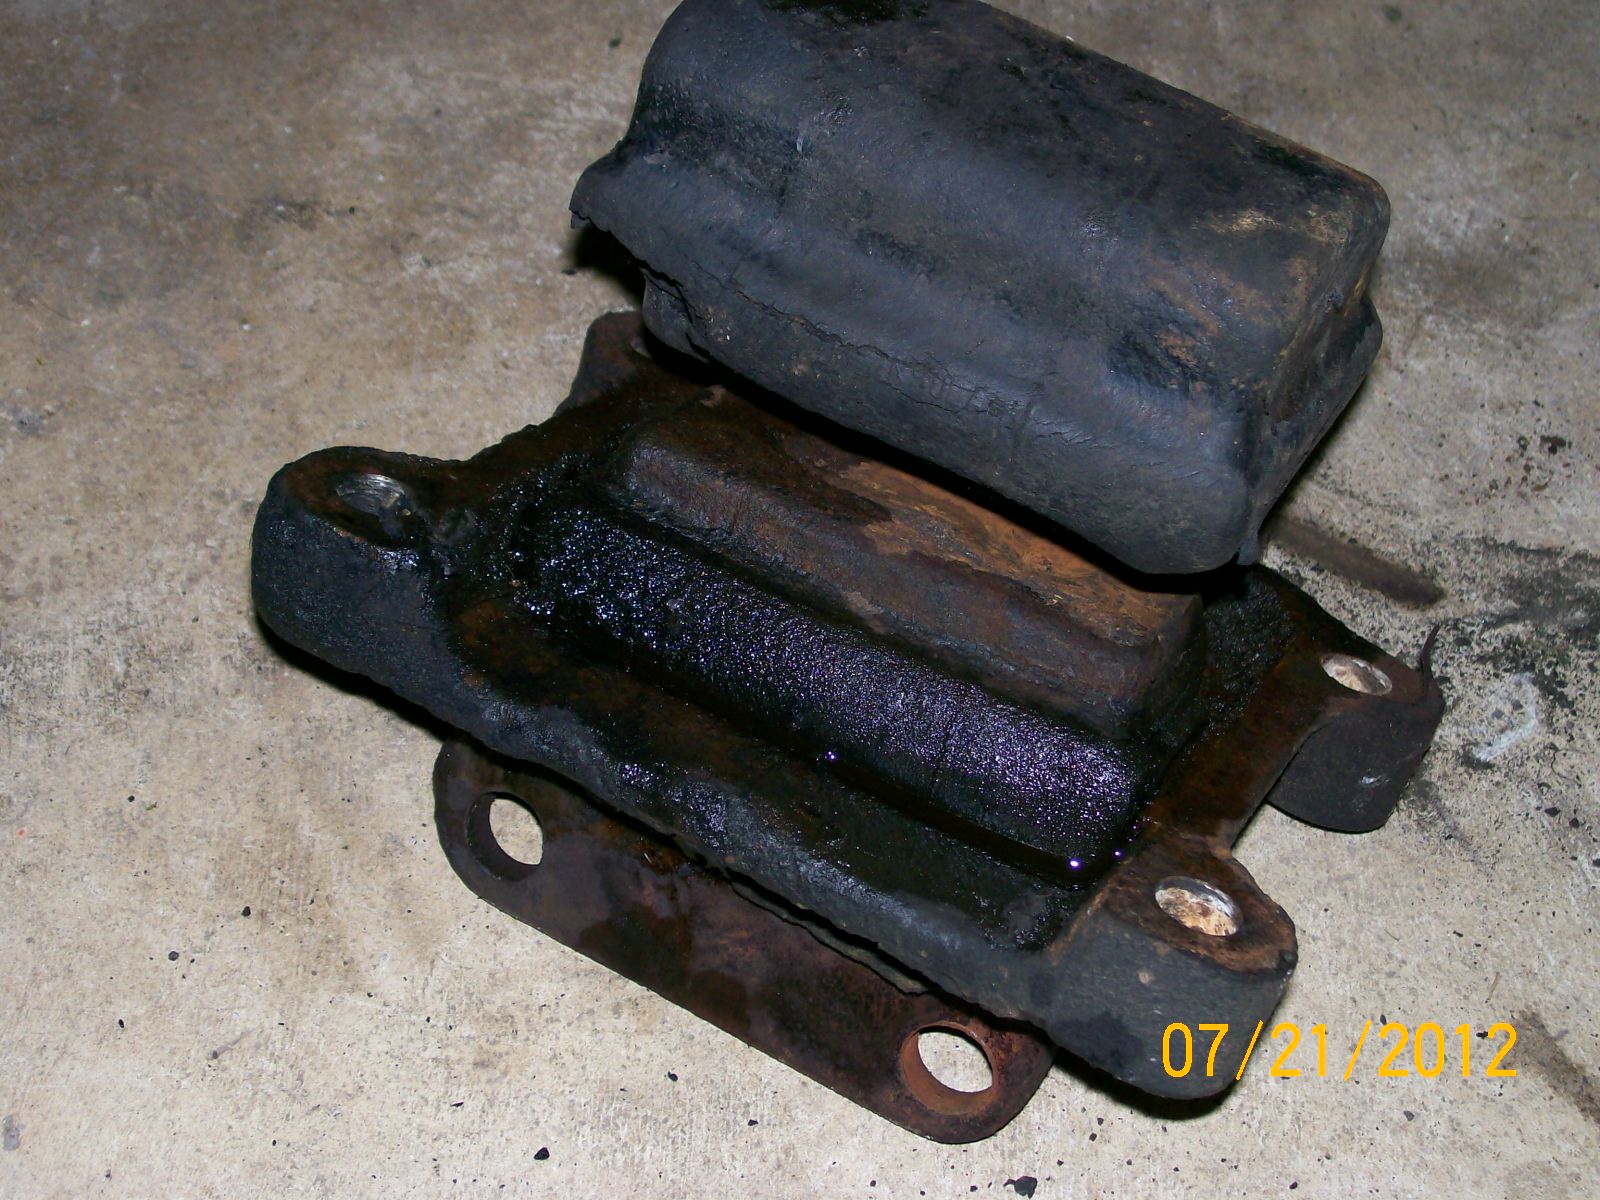
Just a couple of shots of the new slack adjusters and spring brakes on the old Dog. Notice the bolt-on retention instead of snap rings...
-
A few shots of the new spring brake chambers, new tubing, and new slack adjusters.
Gonna do a little more "detailing" on it this weekend, and maybe do the next axle.


-
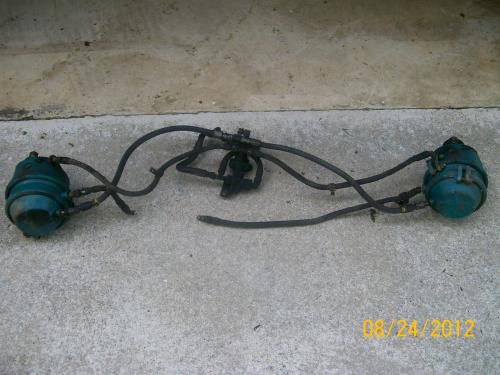
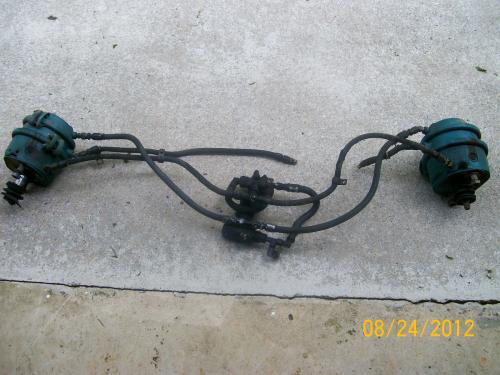
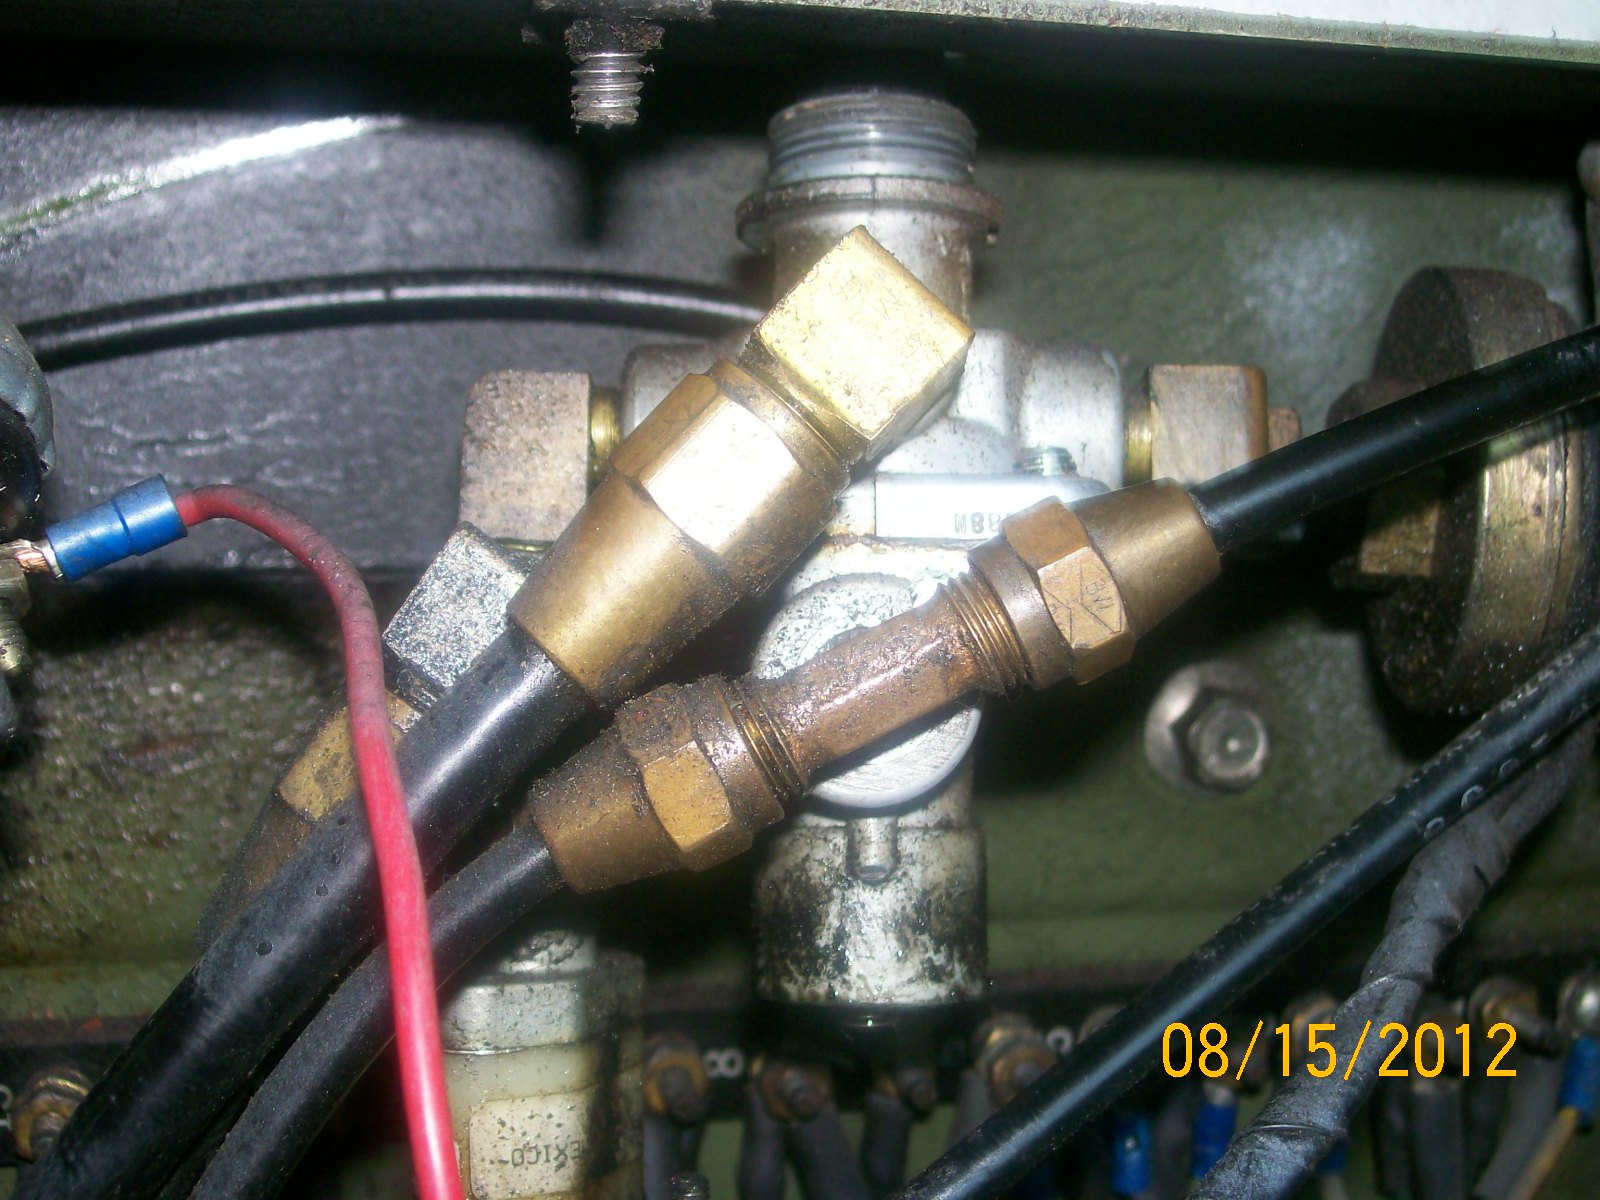
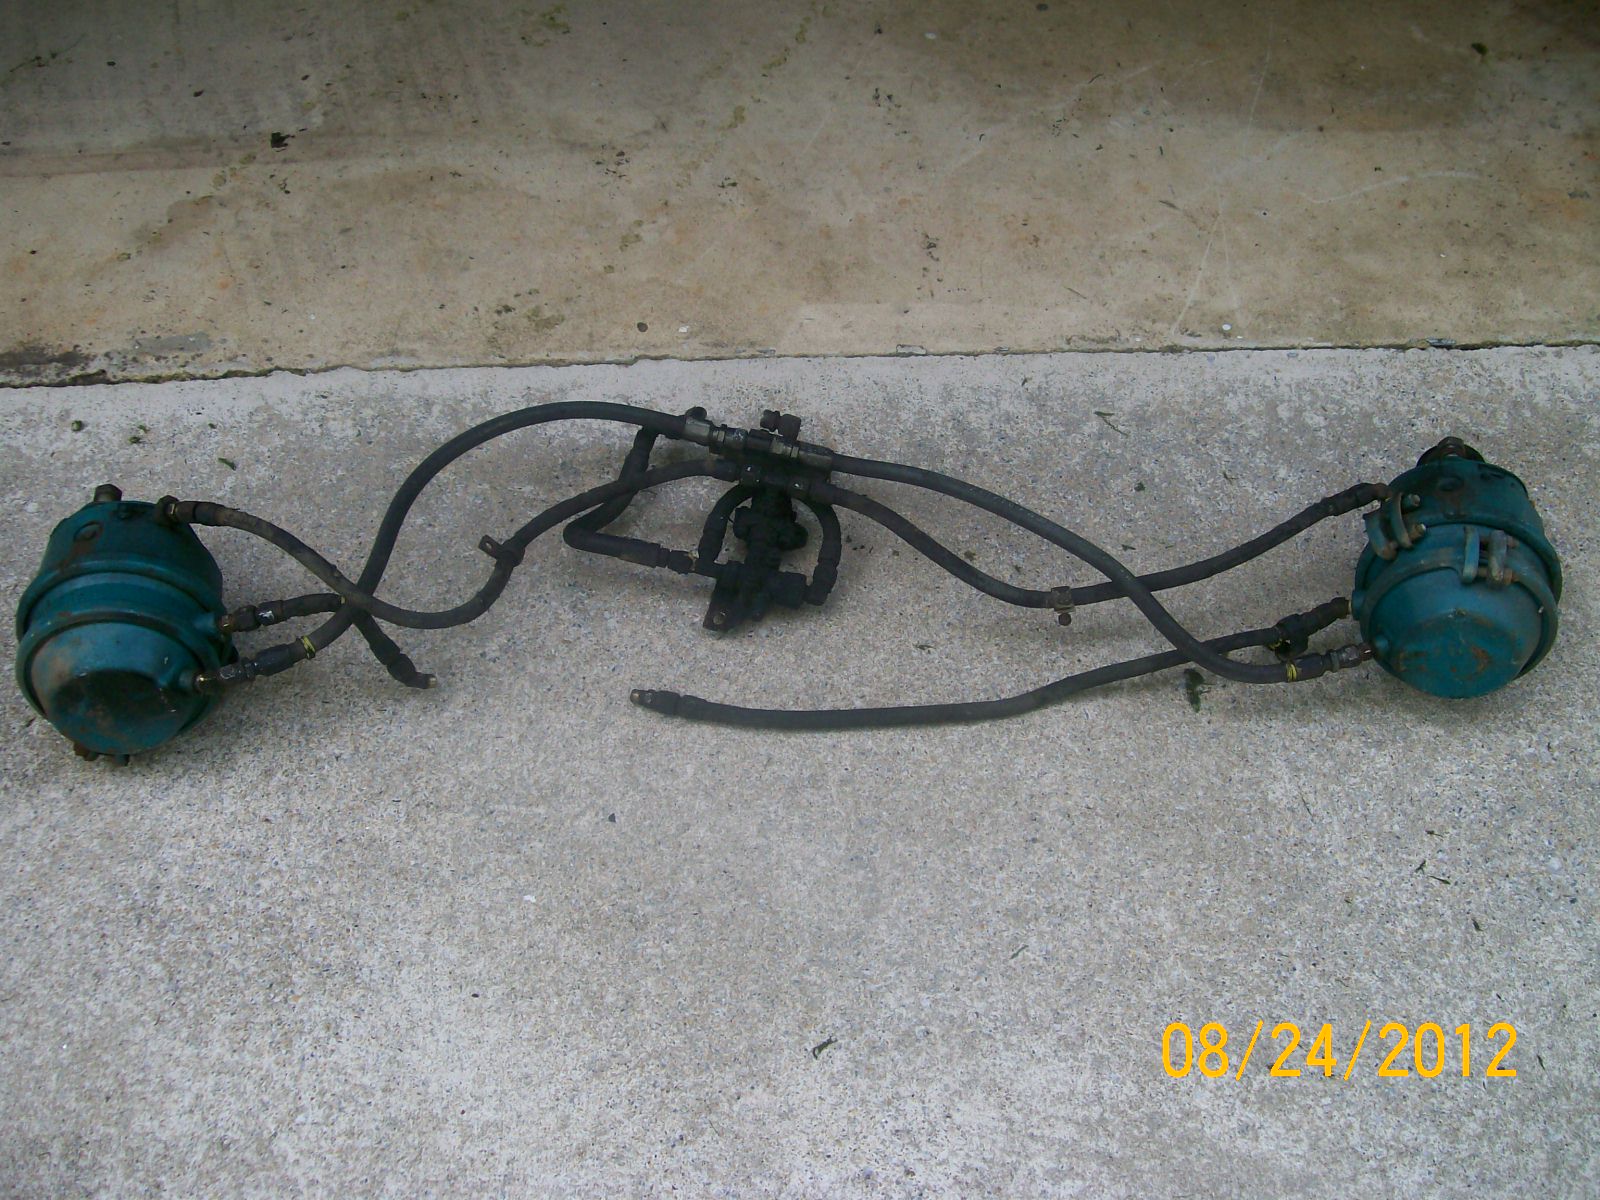
As promised, here are a couple of pictures of the DD3 system.
Let me know if anybody is interested.
Oh, and we CAN do trades! I have a long list of little, piddly parts I need. Somebody out there might have them just laying around...
Kent
-
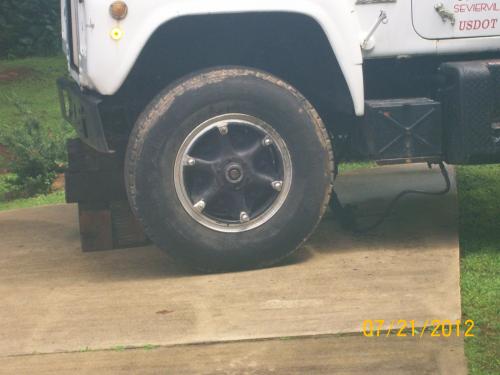
Okay, got the DD3s replaced on the rear-most axle this week. Put in 2424s and new slack adjusters. 2424s fit well. Of course, I thought they would, once I determined that the front drive axle actually DID have 24s on it! Sometimes it's hard to determine exactly what you have when the parts are this old! Have to find old product information to be able to accurately identify this stuff.
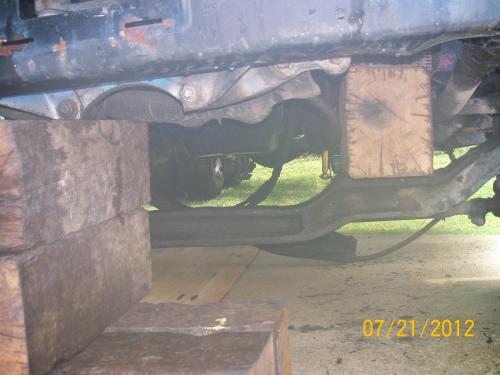
The finished axle looks very neat. I was able to use another QR valve in the new spring brake release circuit as both a release valve and a convenient tee location. I mounted it back-to-back on the existing QR valve, so it looks really clean. I'll get a picture or three on here in a day or two. Might give somebody else some ideas.
The Gates air brake tubing sure looks better than 43-year-old hose. I went with G32 (compression) fittings instead of push-to-lock fittings. I like the PtL, but the compression fittings just make me feel better.
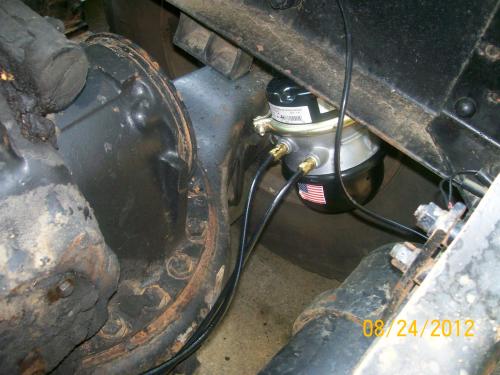
Managed to keep the isolated air tank at the rear, originally connected to the DD3 system, as an emergency brake release reservoir.
Still got a lot to do. But, I can now start moving forward, replacing a little air system at a time. Plan to do the front drive axle, and a few feet of air line, this weekend...wife permitting! Who knows; some day I might actually get through the whole air system!
Brakes...brakes are cool...m'kay?
Much more to come...
Kent
-
Hi, everybody!
I have a pair of DD3 chambers (24 sq in service / 17 sq in parking) I just removed from my '70 R600. The bellows on them need replaced, but the cans worked correctly when I removed them (08/23/12). I took the entire "octopus" of hoses off the rear axle as a complete unit when I removed it. So, the mounting brackets, tees, inversion valve, etc... are all there and intact.
Pictues and pricing will be forthcoming. I need to research pricing a bit before I commit to anything. Actually, I have a post out there entitled "Spring Brake Upgrade" which has a few pictures of the system on it, if anybody's interested.
I don't need them, and would prefer to sell the whole thing to avoid starting a pile of "junk" in the garage! So, the pricing will be reasonable, but not free! I mean, they're not "junk" by any means. But, they're not new either. I do not think these are '70 vintage, but rather have been rebuilt and replaced at some point in time between then and now.
I understand these can be somewhat difficult to come by, and rebuilt ones can be pricey. Maybe these can help somebody get something going without having to fork out the dough for a new set.
In the meantime, feel free to make offers or suggestions (be nice, Rob)!
More to come...
Kent
-
More on the brakes...Type 24/24 chambers should fit if you do not have backing plates for the brakes and they are open. Otherwise you will need to either install type 20, or go salvage yard searching for a later set of chamber mounting brackets to move the chambers inboard and longer "S" cams to tie everything together. You could also make a spacer to offset the chamber mount closer to the centerline of the truck and install longer "S" cams to make up the difference. You have offset slack adjusters now due to someone probably retrofitting the chambers currently mounted.
Rob
One of the DD3s failed to release this weekend. Turns out, at some previous service, somebody swapped the service and parking lines. So, there was no way for the smaller (17 sq in) chamber to advance the rod far enough to allow the roller locks to disengage. Even when I swapped them back, I had to loosen the bracket slightly to get them to release. Works better now. And, it stops a lot better on the larger (24 sq in) diaphragm.
Have some 2424s located locally, and am waiting on a few more air brake tubing fittings from same source. Should have everything here this week. Going to remove DD3s and replace with the 2424s (after verifying clearance...but it looks okay). Will remove "inversion valve", and other DD3-related plumbing. probably put in a QR valve on the parking brake line. DD3 setup didn't have one. Probably couldn't use one, what with the inversion valve and such. Good time to put on a new pair of slack adjusters (they finally arrived).
Found a schematic using standard spring brakes that allows me to keep the remote reservoir and emergency release circuit intact, so I'm going to do that. I like having the isolated emergency release reservoir. Beats the heck out of caging the parking brake spring to move a dead truck off the railroad tracks!
So, hopefully I'll have the rear drive axle converted to current brakes and new brake line tubing soon. Then, I can move to the front drive axle and replace the cans and lines there, as well. The tees and junctions along the frame allow for a fairly small section of air line to be replaced at a time, starting from the rear. So, I can do that in stages and not get over-stressed by taking everything off at once.
More to come...
Kent
-
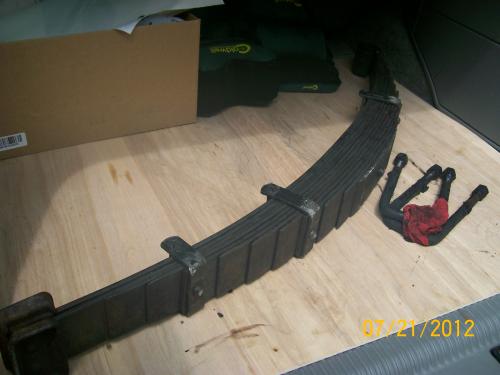
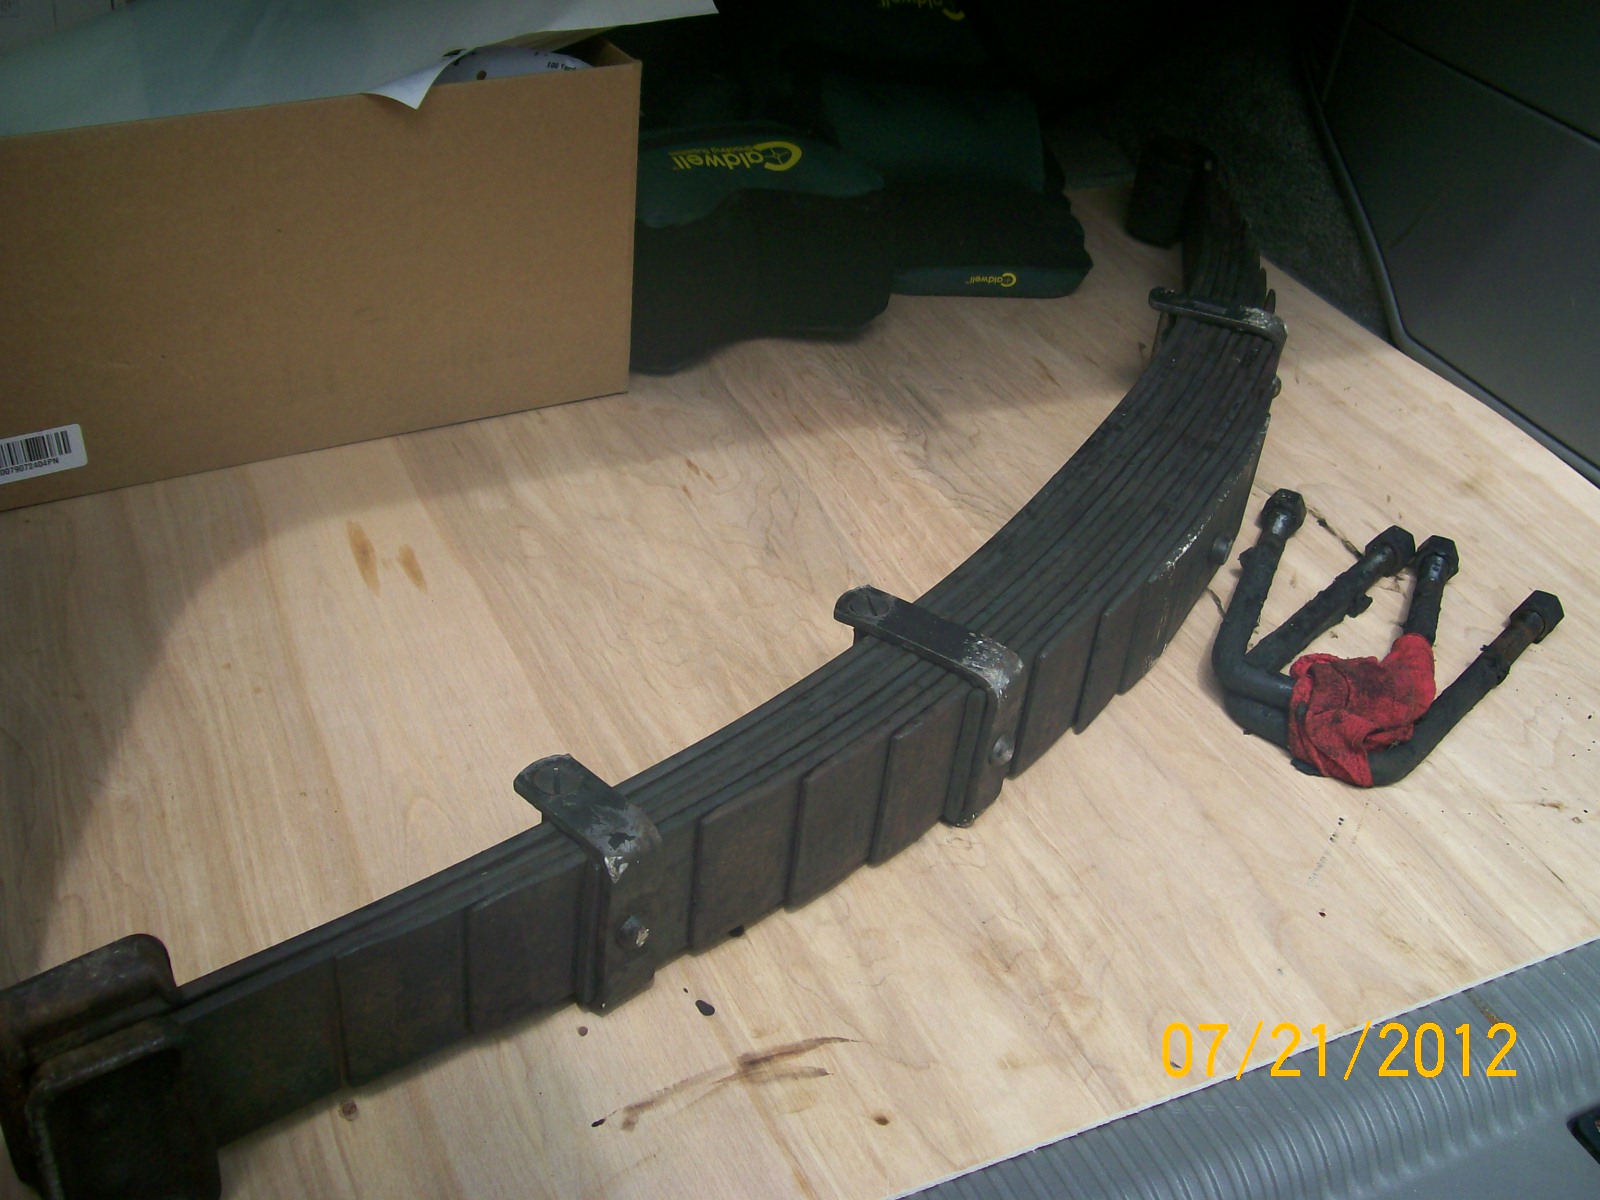
New spring leaves are in. The guys in Knoxville, TN, at Suspensions Unlimited (aka Knoxville Spring Service) got me in and out in about an hour. Did 3 new leaves at $50/per, and 2 new U-bolts. Total cost: $211.
They were planning to have to cut the spring bands off, but, like everything else under this truck, they came off with no problem. Sometimes it's good being covered in oil!
They reminded me to re-torque the new U-bolts after a little driving. Will also re-chech the screws in the bands.
So, this piece (1 of 10,000) is done. Now, back to brakes, lights, etc... Thanks for all the comments.
More to come...
Kent
-
The slack adjusters have now arrived at the parts house. They should ship out on Monday, and be here by Thursday or Friday. I should have the front spring back in by then, so I can put these on next weekend, maybe.
-
Found a guy a couple of hours away who can make me a couple of replacement leaves fo $50 each. He's another old 40-year veteran spring maker, and was recommended by the Mack dealer there. So, I pulled the spring out this morning. Use a cut-up cross tie for blocks. Jacked up against the middle of the front crossmember. After spring was removed, put another block on the axle, and let it down until the frame rested on it. Also have a block under the front crossmember. Front pin wouldn't quite go out from the outside-in, because of a slightly tweaked bumper mount. So, I pushed it back in and went out the other way. Of course, the spring got out of kilter, and had to be weaseled into position before the pin would go in.
Pictures of the hanger cap soaking, the truck blocked up, the spring cleaned up and resting comfortably in the back of the Tahoe (FUN by yourself!), and a close-up of the broken leaves. U-bolts came out with a little torque, so I didn't have to torch them. Should make it easier to duplicate them, having them in one piece!
-
 1
1
-
-
Holy crap. This is funny!Try Eaton/Detroit Spring in Detroit, and St. Louis Spring Co. in St. Louis. I've used the both for years and truck shipping is not that expensive. I'll relay a couple of other names I've used also but I've never had any issues with St. Louis Spring and my grandpa had all his spring work done there for many, many years.
Rob
I had stumbled across St. Louis Spring earlier, and had sent them a message from work. When I checked my work email, they had already responded. His price is about 1/3 that of Stengel brothers.
I'll be talking to them soon...
Thanks again,
Kent
-
Thanks, Dude.Try Eaton/Detroit Spring in Detroit, and St. Louis Spring Co. in St. Louis. I've used the both for years and truck shipping is not that expensive. I'll relay a couple of other names I've used also but I've never had any issues with St. Louis Spring and my grandpa had all his spring work done there for many, many years.
Rob
-
You ain't right!Feeble attempt to keep them on their wheels.....
Rob
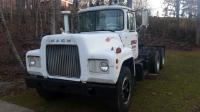
I was lookin' at new springs for my old R. And, the more I learn, the less I like the prospect of diggin' two more 40-year-old springs out of the junk yard. I mean, they're the same age as my worn out and broken things.
I checked with Stengel Bros. They can hook you up, but that's almost as much as I paid for the truck!
Know of any other reputable spring shops (preferrable in the SouthEast...so shipping doesn't cost more than the springs)?
-
Ya know...
Some of the old U-model sales brochures point out that the left-side spring had more leaves than the right-hand one (like 12 vs. 10).
For what it's worth...
-
Thanks, Ron.I have a 72 R model that i installed 3 leaf springs a few years ago, i got parts off of a 78. ( may be imposible to find ) but find you a late 70s early 80s U model that has 3 leaf springs. you need the rear spring hangers, blocks on the axle,springs,and the battery box brackets that bolt on the hanger. the front hangers are the same as the older R models. i think it does ride better with the 3 leaf front end. Ron
When you mention the rear spring hangers, I assume you're talking about the entire bracket which bolts to the frame.
And, I also assume you re-used your original axle.
Did yours have threaded front pins or straight front pins?
Kent
-
Yeah, them's all familiar names, alright! I've always been in the Dodge group ("team green"). Made v-belt pulleys (sheaves) and couplings for 13-1/2 years, then moved when we built the new roller bearing plant in '96. Made our own housings for years, and used Timken (tapered) and FAG (spherical) inserts. Dodge had wanted to make their own tapered bearings for about 40 years, but couldn't make it happen. I was "lucky" enough to get to make it happen. No pressure, right? If you're ever here in western NC, I'd be glad to show you around.The spings with the exception of being tight are very straight forward to work with. If you are patient and work with the front spring pin, and don't bust something beating upon it, the job is not that difficult. Don't be under that spring when it comes loose from it's mount! Damned things are heavy.
Used to use a lot of Dodge bearings and gearboxes, along with Tulsa, and Braden drives for mechanical power transmissions in the sawmill equipment manufacturing industry. Falk was another of the gear reducers used a lot but only in very large, (100+ horsepower) applications. Baldor/Reliance were always the motors of choice to use for quality and a long lasting product. Cheaper motors, well, you do get what you pay for.
Rob
Kent
-
OK. Those points all make sense. I just need to round up some decent tall jack stands.Expensive stone segments too!! They come apart with some force and are very short. I seen a crankshaft grinding wheel come apart at speed once and the damage to a concrete block wall was enough to teach me to "ring test" any rotating vetrified wheel!!
I usually block up behind the rear hangers of the front springs to hold the truck. I also place a single stand under the front xmember to take a little stress off the frame. I have tall stands but prior to having them, I used six, and 10 ton stands as they were long enough for the job.
Rob
The company I work for is Dodge (no relation whatsoever to the auto maker). We make mechanical drive components (gearboxes, pullys, couplings, etc...). A few years ago, Rockwell sold us to Baldor. So, now Reliance and Baldor motors are part of the same company. Weird, considering the years of competition. Then, ABB, a Swedish outfit, bought the whole kit and kaboodle. Huge freakin' company. They paid something like a billion dollars CASH for the Baldor/Reliance/Dodge corporation.
I've been lucky. Started as a machine operator. Worked on about every type of machine they had. Did maintenance. Did engineering. Modified and rebuilt machines. Designed machines. Traveled extensively (can't tell you how many times to Europe...lost count years ago). Was the engineering manager for 5 years. Hated it. Would rather do it myself. Am doing it myself now! Our plant is one of the most profitable facilities in the global organization (I take credit for that!). We do something like $140 million in business per year with only about 115 people total. Can't publically tell you the profit numbers, but they are obscene (again, I take credit for that!).
But, with the headaches that come with high-profile projects, I need a release. The old Mack is just the ticket. Sure, it needs work. But, once I get the springs fixed, I can drive it. I'm working through the air system, but I try to leave it drivable most of the time. I dread the springs. It looks like it could be a royal pain in the rump!
MUCH more to come...
Kent
-
No, seriously Rob. How the heck do you block that thing up? Front crossmember, maybe?
Kent
-
Oh, yeah. Very familiar with a Blanchard. The first night I went to work (been there 30 years this Thanksgiving), I ran a 48" blanchard grinder. Saw a guy forget to pull out the stone spacers (used when wheel segments got too short) when he put on new wheels. Touched the parts, and "poof"! New set of stones reduced to rubble. Funny as h%#l!You are living right I'll tell you that. Good maintenance does pay off in many ways. I'd replace both springs as the other side will fail shortly after replacing the one side. That according to the law of averages that rules my life.......
Rebuild machine tools eh? I'm certain you know what a blanchard stone is then and how to use them? There's the test for the day.
Rob
Rob
Worked on maintaining and rebuilding CNCs, programming CNCs, buying CNCs, blah-blah-blah CNCs. Was part of the plant start-up crew when we built the plant I'm in now. Been designing tools and fixtures off and on for 25 years.
For the past 8 years or so, I've been developing process and designing machines to in-source our own double-row tapered roller bearings, previously sourced from Timken.
But, when it comes to figuring out exactly how to jack up the old Mack, and still manage to get jack stands under it, I'm a newbie!!!
And, dang, them's gonna' be some tall jack stands, ain't they?
Kent
-
Good news, Rob.That is a jamb screw the hits a "flat" on the pin if I remember correctly. Most likely this pin will be frozen in place and will take a bit of persuasion to remove. Most ot the grease zerks I've seen in this setup are 90 degree fittings. Most of these pins are press fit but look closely at the ends of the pins. If it is a screw in pin, there will be two flats machined into the end of the pin for a wrench to grab onto. If it is a straight pin, then it will need to be pressed out with a large "C" clamp setup. These can take a tremendous amount of force to bust free but once they "pop" loose, you can almost push them out by hand.
The rear spring hanger is fairly easy to do but the removing the bolts at times can be a chore. I like to heat the housing very warm, (don't incinerate the rubber insulator) so the bolts don't snap off in the cap, or hanger. I've seen severa old trucks requiring spring work and only have either two, or three bolts retaining the spring pocket cover.
Rob
I went out and laid down in the mudhole which used to be a yard before all this rain, and with very little fanfare, loosened and re-tightened those 4 bolts on the rear spring hanger.
I grumble a lot about the build-up of grime on this old truck, but I really have to hand it to the guys who used it last. There is grease everywhere there is supposed to be grease. They apparently did maintain their trucks. Oh, there are frozen-up things here and there, but, by and large, most of the important bolts still turn.
So, maybe this won't be all that bad. Of course, I still need to get a spring and new U-bolts. But, I feel better knowing the bolts aren't frozen!
More to come...
Kent
-
Thanks again,Rob.That is a jamb screw the hits a "flat" on the pin if I remember correctly. Most likely this pin will be frozen in place and will take a bit of persuasion to remove. Most ot the grease zerks I've seen in this setup are 90 degree fittings. Most of these pins are press fit but look closely at the ends of the pins. If it is a screw in pin, there will be two flats machined into the end of the pin for a wrench to grab onto. If it is a straight pin, then it will need to be pressed out with a large "C" clamp setup. These can take a tremendous amount of force to bust free but once they "pop" loose, you can almost push them out by hand.
The rear spring hanger is fairly easy to do but the removing the bolts at times can be a chore. I like to heat the housing very warm, (don't incinerate the rubber insulator) so the bolts don't snap off in the cap, or hanger. I've seen severa old trucks requiring spring work and only have either two, or three bolts retaining the spring pocket cover.
Rob
Tricks I've leared through the years which have helped keep whatever sanity I have left are: (1) lots of penetrant (I like PB Blaster), (2) a little bit of heat, and (3) always hit the head of the bolt (like trying to drive it into the hole) before you try to remove it. And, usually, I "tighten" just a fuzz before loosening. I work every day on machine tools, and sometimes getting the screws out is the worst part of fixing them.
If I recall correctly, isn't that rear housing aluminum? Steel bolts really hate aluminum threads!
Kent


BMT Forum Logo

Replacing Slack Adjusters
in Air Systems and Brakes
Posted
Kent