


Rob
-
Posts
12,753 -
Joined
-
Last visited
-
Days Won
175
Content Type
Profiles
Forums
Gallery
Events
Blogs
BMT Wiki
Collections
Store
Posts posted by Rob
-
-
1 hour ago, other dog said:
Hmmm...I think you coulda' plugged that tire and made it back to the shop.
It was a hard decision to not make attempt to facilitate a repair even if of a temporary nature. However, after several hours of grueling thought processes of how to accomplish the task I arrived at the foregone conclusion of "Well Fuck it Then", and went on about my business.
I did lose a few hours of beauty sleep over this tire too and you know how much I need that.
Great seeing you post again. Sure miss a lot of the old group myself.
-
 1
1
-
-
I think it was more of a "one off" myself. I believer I seen the truck back in 1982 in central Illinois at a truck stop fueling. It was pulling a refrigerated van IIRC but that's been quite some time ago.
-
The RL series utilized aluminum frame rails which were straight front to rear. The standard R series used steel frame rails which "splayed", or widened starting about centerline of the fuel tanks forward. The transmission, or rear engine mounts affix to the frame rails in this area and are slightly angled in the R series but straight or flat in the RL series. The RS series is just as the RL series except steel frame rails.
-
 2
2
-
-
Lot easier to obtain parts for too.
-
1
-
-
13 minutes ago, terry said:
I would bet a R model mount is different from a RL mount. terry

The offsets differ for the frame splay on the standard R series. I have both types of trucks meaning an RL700 with a 13 speed Fuller, and R612 with the same transmission.
-
Just now, Hayseed said:
I've had a very Good run out of Triangle Tyres From China.......
I was considering them for my R-612 as have heard more positive than negative in their truck tires. I ran General for years and did have good service from them.In light trailer tires I've not really seen too much good service from any brand exacerbated by the production in China. Years ago when Goodyear was the mainstay on mobile homes, and many trailers, they didn't hold up well either and were USA produced.
-
Yup. All tires that are seemingly affordable come from China, or India with about the same results as far as service. They are slowly being rotated through albeit at my expense alongside the roadway. I've only had to chain the axle up once when both tires on the same corner blew last year. After paying almost $375.00 for the pair replaced after I hauled the blown ones in, they started ordering the same exact tires from Amazon at $96.00 each with free shipping. These do not match the original tires on the trailer, but rather the ones the tire dealer mounted up. I have a tire machine at the shop so not much effort once there.
I pushed for all to be replaced at the first signs of trouble but they wanted the original tires slowly expended so one or two at a time it goes..... Another pair were ordered yesterday afternoon. Of the original nine, there are only three remaining on the ground. Once the new pair arrive, another new one will go on the trailer next to this new one installed and the old one becomes the spare till the next go round.
There are no tools on the truck to change a tire although that may change if I stay hauling for them.
-
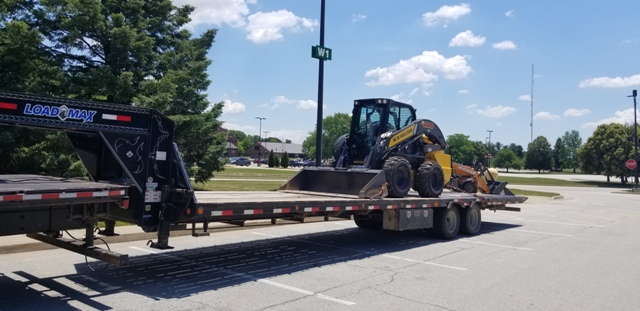
Went over to Parkland College to pick up this new skid steer used at the CNH technical center there:
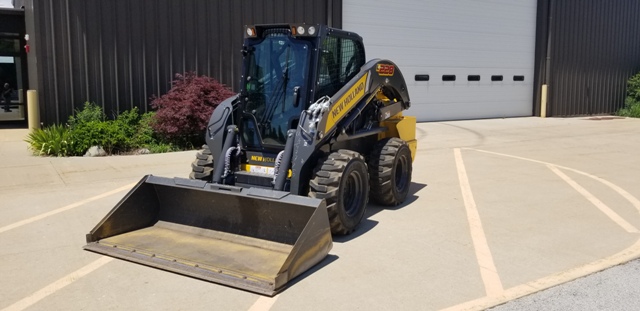
Loaded it onto the trailer like this to allow a new Gravely zero turn mower to be loaded in front on the return trip:
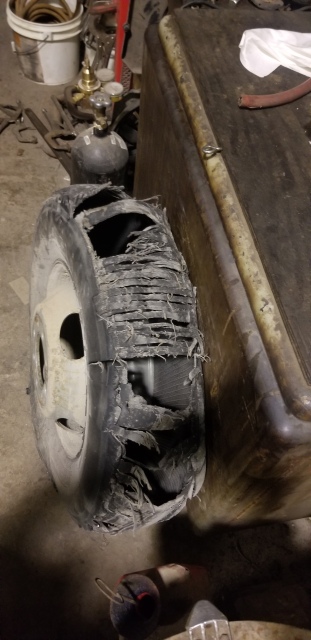
Got just about 30 miles when a strange but familiar shudder emminated through the truck. Upon a quick glance in the mirror I seen a tire rapidly discarding it tread. Once stopped on the shoulder, this is what I found:
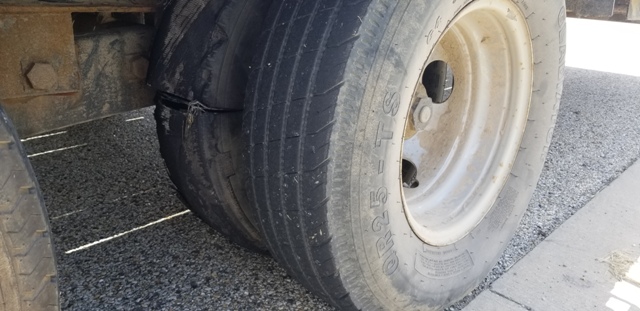
Inside tire on rear axle:

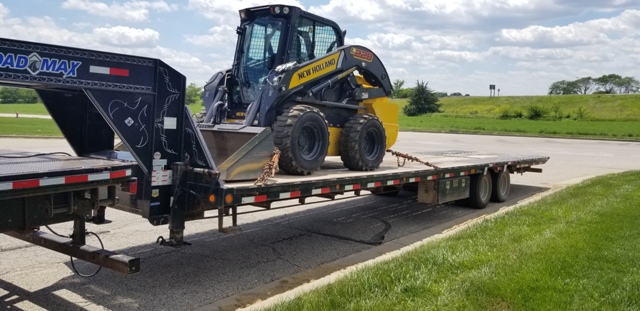
I drove the 1.5 miles or so to a "Love's" truck stop and moved the loader further forward to put the weight on the truck and remove it from the trailer suspension. The spare for the trailer is flat with two punctures I found out. After chaining down again, I got on my merry way:
I then stopped about 30 miles distant and loaded up the new Gravely mower:
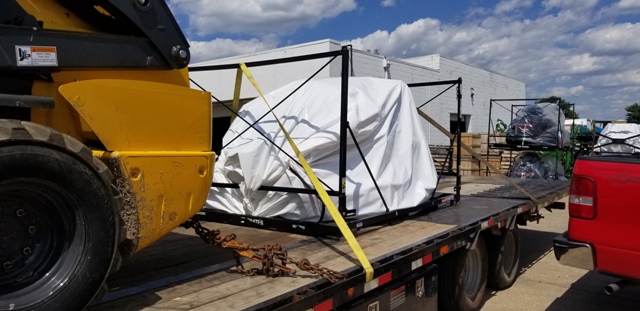
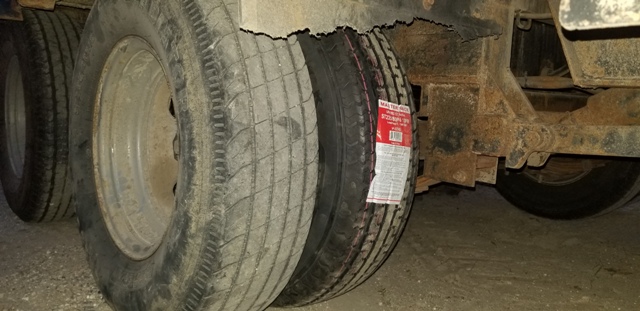
After unloading and back at my shop, I removed the tire shown, and mounted up the new as had a ready spare available:
All good in paradise again:
That is the sixth blowout I've had on these tires, (Gladiator Branded) so only three more to go. They get replaced one or two at a time to not run used next to new and at this rate, I'll probably have replaced all nine by the end of the summer.
Yes, "Gladiator" tires are chinese manufactured.
-
If the engine has an oil cooler installed the sealing rings are probably leaking which separate the oil from the coolant. Common problem on those engines with age. I've rebuilt three of mine from the same thing.
-
1
-
-
38 minutes ago, Paul prinzo said:
My Dynatard works great at lower rpms but no so great at higher rpms. I’ve replaced the terminal that threads into the injector pump that the wire attaches to, no improvement. I’ve heard that there is a terminal inside the Ambac pumps that goes bad. Anyone come across this issue? If so, is it hard to replace?
Low-speed operation being great, high-speed operation being rather poor is very common. Nature of the Beast, this is not a Jacob's engine brake.
-
1
-
-
When using that trailer routinely I did also. Five years was about it for lifespan. It hasn't been off my shop property in years now and just sets.
No cracking or dry rot evident on these at all.
-
Tractor hitch is just as good as sliced bread moving trailers around to mow. Unfortunately it brings some faults to light I did not know about.
First I pulled the skid steer trailer out to mow, then moved the car hauler trailer. Upon moving my tongue block for the skid steer trailer I noticed this:
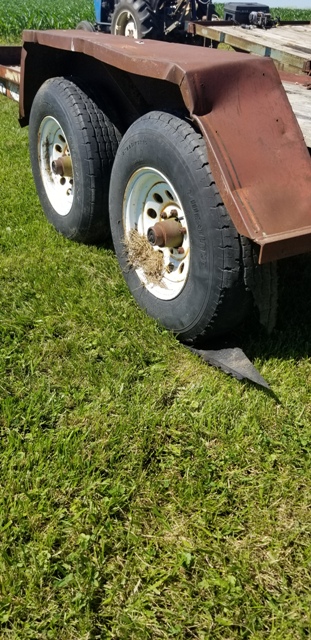
Don't guess I'll use this set of tires any longer. They don't have 200 miles on them but are over 12 years old. No flats ever either. I purchased the rims and tires together back in '09. Still full of air too. Oh well.
-
1
-
-
9 hours ago, Licensed to kill said:
My engine is a 1980, 283HP with the air to air as part of the intake manifold. Ian told it i a 676 ENDT but have also been told it is an E-6. Is it one or the other or are these two monikers for the same engine?. Also, where would i find the torque curve for this engine?.
If the engine was built prior to April, 1980, the engine should be an ENDT-676. Effective in April, 1980 and for a few years, the designation was changed to something like ETAZ673XXXX. I don't remember when, but sometime in the early 1980's the E-6 designation came along.
They are basically the same engine with the alphanumerics changing during the years.
-
1
-
-
Yup. My old Motorola flip phone goes a full week between charging where the newer Samsung phone goes three days unless it's used often. I have the screen setting to go dark as soon as you are not looking at it to lengthen the battery life.
The kids seem to be tied to some type of battery charger these days either playing games, watching videos, yakking, or just about anything else besides looking to perform work.
-
- Popular Post
- Popular Post
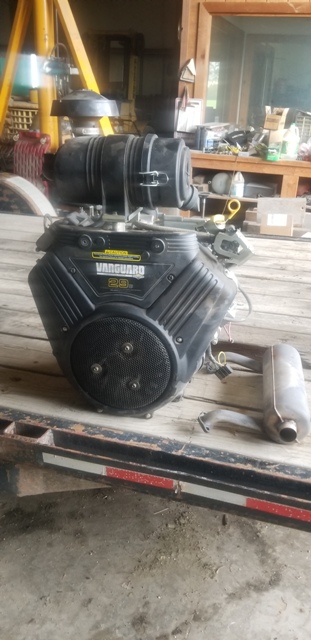
Been wanting to build a skid mounted portable hydraulic pumping unit for some time. I have plenty of pumps, valves, hose crimping machine etc. and ran across an engine the other day to use for this project:
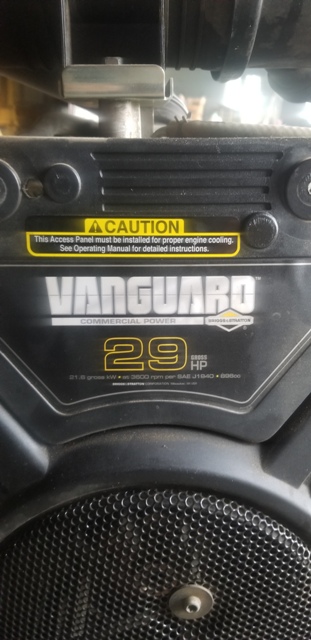
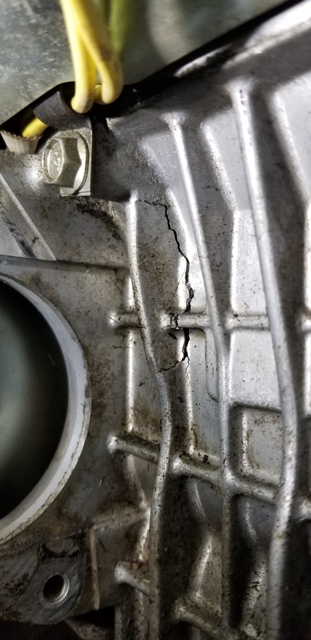
This engine runs well and only has 31 hours on it from a Grasshopper mower and was replaced under warranty. According to the owner, it started leaking oil for some reason profusely when running. However once brought into the shop it was found to have a very large "stick", or tree branch wedged between the starter motor and a strengthening rib on the cylinder block. This as can be seen from the photo broke the block:
This was over a year ago and the engine has been setting ultimately ordered disposed of. It is complete including starter and everything ancillary except a correct muffler. The one shown here has the correct flanges but does not orient properly to the engine:
Scrounging through the scrap pile of old engines, I found this other 29hp Vanguard engine short block that broke a connecting rod with a good block at low hours so brought it home also. This engine too was a warranty replacement being ordered disposed of.
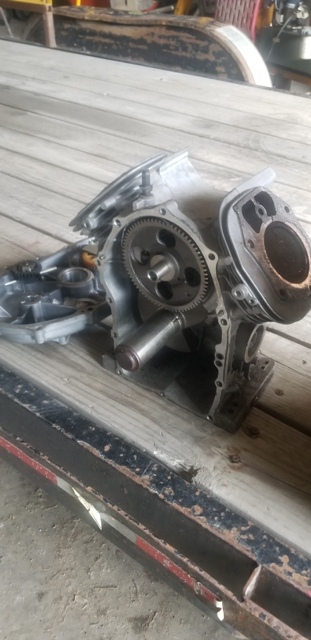
I'll attempt to steam clean the broken block and tig weld up the break first as there really is nothing internal the heat will bother. If that is not successful, I'll then build up the other good block using this engine as it's parts source to have basically a new engine.
I have a shop hydraulic pumping unit but I want something to slip into a pickup truck not requiring electricity to operate for mobile repairs and troubleshooting remote from the shop.
-
3
-
Well the combination of the zero turn Woods mower, and more powerful White "Honkey" tractor has effectively halved the time I spend mowing each session. The zero turn isn't that good in the ditch embankments fronting the shop but the tractor does a fine job on them. I've not removed any front weights but with the ground much drier and harder than the earlier spring season, rutting or digging in hasn't been a problem. Third gear in the medium speed is very good running the mower right at 540rpm and the live PTO is great. Plenty of power and dropping to second gear readily allows cutting grass and weeds over three feet tall without bogging the engine at all. Sure sounds nice when the governor asks for more power too.
With a combination of the proper ground, and implement speed, along with sharp blades yields a cut almost of "Golf Course" quality and it very well may be but I don't golf. The cut however is good enough for who it's for.
That hitch on the back of "Hercules" sure is working out well for moving things around the shop to mow also. Glad I made the purchase.
-
1
-
-
You see a few over here from time to time but not like in the COE days when they were much more prevalent. I have a couple of the Maradyne "Power Ram" styles from many years ago saved from upset trucks where they were replaced with new. Think I have a new Donaldson also. The support band and arms I always made myself and have never purchased one. Far too expensive for my tastes even in the 1970's.....
-
Almost any truck parts supplier can get these that vendors Donaldson Air Filter products:

These are aluminum and durable but the cost is pretty heavy:
https://turboprecleaner.com/product-line/turbo-iii-power-ram/
-
1
-
-
On 6/3/2021 at 12:30 PM, h67st said:
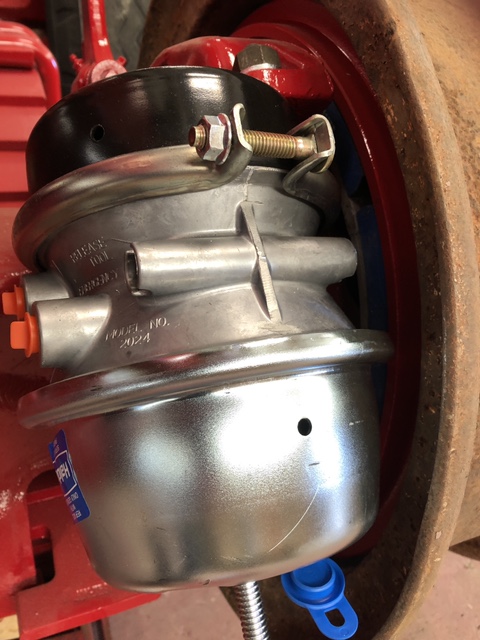
I used the schematic in this Bendix brake handbook to help with plumbing the system. I'm using Bendix valves because they're very common and cheap. dcweasel is correct about the anti-compounding, especially if you have aluminum spiders like mine. I used a QR-1C quick release valve on my rear axle to achieve the anti-compounding.
For my spring brakes, I used Haldex GC2024 which have a #20 service side and a #24 spring side. They are $92.00 with free shipping from Finditparts.com. They are adequate for a bobtail hobby truck, not sure about hauling freight with them. I rotated my spiders one bolt hole to get them away from the frame rail, but they are only about 3/4" away from the 10:00-20 rims (you'd have more clearance if you went with tubeless or 10:00-22).
1837032478_BendixAirBrakeHandbook2002.pdf 5.17 MB · 1 download
Only trouble I've seen using that setup is the heat of the brakes makes for a shorter lifespan of the rubber parts of the brake chamber which really wouldn't be a problem on a hobby or casual use truck. I did try that setup as it was easy on a tandem end dump; but it didn't hold up the best only because of the brake drum heat soaking they took.
-
On 6/3/2021 at 7:32 AM, 67RModel said:
Rob,
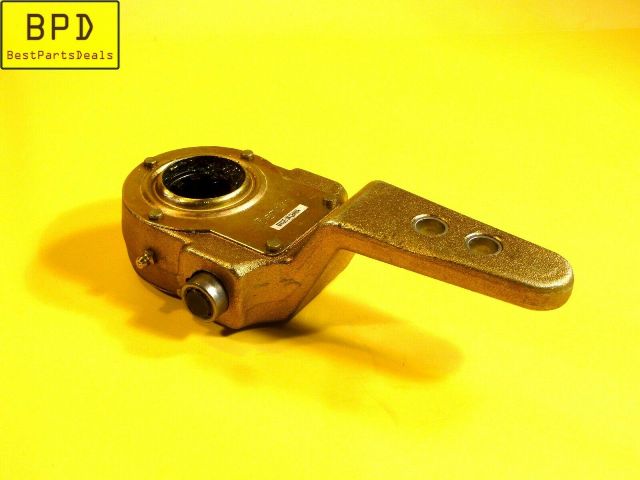
I never realized there was offset slack adjusters available. Do you happen to have a picture of what the final result looks like with the fabricated 1/2" mounting plate? I would be interested to see what it all looks like. As far as I'm concerned the air plumbing portion of this job is the easy part. Thanks in advance.
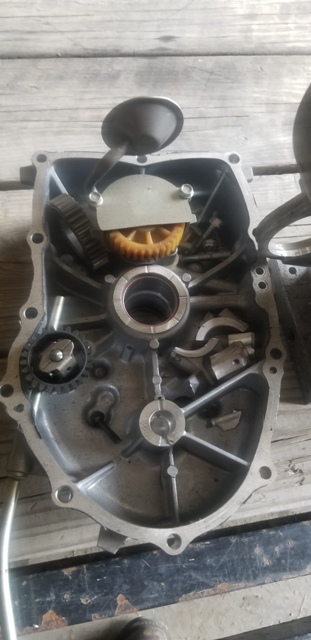
I probably do with stuck together Polaroid photos from all those years ago when the basement flooded. Basically a modified circular flame cut plate with one side being more of an ellipse than rounded. This elliptical side was to clear the inner wheel and dust shield yet yield adequate strength to not flex. There were then five holes drilled into the plate, (two mounting the plate to the spider, two mounting the brake chamber to the plate) with a larger center hole where the brake chamber pushrod penetrated. IIRC the plate mounting holes were 5/8", and the pushrod hole was 1.25" allowing for a rubber dust boot to be fitted. I always rounded the edges of the plate to not cut things like air lines, fingers, etc. Here is a single example of an offset slack. I believe the offset was 5/8" to allow you to retain your original "S" cams. https://www.ebay.com/itm/293728331804?hash=item446392a81c:g:sHgAAOSwitZgF7FK
Here is a photo of what they would look like:
I have a couple of B series trucks I plan to modify so may get you an example sometime shortly.
-
1
-
-
I'd give a look to see if the exhaust manifold doesn't have a warping issue when hot. Exhaust studs should be replaced and manifold checked for flatness whenever the engine is apart. Seen this problem on many engines over the years myself.
Wash the engine very clean around the manifold sealing areas and run it hard for a bit ensuring the squeal is prevalent. Allow the engine to cool and then with a very bright flashlight and an inspection mirror, look closely for exhaust "streaking" away from each exhaust port of the manifold.
-
Thanks for the follow up. I've not seen that problem but also haven't worked with such heavy rears that I remember.
-
- Popular Post
- Popular Post

-
3
-
3
-
 1
1
-
There are threads on this scenario from the earlier days of the site. Basically a PP valve in the dash, (PP1, or PP7) and an R12 relay valve supplying the spring brakes equipped axle(s) along with associated air line routing. Not hard to do but you will need to space those rear chambers outward from the drive tires. I used to do this with 1/2" plate mounting to the original chamber mounts via grade 8 bolts and the new spring brake chambers mounting to the plate. You will require offset slack adjusters which are readily available. I always upped the size from the type 20 rotochambers to type 24/24 spring brake chambers myself offsetting the mountings by the distance of the slack adjuster offset. This size provided adequate stopping power for a tandem end dump truck and is physically smaller than the type 30/30 chambers. 1/2" plate was stiff enough to not bend under full brake application pressure under normal conditions. Never had problems with DOT on the matter but had heard of folks doing this with 1/4" plate and having problems.
If you have someone with a steady hand a torch does a good job or these days a plasma cutter. I made a pattern and probably still have it someplace.....
-
1
-
BMT Forum Logo

175° DEGREE F - Kysor 24000 SHUTTERSTAT
in Engine and Transmission
Posted
Sounds more like he means the shutterstat that is threaded into the coolant passage which controls the shutter air cylinder to me.