


Bollweevil
-
Posts
604 -
Joined
-
Last visited
-
Days Won
4
Content Type
Profiles
Forums
Gallery
Events
Blogs
BMT Wiki
Collections
Store
Posts posted by Bollweevil
-
-
After i got all hot and bothered and sweaty, me and grandson walked down into dried up creek bed to get out of sun. Normally where im sitting, water would be over my head. Yes, that is my snake charming machete with me. randyp
Thought you might have found one of them caves, I could see you already have your pants off.
-
 2
2
-
-
Nunt uh, no way, even the pope lies, or don't tell the whole story sometimes.
I still don't believe it. No photos, no holes. Has to be a sham begging for our sympathies.
A man don't dig no holes in this kind of heat by hand.
Rob
I had to dig some holes to set some posts for my garden, 28 of them 2 ft deep. I borrowed a one man power digger from my cousin. He showed me how to get it started, and how to operate the thing, a really neat little rig, but failed to tell me that if it got hung up, to turn it loose and step away. It about broke both my arms, and beat the heck out of both legs before I figured it out on my own.
-
Do anyone know any mfg'r that sells indiviual bushing drivers? I need an 1 1/2 and an 1 1/4...all of the sets I have see max out at 1 3/8's.
Thanks
You can spend a good sized piece of change on a generic set of bushing drivers, and find that for the most part you rarely have one that will fit anything you are working on that needs a bushing. If you can find a set with a good drive handle, and at least some of the tooling you actually need, then having individual piece's made at a local machine shop is the best way to go. Ask around, if someone knows anyone that does machine work at home or as a hobby. You don't kow what you can find til you ask.
-
1
-
-
Well this crap is getting old. After cleaning parts I discovered the rt countershaft bearing in the auxilary section to allow the countershaft to rock side to side almost 1/2". Just for shits and grins, close examination of the former transmission reveals the auxilary section gearset to be in much nicer looking condition than the one I'm currently working on. The syncronizer in the new trans is starting to flake off also. The main gearset in the new trans looks much better than the former however. I'm wondering if I should marry the two best looking sections back together as one unit? I haven't measured anything as of yet and both sets are in the parts washer now. I'll make that determination tomorrow.
Regardless, I ordered new countershaft bearings for the auxilary section no matter which one gets used.
Rob
The noise associated with a 12513, comes from the rear box. If you have to use it also check the auxillary drive gear fit on the main shaft. I have seen them loose enough to flop. If you can stand it it might be a good time for the 14613 rear.
-
Here are two more pictures:
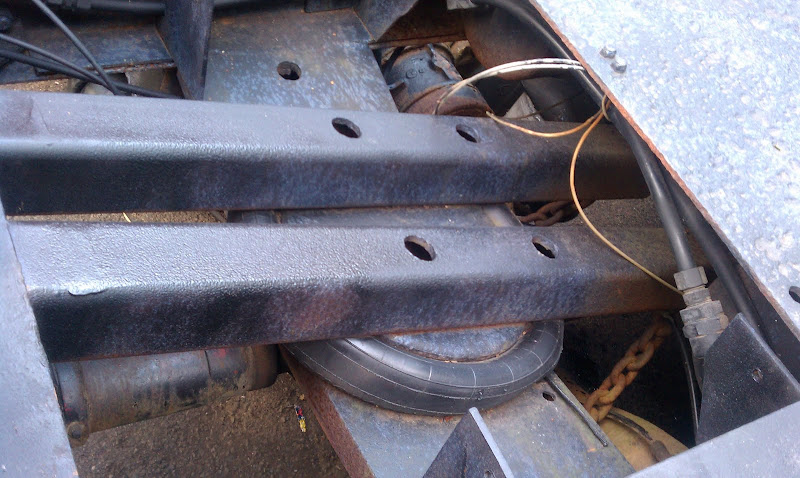
This is the part of the air bag support that is cracked clean off. Its also bent up pretty bad. Plus they welded it to the frame, something that should not be done, especially on the flange.

The suspension does have these chain mounts.

I figure I could remove the wheels if there is a problem. I am sure the ridge quality will be affected if I inflate the air bags. If I don't inflate them the tag axle brakes will lock the wheels and it will drag along the road. Still on the fence here on what to do.
You might be able to jack the lift axle high enough to to chain it in place without removing the wheels. The worse case could be that with the wheels off, and the axle not chained up, it would hang low enough for the drums to drag. If your first goal is to move it around to get in position to work on it, I would first try to chain it up. When you get it to where it will move around fairly easy, step back and look at it for a while. You have been a long time getting this far. Someone was using it like it is, and You already have on hand most of the stuff that it will take to make it work again. If it would go up and down on demand, you could live with it for a while, until you figure out which direction you want to go. The worse thing you can do is to start taking things off with out a plan. In one respect a truck is like a race car, it absolutely will not nickle and dime you to death. They will take every penny you can scrape together.
-
So the air lift tag axle on my B has a bad lifting bag. I checked out the lift mechanism and I think its partially homemade as this setup cant be what comes from a respected suspension manufacturer (Neway)
Here you see one end of the lifting lever. there is no pivot point or attachment. When the lift bag inflates, the arms simply rest on top of the cross member. This does not look right to me.
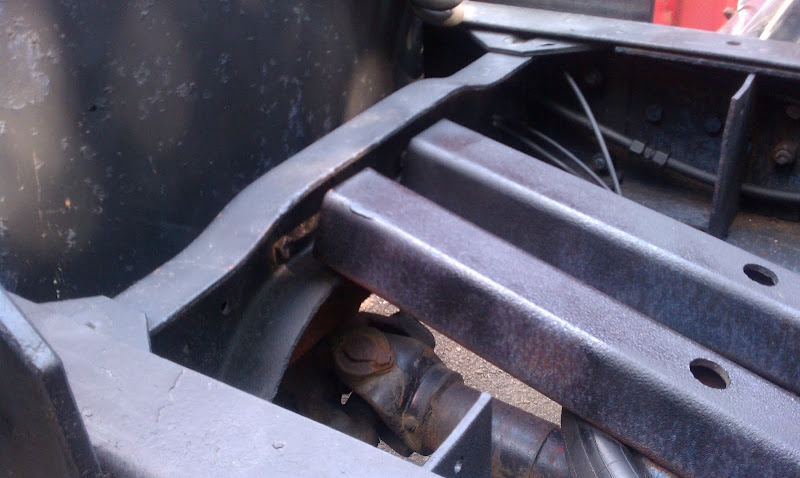
If you look the plate the air bag is mounted to is bent and cracked on one side where it meets the rail. It simply isn't strong enough to deal with the forces necessary for lifting the axle. You still cant see any pivot point. the only thing preventing the arms from falling off is the air bag. From each arm, a chain runs down to an attachment point on the suspension so I believe it is a lift axle suspension that some bought incomplete and fabricated this mess. That or the original mechanism went bad and this was its replacement.
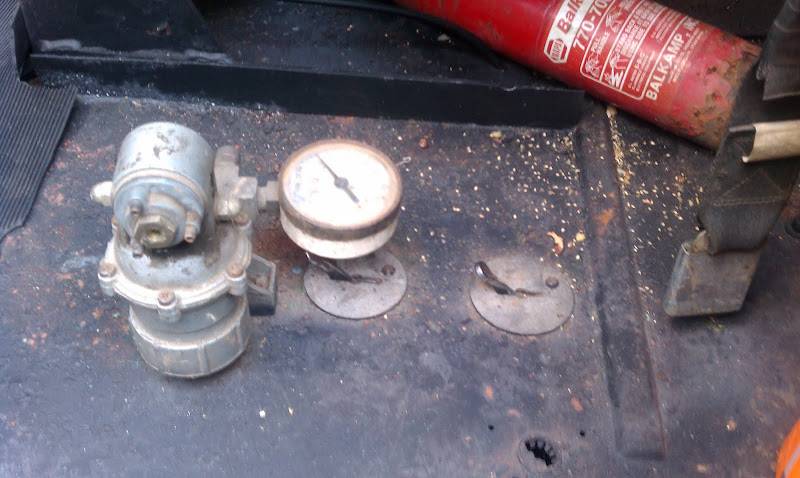
This is a problem because I cant lift the axle unless I remove this contraption and chain the axle in the up position. That or I simply leave the axle in the lowered position but I would prefer to get the setup working. I also noticed that next to the drivers seat is a an air valve looking thing that has a pressure gauge on it which has the Neway logo on the gauge. Three holes are next to the valve where hoses probably ran through them to the valve thing. Next to that valve are two air toggle switches that don't appear to do anything. The lift axle is now controlled by this control box to the left in the picture:

Here is that valve thing:
Any ideas on how I can fix this? Can I find a left mechanism or should I look at buying a used lift axle?
What sort of suspension does the tag axle have? The under dash valve is typical of an air tag set up. Flip the valve and screw the knob in or out to a predetermined pressure. Normally, just enough to equalize both axles when under a load. A neat thing about that set up was, back when the state highway scales could only weigh one axle pair at a time, they would set the scale platform for 32,000 plus allowance. If you were a little over gross you could crank the valve pressure up to shift weight to the steer, release the valve as the steer cleared the platform, and just keep rolling. Most of the tag axles that you saw were spring return. It doesn't take much to lift the axle at all. I don't see that what you have is poorly engineered at all. Figure out how it did work and fix it so that it will.
-
These are the best looking Western Stars. I don't like the newer ones where the cabs look like they've been over inflated. Todd had a couple of Low-Maxxes, I think they were called, and they were butt-ugly.
They look like a dog with it's ears clipped.
-
That knot hole isn't a defect, thats for the beer tap or the mouth tube from the keg.

If it is not a hole what the heck is it? Actually it is about the right size to hold a bottle of Tom's world famous red pepper grilling sauce.
-
A while back I started to redo the chassis and associated assemblies for my '26 AC. Rob steered me to Huck Bolts to replace all the loose and missing rivets.I got them from the local Fastenall Dealer. The chassis is 100% disassembled, A few brackets and one crossmember were made up to replace unrepairable ones. I dye checked both rails for fatique and stress cracks and found a ton of them around the rivet holes and more along the rear 1/2 of the rails. Mine is a crane carrier from new and I'm sure that has more to do with the cracks than normal use.
Now would you drlll stop holes and weld up the cracks, add a full length plate either on the outside or inside of both rails or look for another chassis. I'm personally leaning to adding a full plate to the outside of each rail and boxing the areas where the turntable mounts to the chassis. Paul
You might be ahead both time and money wise to consider new rails. If you have them apart anyway, and the rails are a straight type rail, that might be the way to go.
-
i drove one in a pete,i didnt like it,but it had the electric gas pedal shut off,that only gave you like 1700 rpm,s so if you were on a slight grade,and shifting up from a traffic light,buy the time you let the gas off the truck would slow down too fast and wouldnt click into hi,,it was a pain in the ass,,would have been ok with a little more throttle,,,who the hell designs this rediculous stuff..bob
a worthless piece of junk
-
I can't get the front bearing retaining to break free from the housing in the rebuilt/donor transmission. These things have always basically "fallen loose" everytime I've changed them before. This trans was rebuilt by an independent and they must of glued this sucker in something fierce. I've not put any heat to it but am to that point. The input shaft suffers from clutch wear in the splines and I have a new input shaft , seal, and gasket for it. I've tried slightly oversize bolts in the retaining holes offering a slight resistance and grabbed them with a slide hammer and it won't budge. I can't get to the snap ring out of the main shaft to separate the two with this retainer in place.
Any suggestions? Is heat the next option to soften the obvious sealer used during the prior rebuild?
Another quick statement and question: My favorite truck parts vendor, (who rebuilds transmissions also) has enough parts to completely built up a RTO-12513 to RTO-14613 conversion. Said they used to do this a lot during the early to mid 1980's but no longer. Anyway, they can set me up complete using my original rear housing and genuine Fuller good used, and new parts for $400.00 ready to bolt on. Think I should spend the money?
Thanks,
Rob
You will never find a better deal on a rear section.
-
Tackle this on my 98 CH day cab. New hoses, evap, ex-valve, comp and drier. All from Mack So everything new except condenser. Air temp at center ducts only 60. Slap guages back on and shows freon temp at 28-30 and head is 145 to 150.
E-block is sweating and so is suction line, drain is open and dripping.
This is on recirc. Numbers get worse on fresh.
Wassup???
Assuming that you are using 134A, I would expect to see suction pressure to be lower and head pressure a lot higher, if the system were fully charged.
-
something looks familiar about that hill
I was thinking the same thing, now come on rhasler where is it.
-
Late one evening, or either very early the next morning, as the Circus passed through Gladys Va. An Orangutan escaped from his cage, and was immediately struck by a passing automobile. The distraught driver called the sheriff, and exclaimed, come quick, I have hit and killed something, and I don't even know what it is. After his arrival, and subsequent examination, the driver asked the sheriff, well what is it. The sheriff shook his head and said, I don't rightly know. But judging by the callus's on its ass, and the furrows on its brow, it is either a long haul trucker or a domino player.
-
1
-
-
I have the adjustment tools for the clutch and need to read up on the procedure to do it right. Sounds like the one piece clutch brake is favored so I think I'll go that way. Are there any ways experience has taught rather than a book procedure to adjust one of these things?
Rob
There are times that are especially annoying when trying to adjust a Mack cable operated clutch. Replacing the worn fork and shaft bushings is a good start. Worn clevis's and pins can be compensated for if not too badly worn. Since you are not replacing the clutch, it should be close. The actual clutch adjustment is the same on any Spicer clutch. the linkage, and cable mounting points are problems at times. Setting up the clutch brake is the first order of business. The clutch brake itself SHOULD NOT be the limit of the clutch pedal travel. With the pedal at the absolute end of it's travel, adjust the linkage so the clutch brake is just snug. Then go back to the clutch. with just enough pressure on the fork to pull the clearance out of the bearing you should have 1/2 in between the bearing and brake. A 1/2 in drill bit is a good guage. At rest you should have 1/8 in clearance between the fork and the bearing. This should translate to 1 1/2 to a little more pedal travel at the top. As the clutch wears, free travel at the top goes away, As Glenn said go back to the clutch, when adjusted back to 1/2 in, you get the free travel back without messing up the clutch brake
-
Dropped the driveline for both the truck and winch today. Removed the floorpan, shifter tower after vacuming the top of the trans, and all bolts except one in the top center of the flywheel housing. I've started on the jack adapter using the supplied dimensions along with an illustration for a guide; also using the transmission to be installed for a template. Damned 1800 series driveline is heavy I'll tell you that much! So far not even a scratch or donation of blood to the cause but it's not over yet. I ordered a throwout fork and bushing set that should arrive tomorrow. I'm also going to install a two piece clutch brake as the one that is installed currently does not work at all. I know I should install a new clutch but this one doesn't slip, or chatter when empty. I hate doing something twice but really dislike throwing "Franklins" away if unneeded. Planning to rebuild the top cover this evening with new slider blocks and shifting forks. Probably not going to dump 28 pints of synthetic transmission lube into it right off. I have some SAE50W motor oil I'll start with. I know nothing about the trans other than it is said to be good.
Rob
[/quote
I would like to know why you prefer a two piece clutch brake over a one piece with the belleville washer, which is a lot more forgiving. I have replaced clutch brakes for other people before, but can't recall ever failing one myself.
-
I suppose I have led a sheltered life, as I was not aware of an overdrive 10 speed prior to the FRO series. The 12513 with it's 1st generation spur cut gears has earned a well deserved rep for being noisy. All the racket is in the back box though. If you wanted to you can replace the rear box with a 12509 rear, and at the same time over drive the front box. That way you can use the transmission you already already have.
-
The 9 over's are a .73 the 10 overs are a .74 overdrive respectfully. The 10 spreads the ratios a little differently. On flat ground, you wont see much difference. On a long grade, when you have to drop one gear, the difference begins to show. as rpm max's out the 10 will be pulling and the 9 will be against the gov as road speed drops off. Go to Road Ranger.com. Close to the bottom of the page, click on specifications, then choose transmissions. You can find more information than you can use.
-
I actually do with a sub micron guage for six hours minimum. This boils any moisture from the system. I then charge to 50 psi with nitrogen and let dwell overnight. Then pull the system into a vacume of 29.75" to purge the nitrogen charge. Typically another operation is performed while this is going on so the actual clock time is not billed to the customer. 1.4 manhours is what book time calls for evac and recharge on automotive applications. This is fairly accurate if there are no problems present. It costs a bit more for the precautionary measures taken, but comebacks are extremely seldom and I've really never had problems getting compensated properly as my proceedures are well known around here. Typically I'm billing 2.5 hours with a $35.00 upcharge for the extra nitrogen charge.
Prolly couldn't do that without a good repore with insurance adjusters.
Rob
Nitrogen, under pressure, and a spray bottle of soapy water, also makes for a great leak detector.
-
You have a very valid point in longevity as installed OEM. However, if a three micron filter is incorporated into compressor discharge line when built, the compressor has the very real possibility of lasting as long as the vehicle provided no corrosion or impact disturbs the integrity of the system. If all the joint were silver soldered, there would be no rubber sealing rings to leak. As compressors run they minutely wear and put abrasive particulates into the components of the system. These can eventually plug or restrict both liquid refrigerant and oil mixture compounding the problem of wear. With the added restriction(s), head pressure builds higher than normal and even more wear ensues. Viscious cycle is what this is. With a large capacity filter installed from the start, these particulates are captured and not allowed to pass this point. The balance of the system remains clean and runs a long time before failure.
This is why a compressor in a home system last so many years in comparison to automotive usage.
Rob
Clean and dry is a prerequisite for longevity. Dichlorodifluoromethane + even small amounts of H2O combine to create hydrocloric acid, or something just as nasty, the results of which cause more damage than normal wear particulates. Nobody does it, but you need to pull a deep vacuume for at least 4 hours when a system has been opened.
-
They were great compressors till the piston rings and seals started to leaking from age. This caused the crankcase to pressurize and blow the double lip carbon packing seal on the crankshaft. When they were in good shape, you could check the crankcase oil without dumping the charge. If you removed the side plug and pressure blew it out of your fingers, it was time for rebuild.
The valve plates were the most problematic of the system. In cars, the mechanical POA valves of the late 60's to mid 70's were always freezing from being stationary during the cold months and head pressure would rise uncontroled until either the high pressure cutout disabled the current to the compressor clutch, or the valve plate in the head distorted dissallowing pressure buildup. Either way, it was time for rebuild.
They made great mobile air compressors too.
Rob
Another point worth considering, is that the service life of an AC compressor on a class 8 truck is nothing near the half life of Radium. In the 70's a Buick or Old's with 150,000 was was was pretty much used up. We put that much on a truck, in a year easy, with the same basic compressor. If you have a lot of miles on a compressor that is leaking, replacement is probably a better choice. Especially if you figure down time as worth anything. That said, I would probably take 3 or 4 apart to make 1 good one. If you you don't have a compressor clutch tool kit, that is about 1/3 the price of a compressor.
-
They were great compressors till the piston rings and seals started to leaking from age. This caused the crankcase to pressurize and blow the double lip carbon packing seal on the crankshaft. When they were in good shape, you could check the crankcase oil without dumping the charge. If you removed the side plug and pressure blew it out of your fingers, it was time for rebuild.
The valve plates were the most problematic of the system. In cars, the mechanical POA valves of the late 60's to mid 70's were always freezing from being stationary during the cold months and head pressure would rise uncontroled until either the high pressure cutout disabled the current to the compressor clutch, or the valve plate in the head distorted dissallowing pressure buildup. Either way, it was time for rebuild.
They made great mobile air compressors too.
Rob
-
"Lester" is a rebuilder and not a manufacturer. Don't know if they are still around. Replace with either a York, or Sanden depending if the existing is a reciprocating or swash plate or axial design.
Rob
I do not know which, or what might have been available in your time frame. For a quick ID, the body of a Sanden compressor is round, and the body of a York is square. Back in the day, when confronted with having to replace a york compressor I would always specify a Tecumseh replacement. The reason being, the York housing was aluminum, and the Tecumseh was cast iron, and seemed to last a lot longer. Either was supplied with two versions of service port seals, which do not interchange. Today, a Sanden compressor is a much better choice, even if you have to round up the correct mounting brackets. You can buy a Sanden just about anywhere, but they are model specific. There are many different clutch, pulley, and service port configurations, even though most mounting points seem to be the same. I should mention, to further complicate matters, that the York type compressor always seemed to come less the clutch assembly. You had to transfer yours to the new compressor, or buy a new one separately.
-
thanks. is there a way to tell if my rears are 38k by looking? just noticed on my bill of sale that states 44,000lb rear end and 20,000 lb front. so i guess i should have a transverse rod on the 2nd axle also. anybody have an idea where i can get a transverse rod kit if available.
thanks again
44's will have 6 axle retaining studs, or bolts.
BMT Forum Logo

Steel Front R600S
in Antique and Classic Mack Trucks General Discussion
Posted
Soliciting. Trucks, Pictures, dang. How would you go about unsoliciting someone? Having pictures would make denial awkward.