paulbrook Posted December 31, 2009 Share Posted December 31, 2009 Hi folksMay I just take this opportunity to wish you all the very best of fortunes in 2010. Whoever you are, and whatever you are up to I hope that the coming year is one to remember (in a good way!)In the meantime I am plugging away with the restoration of the old Bulldog - and I have posted some pictures of the engine stripdown on the website www.rustytrucks.com - just follow the "what's New" link on the homepage.In the meantime if anyone out there has a set of standard AC pistons (1929 is the build year) and valves I would be very keen indeed to make contact. If I cannot find some (and I am sure there are some out there somewhere) then I will have to have some made (gulp....)If I do have some made, does anyone else want a set? (as it will be more cost effective to make a whole bunch as it will be to make just one trucks worth)Anyway, enjoy the pics and have a great New Year! Quote Link to comment https://www.bigmacktrucks.com/topic/12012-mack-ac-engine-strip-down/ Share on other sites More sharing options...
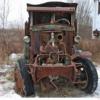
steve s. Posted December 31, 2009 Share Posted December 31, 2009 And Happy New Year to you Paul. You are making good progress. I'm curious about your chassis preparation. Did you do any abrasive blasting or sanding/grinding/wire brushing ? What is the rust stop/primer product you used ? The photo of the chassis in red primer looks real good. On the other hand, the engine looks pretty bad. Do you plan to install cylinder sleeves? Is that why you are looking for standard size pistons? Steve Quote Link to comment https://www.bigmacktrucks.com/topic/12012-mack-ac-engine-strip-down/#findComment-46229 Share on other sites More sharing options...
paulbrook Posted January 1, 2010 Author Share Posted January 1, 2010 (edited) Hi SteveHappy New Year! Glad yo like the progress- it's slow but steady. As far as the chassis was concerned I blasted it with a water/grit system which is better than grit alone for getting the sticky tar/oil/grease residu off - plus it is a lot less dusty. Downside is the dreaded water, and even though the metal is clean it very quickly gets a very light film of surface corrosion on it. I killed that off with some stuff called Fertan, which not only neutralises any corrosion but soaks into all the nooks and crannies and kills the rust there too (great for chassis plates and seams etc). I put that on with a garden spray, then pressure washed the whole plot again (no rust this time because the Fertan keeps working)before spraying it with 4 coats of resin-based primer. There is still quite a bit of tidying up to do on the chassis (a couple of cracks to weld up, a spring clp or two and some tidying here and there)but that will be done pretty quick once I get around to it. I would normally put a coat of gloss paint on even before finishing things off because primer holds damp and can be troublesome if left un-top coated for a long time (especially over an English winter!) but the chassis is in a shed right now so I have not bothered (also I am curious to see how well the Fertan copes - I have used it on small parts before but never on a whole truck)The block is being sleeved back to standard - as you will have seen it was in bad shape. I am doing another experiment here too, normally a sleeve gets pressed in hard, but I am going to use a less tight fit and ceramic paste to keep the stresses in the block down. I have also got back the first of the heads from the specialist welders (the one that used to have the big hole in it) and will post pictures soon - they have done an amazing job and I am really pleased. So although it is bad right now, I am very confident that it will be in good shape and barking very soon!All the best, Paul Edited January 1, 2010 by paulbrook Quote Link to comment https://www.bigmacktrucks.com/topic/12012-mack-ac-engine-strip-down/#findComment-46284 Share on other sites More sharing options...


Recommended Posts
Join the conversation
You can post now and register later. If you have an account, sign in now to post with your account.