


treemuncher
-
Posts
47 -
Joined
-
Last visited
Content Type
Profiles
Forums
Gallery
Events
Blogs
BMT Wiki
Collections
Store
Posts posted by treemuncher
-
-
Hey, I have been doing a lot of research on adding hydrogen to the fuel mixture to get better mileage. I've found a couple company's making the hydrogen boosters and I was wondering if anyone has tried it on thier Mack truck.
I've been running a propane injection system on my Ford F550 for years when I need the extra muscle. Too costly to run it full time and the extra power stripped out my stock clutch!

I know that the propane acts as a catalyst to provide a more complete and energetic burn for the diesel but how does the hydrogen work?
I've not heard of the hydrogen booster before this post. What websites did you find these units on?
The propane system increases my fuel mileage but the extra cost of the propane precludes any monetary savings. I've learned to keep the propane injection throttled back a bit but the extra power is great for those big hills and short passing lanes! A couple hundred pounder propane tanks strapped on the back of my Mack would be great, but I could not stand to lose my E9 if something went wrong.
-
I had another thought this morning. Now knowing about the internal stops and the types of adjustments required on these boxes, maybe someone had removed the pitman arm in the past and put it back together one or two notches over from the original position. That is if it is possible to reassemble it in the wrong position.
This would account for full power all of the way to the right stops and an early loss of power towards the left if I am understanding the previous posts regarding how the mechanism works. With the low mileage on the truck, this would make the most sense to me and it would also be the easiest fix. Somehow, I'm not so sure Mr. Murphy and his laws would let this pass if he knows anything about it, but it is the first thing I will check.
Thanks to all for your input.
-
If your tranny has a basic 5 speed with the air shift rear compound on the stick with H-D-N-R as read left to right and the dash mounted front compound deep reduction then you likely have the TRTXL1070(
 12 speed. That's what I've got in my RD. The front compound can only be used in the first gear but is good for D, H and R.
 I've never had a tranny that offered 5 speeds for the pto unit but is nice to have a selection!
I don't know of any way to adjust the retarder, although I wish I could.
If you have the E6-350 4v, there are some posts on how to turn up the fuel. You will need to do a search and make sure it is for the right pump. I did that to mine and it made quite a difference. You might also check that the puff limiter is working correctly or is removed so that it allows the rack to travel to the full fuel position. Watch your pyrometer and turbo pressure to make sure that you don't over do it and cook anything you don't want melted or scorched.
-
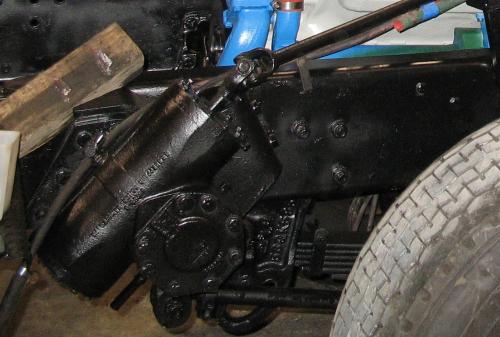
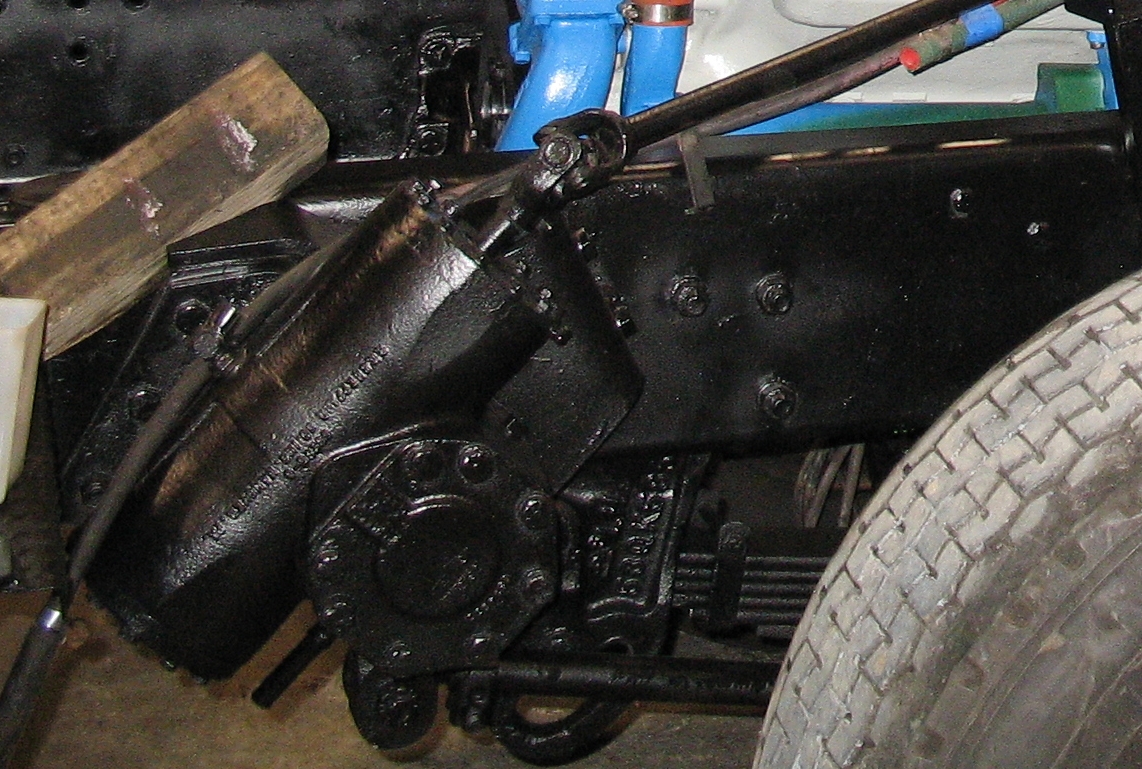
The name that is cast into the steering box is R.H. Sheppard Co. from PA. I did not see a tag or number on the unit at this time. According to the build notes from the Mack Museum, it is a 245-2204 steering unit 592s Shep-pwr(integral).
Where can I find service literature for this? I can likely do any repairs myself. I've done quite a bit with hydraulic systems but pictures and exploded views really help. I'm sure there is a specific set-up sequence to follow as well in order to get everything adjusted evenly.
-
My RD822 has power steering and a massive single steering box. The power steering pump is gear driven and the reservoir is full. When I try to make a sharp turn to the left, loaded or unloaded, the last two turns of the wheel prior to the stops are very difficult. Steering to the stops on the right turns is a breeze. I'm afraid I will get dizzy if I have to make all right turns on every trip!
What should I be looking for to fix this issue? The king pins took grease without problems, the truck only has 91k on it, I did not see any damage to any of the components on a visual inspection. I'm thinking it must be the hydraulics because it only happens when turning to the left and the engine speed does not make a difference to the effort required to get it to turn.
My Superliner was like this sometimes but I always thought that was because I took up the slack in the steering box. I've not made any adjustments to the steering on the RD yet. If I can get the left turns as easy as the right turns, I'll be happy.
-
I made some adjustments to the throttle linkage because the throw did not appear to be correct. At full pedal mash, the air cylinder did not bottom out the throttle arm. It was as if the air cylinder was not moving far enough.
I also pulled the air throttle out and did some clean up and new o-rings on that part. It should be noted that the o-rings must be the correct size on the throttle body parts. I used what I had at the shop which was a tad overly thick and it caused the throttle to jump around alot due to the tight fit. The old part was reinstalled and that problem was solved.
While it was in the shop, I tested the diaphram on the puff limiter. It was fine. All of that assembly was pulled apart and cleaned up as well. So, I made some other adjustments while I could see how it worked. Now, the throttle response is much snappier, it lets out just a little black-grey smoke and seems to run somewhat stronger. I turned the fuel up just a little but my turbo pressure still has not exceeded 22psi, but then again, my trailer is still empty for the road tests. The next equipment move should tell me more.
I'm also going to post a question in steering & suspension regarding my power steering. It turns great to the right but it gets tight when turning to the left and will not go to the locks without extreme effort on the steering wheel.
-
Both levers !THE STOP LEVER wether air or cable poperated has to be fully on! And the throtle needs to go fully on to acheive comlplete power!Once youve run this abit you may want to juice it sum!The straight fuel pump didn't put out as good as the v pump! you can remove the (AFC)smoke limit divice at the top rear of the pump and slide the fuel plate forward 30 or so thou to get some more jam from it! You'll find the info to do this on this site> http://www.tstproducts.com/INSRUCT98.pdf
22 psi Is MAYBE 400 hp on a v8 what is the rating on the VALVE cover!
NOTE anything more than 28 psi boost your running the risk of pounding out your wristpin bushings!
USE THE POWER WISELY.
It's a 500 hp E9.
Maybe I need to mount a 100 lb propane cylinder on the back end and put in the propane injection kit! The propane kit gave my F550 so much torque that it stripped out the stock clutch on a long hill! Propane makes a diesel much more fun to drive, that's for sure.

I'll be pulling the truck into the shop today to check on the throttle linkage. I know the stop lever is set correctly from when I installed the motor. If the air linkage is working proper, I'll set the fuel up a little bit at a time until things look right by the numbers. I certainly don't need to worry about trashing this engine.
-
 hello guys i just bought on e bay a E9 truck engine workshop repair service manual my question is is this the same manual than in the usa or is it much diferent its about 170 pages whit detail fotos in it.i think in great lines its the same.how has the answer for me thanks to you all.gr rene
The E9 manual I have is dated March 1993 but it shows a 3rd print date of November 2000 on the inside page. 5-102 is written on the lower right hand corner of the front cover. This is the OVERHAUL PROCEDURES book. Total page count is 186 numbered plus the index pages. I orded it from autorepairmanuals.biz for $29.95 + shipping.
It is not an all inclusive manual. While it does cover most of the necessary material to work on this engine, it will not include anything about the clutch, detailed specs of the motor or any external accessories. It does have all of the required information for reworking the heads and rebuild information of the entire engine assembly.
If you need to work on more than just the engine, you will need other books than this one.
-
Last night I found the link to the Eaton Clutch video. I forgot who posted it
I beleive that be me!The thing the video touches on but dosent ephisize is the linkage adjustment!Get that clutch arm set properly and the rest is a cake walk!If you are using an easy pedal clutch and the linkage is not set correctly and you shoot for their measurments it will slip!
Them dam air throtles are a pain!You can tweak the peasure at the foot valve a bit but for the most part you need to mess with the linkage till you get it to hit the stop fully!!this is and rd 800 right?I would get or make a cable setup simular to the superliner set up it will make your life much simpler!SEE if Barry can set you up with at least a cable and devize your own pedal.
That v8 should pull like a train too IF you got full throtle and the stop is going FULL ON!Have somone push on the throtle and confirm at the pump that the lever is going full on! on both levers!The other posibility is the smoke limit diphram MAY have a hole in it!A good running V8 will make 24 to 28 psi boost and stay under 1000 on the pyro!A HOT V8 will make 28 to 32 psi boost and stay in the same heat area!
Yes, this is the RD that has the E9. My engine is running about 20-22 psi max boost. I have not seen the pyro get past 900 degrees. Both of these guages are brand new so they should be reliable. I'll have to check the throttle linkage this weekend when I can get an assistant, or cut a 2x4 to length between the seat and the throttle.
What is meant by "both levers" on the throttle adjustment. As far as I know, there is only one servo on the left side that operates the throttle.
I'm hoping that dropping that rocker arm assembly on #1 & #2 did not damage anything. It operated for 20-25 miles like that to limp on home. Other than bad fuel washing, I would not see it as too much of a problem. Without oxygen, the fuel should not have been able to ignite and as thin as the fuel is, it should have been able to bypass the rings. I was careful not to overheat anything on that trip home that night.
Thanks for the input.
-
Last night I found the link to the Eaton Clutch video. I forgot who posted it but many thanks. That's a great video regarding how to install and set up the clutch. I re-adjusted my clutch and rechecked everything this morning. All was set to spec, now. Bob-tailed it did not seem to slip. With the lowboy and 25k lbs it slipped a little and then was ok. I moved the trackhoe this evening (50k lbs + 20k lb trailer) and I could slip it a little in high gear but then it seemed to dry out and hold well when I had to climb a steep hill on a side road heading to my jobsite.
The engine is still leaking oil, very badly. While I did not do a complete rebuild, just a valve job and head gaskets, I replaced the majority of the gaskets and oil hoses to prevent leaks. The liners still had light hone marks and few, if any, scratches. Everything looked really good inside the motor. Now, I still can't see where all the oil is coming from although it looks like the rivets at the draft tube connection might be the cause. When I had the engine out, I put in all new hoses in the valley and all new gaskets. The only other culprit could be the back of the injector pump.
As far as the rest of the engine goes, I am not impressed with the E9 at all. I don't expect it to run as fast as my WRX but it is still lacking power. I've never seen any black smoke and I am wondering if the air throttle is fully opening the injection pump. On a long pull, the pyrometer has not exceed 900 degrees, empty or loaded. The smoke that does exit the stack is usually nearly white or light in color but never black. I don't know if this is the emission controlled throttle or lack of fuel. All new filters were installed so that should not be the cause.
Does anyone have any suggestions on checking the air throttle? It acts as if it does not deliver full fuel flow when the pedal is on the floor, sometimes. The pedal will also make a funny sqeaking sound after crossing a rough area in the road, almost as if something in the air valve is loose or leaking. I think I miss the old cable rig on my E6. The E9 sounds like a freight train, which is cool. Now if I can get it to pull like one, I will be satisfied. When I pulled the trackhoe today, it was a little faster than the E6 but not by much and that's not good. My E6 was never over enthusiastic.
-
 1
1
-
-
Update: After cracking loose each injector line and listening to the difference in rpms, I determined it was #1 & #2 cylinders that were not operating.
After pulling the right fender off and getting under the rocker cover, it was determined that the rocker arm assembly had come loose, jumped the push rods and snapped one of the bolts off with about 1/2" threads left in the head. I was lucky enough to get the remains out of the head with just a sharp punch and a small hammer. Some of the holes around the base of the mounts were less than perfect but a little file touch up put things back to a flat state. I found 3 leftover 7/16 grade 8 bolts from my previous exhaust re-work that were perfect. I used the least damaged old bolt to make up the fourth unit. A new o-ring, some oil and locktite and things are now back together. The motor sure sounds better but not as good as "killer" the pullin' rig!
I must have missed torquing down those bolts on the rocker assembly during the re-build. I doubt there was any other way that they could have come loose in 50-60 miles. Other than a tiny chip out of the head next to the broken bolt, nothing was hurt but my backside from me kicking myself.

I hope to road test it again tomorrow after I finish with the mirror installation. The next drag will be about 52-55k lbs when I move my trackhoe. After that, I have a D8 to move and that should be the real test. If the clutch is not slipping with either of those loads then things will be looking pretty good.
I would still like to know what the factory's idea of run-in and retorque procedure is supposed to be. After the initial fire up, I let the engine run for about 30 minutes at 1200-1500 rpm with no load. I pulled it back in the shop and retorqued the next morning when everything was cooled back down. I don't know if this was the right way or not but there did seem to be a considerable amount of take up on the retorque.
-
If you had i guess you are talking about head gaskets leaking or blowing you would hear them making a leaking copression noise like leaking compression to the out side. But if they blowed that soon your engine has a problem other than a torque procedure. I know old boys that dont take time to retorqe and dont have that much trouble. i guess you check the liner protrueion and the top of the liner were not damage.You probley would have compression in the coolant if you had a head gasket leaking bad enough to loose power.It i were you i would find the clyinder that are missing and that is easy and then pull the valve covers on that cylinder and then see if a push tube did not jump off. I my self let the engine get 5 to 10,000 miles on it then let it cool and retorqe by backing off one head bolt at a time 1 turn and retorque it and go to the next bolt and the reset valves. I have not worked on the E9 very much but the 864 865 was my days and the thing you dont what to do is start tear it down llok for the miss. find it firsr and go on it may be a missing injector ,i mean they may have been ok before you pulled it down but any thing can happen when you are around a little dirt that is on all trucks and who knows why a push tube kicks off but some time they do. I dont know what you did to it but you will find it when you start checking for a miss.
I've had head gaskets let go on other engines. They do not always make noise to let you know compression is lost, nor do they always leak into the coolant system.
My plan is to start cracking injector pressures and using an infrared temp probe this AM to determine which cylinders are having a bad day. I've got a cylinder compression tester to check with after the preliminary test is done to see how bad things are.
What is your definition of a "push tube"? Are you referring to a pushrod that operates between the lifters and the rockers?
My liners spec'd out fine during pre-assembly measurements. Everything was re-assembled with care and done by the book. Even the torque wrench was new! The liners were not removed from the block. Only a valve job, new gaskets, seals and painting were done.
Thanks for the input.
Does anyone know if the retorque should be done with the engine hot or cold?
-
I finally got the E9 all back together and cozy with the frame. The test driving bobtail was fine except that it was slipping the clutch a little due to the torque and maybe some errant grease or oil on the flywheel. The clutch was re-adjusted and I took it out to pick up some equipment with my lowboy. While the trailer was empty, I had no problems but after I loaded up with about 25k lbs of equipment, the ride home went real bad, really fast. I'm pretty sure a couple of head gaskets let loose as I lost a lot of power and it started running very rough. I made it home, but it was a slow ride.
The only thing that I think may have gone wrong on my reassembly would have been the run-in and retorque procedure. I am a meticulous mechanic. I don't think that I missed anything on reassembly. The book was very vague regarding initial run-in procedures.
My questions:
1) What is the correct run-in procedure before retorque of the heads?
2) Should the engine be hot or cold during retorque?
I was so pissed with the whole deal that I parked the truck over the holiday week and left town. Now I have to face reality and get busy with it and determine if the head gaskets did go. If a simple retorque procedure can't fix the problem then I guess I will be yanking the motor out of the cradle, again
 I am not happy with the machine shop that did the valve job as they banged the heads around and left scratches that cross over the fire rings. I think this led to the problem.
 The block measured flat enough with the feeler gauges, as did the heads but both surfaces looked less than perfect. I think the motor had a bad gasket or two on it for a long time before I adopted it. Any suggestion besides finding another heart for the patient would be appreciated.
-
I've been surfin' the net this AM on the wife's high speed connection and found this video of a Superliner with a "Super" E-9.
I've never been to a truck pull, but now I might wish to. Very impressive pulls. I sure wish my dog's heart had that much gusto! It's almost as if someone fed that puppy speed with his superpuppy chow!
Do a youtube search for user rab6030 to find all of his videos of this truck.
Next time some loser tells me I should own something besides a dog I'll have to remember this video to get 'em educated.

If my old Superliner was this fast, I would not consider replacing it.
-
Many thanks to all respondents for their input. Please see the update that I editted into the first post for alternative methods of securing the exhaust bolts. If and when I get time, I may try to post a Wiki page regarding my experience with this matter. I sincerely hope that this post will help others in the future.
-
Would you please clarifi if you have a V pump ( AMBAC) Or Robert Bosch! If you have robert bosch use the v pointer to set the valves . The p pointer is for instalation of the fuel pump! If your using the v pump then the tdc pump pointer valve set pointer are all the same one mounted right hand lower of the timing cover directly behind the AC pump if equiped!If the directions you have are not for the robert bosch style pump engine which was intoduced in the late 80s early 90s there will be no mention of the second pointer.the manul u are useing may not be for that engine! Rule of thumb ! If that engine has a STRAIGHT fuel pump ( ROB Bosch)
USE THE V Pointer to set valves If it has an ambac pump that looks like a mini v8 in the valley then use the tdc pointer to set valves.
By the way if it has the rob bosch pump the fuel lines can be a real bear to get sealed to the injectors ,be prepared to buy several injection lines before your done!
My engine has the Robt. Bosch pump. I've reset the valves as of today and the difference between using the P and the V mark is minimal. About 0.002" difference was noted on a couple of the valves when I checked them before resetting them to the proper timing mark. I don't see how the engine could be damaged if the wrong mark is used, although I do prefer to have the timing set correctly.
The engine is now back together, running and awaiting a road test. It should be noted that on the retorque of my heads after the initial run in period that there was a significant amount of take up on the re-torque. While none of the bolts were loose, every one of them seemed to take up considerably more slack when re-torqued. I don't remember if I ever re-torqued my E6 a couple years back, but I will always check after todays demonstration. It is time consuming to perform but it should be well worth the invested time to do the job right!
Thanks to all who posted their helpful opinions on this matter of correct valve timing.

-
I've used the input shaft from a roadranger transmission, (two inch) for years as a line up tool. Works flawlessly.
Rob
THAT is by far the best and easiest way to do it. I did not have the parts laying around so I manufactured what I needed. Wood is easier and faster to cut than steel and works fine as an alignment shaft.
-
I see ya have the robert bosch pump did you set the valves on the v mark?
Not yet but before it is started, it will be.
Another tip for clutch alignment: the width of the spline was about 2 paint stirring sticks in width. I had already cut a pilot shaft out of wood on the lathe but I did not want to take the time to make splines. After the pilot was inserted through the disks, I clipped (with wire cutter dikes) two strips from an old paint stirring stick and drove those into the spline to align the two disks. Drive the pieces in from the flywheel side. Let them be a tight fit on the driven in side and clip off any excess. You only need to get one spline groove aligned. Secure the clutch flywheel to the spring plate with a couple of wire ties. Use 2 long bolts with the heads cut off as alignment pins to seat the assembly. Once the bolts are started on the spring plate, cut and remove the wire ties while the assembly is still loose. Tighten the spring plate and when the pilot shaft is pulled out, the pieces of the stir stick will fall down and can be blown out with an air hose.
After this is completed, stab the motor to the tranny and bolt it down!
About 2 hours later, the motor is mounted back into the truck. Now to start with the hoses, wiring & other connections.
-
Align the discs as close to each other as the splines will allow...
Thanks, Maxville. That what I thought was right, but I was unsure. It's much easier to make sure than pull the engine again after realizing there is a problem!
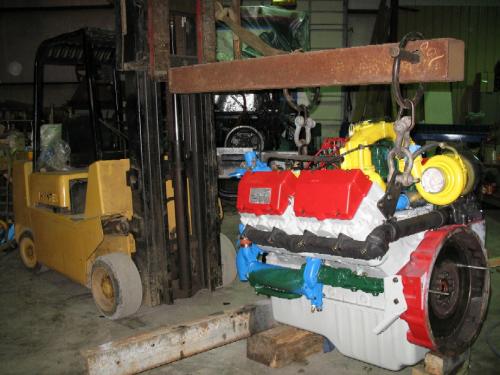
For those who need ideas on an easy engine pulling unit, see the enclosed photo. My forks are spread approximately 15 inches - the same width as the lift rings on the motor. I've slid a 6" x 6" steel tube over the one fork to provide the required reach to the back ring. A cross piece at the end of the tube ensures that the load won't jump off of the end of the tube. There are two pieces of 2x4 stacked below the fork at the base of the 6x6 tube to keep it from tilting too far down. I also secure at least one lift ring with a tie back anchor strap so that the whole load can not slide forward and off of the forks. It takes a little throttle to lift this motor but the ride is solid and this is the easiest method I know of to pull or install a motor when working alone as I usually do.
-
I'm trying to put the clutch back on the E9 but my paint marks for alignment have become somewhat less than legible from the parts washer. I can see my marks for the flywheel and backing plates but not for the disks. I don't want to put this together the wrong way.
What is the correct alignment of the 2 disks? Inline, slightly offset or completely offset?
I know that the splines must be aligned to slide back onto the transmission input shaft and I've already built an alignment tool to get them centered.
Once this is set right, I can put the motor back in.
-
Thanks for the reply.
The Mack museum sent me a copy of the original owners manual and maintenance manual. The maintenance manual corresponds with the service book that I already had. "valves must be adjusted in firing order sequence with the piston at the top of its compression stroke." TDC corresponds to the P pointer. I've already determined that with a dial indicator when I had the heads removed. The V pointer corresponds to ATDC.
If these adjustments are to be made at TDC then why does the pointer not line up at the V mark if that is where TDC is supposed to be?
If the timing is located via dowel pins, there should be no way to get this wrong. I've not finished the re-assembly and insertion process yet. I just want to make sure things are set correctly.
I guess I will need to put the dial indicator on the rockers to see how much of a difference the 2 marks have between them in order to satisfy my curiosity and confusion on this matter.
-
I've pulled the heads for a valve job and new head gaskets. Everything is nearing completion and I am ready to set the valve lash on the E9. It has the mack engine brake.
I have a Mack service manual for the motor and it says to set the valve lash at TDC which corresponds to the timing marks aligning with the P mark. My understanding is that this P references the Pump timing and the V mark references the valve timing. Somewhere, I've read where other Mack motors set their valves when the timing is set at the V mark.
Which is the correct procedure? Should TDC be aligned with the P mark or the V mark? I'm thinking that maybe someone set the gear timing wrong if the V mark should be TDC.
Now is the time to get this resolved while the motor is still out of the truck. I would appreciate any available expert advice on this motor.
Thanks
-
 1
1
-
-
Regarding the broken bolt removal, that will be up to the machine shop to do. Although I have a vertical mill myself, I will leave it to the professionals at the machine shop. At $15-$20 per removal, it is money well spent while I make money elsewhere.
The exhaust valves show some minor leakage so all 4 heads will be sent out for cleaning, inspection and whatever else needs to be done to make them 100%. I only want to fix it once. Although I have to be a mechanic most all of the time, projects like this do not make my day.
And, while the heads are off, out comes the motor to replace the rear main seal and possibly, the transmission front seal. The clutch will be inspected and a new throw out bearing installed if necessary. The radiator will be sent out for rodding and cleaning while it is removed.
In for a penny, in for a pound. I want it done right the first time and I don't want to see any oil on the ground after I'm done. It is far less expensive money and timewise to get all of this done at one lick.
I'm seriously considering allen head cap screws for the manifold bolts. These are extremely tough and reasonably priced.
-
I've started to troubleshoot and nitpick on the new-to-me dog. I have two broken exhaust bolts in two different heads and the exhaust gaskets were shot. All of the bolt heads are in rough shape from salt damage and weathering so I plan to replace them all. 20 pieces total plus the other 4 that connect to the 90 degree elbows. I've gotten pricing from 2 different Mack dealers and they both quoted me roughly the same price right at or near $15 each piece. That adds up to over $300 for bolts!
What is so special about these shouldered bolts that makes them such a high priced item? I can purchase grade 8 or 9 bolts for $1-$3 each. These bolt don't encounter exhaust gasses directly and there is nothing special looking about them except for the shoulder. A shiny new washer under a shiny new grade 8 bolt will act just the same.
A dog on the top of the bolt is not worth that price to me. Sounds like someone moved a decimal point the wrong way.
OK members, what say you???
UPDATE: I've purchased bolts through Fastenal to replace the original Mack bolts that were so severely corroded. I ordered stock # 19765 and #19761 in case any one else runs into the same problem. The cost for 15 units of each stock number was $58.20 and $26.70, respectively, or $3.88 and $1.78 each. Total bolt cost was $84.90 + tax. There should be about 6 bolts left over for back up. These are grade 8.2 flange head bolts. Although both numbers are listed as serated shoulder type, only the 19761 bolts are serrated.
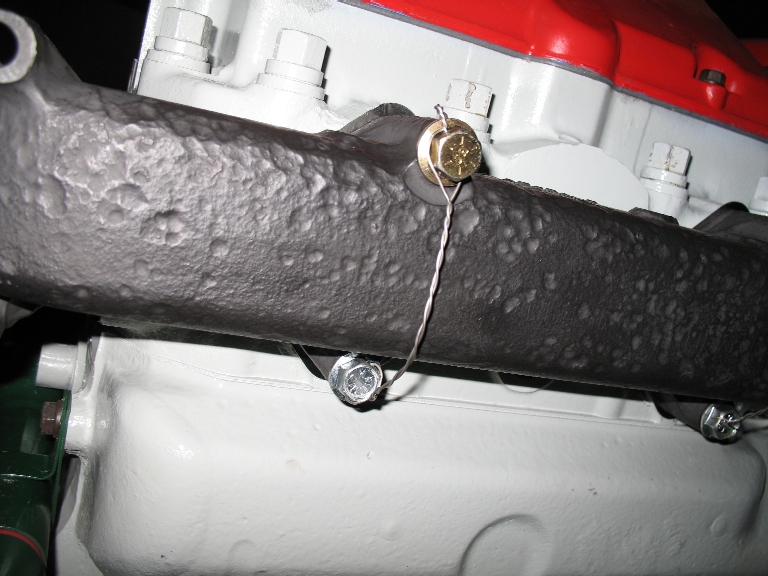
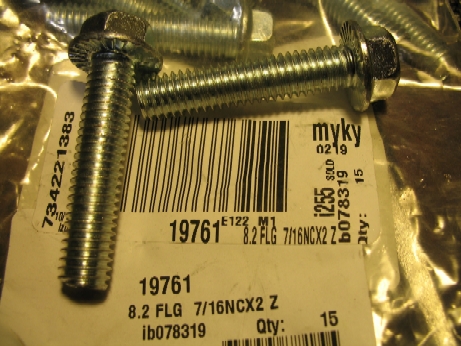 All threaded holes were re-tapped prior to installation. All threaded surfaces were liberally coated with antisieze and torqued to 55 ft-lbs. No fold - over bolt locks were included with the upper gasket set so I drilled out the bolt heads and installed safety wire locks to help keep anything from coming loose. Total machining time was 1.0 - 1.5 minutes per bolt and 3 drill bits. As time permits, I will try to post on the Wiki link for tips on machining these hardened bolts, rebuilding joint problems on the exhaust manifolds and other problems solved on the E9


BMT Forum Logo

E-9 Paint Colour
in Engine and Transmission
Posted
I used Rustoleum Proffesional series paint when I repainted my E9. After a good coat of primer, I used a light machine grey color which was close, but not exactly original, for the color of the block. A lighter color will let your oil leaks show more readily in order to trace down the problems.
See my gallery to the left in my signature. There are some pictures of my E9 and my color coding when I had it out this past Fall. Remember to paint it pretty - that will make it go faster