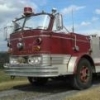
Popular Post ff6cav Posted April 30, 2015 Popular Post Share Posted April 30, 2015 Back in February, I purchased a 1963 C85 engine. The engine spent her in-service time in Bellwood and Philipsburg, PA and then went to Harrisburg as a parade piece for the Camp Curtin volunteers. The body is solid and she runs great, with the only major issues being a coolant leak (I think needs a new water pump) and a crack in the exhaust manifold. I also need to go over the fire pump, as the tank-to-pump valve is stuck half open and I would like to be able to pump with it eventually 1 3 Quote Link to comment Share on other sites More sharing options...
mowerman Posted April 30, 2015 Share Posted April 30, 2015 wow nice,,,,have a ball.bob Quote Link to comment Share on other sites More sharing options...
VALS327 Posted April 30, 2015 Share Posted April 30, 2015 Very nice, The C model is my favorite. Good Luck Don Quote Link to comment Share on other sites More sharing options...
41chevy Posted April 30, 2015 Share Posted April 30, 2015 Very nice. Good luck with it. Paul Quote "OPERTUNITY IS MISSED BY MOST PEOPLE BECAUSE IT IS DRESSED IN OVERALLS AND LOOKS LIKE WORK" Thomas Edison “Life’s journey is not to arrive at the grave safely, in a well preserved body, but rather to skid in sideways, totally worn out, shouting ‘Holy shit, what a ride!’” P.T.CHESHIRE Link to comment Share on other sites More sharing options...
64C85 Posted May 1, 2015 Share Posted May 1, 2015 Nice looking C...I too am a C model fan. Have fun with her. Doug Quote Link to comment Share on other sites More sharing options...
ff6cav Posted May 8, 2015 Author Share Posted May 8, 2015 Did a little work on the rig yesterday. Got a coat of Herculiner bedliner in all the compartments, and got the silver rims painted on the officer's side wheels. 1 Quote Link to comment Share on other sites More sharing options...
1958 F.W.D. Posted May 8, 2015 Share Posted May 8, 2015 Call Waterous with your pump SN handy, they will send you a SN specific manual and parts sheets. You should still be able to get rebuild kits for all the valves, they are very easy to rebuild. I recommend using the newer stainless steel balls, more expensive but last longer.If the tank to pump is an Akron (not uncommon) rebuild kits are easy to get for those as well. Quote TWO STROKES ARE FOR GARDEN TOOLS Link to comment Share on other sites More sharing options...
ff6cav Posted May 13, 2015 Author Share Posted May 13, 2015 Got the water pump off today to be rebuilt. It put up a fight, and the process was a lot more involved than I initially thought, but it's out and i didn't break anything! I am somewhat mechanically inclined, although most of my experience is with green tractors, so every time I work on this truck I learn something new! 1 Quote Link to comment Share on other sites More sharing options...
609albert Posted May 14, 2015 Share Posted May 14, 2015 Is your Mack gas or diesel, air brakes ,power steering ,etc.? Quote Link to comment Share on other sites More sharing options...
ff6cav Posted May 14, 2015 Author Share Posted May 14, 2015 Is your Mack gas or diesel, air brakes ,power steering ,etc.?707C Gas engine, air brakes, air power steering Quote Link to comment Share on other sites More sharing options...
ff6cav Posted August 25, 2015 Author Share Posted August 25, 2015 Here's the latest updates- while waiting for more time to look into the clutch issue, I've been taking pieces off to repaint them and replace missing or broken hardware. The pieces of the dog box had multiple holes drilled in them to attach diamond plate at one point in the rig's life, so I removed the diamond plate and filled the holes to bring it back to more of its original appearance. I've also taken it to the CAFAA and PA Pump Primer's musters, and hope to get to the Old Fire Farts in York later this year. Quote Link to comment Share on other sites More sharing options...
j hancock Posted August 25, 2015 Share Posted August 25, 2015 Looks Good! Mechanical stuff is mechanical stuff whether it is green, red, black or white. All have their secrets and tricks of the trade. 2 Quote JimIt doesn't cost anything to pay attention. Link to comment Share on other sites More sharing options...
ff6cav Posted September 11, 2015 Author Share Posted September 11, 2015 A couple updates- removed the pump panel cover to get to the tank to pump valve, which was stuck. Removed the valve, and have it soaking to see if I can break it loose. Also removed the fuel pump and oil filter canister to fix the oil leak, and cleaned up and painted them while I have them off. 1 Quote Link to comment Share on other sites More sharing options...
Bobby j Posted September 11, 2015 Share Posted September 11, 2015 Nice looking rig.......Bobby j. Quote Link to comment Share on other sites More sharing options...
ff6cav Posted September 15, 2015 Author Share Posted September 15, 2015 Another little update- the fuel pump and oil filter are back on, after a lot of swearing and frustration(mostly at the fuel pump)! I also ended up breaking the arm of the tank to pump valve when trying to loosen it, so for now I think I will put it back on and keep it as-is, as I have no plans on filling the tank any time soon. 1 Quote Link to comment Share on other sites More sharing options...
Gmerrill0516 Posted September 15, 2015 Share Posted September 15, 2015 Looks like you are having fun. I'm wondering what 707 that is with the intake and exhaust manifolds on opposite sides of the head? enjoy it!Greg Quote Link to comment Share on other sites More sharing options...
ff6cav Posted September 15, 2015 Author Share Posted September 15, 2015 Looks like you are having fun. I'm wondering what 707 that is with the intake and exhaust manifolds on opposite sides of the head? enjoy it!GregThis has the 707C Quote Link to comment Share on other sites More sharing options...
41chevy Posted September 16, 2015 Share Posted September 16, 2015 Looks like you are having fun. I'm wondering what 707 that is with the intake and exhaust manifolds on opposite sides of the head? enjoy it!GregI believe there was a 672 gas engine the ended production in 1962, the 707 came out in 1963. if so it could be an early production truck. Quote "OPERTUNITY IS MISSED BY MOST PEOPLE BECAUSE IT IS DRESSED IN OVERALLS AND LOOKS LIKE WORK" Thomas Edison “Life’s journey is not to arrive at the grave safely, in a well preserved body, but rather to skid in sideways, totally worn out, shouting ‘Holy shit, what a ride!’” P.T.CHESHIRE Link to comment Share on other sites More sharing options...
Popular Post ff6cav Posted October 22, 2015 Author Popular Post Share Posted October 22, 2015 Took advantage of the beautiful weather today to go for a drive (and ice cream ). Took the rig out on the Gettysburg battlefield for a few pics 4 Quote Link to comment Share on other sites More sharing options...
Popular Post ff6cav Posted November 22, 2015 Author Popular Post Share Posted November 22, 2015 Took the rig out yesterday (Saturday) to York for the funeral of a past fire chief and Mack apparatus enthusiast who passed away from brain cancer. I missed getting individual pics of a few of them, including Lincolnway's recently retired CF which carried the Chief's ashes to the cemetary, but here's what I got: 3 Quote Link to comment Share on other sites More sharing options...
1958 F.W.D. Posted November 23, 2015 Share Posted November 23, 2015 Wow.....Guy that owns that Oaklyn Scope lives near me.....He traveled a long ways. Good for him. Quote TWO STROKES ARE FOR GARDEN TOOLS Link to comment Share on other sites More sharing options...
1958 F.W.D. Posted November 23, 2015 Share Posted November 23, 2015 Took advantage of the beautiful weather today to go for a drive (and ice cream ). Took the rig out on the Gettysburg battlefield for a few pics20151022_160041.jpeg20151022_155136.jpegShould have gotten a pic of it in front of the 72nd NYI (Second Fire Zouaves) Momunent!!! Quote TWO STROKES ARE FOR GARDEN TOOLS Link to comment Share on other sites More sharing options...
ff6cav Posted November 23, 2015 Author Share Posted November 23, 2015 Should have gotten a pic of it in front of the 72nd NYI (Second Fire Zouaves) Momunent!!! We drove right by it to get to the PA Monument, but it's too far off the road to get a good pic with my phone- next spring we're going to go out and get some better pics with my wife's camera Quote Link to comment Share on other sites More sharing options...
ff6cav Posted November 23, 2015 Author Share Posted November 23, 2015 Wow.....Guy that owns that Oaklyn Scope lives near me.....He traveled a long ways. Good for him. I got to talk to him after the services; it's a gorgeous rig! Quote Link to comment Share on other sites More sharing options...
ff6cav Posted January 4, 2016 Author Share Posted January 4, 2016 It's been a while since I've been able to do any work on the rig (holidays and whatnot), but I'm hoping to get into it some more this winter. The first, and hopefully simplest, is getting the speedometer rebuilt, as it "bounces" 5-10 mph on either side of the actual speed while going down the road. I also want to remove the rear body panel (under the hosebed) to nip some surface rust in the bud before it develops any further- any thoughts/suggestions on removing that panel? I took a quick look at it and can't seem to find how to get it apart. Quote Link to comment Share on other sites More sharing options...


Recommended Posts
Join the conversation
You can post now and register later. If you have an account, sign in now to post with your account.