shortstack Posted March 6, 2015 Share Posted March 6, 2015 Oh don't worry about it ending. With a truck, it's never done! I'm just mesmerized and realizing how lazy I really am. Quote Link to comment Share on other sites More sharing options...
thomastractorsvc Posted March 6, 2015 Share Posted March 6, 2015 Coming along good couple more days is all you got left. Are you going to pant the shifter and pto levers?/ Quote Robert"I reject your reality and substitute my own." Link to comment Share on other sites More sharing options...
mrsmackpaul Posted March 6, 2015 Share Posted March 6, 2015 not ant my bloody fat fingers it was meant to be any oop'smate your paint job is 1000% on mine I can do mechanical things ok but the panel work well what can I say when I do it it looks like it is done by me big time and having said that the feeling I get when I do a job is something I cant describe knowing that I have achieved what ever it is I had just done and not paid someone elseI think you should be really proud of the job your doing and thank you for taking us all along with you on the journey so far Paul 2 Quote Link to comment Share on other sites More sharing options...
Popular Post Wobblin-Goblin Posted March 6, 2015 Author Popular Post Share Posted March 6, 2015 Thanks for the kind words, fellas. I wasn't sure why it was so quiet in here. Today's progress:1. Continued with the interior. Had a lot of critter debris inside the cushions, so I used a hole saw and made one of the air holes on the back/underside of each seat bigger to shake the junk out. Lots of mouse crap, housing, and leftovers (nuts and shells) came out. Screwed 1/4" thick plywood over the bigger hole to close it up again. Cleaned the seat covers.2. While everything was out of the interior, I pulled out cardboard backing behind the seats. It was in poor shape and probably was the source of odor, so it's staying out. Cleaned all the cab surfaces behind and under the seats. Vacuumed out everything the nozzle would fit in. This cab is as clean as a 50 year old truck can be.3. Wire brushed, cleaned, primed, and painted the seat supports. Re-installed the seats.4. Wiped down, primed, and painted the remainder of the sheet metal over the windshield (where the visor is mounted and the transmission shifting guide is screwed onto).5. Cleaned the visor and painted it.6. Put fiberglass resin over the brazing.7. Primed the outside of the windshield sheet metal.All in all, the interior paint job isn't perfect. There are defects, but I'm not going to worry about it for now. It looks quite a bit better than it did before I did anything, so I'm happy for the time being. Perhaps in the future I'll address the couple of flaws. Then again, maybe not (LOL). Next week we should be hanging the doors and painting the cab. 4 Quote Link to comment Share on other sites More sharing options...
farmer52 Posted March 7, 2015 Share Posted March 7, 2015 Quiet? This group? Never.... We are just mesmerized by the nice (and speedy) work on your B. 2 Quote Ken PRR Country and Charter member of the "Mack Pack" Link to comment Share on other sites More sharing options...
mrsmackpaul Posted March 7, 2015 Share Posted March 7, 2015 is there some were you can get that card boardy type of stuff to replace it I think it will be a lot louder inside with out it Paul Quote Link to comment Share on other sites More sharing options...
Maddog13407 Posted March 7, 2015 Share Posted March 7, 2015 Lancaster County Upholstery sells the headliner kit, around $200 it use to be for the kit. overpriced for what it is but it sure finishes it off a little better Quote Link to comment Share on other sites More sharing options...
thomastractorsvc Posted March 7, 2015 Share Posted March 7, 2015 That card board is less than $10 per sheet can also buy online but shipping would get you. Any upholstery shop would have it comes in a couple ways regular which is 36 x 50 and water proof that is 36 x 48. I know you have messed with the seats but it would be worth taken them a part and cleaning and sanitizing and just re-stapling them, that is something you can do and is really easy. You may want to re-place the ply wood also, that will make the seats not stink anymore or the truck and help keep the vermin out. Wal-mart sells foam squares for like $2 bucks that will fit the seat tops to protect your "rear" from the rotted out foam and burlap. For about $50 in materials you could have everything less than the headliner redone. Quote Robert"I reject your reality and substitute my own." Link to comment Share on other sites More sharing options...
j hancock Posted March 7, 2015 Share Posted March 7, 2015 The kit from Lancaster is pretty nice, but it can be done with patience from board if you have some old material to help with the pattern.Either way, putting a headliner into an egg shaped cab can be a little tricky. Quote JimIt doesn't cost anything to pay attention. Link to comment Share on other sites More sharing options...
mrsmackpaul Posted March 7, 2015 Share Posted March 7, 2015 The kit from Lancaster is pretty nice, but it can be done with patience from board if you have some old material to help with the pattern.Either way, putting a headliner into an egg shaped cab can be a little tricky.are trying to say all B model drivers are egg heads ?????????? Quote Link to comment Share on other sites More sharing options...
Wobblin-Goblin Posted March 7, 2015 Author Share Posted March 7, 2015 Coming along good couple more days is all you got left. Are you going to pant the shifter and pto levers?/ Yes, the plan is to paint the PTO levers. Not sure about the shifters. Quote Link to comment Share on other sites More sharing options...
Wobblin-Goblin Posted March 7, 2015 Author Share Posted March 7, 2015 yes as everyone else has said are making all the rest of us look slackdo you have ant problems braving up spots with the tin work getting warpped ??PaulAh, I get your drift now. Yes, the passenger door warped when I was welding a patch in. I had no idea that it would happen, so my uncle and I spent a fair amount of time straightening out the mess. He then showed me a trick to welding flat sheet metal: use a water spray bottle to cool it down. Nothing else warped. 1 Quote Link to comment Share on other sites More sharing options...
Bigdogtrucker Posted March 8, 2015 Share Posted March 8, 2015 Wow Wobblin that B is coming along great! Nothing like a nice quality "driver restoration" IMO 1 Quote Link to comment Share on other sites More sharing options...
Popular Post gearhead204 Posted March 8, 2015 Popular Post Share Posted March 8, 2015 very nice job! and you have done it yourself, that's what these projects are all about if you ask me, any one can "pay" for show room restro. job and brag about it. I think when you have touched every part then you can brag. 4 Quote Link to comment Share on other sites More sharing options...
Wobblin-Goblin Posted March 10, 2015 Author Share Posted March 10, 2015 Today's progress:1. Some of the internals of the doors were in pretty bad shape, so I had to rob a few components from donor doors and MacGyver a few other things to make it all work. The bottom track on one door was beyond saving and the window crank on the other was in need of replacing. In addition to those, some of the tracks that the windows would move up and down in were terrible, too. In one instance, I had a piece of track that fit loosely inside the channel steel, so I built it out a few layers of black duct tape and then glued it in place. I did a similar thing on the bottoms of the glass where they fit into the bottom channel.Aside from that, I had to do a bunch of running around finding parts and such, so not much else got done. I also had to run to Tractor Supply Co. to find some fasteners, too. 1 Quote Link to comment Share on other sites More sharing options...
Wobblin-Goblin Posted March 12, 2015 Author Share Posted March 12, 2015 Quite a bit of progress today:1. Cleaned up a bunch of bolts and fasteners on the wire wheel, primed all that needed priming and painted all the interior ones.2. Sanded the fiberglass resin I put down on three brazed patches.3. Installed five new cab lights. Will take them off tomorrow, but I had to install them to get all the extra holes drilled before we paint the cab next week.4. Stripped the dash (except for the instrument panel), cleaned, primed, and painted it. 5. Installed the new windshield glass and rubber. 6. Stripped, cleaned, and primed a part of the heating system (the part that is under the heater fan), the metal center strip on the windshield, and the two defroster moldings.Sorry, no pics today. Too busy. Perhaps tomorrow. BTW, hopefully we will have a warm day or two next week for painting the cab. 2 Quote Link to comment Share on other sites More sharing options...
mrsmackpaul Posted March 12, 2015 Share Posted March 12, 2015 hey whats the black tape for ???? does the window run in it or is it going to be a template to make some thing to replace it Paul Quote Link to comment Share on other sites More sharing options...
Wobblin-Goblin Posted March 12, 2015 Author Share Posted March 12, 2015 The felt channel that I had to replace the original Mack window channel (inside those to vertical steel channels) is smaller than stock, so it fit too loose in the steel. I turned the felt channel I had upside down and just kept putting layer upon layer of black tape on and over it until it finally fit snug in the steel. Then, to make sure it doesn't move while the window is rolled up or down, I glued it in place, too. After the felt fit snug and was glued, I used a razor blade to trim the excess tape that stuck out. 1 Quote Link to comment Share on other sites More sharing options...
Popular Post Wobblin-Goblin Posted March 13, 2015 Author Popular Post Share Posted March 13, 2015 Forgot the camera at the garage. Whoops.Today's progress:1. CLEANED the truck and garage. It was a big mess from the interior painting I did on the Mack yesterday.2. Removed the cab lights.3. Installed the driver's door seal (passenger is original).4. Put a little body filler over the resin that's covering the brazing patches. Sanded it down.5. Primed and painted another portion of the heater unit.6. Picked up the paint from NAPA. I hope it's the right color.7. Painted the bolts that attach the air cleaner to the truck.The plan is to paint the cab and hood on a warm day next week. If there are no warm days, we may have to wait until the following week. We're getting close! 3 Quote Link to comment Share on other sites More sharing options...
Popular Post Wobblin-Goblin Posted March 13, 2015 Author Popular Post Share Posted March 13, 2015 Today's progress:1. Cleaned old paint off 4" connector from air cleaner to truck. It had a fair amount of cracks in it, so I put a coating of weatherstrip adhesive over it. Not only did this seal all the cracks, but it gave it back its natural black color.2. Scraped, wire brushed, and wiped down the surface of the driver's side fuel tank. Painted it.3. Wire brushed the PTO/dump levers. Painted them. 6 Quote Link to comment Share on other sites More sharing options...
thomastractorsvc Posted March 14, 2015 Share Posted March 14, 2015 Looks really good turning out like a professional restore! 1 Quote Robert"I reject your reality and substitute my own." Link to comment Share on other sites More sharing options...
Popular Post Wobblin-Goblin Posted March 16, 2015 Author Popular Post Share Posted March 16, 2015 Today's progress:1. Painted "PTO" on the PTO lever in the cab. It didn't come out as cleanly as I wanted, but it's quite a bit better than the hand-scribbled "PTO" that was on it previously.2. Removed right side battery box (all I have is the bottom). Stripped it and the part of the frame around it, the exhaust stack mount, and the passenger side fuel tank. Painted the box bottom, that portion of the frame, the exhaust stack mount, and the fuel tank. 4 Quote Link to comment Share on other sites More sharing options...
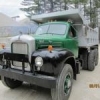
GreenGiant2 Posted March 16, 2015 Share Posted March 16, 2015 Like that green color. Quote We the unwilling, Lead by the unqualified, are doing the impossible, for the ungrateful. Link to comment Share on other sites More sharing options...
thomastractorsvc Posted March 17, 2015 Share Posted March 17, 2015 When are you going to paint the shiny parts? Cant be much more to mess with. Quote Robert"I reject your reality and substitute my own." Link to comment Share on other sites More sharing options...
Wobblin-Goblin Posted March 17, 2015 Author Share Posted March 17, 2015 When are you going to paint the shiny parts? Cant be much more to mess with.If we get a nice day (weather-wise) next week, we will paint the cab and hood at that time. Quote Link to comment Share on other sites More sharing options...


Recommended Posts
Join the conversation
You can post now and register later. If you have an account, sign in now to post with your account.