

Licensed to kill
-
Posts
534 -
Joined
-
Last visited
-
Days Won
9
Content Type
Profiles
Forums
Gallery
Events
Blogs
BMT Wiki
Collections
Store
Everything posted by Licensed to kill
-
 I am assuming that the B-61's were 12 volt systems since they have a series parallel switch to run a 24V starter in a 12V system (or does it run a 12V starter in a 6V system????, Hmmmmmmm, that just occurred to me.) Am I safe to make that assumption and also, is it safe to assume that they were negative ground??. If this is so (with the trucks that I have) were they 12V neg ground from the beginning or were the first B models 6V, and if so, when did they change?. Both trucks that I have parts from are '59 models.
 -
Are those prone to failure?. When they fail, what goes wrong, IOW what gets replaced during a rebuild?. In wouldn't expect much in there but maybe a spring or two and some sort of valve/plunger that the spring moves. Of course this is just spec as I have no idea how it actually works.
-
Preferred exhaust expansion font.
Licensed to kill replied to Licensed to kill's topic in Engine and Transmission
Thanks Joe. I just called the guy that I bought the cab from as I THOUGHT I had seen an expansion joint on his B-61. He said "nope", rigid all the way is the norm and it is common to have a solid clamp close to where I put mine. Had me concerned as this is EXACTLY the kind of screw up I do on a regular basis where to would be easy to fix NOW but difficult after the thing is done IE. the cab is on it. -
Preferred exhaust expansion font.
Licensed to kill replied to Licensed to kill's topic in Engine and Transmission
Yes, I know I need flex pipe (and rubber mounts) to allow for movement between the power train and the frame/cab. This is pipe mounted rigid at the turbo to a rigid mount on the trans, about 40" long. There can be no movement between those two mounting points since the motor and trans are "one", but my concern is thermal expansion. Will the pipe "grow" when it heats up putting stress on the pipe and the two mounting points requiring an expansion joint to allow for said "growth", or am I over thinking this ?. -
So, I made up the exhaust from the turbo down to where it goes horizontal between the trans and frame but, in my zeal to get that done , I did not think that it would/may require an expansion joint. The pipe is solid between the turbo and the clamp mounted to the trans mount which is all solid but I was not thinking about thermal expansion. What are the pros and cons of the woven SS joints vs the steel bellows type or is there a 3rd, better option??.
-
A very interesting and informative video. A great link to share with people who say that they "follow the science" when it comes to CO2 and "climate change".
-
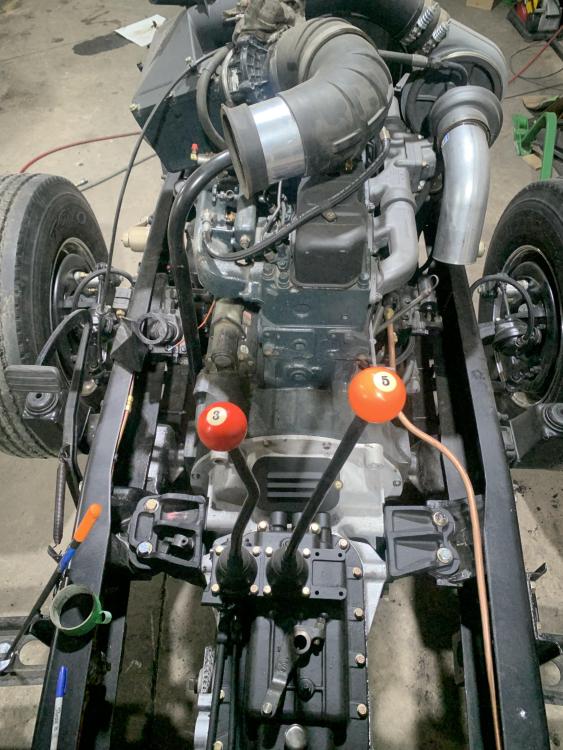
OK, last instalment then I will let the thread die peacefully. I installed the trans but had a minor issue. The shifter knobs from the 6spd were 2 different sizes, one 7/16" thread and the other 1/2". Both shifters on this trans are 7/16" so that left me short one knob. Soooooo, even though I really like the little original knobs, I decided to make a couple and thought that the guys here would "get it". This was not my first idea and I will likely make another set so I can swap them out from time to time. The first idea was to use the 9 and 1 and turn the 9 upside down to a six to make it "61" as in B-61. The yellow of there 9 and 1 would go MUCH better with the colour the truck will be but thought 5 and 3 would be rather appropriate in this case.
-
Wasn't sure where to post this but seems like a "shop talk" kinda topic. It is about NOT leaving something "for another day", something I have (had) a REAL bad habit of doing. I put the trans in my Mack yesterday just to realize that I forgot to check the bolt holes in the bell housing. I was reasonably certain that the bell housing bolts in the old engine that the trans came form were 3/8" and was equally certain that the bolts that came out of the "new" engine were 7/16". I was going to confirm all that a few days ago (when I was thinking of it) but did something else and ended up forgetting. So, in goes the trans yesterday, go to put the bolts in and, of course, they are too big to go through the bell housing. Would have been an easy 2 minute job to drill them out from the front when the trans was sitting on the floor but NOOOOOOO, now I have to do it with the trans on the engine and the mounts are in the way. Pretty typical for me. Anyways, this got me thinking about a similar "bad habit" that I am trying to break and that is putting things together "finger tight" with the plan to torque them "later" or putting a pin in something thinking "I'll put the cotter pin in after". This summer, a friend (Paul) was over and looking at my Mack and noticed something (I think it was a loose bolt) and pointed it out. I said, "yes, I know, I will tighten it later". He said "I NEVER leave something unfinished.....EVER. I ALWAYS tighten ALL fasteners before moving on, if it is in place, it is tight". He then went on to relay a story from his childhood. Turns out, his dad had an MG that he liked to fool with and one day it crapped out or was otherwise immobilized several miles from home. I don't recall the story details but for some reason a tire had to be removed and put back on and IIRC it had knockoffs. Anyways, the knockoff was only put on hand tight just to get it home to be "tightened later" and the car was towed home. A couple weeks later, the issue with the car was resolved and his dad took it for a spin, of course not remembering that the one wheel was not tight. Got a few miles from home and the wheel came off and he crashed..............spent the rest off his life a quadriplegic. Tragic story to hear about...Paul LIVE IT first hand. Something to think about.
-
Coca Cola LJ Mack colors
Licensed to kill replied to 1961H67's topic in Antique and Classic Mack Trucks General Discussion
I just "stumbled" into this thread. Sat and went through the whole thing so far. Of course I had SEEN the thread but wasn't really interested in what colour a coca cola truck was so didn't bother looking but this morning thought, "there sure is a lot of activity for a thread on truck colour" so decided to take a look and glad I did. Great thread and a wonderful project. Just like Matt's project thread, I don't know if these rare "inspirational" or "discouraging". -
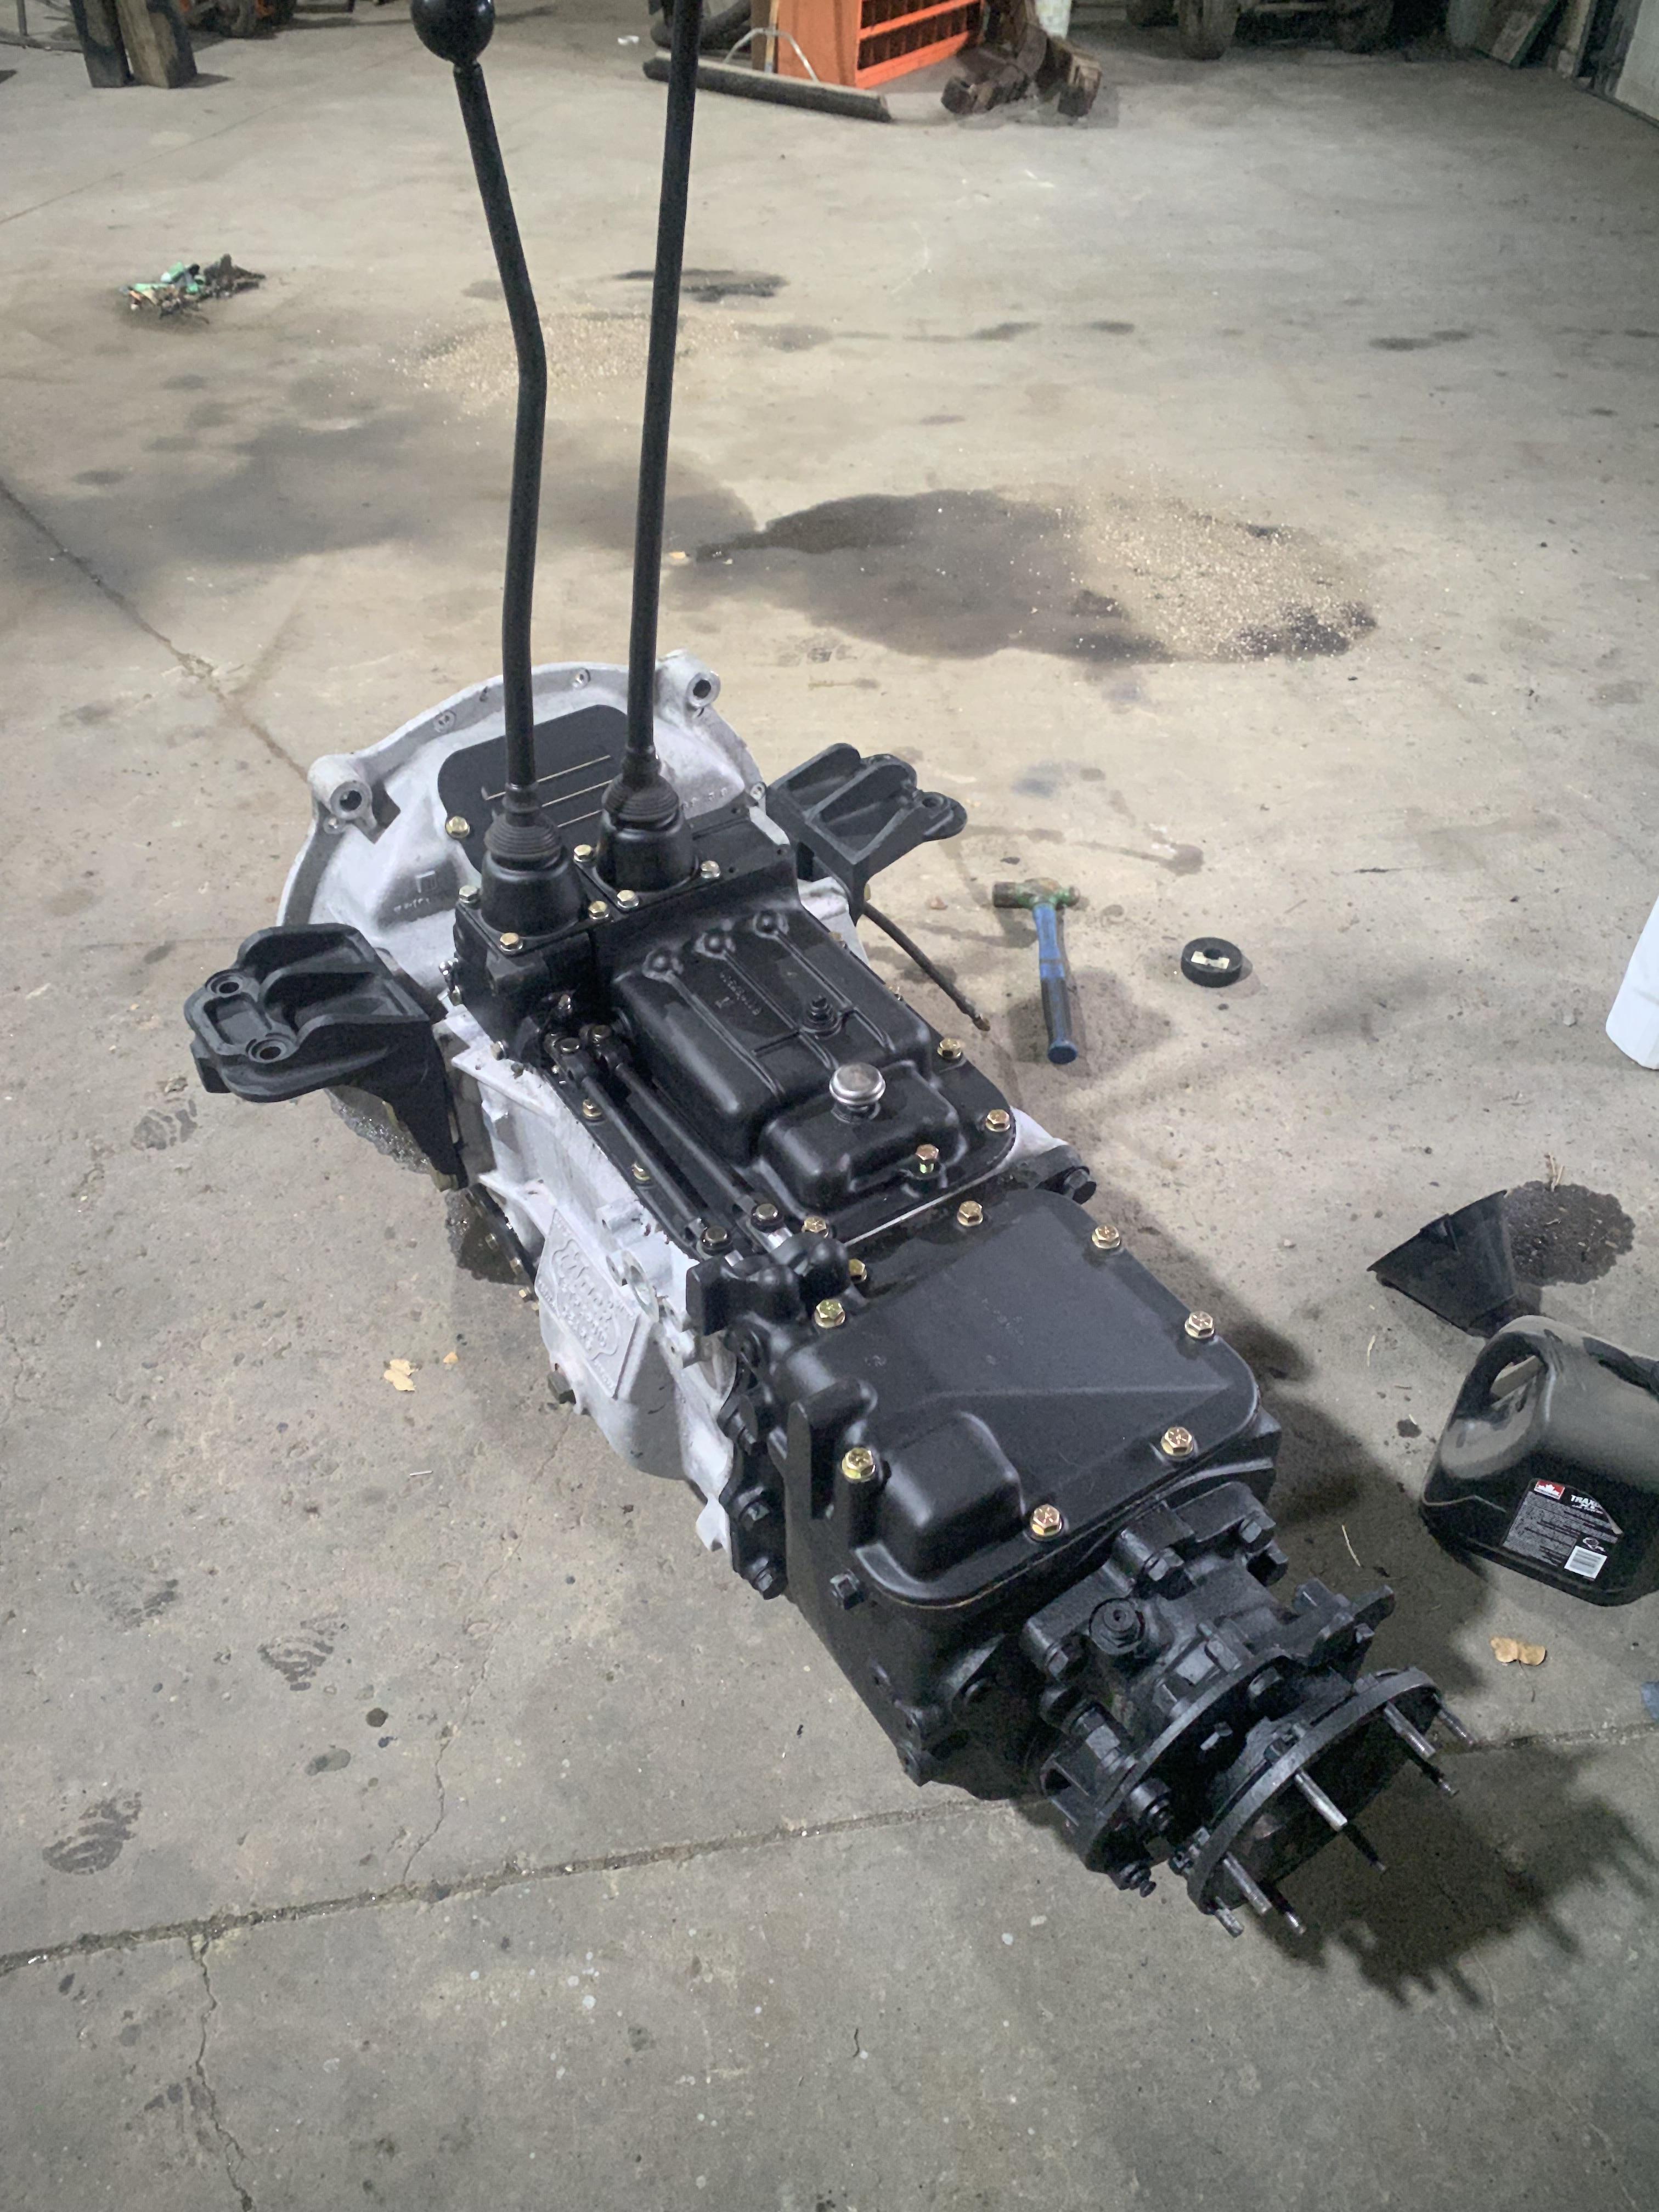
Trans is all cleaned up inside and out and ready for install. The cross shaft for the release bearing had some wear on the "action" side, not a lot but there was some. Couldn't bear to put it back in that way, even though the side play was minimal so I turned that part of the shaft and made an interference fit sleeve to Bring it back to a true 1.25" all the way across. The bushings were still perfect.

-
Yes. I use a piece of flat bar and turned it with a crescent wrench.
-
You take out that cotter pin and the cap (that the pin goes through) screws in to take up slack, out to disassemble. Might have to disassemble and replace the ball if it is wore. The one pictured has the ball riveted onto the pitman arm so replacing would require some effort but can still be done. BTW, do NOT tear that rubber boot if you take it apart. I priced one out a couple years ago and IIRC they wanted $140CAD. That was a hard "NOPE" from me. I would make one out of leather first.
-
Me too, been learning all sorts of stuff as of late.
-
Picked up a fish scale today to check the preload on the countershaft. Manual says 4 - 5 1/2 lbs and I get 5 lbs. sounds good to me. Went to put the drain plug back in and noticed the threads aren't great so gaunt to find a new plug. As near as I can tell the threads in the case look OK. Tried an "experiment" on the shifters. Didn't want to take them apart to remove the rubber boot to powder coat and didn't want to paint sooooooo, I bought a 4' stick of 3/4" heat shrink and put that over them, shrunk it on and looks pretty decent. Of course it formed to the shaft shoeing most of the tooling marks that were there but that's OK. Should help quell any vibration noises coming up from the trans also. Pretty happy with the way that turned out. Also had a broken bolt in one of the PTO covers so got that out. Powder coated the PTO covers (that I had to make since one was missing and the other bent) as well as the shifter rods for the aux box. Making a little progress.
-
the input shaft gear. They refer to it as the "pinion gear" in the manual. I know, that was news to me also. 😀
-
You probably put your tools away also. I'm not very good at either. Instead, I rely on my memory which I KNOW sucks, then have a hissy fit when I can't remember how to do something or where I left a particular tool. It is not uncommon for me to "lose" a tool that I had in my hand less than 2 minutes earlier. MANY years ago (in my 20's) I was working on a car in the garage and could not find my vice grips. While slaming things around in a rage my wife came out and asked what was wrong. I said "I JUST HAD MY VICE GRIPS AND NOW I CAN'T FIND THEM!!!!!?". I was irate. She's said "what is that in you hand??". I put them down and went in the house for a rum. I'm better now, not much...but better LOL. I can tolerate a lot going wrong but not my own stupidity. I have ZERO patience for that.
-
Yup, that's the page I found. It also prompted me to go out and check the magnet. While it had a glob of goo on it, I rolled all of the goo between my fingers to see if there was any substantial "pieces" in it and only found one spec that I could feel, the rest had the consistency of grease which should be just normal wear.
-
Kindred spirits.
-
While there was no description of the "oil trough" in the pages specific to the TRTL-72 in the pages that I printed, It occurred to me this morning to look elsewhere in the manual and found it. It is on the side of the case. I copied and tried to post the page but images don't transfer
-
Aint that the truth. I striped a Ford model A delivery to the bare frame to resto-mod it and took some pictures along the way to help in reassembly. Unfortunately, I did not take enough and many of the one I DID take, I could not figure out what they were suppose to be when I needed them. In hind sight, what would be nice is if I could have made short videos rather than stills and started out a ways to get my bearings on what part of the truck I was looking at and then zoomed in to the detail I was wanting to capture so I could tell what it was and where on the truck I was looking. Close in shots show the detail but I found often were unrecognizable. Took some pics on my B-61 when I striped IT down to the Fram as well but, again not enough. Fortunately, with the MACK, I have another truck all together (as yard art) to refer to.
-
Since you bought the truck as is, you may be unaware that there should be a thin strip separating the two windshields. I have a cab striped down past it's panties and can take some measurements and pics of what it needs to be so you can replace it if you need.
-
In the pages of the manual that 'weasel sent me the link for it says (under assembly), regarding the internal oil pump Pressure of the pump is low and therefore difficult to measure. A functional check should be made on the pump, prior to in- stalling the transmission cover. This can be accomplished by pouring oil into the pump pickup trough, while revolving the main driving pinion. If the pump is functioning, oil will appear at various outlets along the mainshaft. This practice will also insure initial prime to the pump. I looked but have no clue where to find this "pump pickup trough". Didn't see it located on the schematic either. I would really like to do this before buttoning up the trans (when that time comes).
-
Found one.
-
Having .002 end play when I need .002 preload requires a .004 shim to be removed so, while I agree that it would be good as is, I'll try to get it a bit better. The Lash I was referring to was not between the main and counter shaft gears but, rather, pinion gear and main shaft. I checked it and it was also WAY out, .005 - .012 in the book and I have .027. I have no clue how to adjust that and, to be honest left me somewhat concerned. With the counter shaft out of spec by .029, @ .027 end play when it is SUPPOSED to have .002 PRE LOAD, now the pinion lash over double the prescribed max, I'm thinking "is this thing just too wore out to even bother with or what??". I called my brother (HD mechanic for 40 years) and told him my dilemma and asked how to adjust the lash on the pinion and/or is this thing just too wore out. He said " Don't assume that all the tolerances being so far out is the result of wear. It could be that Jed Clampet put the thing together at some point and didn't set any of the tolerances correctly." He also said that "if the bearings were wore to the point of the counter shaft being .027 end play when it is supposed to be .002 preload, the bearings would have piled up a long time ago. They can't wear that much and survive". He suggested that, since it turns easily and smoothly and the teeth all look good to just dial in the countershaft to spec (because it is easy) and call it good. For the record, the main shaft is supposed to have end play and I can not get ANY movement from either main shaft (main or aux box). This could also be an indication of a poor assembly at some point since this is not like valve lash that tightens with wear. I don't know but think I am going to just get the counter shaft right and call it done. I REALLY appreciate your suggesting I check the counter shaft as I would otherwise have just cleaned the thing up and put it in the truck. No telling what groovy noises would have come out of it with the CS the way it was.
-
'62 B-81SX
Licensed to kill replied to Red Horse's topic in Antique and Classic Mack Trucks General Discussion
The engine that I pulled out of one of my B-61's is a 673E. The most obvious difference between it and the two "END 673" stamped blocks is the "E" has the starter high on the drivers side and the "END 673" has the starter low on the drinkers side. Starter location would narrow down the field of possibilities.


BMT Forum Logo
